background image

Publication 1734-UM015A-EN-E - November 2009

Introduction        

13

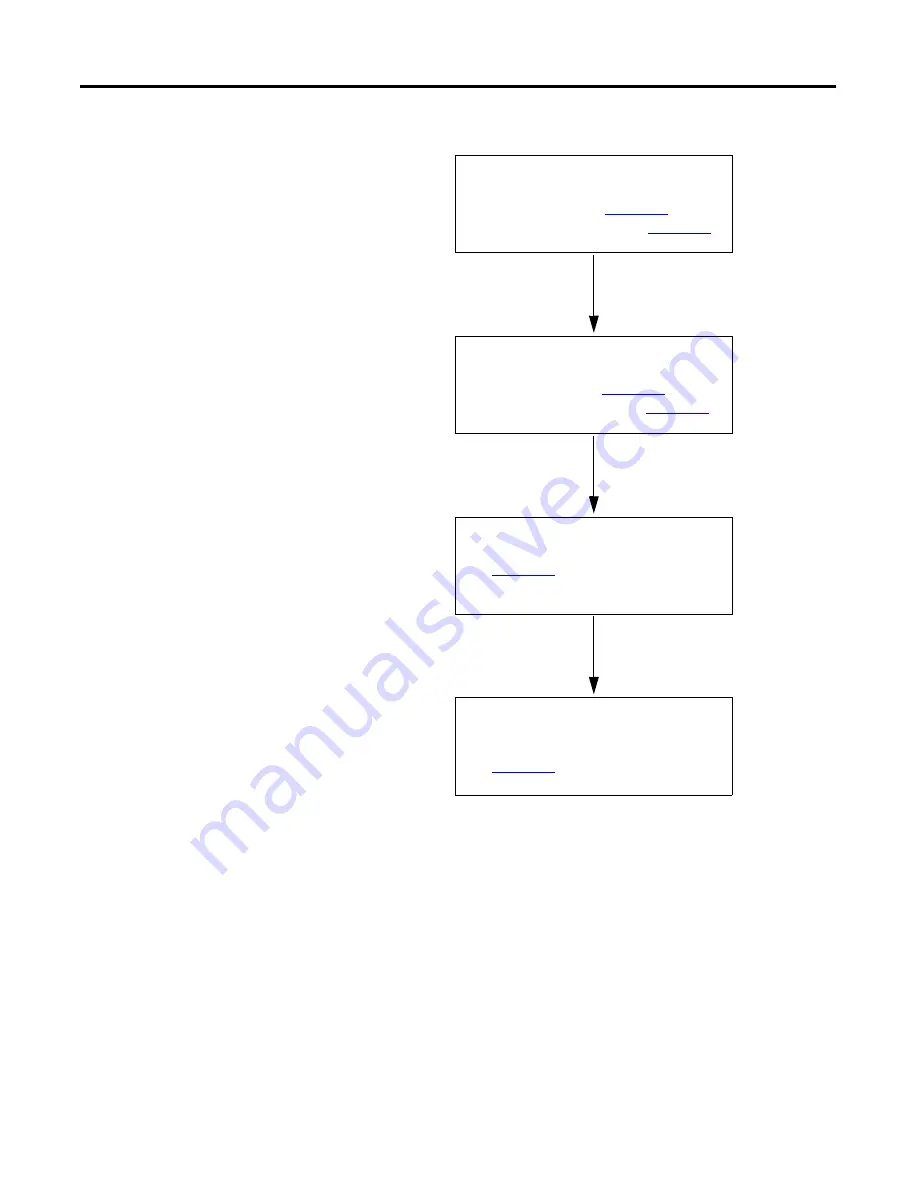
Quick Start - Prepare the 
Modules to work on 
EtherNet/IP and ControlNet

Mount the Module

For POINT I/O, see 

Chapter 2

.

For ArmorPOINT I/O, see 

Chapter 3

.

Wire the Module

For POINT I/O, see 

Chapter 2

.

For ArmorPOINT I/O, see 

Chapter 3

.

Add Module to RSLogix 5000

See 

Chapter 5

.

Write the DeviceLogix Program in 
RSNetworx for DeviceNet

See 

Chapter 7

.

Allen-Bradley HMIs

Summary of Contents for 1734-8CFGDLX

Page 1: ...User Manual Catalog Numbers 1734 8CFGDLX 1738 8CFGDLXM8 1738 8CFGDLXM12 1738 8CFGDLXM23 POINT I O and ArmorPOINT I O DeviceLogix Modules Allen Bradley HMIs ...

Page 2: ...assumed by Rockwell Automation Inc with respect to use of information circuits equipment or software described in this manual Reproduction of the contents of this manual in whole or in part without written permission of Rockwell Automation Inc is prohibited Throughout this manual when necessary we use notes to make you aware of safety considerations Allen Bradley ArmorPOINT I O POINT I O POINTBus ...

Page 3: ...erNet IP and ControlNet 13 Chapter 2 Install POINT I O DeviceLogix Modules About This Chapter 15 Install the Mounting Base Assembly 17 Install an I O Module 19 Install the Removable Terminal Block 21 Remove a 1734 TB or 1734 TBS Base 22 Remove a 1734 TOP or 1734 TOPS Base 23 Wire the Modules 24 1734 8CFGDLX I O Module 24 1734 8CFGDLX Wiring Diagram 24 System and Power Considerations 25 Chapter 3 I...

Page 4: ...bout This Chapter 49 Configure the Module using the Configuration tab 49 Parameters on the Parameters tab 53 Configure Peer Communication 54 Set Up Peer Communication Parameters 55 Produce Data Without Using a Master 58 Start the Function Block Editor 61 Chapter 7 DeviceLogix Capabilities About This Chapter 63 Function Block Instructions 63 Process Category 63 Filter Category 64 Select Limit Categ...

Page 5: ... About This Appendix 91 Peer I O Sizes 91 Digital Input Modules 91 Analog and Specialty Input Modules 92 Peer Data Maps 93 2 Point Digital Input Modules 94 4 Point Digital Input Modules 94 4 Point Digital Input with Diagnostics Modules 95 8 Point Digital Input Modules 95 8 Point Configurable Modules 96 16 Point Digital Input Module 96 8 Point Digital Input Modules with DeviceLogix 97 2 Point Analo...

Page 6: ...Publication 1734 UM015A EN E November 2009 4 Table of Contents Notes ...

Page 7: ...are not compatible with the PROFIBUS adapter The modules in this manual are DeviceNet ready Each module can exist on the DeviceNet network as one of the following An individual node With an adapter catalog number 1734 ADN or 1734 ADNX as a single node For applications using these modules in a network with a 1734 PDN DeviceNet Communication Interface or a 1734D xx POINTBlock I O module this user ma...

Page 8: ...to use 1734 ACNR adapters DeviceNet Communication Interface Module Installation Instructions publication 1734 IN057 Provides installation information about 1734 PDN modules DeviceNet Adapter Installation Instructions publication 1734 IN026 Provides installation information about 1734 ADN and 1734 ADNX adapters DeviceNet Adapter User Manual publication 1734 UM002 Describes how to use 1734 ADN and 1...

Page 9: ...738 8CFGDLXM23 ArmorPOINT Module with Configurable 24V DC Points and DeviceLogix Installation Instructions publication 1738 IN027 Provides installation information about 1738 8CFGDLXM8 1738 8CFGDLXM12 and 1738 8CFGDLXM23 Communication Devices ArmorPOINT ControlNet Adapter Series A Installation Instructions publication 1738 IN016 Provides installation information about 1738 ACNR adapters ArmorPOINT...

Page 10: ...Publication 1734 UM015A EN E November 2009 8 Preface Notes ...

Page 11: ...contain fewer than 40 function blocks can be executed in 1 ms Each module produces 20 bytes of data including I O state eight bits eight user defined bits and eight user defined words of analog data to be consumed by processors or other DeviceLogix modules Each module consumes 20 bytes of data to set the I O state eight bits eight user defined control bits and eight user defined words of analog da...

Page 12: ...quirements other than IP67 may require an additional appropriate housing I O connectors are sealed M8 pico M12 micro or M23 styles The mounting base ships with the module Modes of Usage The module can be used in one of the following modes as a standard POINT I O module in a stand alone DeviceLogix program where it controls its own I O and in network applications with or without the peer exchange o...

Page 13: ...used on ControlNet or EtherNet IP the tool bridges through the adapter to directly communicate with the DeviceLogix module on the POINT I O backplane Peer Enabled POINT I O The POINT I O DeviceLogix module can listen in on data connections to other POINT I O modules on the backplane This data can be used in the DeviceLogix program to control the outputs It can consume data from 8 different peers T...

Page 14: ...unt the Module For POINT I O see Chapter 2 For ArmorPOINT I O see Chapter 3 Wire the Module For POINT I O see Chapter 2 For ArmorPOINT I O see Chapter 3 Configure DeviceNet Network and Scanner See Chapter 4 Configure the Module using RSNetWorx for DeviceNet See Chapter 6 Write the DeviceLogix Program See Chapter 7 ...

Page 15: ...rNet IP and ControlNet Mount the Module For POINT I O see Chapter 2 For ArmorPOINT I O see Chapter 3 Wire the Module For POINT I O see Chapter 2 For ArmorPOINT I O see Chapter 3 Add Module to RSLogix 5000 See Chapter 5 Write the DeviceLogix Program in RSNetworx for DeviceNet See Chapter 7 Allen Bradley HMIs ...

Page 16: ...Publication 1734 UM015A EN E November 2009 14 Introduction Notes ...

Page 17: ...be potential difficulties ensuring electromagnetic compatibility in other environments due to conducted as well as radiated disturbance This equipment is supplied as open type equipment It must be mounted within an enclosure that is suitably designed for those specific environmental conditions that will be present and appropriately designed to prevent personal injury resulting from accessibility t...

Page 18: ...s known to be nonhazardous Secure any external connections that mate to this equipment by using screws sliding latches threaded connectors or other means provided with this product Substitution of components may impair suitability for Class I Division 2 If this product contains batteries they must only be changed in an area known to be nonhazardous ATTENTION Prevent Electrostatic Discharge This eq...

Page 19: ... terminal bases 1734 TOP or 1734 TOPS wiring base Module Status Netw ork Status NODE 0 1 2 3 4 5 6 7 Mechanical Keying orange Module Wiring Diagram Module Locking Mechanism Insertable I O Module Mounting Base Removable Terminal Block RTB DIN Rail Locking Screw orange Slide in Writable Label Interlocking Side Pieces 44713 RTB Removal Handle 44714 1734 TOP or 1734 TOPS One piece Terminal Base with S...

Page 20: ...ng base assembly vertically above the installed units for example adapter power supply or existing module 3 Slide the mounting base down allowing the interlocking side pieces to engage the adjacent module power supply or adapter 4 Press firmly to seat the mounting base on the DIN rail until the base snaps into place 5 Use a small bladed screwdriver to rotate the DIN rail locking screw to the horiz...

Page 21: ...yswitch on the mounting base clockwise until the number required for the type of module aligns with the notch in the base 2 Make certain the DIN rail locking screw is in the horizontal position noting that you cannot insert the module if the locking mechanism is unlocked WARNING When you insert or remove the module while backplane power is on an electrical arc can occur This could cause an explosi...

Page 22: ...ht down into the mounting base and press to secure 4 Secure the module with the RTB removal handle for 1734 TB or 1734 TBS bases or handle for 1734 TOP or 1734 TOPS bases 2 4 V D C S o u r c e O u t p u t M o d u le S t a t u s N e t w o r k S t a t u s 1 7 3 4 O B 4 E 0 1 2 3 N O D E 44967 44859 Handle Module ...

Page 23: ...llows 1 Insert the RTB end opposite the handle into the base unit This end has a curved section that engages with the mounting base 2 Rotate the terminal block into the mounting base until it locks itself in place 3 If an I O module is installed snap the RTB handle into place on the module WARNING When you connect or disconnect the RTB with field side power applied an electrical arc can occur This...

Page 24: ...to the right of the base you are removing noting that the interlocking portion of the base sits under the adjacent module 5 Use a small bladed screwdriver to rotate the orange DIN rail locking screw on the mounting base to a vertical position 6 This unlocks the mounting base from the DIN rail 7 Lift the mounting base straight up to remove WARNING When you insert or remove the module while backplan...

Page 25: ... to remove the module 2 Use a small bladed screwdriver to rotate the orange DIN rail locking screw on the mounting base to a vertical position This unlocks the mounting base from the DIN rail 3 Slide the base up to release it from its mating units WARNING If you connect or disconnect wiring while the field side power is on an electrical arc can occur This could cause an explosion in hazardous loca...

Page 26: ...I O 5 I O 6 I O 7 Status of I O 0 Status of I O 1 Status of I O 2 Status of I O 3 Note that voltage and current to the module is applied through the adapter the 1734 FPD module or the 1734 EP24DC module V 10 28 8 V DC Status of I O 4 Status of I O 5 Status of I O 6 Status of I O 7 DeviceLogix Status Prox I O 0 Load Prox Prox Prox Load Load Load I O 2 I O 4 I O 6 I O 1 I O 3 I O 5 I O 7 V C C If a ...

Page 27: ...g 1734 PDN DeviceNet adapter 1734 ADN or 1734 ADNX DeviceNet adapter 1734 ACNR ControlNet adapter 1734 AENT or 1734 AENTR EtherNet IP adapter 1734 EP24DC Expansion power supply 1734 FPD Field power distribution Channel Terminal Number I O Common Voltage 0 0 External 1 1 Common connections require an external connection such as a 1734 CTM module External 2 2 Supply Voltage Connections require an ex...

Page 28: ...dule 1 r 1734adn4 Adapter Status DeviceNet Status PointBus Status I E 2 C O E 2 C I B 2 O B 2 E ADN I B 2 O B 2 E O B 4 E EP24DC 0 1 0 1 0 1 0 1 0 1 0 1 0 1 0 1 System Power Power DeviceNet 24V DC supply 1734 EP24DC 1734 ADN 12V DC supply Status Power Power DeviceNet 1734 VTM 0 1 1734 CTM 0 1 1734 VTM 1734 CTM Voltage Out Voltage Out Voltage Out Voltage Out Voltage Out Voltage Out Voltage Out Volt...

Page 29: ...ed Group 1 Class A industrial equipment according to IEC CISPR Publication 11 Without appropriate precautions there may be potential difficulties ensuring electromagnetic compatibility in other environments due to conducted as well as radiated disturbance IMPORTANT The ArmorPOINT I O module must be mounted on a grounded metal mounting plate or other conductive surface ATTENTION Make sure all conne...

Page 30: ...essary holes for M4 8 machine or self tapping screws 3 Mount the base using M4 8 screws 4 Ground the system using the ground lug connection The ground lug connection is also a mounting hole Adapter 102 mm 4 02 in 46 mm 1 81 in 47 2 mm 1 9 in 50 mm 2 0 in 22 mm 0 87 in 22 mm 0 87 in 50 mm 2 0 in 50 mm 2 0 in Adapter 102 mm 4 02 in 46 mm 1 81 in 47 2 mm 1 9 in 50 mm 2 0 in 22 mm 0 87 in 22 mm 0 87 i...

Page 31: ...the base 2 Position the module vertically above the mounting base The module bridges two bases 3 Push the module down until it engages the latching mechanism You will hear a clicking sound when the module is properly engaged The locking mechanism locks the module to the base Keyswitch 43675 Set to position 1 for the 1738 24V DC modules 1738 8CFGDLXM12 24V DC Out MOD NET DLX A H B G C F D E 0 1 2 3...

Page 32: ...e latch The module lifts up off the base 3 Pull the module off the base Wire the Modules This section provides wiring instructions for the modules 1738 8CFGDLXM8 I O Module ATTENTION Make sure all connectors and caps are securely tightened to properly seal the connections against leaks and maintain IP enclosure type requirements MOD NET 1738 8CFGDLXM8 24V DC 0 1 2 3 4 5 6 7 0 1 2 3 4 5 6 7 DLX Con...

Page 33: ...n Pin 4 I O 0 M8 A I O 1 M8 B I O 2 M8 C I O 3 M8 D I O 4 M8 E I O 5 M8 F I O 6 M8 G I O 7 M8 H 1738 8CFGDLXM12 24V DC Out MOD NET 0 1 2 3 4 5 6 7 A H B G C F D E DLX 44355 LED indicators Connectors M12 A D Connectors M12 E H 43664 view into connector Pin 1 24V DC Pin 2 Not used Pin 3 Common Pin 4 I O 0 M12 A I O 1 M12 B I O 2 M12 C I O 3 M12 D I O 4 M12 E I O 5 M12 F I O 6 M12 G I O 7 M12 H Pin 5...

Page 34: ...through one of the following 1738 ADN12 or 1738 ADN18 1738 ADN18P 1738 ADNX DeviceNet adapter 1738 ACNR ControlNet adapter 1738 AENT or 1738 AENTR EtherNet IP adapter 1738 EP24DC Expansion power supply 1738 FPD Field power distribution 1738 8CFGDLXM23 24V DC In MOD NET 0 1 2 3 4 5 6 7 DLX 44353 LED indicators M23 connector 43681 view into connector Pin 1 I O 0 Pin 2 I O 1 Pin 3 I O 2 Pin 4 I O 3 P...

Page 35: ...ns available while performing the procedures in this section See Related Publications for a list of related publications This section describes the setup of a DeviceNet network using RSNetworx for DeviceNet when the module is not connected to the network When configuring the module in the Offline mode you must place all nodes on the network in the View window manually Use the Hardware tree to find...

Page 36: ...ckplane This example shows you how to build the backplane The following screen shows the 1734 ADN Point I O Scanner added Next locate the I O modules In this example the following modules will be added 1734 8CFGDLX POINT I O DeviceLogix module 1734 IB8 POINT I O DC Input module 1734 IE4C POINT I O 4 20 mA Analog Input module ...

Page 37: ...alog box of each module For instructions on editing the configuration of the DeviceLogix module see Chapter 6 Include all the I O modules in the backplane to the Scanner s scan list After configuration is complete save your work in the DNT file DNT is the three letter file name extension One file contains all the configuration data for all the modules on the network or backplane Remember that you ...

Page 38: ...ne button RSLinx will start If the Online path is not set in Network Properties the Browse for network dialog box will appear 2 Navigate to the DeviceNet network or DeviceNet subnet if configuring the backplane The OK button will become available when you select a valid network RSNetWorx will automatically browse the network to discover all the participants 3 If there are any module identity issue...

Page 39: ...u bar 5 Review the Message window for any errors The stored configuration DNT file and the configuration of all the modules now match 6 If any changes are made be sure to download them to the module and save them in the DNT file 7 When in the Online mode you can change the configuration of a module by double clicking its icon You can also right click the icon and select Properties Allen Bradley HM...

Page 40: ...November 2009 38 DeviceLogix for POINT I O and ArmorPOINT I O on DeviceNet Familiarize yourself with all the tabs in the Properties window before proceeding to Chapter 6 where you will learn how to configure the DeviceLogix module ...

Page 41: ...Pt 01 Pt 00 Data 1 PNB 07 PNB 06 PNB 05 PNB 04 PNB 03 PNB 02 PNB 01 PNB 00 Data 2 Reserved Owned LogicEn Data 3 PM7 PM6 PM5 PM4 PM3 PM2 PM1 PM0 Data 4 Produced Network Analog Word 0 Data 5 Data 6 Produced Network Analog Word 1 Data 7 Data 8 Produced Network Analog Word 2 Data 9 Data 10 Produced Network Analog Word 3 Data 11 Data 12 Produced Network Analog Word 4 Data 13 Data 14 Produced Network An...

Page 42: ... of consumed assembly instance 102 Data 0 7 Default Data Map Consumed Assembly Instance 102 Message Size 20 Bytes Bit 7 6 5 4 3 2 1 0 Data 0 Pt 07 Pt 06 Pt 05 Pt 04 Pt 03 Pt 02 Pt 01 Pt 00 Data 1 CNB 07 CNB 06 CNB 05 CNB 04 CNB 03 CNB 02 CNB 01 CNB 00 Data 2 Reserved Data 3 Data 4 Consumed Network Analog Word 0 Data 5 Data 6 Consumed Network Analog Word 1 Data 7 Data 8 Consumed Network Analog Word...

Page 43: ...dlV 2 IdlV 1 IdlV 0 Data 8 Reserved RACK CFO DM MP Data 9 Reserved Data 10 Masterless Produce Assembly Instance 0 4 101 111 Data 11 Data 12 Masterless Produce EPR ms Data 13 Data 14 Masterless Produce PIT ms Data 15 Data 16 Peer 0 Slot MacID Data 17 Peer 0 Consume Message Length bytes Data 18 Peer 0 EPR ms Data 19 Data 20 Peer 1 Slot MacID Data 21 Peer 1 Consume Message Length bytes Data 22 Peer 1...

Page 44: ...ult 1 Hold Last State IdlV Idle Value 0 OFF default 1 ON RACK Produce with Rack Assembly 4 and Consume Rack Assembly 34 0 Disabled default 1 Enabled CFO DeviceLogix Communication Fault Override of Outputs 1 Enabled When enabled the DeviceLogix program will continue to control the outputs even in the event of a communication fault 0 Disabled default When disabled the outputs will follow the Fault a...

Page 45: ...d in your program for your use Use RSNetworx for DeviceNet to configure the POINT I O DeviceLogix module Add a POINT I O DeviceLogix Module to RSLogix 5000 To add a POINT I O DeviceLogix module to RSLogix 5000 do the following 1 In the I O Configuration tree find the adapter In this example we will be using the 1734 AENT with the 1734 8CFGDLX The same procedure applies if you are using an ArmorPOI...

Page 46: ... 3 Under Digital double click the Point I O DeviceLogix module The following dialog box appears IMPORTANT If you cannot find the module in the Select Module dialog box you will need to install the Add On Profile AOP for the module You can download the AOP from http www rockwellautomation com support downloads html ...

Page 47: ...module is online There is no tab for configuration Configuration of the Point I O DeviceLogix modules is done only using RSNetworx for DeviceNet See Chapter 6 for more details RSLogix 5000 will create the following input tags AdapterName SlotNumber I Data AdapterName SlotNumber I LogicDefinedData AdapterName SlotNumber I Status LogicEnabled AdapterName SlotNumber I Status Owned AdapterName SlotNum...

Page 48: ...When set the module is owned by a master PeerMissing Each bit represents one of the eight possible peers If a bit is set the data from that peer is missing or invalid LogicDefinedData These eight values are assigned using the Network Output Word tags in the DeviceLogix program Output tags and their descriptions Tag Description Data This value is sent by the master to set the output state of the ei...

Page 49: ...hen you download the contents of the DNT file to the I O module To configure the module 1 Start RSNetworx for DeviceNet 2 Go online by doing one of the following Click the Online button On the Network menu click Online Press F10 The RSLinx Browse window appears 3 Navigate the tree down to the EtherNet IP or ControlNet Point I O or ArmorPOINT I O adapter 4 Expand the tree branch for the adapter You...

Page 50: ...ad the configuration to the module after you go online To do this right click the module s icon and select Download to Device 7 To change the configuration of a module double click that module s icon Alternatively you can right click the icon and select Properties Details on configuring the module can be found in Chapter 6 IMPORTANT Note the online path in the Messages window at the bottom half of...

Page 51: ...ng the Configuration tab Use the data on the Parameters tab Configure peer communication Produce data without using a master Start the DeviceLogix Function Block Editor on the DeviceLogix tab Configure the Module using the Configuration tab The following diagram shows the Configuration tab of a POINT I O DeviceLogix module in RSNetWorx for DeviceNet The Configuration tab of an ArmorPOINT I O Devic...

Page 52: ...fault 0 Go to Output Fault Value default 1 Hold Last State This parameter is ignored if DLX Fault Override is enabled Output Fault Value The state of each output if a communication fault occurs This parameter is ignored if the Output Fault State is set to Hold Last State or if DLX Fault Override is enabled 0 OFF default 1 ON Output Idle State This parameter controls the action of each output when ...

Page 53: ...rogram a controlled stop or maintenance of a machine state can be achieved when communication is lost with a master Auto Produce Assembly When the Auto produce parameter is enabled this parameter selects which assembly to produce 000 20 byte assembly default 004 1 byte assembly 101 20 byte assembly 111 8 byte assembly For details on the contents of the assembly see I O Data Assembly Maps in Chapte...

Page 54: ...bytes The minimum is 1 byte See Appendix A for peer message sizes of POINT I O and ArmorPOINT I O modules If the received message size does not match the Peer Size value the data will be considered invalid and the appropriate error bits will be set Produced assembly Peer Missing 1 In DeviceLogix program Peer Data valid 0 This parameter is ignored if the Peer MacID is set to No Connection Peer xx E...

Page 55: ...e state of the Consumed Network Words or User Defined Word Data Network Status Override This is a legacy Parameter for DeviceLogix and ZIP It shows the state of Network Status Override Comm Status Override This is a legacy Parameter for DeviceLogix and ZIP It shows the state of Communication Status Override Peer Status The eight bits in this parameter are used to determine the connection status of...

Page 56: ... peers on the backplane or local DeviceNet network Zone Control This is a legacy parameter for DeviceLogix and ZIP It shows the state of Zone Control whether it is enabled or disabled Sequential Auto Address This parameter should only be used in a DeviceNet system It is used to set another POINT I O or ArmorPOINT I O module to the right of this module to a node address one greater than this module...

Page 57: ...ze 1 as its input data size If the module does not consume data from this peer in four times the expected packet rate EPR which is 400 ms in this case the Peer 0 connection fault bit will be set The contents of the data are mapped to the Peer 0 data table To use the data from the 1734 IB4 in the DeviceLogix editor click to place a Boolean bit input on the function block sheet and select the desire...

Page 58: ...of the bit input I O tags In our example Peer 0 Data Valid will be set to 1 when the POINT I O DeviceLogix module is consuming data from the peer that is timely which is within the EPR timeout and of the correct length No other checking is done on the data by the module Peer 0 Exists is set to 1 when a peer connection has been configured Analog data can also be used in a peer connection If a 1734 ...

Page 59: ...est to use the Peer Connection Status bits Peer 1 Data Valid and Peer 1 Exists to validate the data before using it Default Data Map for the 1734 IE4C Analog Input Module Message size 12 bytes Byte 15 14 13 12 11 10 09 08 07 06 05 04 03 02 01 00 Produces scanner Rx Input Channel 0 High Byte Input Channel 0 Low Byte Input Channel 1 High Byte Input Channel 1 Low Byte Input Channel 2 High Byte Input ...

Page 60: ...ected Auto Produce Assembly at the selected Auto Produce EPR Expected Packet Rate The Auto Produce Assembly data can be 20 bytes of produced data it sends all possible data 8 bytes of produced data this does not require the fragmentation protocol so it will reduce network bandwidth 1 byte of produced data only the state of the 8 I O A description of these assemblies can be found in Chapter 4 The A...

Page 61: ...f each module it is recommended that the ZIP Security Key be produced in the data This unique number is calculated using the identity of the module and the present configuration The ZIP Security Key value is in the DeviceLogix Logic Editor under the Analog Input I O tags The output of the Analog Input I O tag can be wired to the input of an Analog Output I O tag to map it into the Produced Assembl...

Page 62: ... verify the constant value For example The ZIP Security Key constant is added using the ellipses button of the NEQ function block This output can be used to condition the execution of other function blocks using the Enable input Note that there could be an unsigned value to signed value conversion when the ZIP Security Key is displayed in the Logic Editor which leads to a mismatch of displayed val...

Page 63: ...start the Function Block editor do the following 1 Go to the property dialog box of the module 2 Click the DeviceLogix tab followed by Start Logic Editor On this tab you can enter the Author s name revision and description of the logic program These are generic text fields They are saved in the DNT file created by the RSNetworx for DeviceNet application Allen Bradley HMIs ...

Page 64: ...modules using RSNetworx for DeviceNet If a program is saved in the DNT file it will be displayed To learn how to use this editor refer to Chapter 2 of the DeviceLogix System User Manual publication RA UM003 For specific uses of the POINT I O and ArmorPoint I O DeviceLogix modules proceed to Chapter 7 ...

Page 65: ...ese function blocks are categorized in the following manner Process Filter Select Limit Statistical Timer Counter Comparison Compute Move Logical Process Category The process category includes the following instruction types Alarm Timing Diagnosis Alarm The Alarm function block initiates an alert based on the comparison between the input value and the threshold The output of the DeviceLogix Alarm ...

Page 66: ...ilter LPF function block provides a filter to attenuate input frequency above the cutoff frequency The module supports only two instances of the LPF function block For more information on the Low Pass Filter function block refer to the DeviceLogix System User Manual publication RA UM003 Select Limit Category The Select Limit category includes the following instruction types Select High Low Limit S...

Page 67: ...eviceLogix System User Manual publication RA UM003 Statistical Category The statistical category includes a single instruction type Moving Average Moving Average The DeviceLogix Moving Average function block calculates a time average value for the input signal For more information on the Moving Average function block refer to the DeviceLogix System User Manual publication RA UM003 Timer Counter Ca...

Page 68: ...k MEQ Operation rules all except Mask MEQ The conditions and outputs of each function block are described below Operation rules Mask MEQ only The Mask process is outlined below IF Source AND Mask Compare AND Mask Output is Set ELSE Function Block Type Condition Output Greater Than GRT Source A Source B 1 Source A Source B 0 Greater Than or Equal GEQ Source A Source B 1 Source A Source B 0 Equal EQ...

Page 69: ...Operation rules all except Mask MEQ The conditions and outputs of each function block are described below Function Block Type Output Add ADD Source A Source B Multiply MUL Source A x Source B Subtract SUB Source A Source B Divide DIV Source A Source B Modulus DINT Source A Source A Source B x Source B Modulus REAL Source A DINT Source A Source B x Source B Absolute ABS Absolute value of Source A N...

Page 70: ...ND BAND Not AND BNAND OR BOR Not OR BNOR Exclusive OR BXOR Exclusive Not OR BXNOR NOT BNOT Latch Set Latch SETD Reset Latch RESD Boolean Functions The Boolean functions are as follows Note that the number of inputs can be changed on some functions but are limited to a maximum of four The latch instruction type has two fixed inputs Set as input 1 and Reset as input 2 Function Block Type Input 1 Inp...

Page 71: ...ave different element order See its truth table below Not OR BNOR 0 0 1 0 1 0 1 0 0 1 1 0 Exclusive OR BXOR 0 0 0 0 1 1 1 0 1 1 1 0 Exclusive Not OR BXNOR 0 0 1 0 1 0 1 0 0 1 1 1 NOT BNOT 1 0 N A 1 1 N A 0 1 The Input number can be set in a property page the default number is 2 BNOT has only one input Function Block Type Reset Set Value at time t0 Value at time t0 1 SETD Set Dominant 0 0 0 0 0 1 0...

Page 72: ...locks used in the entire DeviceLogix program The module will execute the entire logic program before applying the outputs The module follows these steps 1 Sample all inputs hardware network peer 2 Execute logic 3 Apply all outputs hardware network RS Reset Dominant 0 0 0 0 0 1 0 1 1 0 0 0 1 1 0 0 0 0 1 1 0 1 1 1 1 0 1 0 1 1 1 0 Number of Function Blocks Expected Execution Time ms 0 40 1 41 100 2 1...

Page 73: ...nput 0 through Discrete Input 7 are the states of the eight I O points on the module Status The following is a list of status bits that can be selected Most will only be used in a DeviceNet network Explicit Msg Cnxn Exists Polled Cnxn Exists COS Cyclic Cnxn Exists Polled Cnxn Fault COS Cyclic Cnxn Fault Polled Cnxn Idle Network Fault Minor Module Fault Bit Strobe Cnxn Exists Bit Strobe Cnxn Fault ...

Page 74: ... and the Data Valid bit to check if the data from the peer has been received in the expected time EPR and with the expected data size Network Network Input 0 through Network Input 7 are sent to the DeviceLogix program through the Output Data assembly byte 1 In RSLogix 5000 the tag name for these bits is UserDefinedBitData Reserved Bit 8 through Reserved Bit 31 are legacy bits and should not be use...

Page 75: ...In RSLogix500 the tag name for these words is UserDefinedWordData 0 7 The ZIP Security Key defines a unique number that can be sent to a peer to verify the identity and configuration of the module The ZIP key can be directly tied to a Network Output Word in the DeviceLogix program Peer x Word x There are eight groups of peer data 0 7 and 12 words within each group These are the eight peers and up ...

Page 76: ...e If these tags are unused that is not mapped in the DeviceLogix program then there is a virtual mapping from the Data Byte Output Assembly to the output point This means that the output is under control of the owning processor If the Discrete Output is mapped in logic it is controlled by the module Virtual Connection if Output Not Used in Logic Discrete Output 0 Consume Data Assembly Byte 0 7 6 5...

Page 77: ...ue Source Selector Behavior for Bound Outputs Update Output End Network Fault Logic Enabled Perform Logic Program Apply Force Value Apply Value to DOP Network Fault Override Yes Yes Yes Fault Exists Receive Idle DOP in RUN mode Disabled Explicit Message Request to change DOP value I O Message to change DOP value DOP in Available State Return Object State Conflict Error Use Idle Action and Idle Val...

Page 78: ...1 These bits can be sent to the owning processor or to other peers In RSLogix 5000 the tag name is UserDefinedBitData Analog Outputs from Function Blocks Network Network Output Word 0 through Network Output Word 7 are mapped to the Input I O Assembly These words can be sent to the owning processor or to other peers In RSLogix 5000 the tag name is UserDefinedWordData 0 7 ...

Page 79: ...nput Under normal conditions the Enable output will have the same value as the input passing the enable information to the next instruction Certain error conditions that occur within the processing of a function block may cause the Enable output to go false If the Enable Line feature is used EnableIn can be connected to an input I O tag or the output of another function block The EnableIn input wi...

Page 80: ...t contain any configuration information The configuration must be sent via RSNetWorx for DeviceNet while online The I O module will save the configuration and DeviceLogix program locally inside the module You will only need to download the configuration once If you replace the device you need to download the configuration to the new module Before the DeviceLogix program executes it must be enabled...

Page 81: ... this option the device enters an idle state turning off the Logic Enable Bit in the produced data The Logic Enable bit in the Produced I O assembly of the device reflects a 0 or 1 for Logic Enable Off or Logic Enable On To set Logic Enable Off select Communications Logic Enable Off Dependent Mode Logic will also be enabled or disabled if the Dependent Mode parameter is Enabled In this case logic ...

Page 82: ...the Timer and Counter function blocks and how to enable and disable logic with the Logic Supervisor Object The first thing that is important to know is that each function block has a handle or an instance number This instance number is assigned by the editor it can be found in the upper left corner of the function block The instance number can change if you edit the program It may also be differen...

Page 83: ...ing RSLogix 5000 you can send a message by using the MSG instruction Function Block Class Code Instance Attribute Data Length Logic Supervisor 0x30E 1 Logic Enable 0x01 1 byte Timer Function Block 0x30A Displayed in editor Preset Time 0x04 2 bytes Elapsed Time 0x07 2 bytes Time Base 0x08 1 byte 0 1 ms default 1 10 ms Counter Function Block 0x309 Preset Value 0x05 2 bytes Count Value 0x07 2 bytes M...

Page 84: ... Instance number from the upper left corner of the Timer function block to which you are sending the message 6 Enter the Attribute number in hexadecimal 4 is the Preset Time 7 Verify that the Source Element and Source Length in bytes is correct 8 Click the Communication tab 9 If you are using EtherNet IP or ControlNet click Browse to navigate to the DeviceLogix module If you are using DeviceNet br...

Page 85: ...expectedly About Module Diagnostics All status and diagnostic information strobed polled cyclic or change of state is reported back over the network communication adapter A single point of failure is detected and reported at the module and to the control system Node level diagnostics Module Status indicator indicates the health of the module Network Status indicator indicates the status of the com...

Page 86: ...ommissioning due to missing incomplete or incorrect configuration Configure device properly Flashing red Recoverable fault 1 Cycle power to device 2 If condition persists replace device Red Unrecoverable fault may require device replacement Replace device Flashing red green Device is in self test None 1 3 0 2 Module Status Network Status Device Logix Status 1734 8CFGDLX 1 3 0 2 5 7 4 6 NODE 44759 ...

Page 87: ...peer is not producing data at all or it is not configured correctly Check I O connection with master Verify peers are present and configured properly Red Critical link failure failed communication device Device detected error that prevents it communicating on the network Verify that adapter and terminal bases are properly installed and reinstall as needed Flashing red green Device is in self test ...

Page 88: ...evice Green Device operating normally None Flashing green Device needs commissioning due to missing incomplete or incorrect configuration Configure device properly Red Unrecoverable fault may require device replacement Replace device Flashing red Recoverable fault Cycle power to device If condition persists replace device Flashing red green Device is in self test None 1738 8CFGDLXM12 24V DC Out MO...

Page 89: ...r more I O connections are in the timed out state Check for I O module failure and correct as needed Red Critical link failure failed communication device Device detected error that prevents it from communicating on the network Verify that adapter and terminal bases are properly installed and reinstall as needed Flashing red green Device is in self test None Indication Description Recommended acti...

Page 90: ... size or data rate have not been configured correctly Use the Peer Missing bits in the I O assembly to check which peer connection is missing Verify the configuration is correct Upload from the module into RSNetWorx for DeviceNet Verify the Node number or Slot number is correct Verify the connection size is correct Increase the EPR Expected Packet Rate Verify that the owner of the connection to th...

Page 91: ...d to the module A DeviceLogix program and most configurable parameters cannot be changed while the DeviceLogix program is running or when an I O connection is active Inhibit the connection in RSLogix 5000 if using EtherNet IP and ControlNet Disable logic in RSNetWorx for DeviceNet before downloading Allen Bradley HMIs ...

Page 92: ... reason may be that the ADR feature of the scanner is turned on and the ADR data of the module stored in the scanner is not consistent with what is on the module When the scanner establishes connection to the module it will verify the configuration in itself with what is in the module Any mismatch would result in the scanner downloading its saved ADR data to the module Check the ADR feature of the...

Page 93: ...are not included here for the sake of brevity If another module s output data is required in your DeviceLogix program it is suggested that this data be sent from the owning master to the DeviceLogix module through the output consumed data assembly Digital Input Modules Produced I O Sizes of Digital Input Modules Catalog Number Description Produced Size 1734 IB2 2 point sinking DC input 1 1738 IB2M...

Page 94: ...iceLogix 20 default 8 1 Produced I O Sizes of Analog and Specialty Input Modules Catalog Number Description Produced Size 1734 VHSC5 1 channel 5V 2 out Very High Speed Counter 6 6 10 default 1734 VHSC24 1 channel 24V 2 out Very High Speed Counter 6 6 10 default 1734 VHSC24M23 1 channel 24V 2 out Very High Speed Counter 6 6 10 default 1734 IJ 1 channel 5V counter 6 default 6 10 1734 IK 1 channel 24...

Page 95: ...e 10 1738 SSIM23 Synchronous Serial Interface 10 1734 232ASC RS232 ASCII Interface 4 132 24 default 1738 232ASCM12 RS232 ASCII Interface 4 132 24 default 1734 485ASC RS485 ASCII Interface 4 132 24 default 1738 485ASCM12 RS485 ASCII Interface 4 132 24 default Produced I O Sizes of Analog and Specialty Input Modules Continued Catalog Number Description Produced Size Internal Data Table in Module Ref...

Page 96: ... Modules 1734 IB2 1734 IV2 1734 IA2 1734 IM2 1738 IB2M12 1738 IB2M8 1738 IA2M12AC3 1738 IA2M12AC4 4 Point Digital Input Modules 1734 IB4 1734 IV4 1734 IA4 1734 IM4 1738 IB4M12 1738 IB4M8 1738 IV4M12 1738 IV4M8 Input Tags for 2 Point Digital Input Modules Input Tag in DeviceLogix Editor Data Peer X byte 0 bit 0 Input channel 0 Peer X byte 0 bit 1 Input channel 1 Input Tags for 4 Point Digital Input...

Page 97: ...t 6 Fault channel 2 Peer X byte 0 bit 7 Fault channel 3 Peer X byte 1 bit 0 Open wire channel 0 Peer X byte 1 bit 1 Open wire channel 1 Peer X byte 1 bit 2 Open wire channel 2 Peer X byte 1 bit 3 Open wire channel 3 Peer X byte 1 bit 4 Short circuit channel 0 Peer X byte 1 bit 5 Short circuit channel 1 Peer X byte 1 bit 6 Short circuit channel 2 Peer X byte 1 bit 7 Short circuit channel 3 Input Ta...

Page 98: ... I O channel 7 Input Tags for 16 Point Digital Input Modules Input Tag in DeviceLogix Editor Data Peer X byte 0 bit 0 Input channel 0 Peer X byte 0 bit 1 Input channel 1 Peer X byte 0 bit 2 Input channel 2 Peer X byte 0 bit 3 Input channel 3 Peer X byte 0 bit 4 Input channel 4 Peer X byte 0 bit 5 Input channel 5 Peer X byte 0 bit 6 Input channel 6 Peer X byte 0 bit 7 Input channel 7 Peer X byte 1 ...

Page 99: ...t 5 I O channel 5 Peer X byte 0 bit 6 I O channel 6 Peer X byte 0 bit 7 I O channel 7 Peer X byte 1 bit 0 User defined bit 0 PNB0 Peer X byte 1 bit 1 User defined bit 1 PNB1 Peer X byte 1 bit 2 User defined bit 2 PNB2 Peer X byte 1 bit 3 User defined bit 3 PNB3 Peer X byte 1 bit 4 User defined bit 4 PNB4 Peer X byte 1 bit 5 User defined bit 5 PNB5 Peer X byte 1 bit 6 User defined bit 6 PNB6 Peer X...

Page 100: ...for 2 Point Analog Input Modules and RTD Input Tag in DeviceLogix Editor Data Peer X word 0 Input channel 0 Peer X word 1 Input channel 1 Peer X byte 4 bit 0 Channel 0 fault Peer X byte 4 bit 1 Channel 0 calibration mode Peer X byte 4 bit 2 Channel 0 low alarm Peer X byte 4 bit 3 Channel 0 high alarm Peer X byte 4 bit 4 Channel 0 low low alarm Peer X byte 4 bit 5 Channel 0 high high alarm Peer X b...

Page 101: ...it 4 Channel 0 low low alarm Peer X byte 8 bit 5 Channel 0 high high alarm Peer X byte 8 bit 6 Channel 0 underrange Peer X byte 8 bit 7 Channel 0 overrange Peer X byte 9 bit 0 Channel 1 fault Peer X byte 9 bit 1 Channel 1 calibration mode Peer X byte 9 bit 2 Channel 1 low alarm Peer X byte 9 bit 3 Channel 1 high alarm Peer X byte 9 bit 4 Channel 1 low low alarm Peer X byte 9 bit 5 Channel 1 high h...

Page 102: ...gs for 8 Point Analog Input Modules Input Tag in DeviceLogix Editor Data Peer X word 0 Input channel 0 Peer X word 1 Input channel 1 Peer X word 2 Input channel 2 Peer X word 3 Input channel 3 Peer X word 4 Input channel 4 Peer X word 5 Input channel 5 Peer X word 6 Input channel 6 Peer X word 7 Input channel 7 Peer X byte 16 bit 0 Channel 0 fault Peer X byte 16 bit 1 Channel 0 calibration mode Pe...

Page 103: ... 19 bit 1 Channel 3 calibration mode Peer X byte 19 bit 2 Channel 3 low alarm Peer X byte 19 bit 3 Channel 3 high alarm Peer X byte 19 bit 4 Channel 3 low low alarm Peer X byte 19 bit 5 Channel 3 high high alarm Peer X byte 19 bit 6 Channel 3 underrange Peer X byte 19 bit 7 Channel 3 overrange Peer X byte 20 bit 0 Channel 4 fault Peer X byte 20 bit 1 Channel 4 calibration mode Peer X byte 20 bit 2...

Page 104: ...r X byte 23 bit 1 Channel 7 calibration mode Peer X byte 23 bit 2 Channel 7 low alarm Peer X byte 23 bit 3 Channel 7 high alarm Peer X byte 23 bit 4 Channel 7 low low alarm Peer X byte 23 bit 5 Channel 7 high high alarm Peer X byte 23 bit 6 Channel 7 underrange Peer X byte 23 bit 7 Channel 7 overrange Input Tags for 2 Point Thermocouple Input Modules Input Tag in DeviceLogix Editor Data Peer X wor...

Page 105: ... 7 bit 6 Cold junction underrange Peer X byte 7 bit 7 Cold junction overrange Input Tags for Very High Speed Counter Input Modules Input Tag in DeviceLogix Editor Data Peer X word 0 Present data low word Peer X word 1 Present data high word Peer X word 2 Stored data low word Peer X word 3 Stored data high word Peer X byte 8 bit 1 Zero frequency detected Peer X byte 8 bit 2 Stored data count 2 Peer...

Page 106: ...tored Count value but the DeviceLogix module only uses 16 bit Word values To re combine the Double Word the following logic can be used Peer X byte 9 bit 5 Not ready Peer X byte 9 bit 6 EEPROM fault Peer X byte 9 bit 7 Program fault Input Tags for Very High Speed Counter Input Modules Continued Input Tag in DeviceLogix Editor Data ...

Page 107: ...ut Tag in DeviceLogix Editor Data Peer X word 0 Present data low word Peer X word 1 Present data high word Peer X word 2 Stored data low word Peer X word 3 Stored data high word Peer X byte 8 bit 1 Zero frequency detected Peer X byte 8 bit 2 Stored data count 2 Peer X byte 8 bit 3 Stored data count 3 Peer X byte 8 bit 4 A input status Peer X byte 8 bit 5 B input status Peer X byte 8 bit 6 Z input ...

Page 108: ... word tags Peer X byte 0 bit 0 Peer X byte 23 bit 7 Peer X word 0 Peer X word 11 Peer X byte 8 bit 2 DEC SSI data count decreasing Peer X byte 8 bit 3 INC SSI data count increasing Peer X byte 8 bit 4 C1R Comparator 1 value reached Peer X byte 8 bit 5 C2R Comparator 2 value reached Peer X byte 8 bit 6 C1ST Comparator 1 active Peer X byte 8 bit 7 C2ST Comparator 2 active Peer X byte 9 bit 0 SPF SSI...

Page 109: ...Publication 1734 UM015A EN E November 2009 Peer Data Maps 107 Notes Allen Bradley HMIs ...

Page 110: ...Publication 1734 UM015A EN E November 2009 108 Peer Data Maps Notes ...

Page 111: ...Allen Bradley HMIs ...

Page 112: ...eview the information that s contained in this manual You can also contact a special Customer Support number for initial help in getting your product up and running New Product Satisfaction Return Rockwell tests all of its products to ensure that they are fully operational when shipped from the manufacturing facility However if your product is not functioning and needs to be returned follow these ...

Reviews: