Before Starting to Use
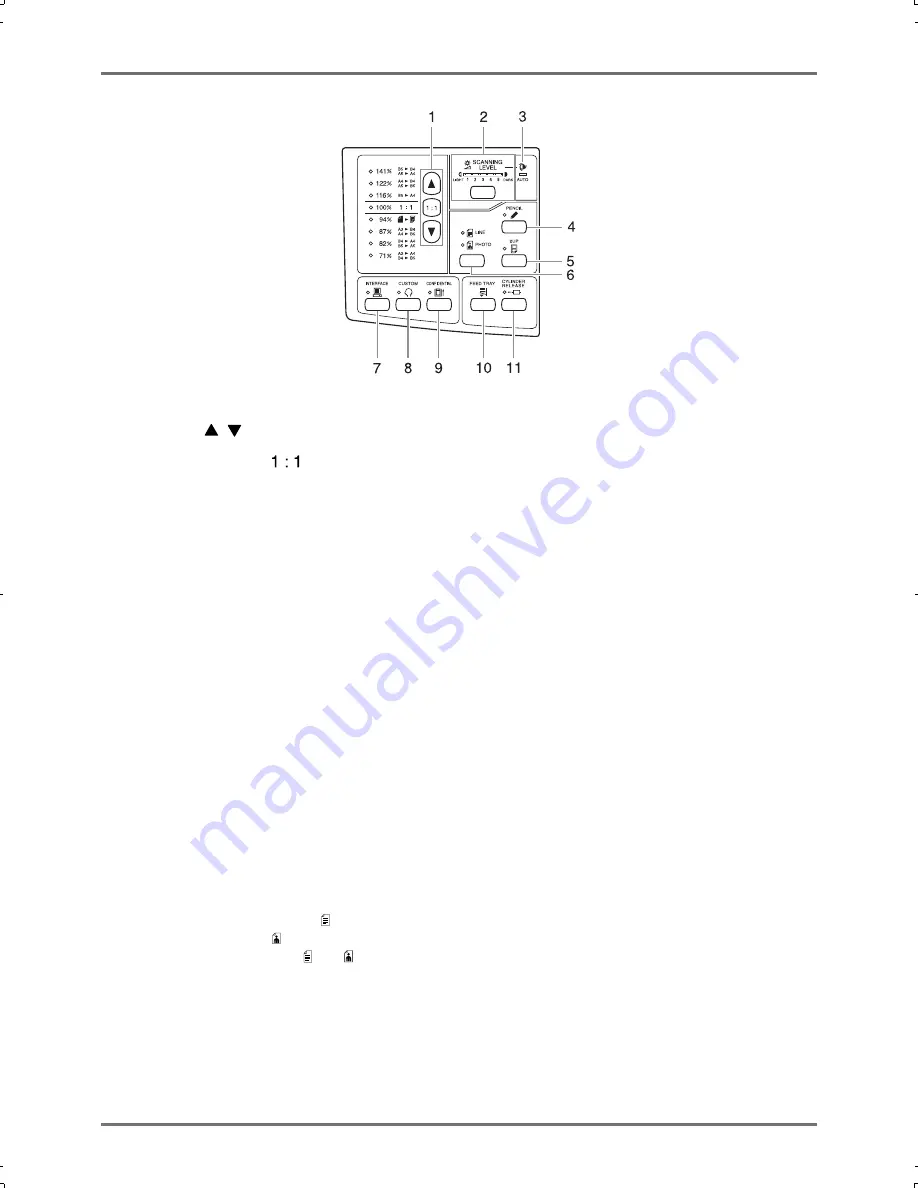
Control Panel
17
1)
Reproduction Size Selection Key (
)
p.30)
When selecting from among the standard reproduction
sizes, press
/
to switch the selection. The corre-
sponding indicator lights to indicate the current selection.
To restore 100%, press
.
2)
Scanning Level Adjustment Key/Indicator
(
)
p.31)
Selects an original scanning level.
The indicator above the key shows the current scanning
level.
3)
Auto Scanning Level Adjustment Indicator
(
)
p.31)
Lights when you select the automatic scanning level
adjustment.
4)
Pencil Mode Key/Indicator (
)
p.29)
Select for an original written using a pencil.
Each time you press the key, the function is switched on
and off.
When activated, the indicator above the key lights.
5)
2-UP Key/Indicator (
)
p.34)
Allows side-by-side printing with a single paper.
Each time you press the key, the function is switched on
and off.
When activated, the indicator above the key lights.
6)
Image Processing Selection Key/Indicator
(
)
p.28)
Each time you press the key, the Image Processing
mode is changed.
When the Line mode is selected, lights. When the
Photo mode is selected, lights. When the Duo (text /
photo) mode is selected, both and
light.
7)
Interface Key/Indicator (
)
p.26)
Selects the Online or Offline mode when interfaced with
a computer (an interface option is required).
The Online and Offline modes are switched over each
time the key is pressed.
The indicator above the key lights when Online mode is
selected.
8)
Custom Key/Indicator (
)
p.54)
Use when changing the initial settings.
When activated, the indicator above the key lights.
9)
Confidential Key/Indicator (
)
p.51)
Prevents confidential documents from being copied.
Each time you press the key, the function is switched on
and off.
When activated, the indicator above the key lights.
10)
Feed Tray Descent Key (
)
p.22)
Press the key to lower Paper Feed Tray if you replace
paper or if you remove Master Disposal Box when it is
filled.
11)
Print Drum (Cylinder) Release Key/Indicator
(
)
p.56)
Press the key and when the indicator lights, you can pull
out the Print Drum (Cylinder) manually. When not lit up,
press the key to light up the indicator. And you can pull
out the Print Drum (Cylinder).
CZ180_UG.book Page 17 Wednesday, October 31, 2007 6:19 PM
Summary of Contents for CZ180 Series
Page 19: ...Before Starting to Use Basic Process 19...
Page 27: ...Basic Operations Printing Data You Have Created on a Computer Optional Kit Required 27...
Page 39: ...Functions for Printing Changing the Print Speed Print Speed Adjustment 39...
Page 83: ...Troubleshooting Troubleshooting Tips 83...
Page 89: ...Appendixes Specifications 89...
Page 92: ...Index 92...


