background image

Rinnai Australia

12

Sapphire Operation & Installation Manual

REMOTE / THERMOSTATIC CONTROLLED OPERATION

REMOTE CONTROLLER - AUTOMATIC OPERATION

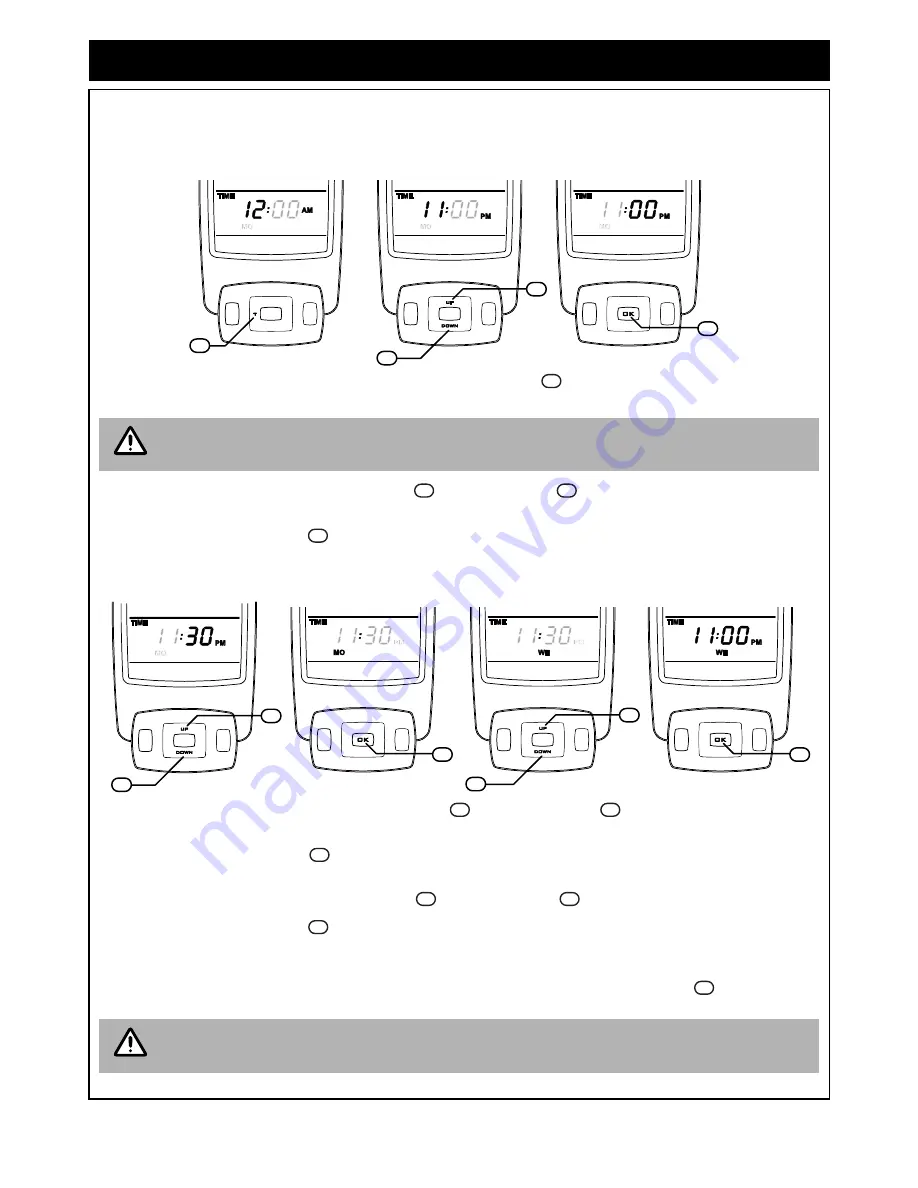
Setting the Current Time and Day of the Week

Step 1.

With the controller ‘OFF’, press and hold the 

‘T’ 

button 

 for approximately 2 seconds. 

‘TIME’

,

‘HOUR’


and 

‘AM or PM’

 will flash. 

Step 2.

To select the hour push the


‘UP

’ button 

 or


‘DOWN’


button 

 until the desired hour is chosen, note

that AM or PM is chosen by cycling through the 12 hour range.

Step 3.

Press the 

‘OK’ 

button 

 to enter the selected hour and AM or PM. 

‘TIME’

 + ‘

MINUTES’

 + 

‘AM or PM’

will flash.

Step 4.

To select the minutes push the 

‘UP

’ button 

 or


‘DOWN’


button 

 until the desired minutes are

chosen.

Step 5.

Press the 

‘OK’ 

button 

 to enter selected minutes, One of the days

 SU, MO, TU, WE, TH, FR or SA

will flash.

Step 6.

To select the hour push the


‘UP

’ button 

 or


‘DOWN’


button 

 until the desired day is chosen. 

Step 7.

Press the 

‘OK’ 

button 

 to enter the selected day and to complete time and day setup.  

To adjust time for Daylight Saving time

To adjust time or to adjust for daylight savings follow Steps 1 and 2  then press 

‘OK’


button 

, three times to

keep the minutes and the current day.

If no buttons are pressed within 10 seconds the display will revert back to 'Initial Set-Up Screen'
retaining the last entered setting. 

When changing batteries all settings will be lost and the controller will revert back to the 'Initial
setup screen'. Re-setting of time, date and programming will be necessary. 

A/M

PWR

T

P

DOWN

UP

OK

A/M

PWR

OK

P

DOWN

UP

A/M

PWR

T

P

DOWN

UP

OK

A/M

PWR

OK

T

P

A/M

PWR

T

P

DOWN

UP

OK

A/M

PWR

T

P

DOWN

UP

STEP 1

STEP 2

14

15

10

STEP 3

11

14

NOTE

10

15

11

A/M

PWR

T

P

DOWN

UP

OK

A/M

PWR

T

P

DOWN

UP

A/M

PWR

T

P

DOWN

UP

OK

A/M

PWR

OK

T

P

A/M

PWR

T

P

DOWN

UP

OK

A/M

PWR

T

P

DOWN

UP

STEP 5

11

A/M

PWR

T

P

DOWN

UP

OK

A/M

PWR

OK

T

P

STEP 4

15

10

STEP 6

15

10

STEP 7

11

10

15

11

10

15

11

11

NOTE

Summary of Contents for RIB2310ML

Page 1: ...all be installed in accordance with All Rinnai gas products are A G A certified Distributed and serviced in Australia under a Quality System certified as complying with ISO 9001 by SAI Global SAPPHIRE...

Page 2: ...apphire gas log flamefire We trust you will have many years of comfort and enjoyment from your appliance BEFORE PROCEEDING WITH THE OPERATION OR INSTALLATION OF YOUR NEW HEATER PLEASE READ THIS MANUAL...

Page 3: ...EDURE AFTER INTERRUPTION TO ELECTRICITY SUPPLY 9 RESTART PROCEDURE AFTER INTERRUPTION TO GAS SUPPLY 9 REMOTE THERMOSTATIC CONTROLLED OPERATION 10 REMOTE CONTROLLER BATTERY INSTALLATION 10 REMOTE CONTR...

Page 4: ...ents are in each carton Ensure that the components listed for the installation method being installed are present before proceeding with the installation The Engine and Fascia are packed into two sepa...

Page 5: ...stallation Right side panel Console Installation Rear panel Console Installation Pillar Packet assembly screws 35 x 8g and 7 x M5 Plinth Installation Freestanding Installation x4 Cartons See Engine an...

Page 6: ...ompliance Certification Number _____________________________________________ Authorised Persons Licence Number _____________________________________________________ Installers Signature ______________...

Page 7: ...intended for use by persons including children with reduced physical sensory or mental capabilities or lack of experience and knowledge unless they have been given supervision or instruction concernin...

Page 8: ...lace articles on this heater DO NOT place articles in front of the louvres DO NOT operate install this heater in areas where painting is taking place or in places such as hairdressing salons where the...

Page 9: ...g from the front of the appliance may over time affect the appearance of some materials used for flooring such as carpet vinyl cork or timber This affect may be amplified if the air in the room contai...

Page 10: ...ischarge vent when installed in a masonry chimney or when installed in a zero clearance box or as a stand alone unit through a 100mm x 150mm twin skinned flue to the outside of the house This applianc...

Page 11: ...lame Up button Flame Down button Glass dress guard Flame window artificial log set and burn media Warm air discharge vent Return air vent Alternative power cable outlet location on front panel can be...

Page 12: ...ART PROCEDURE AFTER INTERRUPTION TO ELECTRICITY SUPPLY To restart your heater once power has been restored follow the steps for TO TURN YOUR HEATER ON above RESTART PROCEDURE AFTER INTERRUPTION TO GAS...

Page 13: ...ndicates when the battery power is below an acceptable level Automatic mode indicator Indicates if the thermostat is in automatic mode Program mode indicator Indicates that the thermostat is in progra...

Page 14: ...ure the heater will not ignite and the power Indicator LED will turn red to indicate that the heater is in Controller Standby mode Raising the set temperature above that of the room temperature will s...

Page 15: ...tton until the desired day is chosen Step 7 Press the OK button to enter the selected day and to complete time and day setup To adjust time for Daylight Saving time To adjust time or to adjust for day...

Page 16: ...h when batteries need replacing The thermostat will remain functional for approximately 5 days before shutting off Re programming of the controller will be required after battery replacement Temperatu...

Page 17: ...ion The remote will then commence automatically cycling through all the display characters finally displaying the full screen as shown below This process takes approximately 20 seconds and does not af...

Page 18: ...button or DOWN button to increase or decrease the temperature in increments of 1 C BEFORE PROCEEDING ENSURE THE GAS AND ELECTRICITY ARE TURNED ON Before remote thermostatic control can be used the he...

Page 19: ...UP button or DOWN button to increase or decrease the flame height Manually Overriding The Set Program At any time the temperature or fan speed may be adjusted UP or DOWN similarly to operating in Manu...

Page 20: ...eparate periods in one day resulting in a possible 28 operating periods per week A weekday program can be set so the program is used Monday to Friday Similarly a weekend program can be set for Saturda...

Page 21: ...is chosen Step 7 Press the OK button to enter the ON minutes SET TEMPERATUTRE DIGITS will flash Step 8 To select the ON temperature for P1 push the UP button or DOWN button until the desired temperatu...

Page 22: ...rgeable Faults caused by insufficient gas supply gas quality installation errors or operation errors are not covered by the Rinnai warranty Refer to separate Warranty Card for details Before asking fo...

Page 23: ...wer restored Initial Install Air in gas pipe Installer to purge air from gas supply Air in hose Repeat Ignition procedure Ignition failure Repeat Ignition procedure Flat battery for remote control Rep...

Page 24: ...Rinnai Australia 21 Sapphire Operation Installation Manual NOTES...

Page 25: ...ATION ZERO CLEARANCE 33 ZERO CLEARANCE INSTALLATION OVERVIEW 33 ZERO CLEARANCE INSTALLATION DETAIL 33 HEATER ENGINE INSTALLATION CONSOLE 36 FREESTANDING CONSOLE INSTALLATION OVERVIEW 36 FREESTANDING C...

Page 26: ...s connection G 1 2 flared male Gas type NG Propane Universal LPG Ignition Continuous Spark Electronic Ignition Input Output Refer data plate and energy rating label on appliance Power Consumption High...

Page 27: ...359mm 62mm 691mm 589mm 305mm 45mm 235mm Zero Clearance 865mm 660mm 363mm 62mm 795mm 650mm 280mm 305mm 45mm 240mm Console 865mm 760mm 363mm 62mm 865mm 760mm 280mm 305mm 144mm 235mm Plinth 865mm 837mm...

Page 28: ...V LCD TV Home Theatre Screens Speakers etc must comply with their manufacturers instructions It is the responsibility of the installer end user to check the installation instructions of these items an...

Page 29: ...ENCLOSURE DIMENSIONS Enclosure dimensions are shown below The enclosure dimensions specified are critical to the successful installation of this appliance and must be strictly adhered to AS 5601 GAS...

Page 30: ...t the minimum clearance the total length of the consumer pipe is 170mm 75mm 95mm Gas Supply Dimension Table Inbuilt Freestanding Masonry Zero Clearance Console Plinth 305mm to right of appliance centr...

Page 31: ...isting wall plug located outside of the intended fireplace or enclosure you may redirect the power cord and plug assembly through the front panel With Fascia assembly removed simply redirect the cord...

Page 32: ...authorised person must install service and remove the Rinnai Sapphire space heater flue system Only the flue system components described in the Flueing Installation Manual For Rinnai Flamefire Heaters...

Page 33: ...er and may void the warranty Chimney Criteria For Open Installation All loose broken bricks must be replaced or repaired ensuring the chimney is of sound construction and does not leak in accordance w...

Page 34: ...roximately 30mm from the top edge The foam strip is intended to form a seal between the heater and the fireplace brickwork If an adequate seal cannot be formed then another means of sealing must then...

Page 35: ...ia assembly mounting panel and in at least 2 of the holes on each side of the side panels as shown Step 9 Connecting Gas Firmly grasp the S S flexi pipe and bend at 90 approximately mid way to line up...

Page 36: ...ements before undertaking installation Ensure gas supply to heater is turned off for the first stages of this instruction Step 1 Prepare Site p 33 Step 2 Assemble Zero Clearance Box p 33 Step 3 Fittin...

Page 37: ...labelled for the correct gas type refer to the gas type label on the top body panel of the heater Refer to the local gas authority for confirmation of gas type if you are in doubt Step 5 Preparing He...

Page 38: ...embly mounting panel with two screws supplied Fasten the heater engine to cladding surface using appropriate fasteners not supplied in at least 4 positions as shown Step 11 Connecting Gas Firmly grasp...

Page 39: ...allation position and fasten to the floor using appropriate fasteners not supplied through the three holes in the base plate Read this manual thoroughly and gain a full understanding of the requiremen...

Page 40: ...g from the S S flexi pipe consumer gas supply pipe Step 6 Fit Heater Engine To Pillar Assembly Align the heater securing holes over the M5 root nuts then secure using the 4 M5 x 12mm screws supplied N...

Page 41: ...ne up with the gas control valve inlet then attach pipe to gas control valve and tighten Step 9 Leak Testing Turn gas back ON and leak test appliance connection Step 10 Completing Heater Installation...

Page 42: ...installation position and fasten to the floor using appropriate fasteners not supplied through the three holes in the base plate Read this manual thoroughly and gain a full understanding of the requi...

Page 43: ...he heater at the front using 3 M5 x 12mm screws supplied and at the rear using 3 8g x 10mm self tapping screws supplied Step 5 Prepare Gas Supply Remove the threaded brass plug from the S S flexi pipe...

Page 44: ...ne up with the gas control valve inlet then attach pipe to gas control valve and tighten Step 9 Leak Testing Turn gas back ON and leak test appliance connection Step 10 Completing Heater Installation...

Page 45: ...inside the burner box of the heater engine these are the log set and the burner granules These items are now accessible for removal Carefully unpack the five logs from the packaging material and insp...

Page 46: ...lining up two pin holes onto the two pins of the locating bracket that is fixed to the centre of the main burner Log Select the thick straight log and fit onto the sheet metal locators at base of the...

Page 47: ...he over folded edge over the two return tabs then gently swing down the bottom edge onto the magnets Confirm the correct location of all the logs before proceeding with the placement of the granular b...

Page 48: ...ns cable to the heater engine s control box Step 8 Switch On the Electricity Supply Switch on the electricity supply the appliance is now ready for commissioning 240 VOLTS RISK OF ELECTRICAL SHOCK Whe...

Page 49: ...wise will increase the outlet pressure whilst turning the screw anti clockwise will decrease the outlet pressure 6 Replace the dust cap after pressure adjustments 7 Reconnect the power to the GCV by r...

Page 50: ...guard fitted to this appliance reduces the risk of fire and injury and no part of it should be permanently removed For protection of young children or the infirm a secondary guard is required If the...

Page 51: ...g signs that could indicate a problem If any of the signs below occur please contact Rinnai Key signs of abnormal flame performance Appliance turns OFF soon after start up and does not relight Flame a...

Page 52: ...DULATING OIL AS ONTROL 3PARKER ARTH LAME 2OD 3PARKER 42 0 2 6 2 42 5 4 4 0 3 4 4 2 37 4 4 6 542 6 6 Z IGH 3PEED 53 6 GREEN 4 EDIUM 3PEED BROWN GRN YLW YELLOW YELLOW GREY GREY BLACK NWORB KCALB KCALB B...

Page 53: ...a secondary guard is required Ensure this Operation and Installation manual is left with the customer Ensure the Customer understands that No part of this appliance should be permanently removed Pape...

Page 54: ...Rinnai Australia 51 Sapphire Operation Installation Manual NOTES...

Page 55: ...Rinnai Australia 52 Sapphire Operation Installation Manual NOTES...

Page 56: ...a local call Higher from mobile or public phones Australia Pty Ltd ABN 74 005 138 769 Internet www rinnai com au E mail enquiry rinnai com au Rinnai has a Service and Spare Parts network with personn...

Reviews: