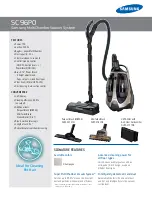
background image

FILTER (Fig. 11)

NOTE:

 The Filter (H) is made of high quality paper designed 

to stop small particles of dust. The Filter can be used for 

dry pick up or small amounts of liquid. Handle the Filter 

carefully when removing or installing it. Creases in the Filter 

Pleats may occur from installation but will not affect the 

performance of the Filter.

REMOVAL & INSTALLATION OF THE 

QWIK LOCK™ FILTER (Fig. 11)

1.  To Remove Filter: Place fingers under the Two Filter 

Tabs.

2.  While pressing down with one thumb on the Qwik 

Lock™ Stud, that protrudes through the center of the 

Filter Plate, lift up on the Tabs until Filter releases.

3.  Slide Filter off Filter Cage. Filter Cage and Float should 

not be removed.

IMPORTANT: 

To avoid Blower Wheel and Motor Damage 

always reinstall Filter before using Vac for dry pickup.
4.  To Install Filter: Slide the Qwik Lock™ Filter (H) over 

the Filter Cage while aligning the Qwik Lock™ Stud on 

the Filter Cage with the center hole in the Qwik Lock™ 

Integrated Filter Plate.

5.  Make sure the Rubber Gasket at the bottom of the Qwik 

Lock™ Filter (H) seats around the base of the Filter 

Cage.

6.  Firmly press the Qwik Lock™ Integrated Filter Plate 

down around the Qwik Lock™ Stud until it snaps into 

place.

NOTE:

  Failure to properly seat the bottom Gasket and 

Integrated Filter Plate to the Filter Cage could result in debris 

bypassing the Filter.
Your Filter should be cleaned often to maintain peak Vac 

performance.


WARNING:

To reduce the risk of injury from accidental 

starting, unplug power cord before changing or 

cleaning filter.

MAINTENANCE

Filter Tab (2)

Stud

Filter Plate

Rubber Gasket

Filter Cage

Float

(H)

(A)

PUSH DOWN

PULL 

UP

PULL 

UP


WARNING:

Do not operate without filter cage and float, 

as they prevent liquid from entering the impeller 

and damaging the motor.

CLEANING A DRY FILTER

1.  Some removal of dry debris can be accomplished 

without removing the Filter from the Vac. Slap your 

hand on top of the Lid while the Vac is turned OFF.

2.  For best cleaning results due to accumulated dust, clean 

the Filter outdoors in an open area.

3.  After Filter removal from Vac, remove the dry debris by 

gently tapping Filter against the inside wall of your Dust 

Drum. The debris will loosen and fall.

4.  For thorough cleaning of Dry Filter with fine dust  

(no debris), run water through Filter as described under 

“Cleaning A Wet Filter”.

CLEANING A WET FILTER

After Filter is removed, run water through the Filter from a 

hose or spigot. Take care that water pressure from the hose 

is not strong enough to damage Filter. 
IMPORTANT: 

After cleaning, check the Filter for tears or 

small holes. Do not use a Filter with holes or tears in it. 

Even a small hole can allow dust to come out of your Vac. 

Replace it immediately.
Allow the Filter to dry completely before reinstalling and 

storing the Vac or picking up dry debris.

 WARNING:


To assure product SAFETY and RELIABILITY, any other maintenance, repairs 

and adjustments should be performed by Authorized Service Centers, always using RIDGID replacement parts.

Fig. 11

9

Summary of Contents for HD16400

Page 1: ...FUTURA CONSERVER CE MANUEL POUR R F RENCE FUTURE AVERTISSEMENT Pour r duire les risques de blessures l utilisateur doit lire et veiller bien comprendre le mode d emploi avant d utiliser ce produit HD...

Page 2: ...y debris ingested by the impeller may damage the motor or be exhausted into the air Turn off Vac before unplugging To reduce the risk of injury from accidental starting unplug power cord before changi...

Page 3: ...VAC Read this Owner s Manual to familiarize yourself with the product features and to understand the specific usage of your new Vac Tug A Long Positive Locking Hose with Dual Flex Provides transfer of...

Page 4: ...Dual Flex 1 J Extension Wand 2 K Utility Nozzle 1 L Owner s Manual 1 These parts come preassembled Fig 1 TOOLS NEEDED Phillips Screwdriver Rubber Mallet CASTER CASTER FOOT ASSEMBLY Fig 3 NOTE Remove P...

Page 5: ...rap D and the Two 10 x 3 4 Pan Head Screws E in loose parts bag 2 Position the Carry Handle Power Cord Wrap D on top of the Powerhead Assembly A with the Carry Handle Power Cord Wrap Extended Flange t...

Page 6: ...come into contact with liquid VACUUMING DRY MATERIALS 1 The Filter must always be correctly installed to avoid leaks and possible Vac damage 2 To maintain peak performance when vacuuming fine dust cle...

Page 7: ...6 Press the Hose Locking Tab and pull the Hose Cuff straight out of the Blower Port INSERT HOSE REMOVE HOSE Blower Port Blower Port Ridges Hose Locking Tab I A J B Dust Drum Flexible Locking Tab 2 C A...

Page 8: ...D Wet Dry Vac has convenient storage locations ACCESSORY STORAGE Fig 10 1 For Storage Slide the Extension Wands J and the Utility Nozzle K onto the Caster Feet Posts 2 To Remove Wands and Accessories...

Page 9: ...k Vac performance WARNING To reduce the risk of injury from accidental starting unplug power cord before changing or cleaning filter MAINTENANCE Filter Tab 2 Stud Filter Plate Rubber Gasket Filter Cag...

Page 10: ...sulated Wet Dry Vac must be identical to the parts they replace Your double insulated Wet Dry Vac is marked with the words DOUBLE INSULATED and the symbol square within a square may also be marked on...

Page 11: ...filtro desgarrado o sin tener el filtro instalado excepto cuando recoja con ella l quidos de la manera que se describe en este manual Los residuos secos absorbidos porelimpulsorpodr anda arelmotorose...

Page 12: ...s cuando la humedad relativa del aire es baja Si recoge residuos finos con la aspiradora se puede depositar carga est tica en la manguera o en la aspiradora El mejor remedio para reducir la frecuencia...

Page 13: ...xtensor 2 K Boquilla de uso general 1 L Manual del usuario 1 Estas piezas vienen preensambladas INTRODUCCI N ENSAMBLAJE DE LAS RUEDECILLAS PIES PARA RUEDECILLA Fig 3 NOTA Retire el ensamblaje del cabe...

Page 14: ...oc nica 10 x 3 4 de pulgada E en la bolsa de piezas sueltas 2 Posicione el asa de transporte enrollador del cable de alimentaci n D sobre el ensamblaje del cabezal del motor A con la pesta a extendida...

Page 15: ...l para uso a la intemperie que est n en buenas condiciones No deje que la conexi n entre en contacto con l quido RECOGIDA DE MATERIALES SECOS CON LA ASPIRADORA 1 El filtro siempre debe estar instalado...

Page 16: ...MIENTO ADVERTENCIA No utilice la aspiradora sin la jaula del filtro y el flotador ya que estas piezas evitan que entre l quido en el impulsor y da e el motor VACIADO DEL TAMBOR PARA POLVO Fig 8 1 Dese...

Page 17: ...cuando est n en uso 1 Para conectar los accesorios fijables Alinee los salientes de la boquilla del accesorio con la leng eta de fijaci n del tubo extensor J Presione para sujetar firmemente la boquil...

Page 18: ...e limpiar a menudo para mantener un rendimiento ptimo de la aspiradora ADVERTENCIA Para reducir el riesgo de lesiones debidas a un arranque accidental desenchufe el cord n de energ a antes de cambiar...

Page 19: ...dora para mojado seco con aislamiento doble deben ser id nticas a las piezas que reemplazan La aspiradora para mojado seco con aislamiento doble est marcada con las palabras DOUBLE INSULATED con aisla...

Page 20: ...tilis par des enfants ou proximit d enfants N utilisez pas avec un filtre d chir ou sans avoir install de filtre saufquandvousaspirezdesliquides commecelaestd critdans ce mode d emploi Des d bris secs...

Page 21: ...ns avec votre aspirateur peut d poser une charge statique sur le tuyau ou sur l aspirateur La meilleure chose faire pour r duire la fr quence des d charges statiques chez vous ou lorsque vous utilisez...

Page 22: ...F G J K D E D R A I N DRAIN A B C H L I D BALLAGE Ce produit n cessite un assemblage V rifiez toutes les pi ces du carton par rapport la liste des pi ces d tach es Si de quelconques pi ces sont endomm...

Page 23: ...arri re du bloc moteur comme illustr 3 Introduisez une vis t te cylindrique N 10 x 3 4 po E dans le trou chaque extr mit de la poign e de transport D et dans l ensemble de bloc moteur A Serrez fermem...

Page 24: ...ue vous utilisez un cordon de rallonge n utilisez qu un cordon pr vu pour emploi l ext rieur et en bon tat Ne laissez pas la connexion entrer en contact avec des liquides ASPIRATION DE MAT RIAUX SECS...

Page 25: ...si re B avant de ranger votre aspirateur AVERTISSEMENT Pour r duire le risque de blessure pouvant tre caus e par une mise en marche accidentelle d branchez le cordon d alimentation avant de vider le t...

Page 26: ...1 Pour connecter les accessoires Alignez les ar tes de la buse de l accessoire sur la languette de verrouillage de votre tube de rallonge J Appuyez pour s curiser la buse sur le tube de rallonge 2 Po...

Page 27: ...he accidentelle d branchez le cordon d alimentation avant de changer le filtre ou de le nettoyer ENTRETIEN NETTOYAGE D UN FILTRE SEC 1 Le retrait de certains d bris secs peut tre accompli sans enlever...

Page 28: ...des et de poussi res doublement isol doivent tre les m mes que les pi ces qu elles remplacent Les mots DOUBLE INSULATED Doublement isol figurent sur l aspirateur de liquides et de poussi res doublemen...

Reviews: