36
r
Press the DISPLAY button to select the
date display method.
There are three methods available to display the
date as follows:
1999/5/15
➝
May 15 1999
➝
15 May 1999
Each time you press the DISPLAY button, the
display method is switched from one position to
the next in the sequence shown above. Press
the DISPLAY button to select the desired date
display method.
t
Press the ENTER button.
The date setting menu is displayed.
Note
• To cancel the operation and return to
the setup menu, press the MENU
button.
y
Press the
▼
and
▲
buttons to change
the blinking numeral.
Pressing the up
▲
(
) button increments the
numeral; pressing the down
▼
(
)button
decrements the numeral. Keep pressing the
button changes the digit fast.
u
Press the ENTER button to flash the digit
you want changed.
Repeat steps
y
and
u
above to make
necessary corrections.
Note
• Each time you press the ENTER
button, the flashing digit changes, from
year to month, day, hour and minute.
• Press the MENU button to cancel the
operation.
i
After you have set the number of
minutes, press the ENTER button again.
The clock gets started and the LCD monitor
returns to the SET UP menu. Turn the mode
dial to select another mode.
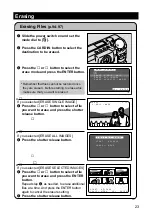
C A N C E L : M E N U S E L . : E N T E R
D A T E S E T T I N G
1 9 9 9 1 1
0 0 : 0 0
C A N C E L : M E N U S E L . : E N T E R
D A T E S E T T I N G
1 9 9 9 1 1
0 0 : 0 0
C A N C E L : M E N U S E L . : E N T E R
D A T E S E T T I N G
1 9 9 9 1 1 5
1 0 : 1 2


