background image

English

English

23

Introduction

Package Overview

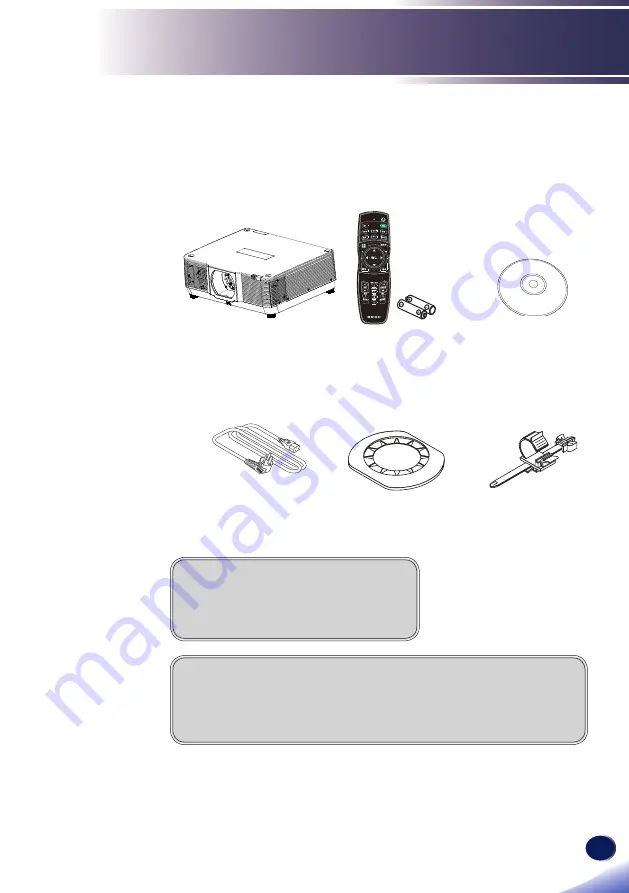
The projector is provided with the following accessories. Make 

sure that everything is included in the package. If anything is 

missing, contact your dealer immediately.

Documents

:


  Quick start guide

  Warranty card

Projector

Remote control & 

(AA/R6 battery x2)

CD-ROM

Lens Gap Cover

Power cord buckle

 

About the CD-ROM

Contains an user’s manual in PDF format and Projector Management
Utility.
Support languages of User’s Manual are English and Chinese.

Power cord

Summary of Contents for PJ RU7700L Series

Page 1: ...handy for future reference For safe and correct use be sure to read the Precautions in this manual before using the machine Troubleshooting LAN Control User Settings Basic Operations Introduction Usag...

Page 2: ...U8806L RU8807L RU8808L RU8809L RU7700L RU8800L RU7701L RU7702L RU7703L RU7704L RU7705L Model Typ Model All models in this manual are represented by the Typ models and the corresponding relationship be...

Page 3: ...PC and USB and a Remote Control Device 38 Powering On Off the Projector 39 Powering on the Projector 39 Using the power cord buckle 40 Power off the projector 41 Input Source Signal Selection 42 Adju...

Page 4: ...e or electric shock could result from spillage or if such objects or substances fall inside this machine Warning Do not use flammable sprays or solvents in the vicinity of this machine Also avoid plac...

Page 5: ...or the following The power cord s inner wires are exposed broken etc The power cord s coating has a crack or dent When bending the power cord the power turns off and on Part of the power cord becomes...

Page 6: ...nect the power cord plug from the wall outlet Then contact your service representative and report the problem Do not use the machine Doing so could result in fire or electric shock Warning Never push...

Page 7: ...w holes to the brackets When installing the ceiling it is recommended to use the Ricoh PJ Type 2 g Do not use the projector in oil mist or smoke environment Doing so may cause the projector case to cr...

Page 8: ...uct the machine s vents Doing so risks fire caused by overheated internal components Caution Push the power plug all the way into the power outlet Do not use a power outlet with a loose connection Doi...

Page 9: ...amage to the product Caution Unplug this product from the wall outlet and take the product to qualified service personnel if you encounter any of the following conditions a The power supply cord or pl...

Page 10: ...rojection light when it is on If you do so the part that is blocking the projection light may get quite hot and deform deteriorate or cause a burn or fire The reflected light may make the lens hot and...

Page 11: ...ry compartment does not close securely stop using the product and keep it away from children If you think batteries might have been swallowed or placed inside any part of the body seek immediate medic...

Page 12: ...ut 333mW The laser module is equipped in this product Use of controls or adjustments of procedures other than those specified herein may result in hazardous radiation exposure Caution CLASS 1 LASER PR...

Page 13: ...NS TYPE E2 2 483 REPLACEMENT LENS TYPE EM1 1 055 REPLACEMENT LENS TYPE EM2 1 218 REPLACEMENT LENS TYPE EM3 2 346 The drawings below are example of typical installation methods Besides these when insta...

Page 14: ...or If the distance between the floor face and the Hazard zone is less than 3 m entering the screen area should be restricted Note Lens HD m REPLACEMENT LENS TYPE EM0 1 653 CAUTION When REPLACEMENT LEN...

Page 15: ...le 6 4 4 6 4 Wide 9 7 6 1 9 7 REPLACEMENT LENS TYPE EM1 Tele 31 7 23 8 31 7 Wide 41 31 8 41 REPLACEMENT LENS TYPE EM2 Tele 13 9 4 13 Wide 27 9 20 7 27 9 REPLACEMENT LENS TYPE EM3 Tele 6 8 4 9 6 8 Wide...

Page 16: ...TYPE E2 Tele 5 5 2 5 3 Wide 8 4 3 8 4 6 REPLACEMENT LENS TYPE EM1 Tele 28 9 15 4 18 3 Wide 37 8 21 2 24 9 REPLACEMENT LENS TYPE EM2 Tele 11 6 5 9 7 Wide 25 3 13 3 15 8 REPLACEMENT LENS TYPE EM3 Tele...

Page 17: ...1 2nd edition 2007 Do not look into the beam No direct eye exposure to the beam is permitted 5 Do not remove the cover or non user operating area Never hang any heavy objects on the top of cover 6 Thi...

Page 18: ...the air outlet one meter away from other objects DO NOT touch the area close to the air outlet especially the metal components e g screws This area and parts will get very hot once your projector sta...

Page 19: ...English English 17 Usage Notice Horizontal 360 Vertical 360 Vertical Horizontal 360 360 360 360 360 360 360 360 projection This projector support 360 projection...

Page 20: ...r Set Type 1 The protection cover is optional If necessary please contact the authorized dealer to purchase separately In the direction of back and forth 20 150 Protective cover A must be attached 200...

Page 21: ...ttach the protective cover B Protective cover A must be attached 0 85 Protective cover B must be attached 270 90 270 180 0 Protective cover B Protective cover A 170 265 Protective cover B must be atta...

Page 22: ...exhaust hood with the projector 2 Loosen 2 screws A M3 110 and tighten the corresponding holes Please refer to the following figure for details A A Intake hood installation 1 Align the two clips on t...

Page 23: ...English English 21 Usage Notice Power Switch Symbols The meaning of the symbols for the switches on this machine as follows On Standby Off...

Page 24: ...or public viewing Varying the aspect ratio of images or movies using a function that changes the screen size to broadcast images for commercial purposes or public viewing GPL LGPL Software License The...

Page 25: ...e package If anything is missing contact your dealer immediately Documents Quick start guide Warranty card Projector Remote control AA R6 battery x2 CD ROM Lens Gap Cover Power cord buckle About the C...

Page 26: ...3 STATUS indicator 4 TEMP indicator 5 Air intake 6 Air outlet 7 Remote Receiver Front 8 LENS release button 9 Adjustment feet 10 AC In Socket 11 Connection ports 12 Safety bar for fixing with wire 13...

Page 27: ...inal 4 LAN terminal 5 DVI D In 6 HDMI1 In HDMI2 In terminal 7 HDMI Out terminal 8 Monitor Out terminal 9 Anti theft lock hole Kensington lock 10 HDBaseT terminal 11 Audio Out terminal 12 Audio In term...

Page 28: ...ctor s abnormal temprature 4 Power Refer to the Power On Off the Projector section See pages 39 41 5 Input Select the input source 6 Four directional key Use or to select items or make adjustments to...

Page 29: ...desired input source 3 ECO Display Laser settings Mode pop up menu See page 73 74 4 Computer Press Computer to choose Com puter In terminal 5 HDMI Press HDMI tochooseHDMI1and HDMI2source 6 Digital Pre...

Page 30: ...op level of OSD for the OSD main menu operation See page 58 15 Exit Back or exit the menu 16 Volume Thisbuttonisinvalid 17 Zoom Focus Enter the optical zoom adjustment mode Enter the focus adjustment...

Page 31: ...lations or guide Remove the batteries when the remote control will not be used for a long time An infrared remote control may not work if it is exposed to strong light or fluorescent light If battery...

Page 32: ...projector the effective range of the remote control is an area of radius 7 meters or about 20 meters in straight line from the receiver The remote control is effective within vertical and horizontal...

Page 33: ...the screen The distance from the lens of the projector to the screen the zoom setting and the video format determine the size of the projected image This projector supports 360 projection See page 17...

Page 34: ...is compatible with your projector before installing it For details on lens and its installation please call local dealers Note Note Be sure to remove the lens cap on the back of the device If the len...

Page 35: ...or 4 seconds or above or press the menu button to select the Expand to act on Lens adjust then select Lens center option Then then lens will be moved to the original position 3 Turn off the main power...

Page 36: ...locked In that case rotate the lens completely to the right the lens release lock will be released 2 Slowly pull down the lens from the projector After removing the lens install the lens cover front a...

Page 37: ...ojector before installing it When replacing the optional lenses it must be done by a professional During the replacement process pay attention to mechanical damage and thermal burns of the lens For de...

Page 38: ...ial cable crossover LAN cat 6 cable HDBaseT Transmitter HDMI cable To ensure the projector works well with your computer please make sure the timing of the display mode is compatible with your project...

Page 39: ...English English 37 Basic Operations Connecting a Audio Device Audio Y Cb Pb Cr Pr Y Cb Pb Cr Pr Audio cable 3 5 Audio cable 3 5...

Page 40: ...Operations Connecting a USB Device USB Display USB PC and USB and a Remote Control Device USB memory device USB A B cable Y Cb Pb Cr Pr Y Cb Pb Cr Pr Audio cable 3 5 Audio cable 3 5 Slave projector M...

Page 41: ...referred language Turn on your source computer notebook video player etc The projector will detect your source automatically Make sure that the Auto Source has been set to On Turn on the projector fir...

Page 42: ...the power supply cord align the tip of the power supply cord buckle with the hole below the AC IN terminal and push it in 2 Pass the power supply cord through the clamper and press the clamper to fix...

Page 43: ...on the rear control panel or the Input Auto set Menu AV Mute Picture ECO Enter Computer Video Freeze Aspect Keystone Volume Magnify Status button on the remote control The following dialog box will p...

Page 44: ...ress the Input button on the remote control or the control panel on the rear and choose Computer HDMI1 HDMI2 HDBaseT DVI Memory Viewer Network or USB Display as the input source Menu operation 1 Press...

Page 45: ...and Image functions are unavailable When the input source is a device that connects to the USB terminal choose USB Display To use USB Display see P 81 for instruction USB Display Note When the input...

Page 46: ...n 2 Rotate the adjustable feet and tilt the projector to an appropriate height follow image 3 To raise the projector rotate the two feet clockwise To lower the projector or retract the adjustable feet...

Page 47: ...ens Betelgeuse PJ1 RDHAB86 2021 03 02 PMdept K Watanabe A B C D E Y0FJ 8806 Keypad RICOH PJ RU7700L CHN 1 2 I N7 0R 7 0 3 Generic Black button on the control panel once to adjust the focus 2 When the...

Page 48: ...ble lens REPLACEMENT LENS TYPE EM3 Motorized focus 1 Press the Zoom Focus button on the remote control to make focus adjustment Or press the lens Betelgeuse PJ1 RDHAB86 2021 03 02 PMdept K Watanabe A...

Page 49: ...The support kit is not shown on this illustration 1 Press the Zoom Focus button on the remote control to make focus adjustment Or press the lens Betelgeuse PJ1 RDHAB86 2021 03 02 PMdept K Watanabe A...

Page 50: ...tton on the remote control to focus edge area adjustment Or press the lens button on the control panel then press button to focus on the edge area of the screen During operation the focal length aroun...

Page 51: ...e lens REPLACEMENT LENS TYPE EM1 EM2 EM3 Motorized zoom 1 Press the Zoom Focus button on the remote control to make zoom adjustment Or press the lens Betelgeuse PJ1 RDHAB86 2021 03 02 PMdept K Watanab...

Page 52: ...English 50 Basic Operations ZOOM A B C...

Page 53: ...ad RICOH PJ RU7700L CHN 1 2 I N7 0R 7 0 3 Generic Black button on the control panel three times to make adjustment 2 The screen will display the lens shift setting Press button to adjust the screen to...

Page 54: ...NS TYPE E1 W W 30 H1 H 10 H2 H 50 REPLACEMENT LENS TYPE E2 W W 30 H1 H 10 H2 H 50 REPLACEMENT LENS TYPE EM1 W W 20 H1 H 10 H2 H 50 REPLACEMENT LENS TYPE EM2 W W 20 H1 H 10 H2 H 50 REPLACEMENT LENS TYP...

Page 55: ...0 770 6 731 16 022 32 032 Projection distance formula WUXGA 16 10 WIDE Y 0 032 X 0 050 TELE 0 064 0 050 16 9 WIDE Y 0 033 X 0 050 TELE 0 066 0 050 4 3 WIDE Y 0 036 X 0 050 TELE 0 073 0 050 Y Projectio...

Page 56: ...0 020 X 0 039 TELE 0 028 0 041 Y Projection Screen Size Unit inch X Projection Distance Unit m 16 10 Screen diagonal length inch Projection Size Projection Distance Width m Height m Wide m Tele m 50 1...

Page 57: ...Projection distance formula WUXGA 16 10 WIDE Y 0 028 X 0 045 TELE 0 065 0 039 16 9 WIDE Y 0 029 X 0 045 TELE 0 067 0 039 4 3 WIDE Y 0 032 X 0 045 TELE 0 074 0 039 Y Projection Screen Size Unit inch X...

Page 58: ...939 1 212 0 010 0 624 0 581 1 794 1 188 100 2 154 1 346 0 083 0 697 0 629 1 976 1 302 120 2 585 1 615 0 229 0 843 0 723 2 340 1 531 150 3 231 2 019 0 449 1 062 0 864 2 885 1 874 200 4 308 2 692 0 814...

Page 59: ...oom Lens Zoom Lens Zoom Lens Zoom Lens UST Lens Zoom Focus Manual Manual Motorized Motorized Motorized Motorized F Wide Tele 1 7 2 37 2 2 2 7 2 0 2 5 1 7 2 0 2 2 2 6 2 0 f mm 24 4 48 6 76 6 116 5 13 3...

Page 60: ...y or key 4 Select the next item to be adjusted in the sub menu and adjust as described above When there is no next menu in the submenu press the buttons to set related options When there is a next men...

Page 61: ...ages The available options Bright Standard sRGB Picture Mode DICOM SIM Bright Mode for emphasizing brightness Standard Mode for optimizing the balance between brightness and color reproduction sRGB St...

Page 62: ...n 32 Press the key to decrease the amount of color in the image Press the key to increase the amount of color in the image Color temp wall color Use this function to set the color temperature of the i...

Page 63: ...el 0 G level press the button to decrease the green level Press the button to increase the green level G level 0 B level press the button to decrease the blue level Press the button to increase the bl...

Page 64: ...plays 16 10 aspect ratio Phase Eliminate flicker from the image displayed Use the or key to adjust the value Phase 0 Frequency This function is used to adjust or diminish the disruption from patterns...

Page 65: ...t Set Exit Reset H V keystone Adjust the keystone of projected images in horizontal vertical directions H V Keystone Horizontal keystone correction Press the key to adjust the left Press the key to ad...

Page 66: ...rightward Press the key stretch the horizontal line upward downward Press the key indent the horizontal line upward downward X oriented offset Press the key correct the vertical line on the right and...

Page 67: ...ter area and area below unchanged while expanding the upper corners Grid adjustment Select this function to adjust the local points of the projected image Press key to enter the Grid adjustment option...

Page 68: ...Off Logo Display logo on the start up screen Off Display an empty start up screen Background Color Use this function to choose your desired background color between logo blue and black Background Colo...

Page 69: ...e and other element settings are not reflected in the patterns Make sure that the input signal has been displayed before all types of adjustments are done Select the mode of the needed patterns off gr...

Page 70: ...when there is no signal input Auto Power Off is activated when the set time interval is due The luminous LED light source will turn off to cool down and enter the standby mode The adjustable range is...

Page 71: ...horten the cooling time 60 sec Running in normal way 30 sec Running faster than in normal mode with shorter time but a louder sound 0 sec Select this function allow you to unplug the AC power directly...

Page 72: ...e light indicator on the remote control flashed If the remote is selected 0 the projector accepts the remote control regardless of the projector s remote ID setting Security Configure the security set...

Page 73: ...ork setting IP address Subnet 32 Set Select Exit Menu Gateway DNS Apply Status MAC Address 192 168 1 100 192 168 1 1 192 168 1 100 54 10 EC 2A 18 9E 192 168 1 1 255 255 255 0 Off On DHCP Select On to...

Page 74: ...o Off to disable PJ Link function On Off PJLink Crestron Set the option to On to enable Crestron function Set the option to Off to disable Crestron function On Off Crestron Reset all Return the adjust...

Page 75: ...ess Enter to finalize the selection The projector will only search for inputs that are enabled Computer Input Source HDMI 1 HDMI 2 HDBaseT DVI Select Set Exit Laser settings This function is used to s...

Page 76: ...est projection effect Press the key to enter the sub menu and configure the desired settings Focus Lens Adjust Lens Shift Zoom Lens Center Lens Caribration Select Enter Exit Focus Adjust the focal len...

Page 77: ...xit Direct Power On When it is set to On the projector is automatically powered on when an AC power supply is connected Standby Power Specify the standby mode Eco In the Eco mode network functions and...

Page 78: ...signals in the unit of Hz Displays when no input signal is detected Laser Power Displays the mode of the laser light source Total Time Displays the number of hours the light source has been used Firmw...

Page 79: ...t Order If you want to project a slide show of images the display effects for switching slides can be customized Sort Order Name Time Name Displays by file name and folder name Time Displays by file t...

Page 80: ...e image 180 Degree 270 Degree Rotates the image 270 Degree to the left Repeat You can specify whether to repeat display slides Repeat On Off Off Returns to the thumbnail display after the last file is...

Page 81: ...USB 2 0 3 Maximum number of folders files that can be displayed is 500 4 Cannot play digital rights management DRM protected files Displaying the Memory Viewer Screen 1 Press the Input button on the...

Page 82: ...lay Memory Viewer setting OSD menu operation here are some option settings for Memory Viewer on OSD menu Please see Page 77 Page 78 for detail Unplug the USB memory 1 Press the buttons on the remote c...

Page 83: ...ixels or more Displaying the USB Display 1 Connect the USB terminal of the projector to the computer by using a USB A B cable Items in gray are unavailable 2 Press the Input button on the remote contr...

Page 84: ...the computer Play video Pause video Switches between playing and pausing images Start Stop Specifies whether to output images from the computer Exit Items in gray are unavailable Disabling the USB Dis...

Page 85: ...et Select Exit Menu Gateway DNS Apply Status MAC Address 192 168 1 100 192 168 1 1 192 168 1 100 54 10 EC 2A 18 9E 192 168 1 1 255 255 255 0 Off On 2 Click the Download button 3 In the pwPresenter sof...

Page 86: ...ep the password blank The projector will be found as name RICOH PJ xxxx xxxx is last 4 digits of the projector s MAC address Starting pausing capture Starts or pauses capturing the selected picture Se...

Page 87: ...ers Basic Setting Specifies the language capture region size and so on Advanced Setting Specifies the image quality network port and so on Basic Setting Advanced Setting Global Setting Specifies remot...

Page 88: ...tings Multicast Setting Specifies the sound volume bandwidth capture rate and so on Projector Network Management Specifies the network user name and password for pwPresenter Disconnecting a connection...

Page 89: ...pages 70 on the projector user s manual DHCP LAN Network setting IP address Subnet 32 Set Select Exit Menu Gateway DNS Apply Status MAC Address 192 168 1 100 192 168 1 1 192 168 1 100 54 10 EC 2A 18 9...

Page 90: ...rd admin Login by clicking the Login button When you log in a navigation bar for setting the projector will be displayed on the left side of the home screen System Status The current status of the pro...

Page 91: ...ly Updates the settings Power Switches the power of the projector between On and Off Source Select Switches the input source of the projector Picture Setup You can change the values to adjust the proj...

Page 92: ...tortion H Keystone Adjust the horizontal keystone distortion Corner correction Adjust the screen when the linearity is uneven or the vertical or horizontal curves of the projected image are deformed N...

Page 93: ...r Management Utility Projector Management Utility conforms to the PJLink class 1 standards and is compatible with all class 1 commands A maximum of 100 projectors connected to the network can be manag...

Page 94: ...and then click X to close the user s manual window 3 Right click the CD ROM icon and select OPEN 4 Open Projector Management Utility folder stored on the CD ROM 5 Double click setup exe stored in the...

Page 95: ...ojectors which support PJLink are displayed in the window Projector name is displayed as until authorization if password is enable Select the desired projector and click Register button Password autho...

Page 96: ...the original screen 2 Directly specifies the IP address and registers the projector Enter IP address of the desired projector and click Confirm button then the projector name will be displayed After...

Page 97: ...List Input button Switches the input source of the projectors or groups selected from the Projector Group List Input source will not be changed if the projector doesn t support the selected input sou...

Page 98: ...le computers the display output settings usually need to be changed For details on the settings see the user manual for the computer Images can be displayed only 10s after the projector is turned on C...

Page 99: ...within the required projection range Problem Image is deformed or disappears Press the Ratio button on the remote control or on the OSD menu choose Image Adjustment Image Mode and specify an appropria...

Page 100: ...ng Abnormal 1 Abnormal temperature Automatic shutdown after abnormal temperature and enter the standby state after Warning Cooling 2 Temperature abnomaly cooling When the temperature is abnormal it wi...

Page 101: ...ate 13 fan 8 error 1s Fan 8 error and enter to the standby state 14 fan 9 error 2s Fan 9error and enter to the standby state 15 fan 10 error 2s Fan 10error and enter to the standby state 16 fan 11 err...

Page 102: ...etergent to remove heavy dirt Do not over apply cleaner to the casing Abrasive cleaner solution or other rough chemical may scratch the casing surface Place your projector in proper container after us...

Page 103: ...4x768 60 48 4 65 0 70 56 5 75 0 85 68 7 94 5 WXGA 1280x768 60 47 8 79 5 75 60 3 102 3 85 68 6 117 5 1280x800 60 49 7 83 5 75 62 8 106 5 85 71 6 122 5 1366x768 60 47 7 84 8 1280x720 60 45 0 74 3 50 37...

Page 104: ...60 37 9 40 0 800x600 72 48 1 50 0 800x600 75 46 9 49 5 800x600 85 53 7 56 3 XGA 1024x768 60 48 4 65 0 70 56 5 75 0 85 68 7 94 5 WXGA 1280x768 60 47 8 79 5 75 60 3 102 3 85 68 6 117 5 1280x800 60 49 7...

Page 105: ...80i 60 15 7 13 5 576i 720x576i 50 15 6 13 5 480p 720x480 480P 60 31 5 27 0 576p 720x576 576P 50 31 3 27 0 720p 1280x720p 50 37 5 74 3 1280x720p 60 45 0 74 3 1080i 1920x1080i 60 33 8 74 3 50 28 1 74 3...

Page 106: ...B 9 1 6 2 RXD 7 3 TXD 8 4 9 5 GND LAN terminal 1 TX 5 2 TX 6 RX 3 RX 7 4 8 HDBaseT terminal 1 HDBT_P0 5 HDBT_P2 2 HDBT_N0 6 HDBT_N2 3 HDBT_P1 7 HDBT_P3 4 HDBT_N1 8 HDBT_N3 HDMI terminal HDMI Type A 19...

Page 107: ...wer 3 TMDS Data 2 4 shield 15 Grounding 5 loop 4 TMDS Data 16 HPD 5 TMDS Data 17 TMDS Data 0 6 DDC clock 18 TMDS Data 0 7 TMDS Data 19 TMDS Data 0 5 shield 8 Analog vertical 20 TMDS Data 5 9 TMDS Data...

Page 108: ...2m Tele 3 2 32 6m REPLACEMENT LENS TYPE EM3 Wide 3 3 31 7m Tele 6 4 63 4m EM0 0 06 2 3m Distance between the back of projector to screen Throw ratio REPLACEMENT LENS TYPE E1 1 46 2 95 REPLACEMENT LEN...

Page 109: ...ifications are subject to change without notice This model may not be compatible with features and or specifications that may be added in the future Note Separately sold product RICOH PJ Protection Co...

Page 110: ...English 108 Appendices External Dimensions Tapped holes used for ceiling installation Screw M4 Depth 10 0mm Unit mm 300 134 218 300 6 M4 150 125 300 78 3 503 3 600 199 218...

Page 111: ...efinition Multimedia Interface are trademarks or registered trademarks of HDMI Licensing Administrator Inc MHL Mobile High Definition Link and MHL Logo are trademarks or registered trademarks of MHL L...

Page 112: ......

Page 113: ......

Reviews: