background image

Troubleshooting

125

Removing Jammed Staples

If the 

[

Add staples

]

 message appears, when there are some more staples left, or

if your documents are not stapled at all despite being set for staples, staple jam
might have occurred.

Warped paper may cause repeated staple jams. In this case, load the paper
upside down.

When removing jammed staples, staples might not be ejected the first few
times you try to use the stapler.

For details about finisher, see 

p.135 “Options”

.

A

Open the finisher's front cover.

B

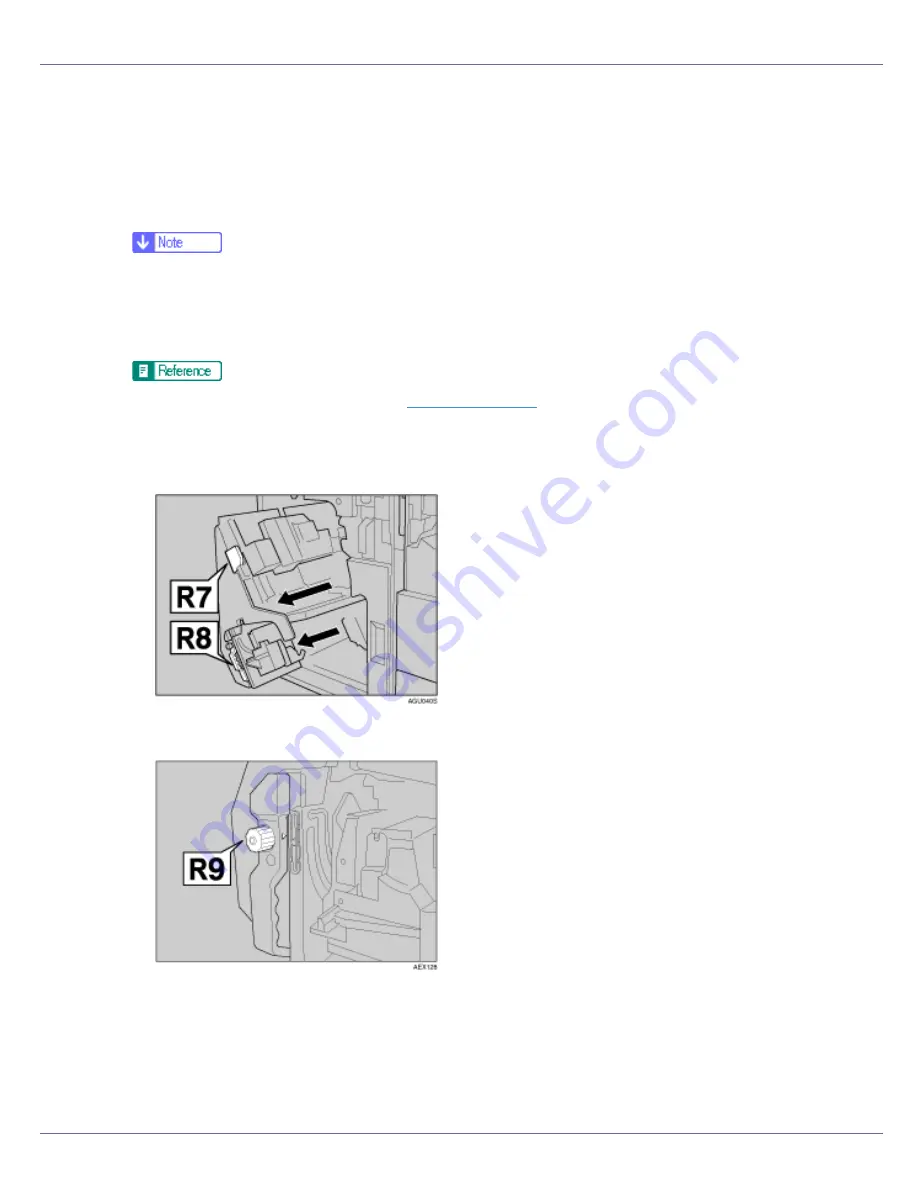
Pull R7 to slide out the unit, and then pull R8 to slide out the staple unit.

C

Turn R9 to adjust 

}

 to the scale.

Summary of Contents for P7575

Page 1: ...anuals for This Printer 14 How to Read This Manual 15 Guide to the Printer Exterior 16 Back 17 Inside 18 Control Panel 19 Setting Up Where to Put the Printer 21 Space Required for Installation 22 Inst...

Page 2: ...d by This Printer 55 Paper Recommendations 59 Loading Paper 59 Storing Paper 59 Types of Paper and Other Media 59 Paper not supported 61 Print Area 61 Loading Paper 63 Loading Paper in Tray 1 Tandem T...

Page 3: ...eed B F Internal 108 Remove Misfeed A U Internal 113 Remove Misfeed Q Interposer 115 Remove Misfeed R Finisher 118 Adding Staples 121 Removing Jammed Staples 125 When the Staple Waste Box is Full 128...

Page 4: ...s Microsoft Windows 95 operating system Microsoft Windows 98 operating system Microsoft Windows Millennium Edition Windows Me The product names of Windows 2000 are as follows Microsoft Windows 2000 Ad...

Page 5: ...n this manual the following important symbols are used Indicates a potentially hazardous situation which if instructions are not followed could result in death or serious injury Indicates a potentiall...

Page 6: ...nplug the power cable with dry hands or an electric shock could occur Do not risk electric shock by handling the power cord or plug with wet hands Do not remove any covers or screws other than those s...

Page 7: ...electric shock or fire Next contact your sales or service representative Do not use the machine if it is mal functioning or not operating normally If foreign objects such as met al liquid etc falls i...

Page 8: ...used toner is inhaled gargle with plenty of water and move into a fresh air environment Consult a doctor if necessary If your skin comes into contact with toner or used toner wash the affected area t...

Page 9: ...aged plugs or cables can cause an electrical or fire hazard The printer weighs about 185 kg 407 9 lb When lifting the machine use the inset grips on both sides Otherwise the printer could break or cau...

Page 10: ...protect the printer from external shocks such as arranging pa pers on top of the printer Depending on temperature and humidity during printing a while steam may come from the printing paper when it l...

Page 11: ...for recommended paper As an ENERGY STAR Partner we have deter mined that this machine model meets the EN ERGY STAR Guidelines for energy efficiency The ENERGY STAR Guidelines intend to establish an in...

Page 12: ...First 12 Positions of RWARNING and RCAUTION labels This machine has labels for RWARNING and RCAUTION at the positions shown below For safety please follow the instructions and handle the machine as i...

Page 13: ...the finisher It could cause injury C The inside of this printer becomes very hot Do not touch parts with this label indicating a hot surface Touching these parts will result in burns D The inside of...

Page 14: ...rating Instructions Printer Reference This manual Provides information about printer setup options and dealing with paper jams and error messages Software Guide HTML Provides basic information about i...

Page 15: ...instructions under this symbol Be sure to read these instructions all of which are described in the Safety Information section The statements above are notes for your safety If this instruction is not...

Page 16: ...ly different depending on the finisher 3 Finisher Shift Tray Collects printed sheets and punched documents 4 Finisher Shift Tray Collects printed sheets and stapled and punched documents 5 Power Switc...

Page 17: ...etwork interface cable or the USB interface cable optional here 2 Ventilation Prevent overheating Place no objects against or near these holes 3 Bypass tray Use for printing onto OHP transparencies la...

Page 18: ...isplay a new toner bottle is re quired 2 Fusing Unit Fuses the image onto paper When Replace Fusing Unit message appears on the panel display replace the fusing unit For details about replacing this u...

Page 19: ...default screen 4 Form Feed key When the printer is offline press this to print all data left in the printer s input buffer You can use this to force the printer to print data received in the online s...

Page 20: ...ondition on the display 10 Enter key Used to confirm or apply settings to proceed to the subsequent steps 11 U T keys Use to increase or decrease displayed values when making settings Keep pressed to...

Page 21: ...t and should not be used with any other electronic equipment or applianc es Do not use any other power cord with this product They could cause electric shock or fire Do not handle the plug with wet ha...

Page 22: ...e printer The recommended or minimum space requirements are as follows A 10 cm 4 inches or more B 5 cm 2 inches or more C 4 cm 1 6 inches or more D 70 cm 27 6 inches or more Permissible and recommende...

Page 23: ...ed space that has poor ventilation you may detect an odd smell To keep the workplace comfortable we recommend you keep it well ventilated Do not place the machine in areas that are exposed to direct s...

Page 24: ...spose of them ac cording to local regulations Do not store toner used toner or toner containers in a place with an open flame The toner might ignite and cause burns or a fire Keep toner used or unused...

Page 25: ...ty However if there is problem con tact the store where they were purchased A Open the front cover of the machine B Take the new toner bottle from the box C Keeping the outer cap in place hold the bot...

Page 26: ...il it is at 90 F Insert the toner bottle Push it in until the green lever clicks If the toner bottle does not click into position pull it slightly back toward you rotate it 10 20 to the right and then...

Page 27: ...Setting Up 27 G Return the lever under the toner bottle to its original position H Close the front cover of the machine...

Page 28: ...et by the manufacturer to accommodate the following types of paper Default settings Tray 1 11 81 2 K Tray 2 81 2 13 L Tray 3 81 2 13 L For details about usable types of paper see p 63 Loading Paper Lo...

Page 29: ...he tray Fan the paper before loading Straighten curled or warped paper before loading Ensure framed and other types of preprinted paper are correctly loaded C Gently push in the paper tray until it st...

Page 30: ...er are correctly loaded C Gently push in the paper tray until it stops Loading Paper in the Large Capacity Tray LCT A Open the top cover of the large capacity tray LCT B Load paper by aligning it with...

Page 31: ...ves down D Load paper by repeating steps B and C The tray can hold up to 4 000 sheets E Close the top cover of the large capacity tray LCT When stacking paper on the left side of the tray align the le...

Page 32: ...mode if you do not use it for a certain period A Open the switch cover and make sure the power is set to cStand by Make sure the power cable is plugged securely into the wall outlet Turn the power St...

Page 33: ...Setting Up 33 Do not switch to standby immediately after turning on the power switch Doing so may result in damage to the hard disk or memory leading to mal function...

Page 34: ...you want to use the display in English the following procedures are unnecessary The default setting is English A Press the Menu key The Menu screen appears B Press the U or T key to display Language...

Page 35: ...Setting Up 35 E Press the Enter key Wait for two seconds The Menu screen appears F Press the Online key The initial screen appears Ready...

Page 36: ...the display B Press the U or T key to display List Test Print and then press the Enter key The menu for selecting the contents to be test printed appears C Press the U or T key to display Config Page...

Page 37: ...Setting Up 37 For details about the configuration page see Interpreting the Configura tion Page Software Guide E Press the Online key The initial screen appears Ready...

Page 38: ...ASE TX connections Before connecting ground yourself to by touching a metal object A Set the machine to Standby mode B A core for the Ethernet cable is supplied with this machine Make a loop at the en...

Page 39: ...ting the Machine 39 Reading the LED Lamps 1 Indicator green Stays lit when the machine is properly connected to the network 2 Indicator yellow Lit if 100 BASE TX is operating Unlit if 10 BASE T is ope...

Page 40: ...feet Rating voltage of the interface connector max DC 5V Follow the procedure below to connect the machine to the host computer using a parallel cable Before connecting the machine and a computer make...

Page 41: ...scissors E Fit the other tie wrap snugly around the end of the ferrite core to prevent the core moving along the cable F Plug the cable into the connector on the machine s interface and the other end...

Page 42: ...a speed equal to that of USB 1 1 is possible For Mac OS Mac OS supports only the standard USB port If USB 2 0 is used with a Mac OS only a speed equal to that of USB 1 1 is possible A Connect the USB...

Page 43: ...an use SmartDeviceMonitor for Admin or a Web browser to make IP ad dress related settings in a TCP IPcapable environment 1 If DHCP is in use the IP address subnet mask and gateway address are all set...

Page 44: ...e U or T key to select Active or Not Active and then press the Enter key About two seconds after the settings are made the screen returns to the ac tive protocol menu To disable the setting select Not...

Page 45: ...eld can then be entered Do not set 011 022 033 044 as the IP address K Press the Enter key The screen changes and the next field can then be entered L Repeat the procedure and then press the Enter key...

Page 46: ...f Auto Select is selected If this happens select the appropri ate frame type Q Press the U or T key to display Frame Type NW and then press the Enter key The current setting appears on the display R P...

Page 47: ...menu and then set IP Address Subnet Mask Gateway Address DHCP Frame Type NW and Active Protocol under the Network Setup menu For details about setting items under Configuring the Printer for the Netwo...

Page 48: ...2 11 Ad hoc or Ad hoc is selected for Comm Mode set the channel to use for transmission Confirm with the network administrator for the channel you want to use To use an IEEE 802 11b card for which the...

Page 49: ...L Press the U or T key to select characters and then press the En ter key You can now enter the next character M Continue entering the key The characters that can be used are ASCII 0x20 0x7e 32 bytes...

Page 50: ...appears The value in brackets at the upper right is the number of characters entered S Press the U or T key to select characters and then press the En ter key You can now enter the next character Cont...

Page 51: ...Escape key T After entering the key press the Enter key After the settings are made the screen returns to the IEEE 802 11b setting menu U Press the Online key The initial screen appears V Print a conf...

Page 52: ...2003 and Windows NT 4 0 you must have an account that has Manage Printers permission Log on as an Administrator Quick Install is not available when using this printer under USB connection If you conn...

Page 53: ...x of the installer and then take out the CD ROM To stop installation of the selected software click Cancel before installa tion is complete Restart the computer and then reinstall the other software o...

Page 54: ...tain operating system setting If this is the case launch Setup exe on the CD ROM root directory C Select an interface language and then click OK D Click Install manuals E Follow the instructions on th...

Page 55: ...feed direction Direction is determined by each paper size Input Paper Sizes Metric version In this manual On the display Paper feed direction L Feed direction A4 210 297 Letter 81 2 11 Short edge feed...

Page 56: ...e set using the control panel There is no dial on the tray The size is supported when the option is attached The size is not supported Input Paper Sizes Inch version 51 2 81 2 L 140 216 81 2 51 2 K 21...

Page 57: ...aper size using the control panel Letter LT L 81 2 11 K 11 81 2 51 2 81 2 L 51 2 81 2 81 2 51 2 K 81 2 51 2 Executive Exec L 71 4 101 2 K 101 2 71 4 A3 L 11 26 16 54 B4 JIS L 10 12 14 33 A4 L 8 26 5 8...

Page 58: ...top of the stack is not higher than the limit mark inside the tray Paper size not supported by both side printing The following paper sizes cannot be printed on both sides B6L Supported paper weight...

Page 59: ...mmended paper contact your sales or service representative Do not use paper that has already been printed onto by other printers Storing Paper Paper should always be stored properly Improperly stored...

Page 60: ...en Thick Paper on the control panel The paper type selected using the printer driver overrides that selected using the control panel Printer driver setup Click Thick in the Type list Enabled paper fee...

Page 61: ...hermal paper aluminum foil carbon paper or conductive paper is heavier or lighter than the limitation embossed perforated has holes windows or cutouts label paper with areas of glue or whose base pape...

Page 62: ...per and Other Media 62 Paper A Print area B Feed direction C Approx 5 mm 0 2 inches D Approx 4 mm 0 16 inches Print area may vary depending on the paper size printer language and printer driver settin...

Page 63: ...r remains in the right stack of Tray 1 the left stack is automat ically shifted to the right While the paper is being moved a message is dis played instructing you to wait Do not pull out the tray dur...

Page 64: ...traighten curled or warped paper before loading Ensure framed and other types of preprinted paper are correctly loaded Specifying the paper type When you load translucent paper or postcards set the pa...

Page 65: ...key to display Paper Type and then press the En ter key The paper tray selection menu appears D Press the U or T key to display the target paper tray and then press the Enter key The paper type selec...

Page 66: ...setting made here is valid until the next setting is made After printing on OHP transparencies or thick paper reset it to the original setting for the next user Loading Paper in Tray 2 and 3 A Pull ou...

Page 67: ...ghten curled or warped paper before loading Ensure framed and other types of preprinted paper are correctly loaded C Gently push the paper tray in until it stops Changing the Paper Size A Make sure th...

Page 68: ...ss the lock button to set them Fan the paper before loading Straighten curled or warped paper before loading Ensure framed and other types of preprinted paper are correctly loaded D Set the paper size...

Page 69: ...y size selected using the printer driver overrides that selected using the control panel A Set the paper size selector knob to the p mark on the left B Press the Menu key The Menu screen appears C Pre...

Page 70: ...ssing and holding increases or decreases in increments of 0 1 inch Holding continuously increases or decreases in increments of 1 inch The screen for entering the length appears H Press the U or T key...

Page 71: ...the large capacity tray LCT B Load the paper in the tray aligning it with the left edge C Press the Down key The key blinks while the bottom plate is moving down D Load paper by repeating steps B and...

Page 72: ...ypass tray load it according to the orientation set on the machine With the RPDL when you load the paper onto the bypass tray load it in the long edge feed direction Select or set the paper size using...

Page 73: ...images or pa per misfeeds might occur C Gently insert paper face up into the bypass tray 1 Extender 2 Paper guides Do not stack paper over the limit mark otherwise a skewed image or mis feeds might oc...

Page 74: ...l When the printer driver is not used make settings using the display panel For printer driver settings see the printer driver Help For details about setting custom paper see p 75 Specifying custom si...

Page 75: ...Specifying the paper type Specifying custom size paper When you load custom size paper onto the bypass tray set the paper size using the control panel Custom size settings set using the printer driver...

Page 76: ...or entering the vertical value appears F Press the U or T key to set the vertical value and then press the Enter key After about two seconds the display returns to the menu G Press the Online key The...

Page 77: ...n menu appears C Press the U or T key to display Paper Type and then press the En ter key The paper tray selection menu appears D Press the U or T key to display Bypass Tray and then press the Enter k...

Page 78: ...Interposer optional Load paper printed side down Load paper in the interposer in the same orientation as paper in the paper tray Staple and punching location is on the left side of the paper when you...

Page 79: ...Paper and Other Media 79 Straighten curled or warped paper before loading Fan the paper before loading Straighten curled or warped paper before loading B Adjust the paper guides to the paper size...

Page 80: ...ocal regulations Do not store toner used toner or toner containers in a place with an open flame The toner might ignite and cause burns or a fire Keep toner used or unused and the toner bottle out of...

Page 81: ...y become increasingly faded so replace the toner bottle as soon as possible When the toner is empty Add Toner appears and printing is no longer possi ble Replacing Toner A Open the front cover of the...

Page 82: ...hake it five or six times with out removing the outer cap E Remove the outer cap Do not remove the inner cap F Place the toner bottle in position then push it in until the green lever clicks Avoid ins...

Page 83: ...Replacing Consumables 83 G Return the lever under the toner bottle to its original position H Close the front cover of the machine...

Page 84: ...a clean dry cloth You must disconnect the plug from the wall outlet at least once a year Clean away any dust and grime from and around the plug and outlet before recon necting Accumulated dust and gr...

Page 85: ...The Menu screen appears B Press the U or T key to display Maintenance and then press the Enter key The maintenance menu appears C Press the U or T key to display Registration and then press the Enter...

Page 86: ...lue F Press the Escape key G Press the U or T key to display Adjustment and then press the Enter key H Press the U or T key to display the adjusting value and then press the Enter key I Press the U or...

Page 87: ...y increases or decreases the value in incre ments of 1 0 mm J Press the Enter key K Press the Escape key The display returns to the print area Adjustment menu L Press the U or T key to display Prt Tes...

Page 88: ...rming up The machine is preparing the development unit Wait a while Energy Save Mode In Energy Saver Mode Level 2 No action required Resetting Job The machine is resetting the print job Wait until Rea...

Page 89: ...e in the communication mode settings Cannot duplex Tray The selected tray is set to 1 sided tray when duplex mode is set Cancel duplex mode Alternatively select another tray using Form Feed or cancel...

Page 90: ...the WEP Key ASCII entry is incor rect Enter the correct WEP key See p 47 IEEE 802 11b Wireless LAN Configuration Error Enter 5 or 13 characters The entered number of characters for the WEP Key ASCII...

Page 91: ...message ap pears again call your service provid er Hardware Problem Wireless Board Access to the IEEE 802 11b board is possible but an error was detected Check the board is installed correct ly If the...

Page 92: ...then remove jammed paper See p 113 Remove Misfeed A U Internal Remove Misfeed B F Internal Paper is jammed in the in ternal paper feed path Open the front cover and remove jammed paper See p 108 Remo...

Page 93: ...oon as possible Replace Transfer Belt It is time to replace the Transfer Belt Call your service provider as soon as possible Replace Waste Toner It is time to replace the waste toner Call your service...

Page 94: ...The Suspend Resume button on the finisher was pressed Press the button again to resume printing Toner is almost empty The printer is almost out of toner Prepare a new toner bottle You can print until...

Page 95: ...l the call light when installed to the printer Doing so may result in damage or malfunction of the call light or the printer The Lamp Status Buzzer Meanings Green light No buzzer Printing Red light Bu...

Page 96: ...int a configuration page there maybe a machine malfunction Contact your sales or service rep resentative See for printing a configuration page Is the interface cable connected se curely to the machine...

Page 97: ...orts tab D In the Print to the following port s list confirm the correct port is selected Windows XP Professional Windows Server 2003 A Click the Start button and then click Printers and Faxes B Click...

Page 98: ...Click the Start button point to Settings and then click Printers B Click the icon of the machine On the File menu click Properties C Click the Ports tab D In the Print to the following port s list co...

Page 99: ...o print as an image See the printer driver Help Strange characters ap pears on the print image You may have not have selected a proper emulation Select Print er Lang in the System menu Images are cut...

Page 100: ...e p 81 Replacing Toner Due to a sudden temperature change condensation may appear inside the printer reducing print quality If this happens do not use the printer until it acclimatizes White streaks a...

Page 101: ...result of PDF Direct Printing characters are missing or appears differ ent Before printing embed the font in the PDF file to be printed The paper size appears on the control panel and print ing is not...

Page 102: ...s Paper has already been printed on See p 59 Paper Recommendations Paper is damp Use paper that has been stored properly See p 59 Paper Recommendations Fan the paper thoroughly before loading Paper ja...

Page 103: ...Replace the unit Con tact your service representative Paper is not fed from the selected tray If you are using a Windows operating system printer driver set tings override those set using the display...

Page 104: ...b Windows 2000 XP Windows 2003 Server In the printer properties dialog box on the Paper Quality tab Advanced Postscript Option Postscript Output Op tion Windows NT 4 0 In the printer properties dialog...

Page 105: ...owest value for Resolution In the printer driver s dialog box on the Print Quality tab in the Print Priority list select Speed To enable Change User Settings select the User Settings check box In the...

Page 106: ...eceived Check the e mail address set for the destination Check the printer s operation history using the Web Image Moni tor s System Log menu in Network If the e mail was sent but not received it is p...

Page 107: ...t notification e mail set with the earlier notification level arrives later e mail will not be sent even if the notification level is changed after When no date information is included in sent e mail...

Page 108: ...toner Be careful not to get toner on your hands or clothes Toner on prints made after removing misfed paper may be loose inadequate ly fused Make a few test prints until smudges no longer appear Do no...

Page 109: ...unterclockwise and remove misfed paper C Return lever B2 to its original position After removing the paper return the lever to its original position If you cannot remove the paper proceed to the follo...

Page 110: ...misfed paper After removing the paper return the lever to its original position If you cannot remove the paper proceed to the following step F Turn fuser unit knob D1 E 11 12 times counterclockwise t...

Page 111: ...3 I Raise lever D4 J Remove the paper being careful not to touch the area around lever D4 After removing the paper return the lever and the unit to their original posi tions If you cannot remove the p...

Page 112: ...he duplex unit fully out L Raise lever E3 M Remove the paper being careful not to touch the area around lever E3 After removing the paper return the lever and the unit to their original posi tions If...

Page 113: ...g it O Remove misfed paper P Return each unit and lever to their original positions and then close the front cover of the machine Remove Misfeed A U Internal A paper jam has occurred in one of the pap...

Page 114: ...Troubleshooting 114 A Open the front cover B Push button A and open the guide plate C Remove misfed paper D Close the guide plate and then close the front cover...

Page 115: ...oubleshooting 115 E Open the top cover F Remove misfed paper G Close the top cover Remove Misfeed Q Interposer A paper jam has occurred in one of the paper trays or the large capacity tray LCT optiona...

Page 116: ...Troubleshooting 116 A Open the interposer s upper cover B Raise the feed roller C Remove misfed paper D Lower the feed roller and then close the interposer s upper cover...

Page 117: ...message persists A Open the finisher s front cover B Lower lever Q1 and then remove misfed paper C If you cannot remove the paper lower Q2 lever and then remove misfed paper D Raise lever Q1 and then...

Page 118: ...nisher A paper jam has occurred in the finisher A Open the front cover B Raise lever R1 and remove misfed paper After removing the paper return the lever to its original position If you cannot remove...

Page 119: ...eed to the following step D Raise lever R3 and remove misfed paper After removing the paper return the lever to its original position If you cannot remove the paper proceed to the following step E Low...

Page 120: ...he following step G Raise lever R6 and then remove misfed paper After removing the paper return the lever to its original position If you cannot remove the paper proceed to the following step H Pull h...

Page 121: ...dge Use one of our cartridges Use of different types of cartridges could result in missing staples or staple jams Be sure to use the appropriate cartridge For details about the finisher see p 135 Opti...

Page 122: ...Troubleshooting 122 C Pull the cartridge gently out of the staple unit D Raise the cover...

Page 123: ...Troubleshooting 123 E Insert the new refill and then lower the cover until it clicks F Pull out the ribbon...

Page 124: ...Troubleshooting 124 G Reinstall the cartridge pushing it into the unit until it clicks H Reinstall the staple unit I Close the finisher s front cover...

Page 125: ...m might have occurred Warped paper may cause repeated staple jams In this case load the paper upside down When removing jammed staples staples might not be ejected the first few times you try to use t...

Page 126: ...Troubleshooting 126 D Pull the cartridge gently out of the staple unit E Push the buttons on either side of the cartridge and open the plate F Remove the jammed staples...

Page 127: ...ubleshooting 127 G Pull the face plate down until it clicks H Reinstall the cartridge pushing it into the unit until it clicks I Push the cartridge down until it clicks J Close the finisher s front co...

Page 128: ...he finisher see p 118 Remove Misfeed R Finisher A Open the finisher s front cover B Release the stopper from the staple waste box and then pull it gently out C Empty the box D Reinstall the staple was...

Page 129: ...e finisher s front cover B Pull out the punch waste box and then remove punch waste C Reinstall the punch waste box If you do not the Empty punch receptacle message remains displayed D Close the front...

Page 130: ...G1267203_v1 00 Copyright 2005 130 Appendix Moving and Transporting the Printer When you move and transport your machine contact the store where it was pur chased or where service is provided...

Page 131: ...Appendix 131 Disposal To dispose of the machine contact the store where it was purchased or where service is provided...

Page 132: ...mend purchasing early or keeping some in stock The actual number of printed pages from a particular toner bottle depends on the type and size of paper you are using contents of print images and printi...

Page 133: ...control of the fusing unit Interface Standard 36 pin printer cable and a parallel port on the host computer IEEE 1284 I F Compatible ECP Nibble USB 2 0 Bidirectional IEEE1284 10Base T 100Base TX IEEE...

Page 134: ...6 without finisher Weight Less than 185 kg without toner Warm up Time Less than 300 seconds 23 C 73 F Paper Capacity 1 Paper weight 60 105 g m2 16 28 lb Memory 384 MB Network Topology Ethernet 10Base...

Page 135: ...20 lb Finisher Shift Tray Paper size A3L B4 JISL A4KL B5 JISKL A5KL 11 17 L 81 2 14 L 81 2 11 KL 51 2 81 2 KL 12 18 L 71 4 101 2KL 8 13L 81 2 13L 81 4 13L 81 4 14L Paper weight 52 216 g m2 14 58 lb S...

Page 136: ...supplied from main unit Dimensions W D H 800 730 980 mm 31 5 28 7 38 6 Weight Approx 65 kg 143 3 lb Booklet Finisher Finisher Upper Tray Paper sizes A3L B4 JISL A4KL B5 JISKL A5KL B6 JISL A6L 11 17 L...

Page 137: ...L 80 g m2 20 lb With mixed sizes 30 sheets A4K A3L B5 JISK B4 JISL 81 2 11 K 11 17 L 80 g m2 20 lb Stack capacity after stapling Non mixed sizes 50 10 sets 10 50 sheets A4K 81 2 11 K 80 g m2 20 lb 50...

Page 138: ...JISK B4 JISL 81 2 11 K 11 17 L 80 g m2 20 lb 50 sheets A4KL B5 JISKL A5KL B6 JISKL 81 2 11 KL 51 2 81 2 KL 80 g m2 20 lb 30 sheets A3L B4 JISL 11 17 L 81 2 14 L 12 18 L 80 g m2 20 lb Stack capacity a...

Page 139: ...ts 11 15 sheets other paper size 80 g m2 20 lb Saddle stitch position Centre 2 position Power consumption Approx 72 W power supplied from main unit Dimensions W D H 700 620 960 mm 27 6 24 5 37 8 Weigh...

Page 140: ...nit Punch unit type 2 4 holes type 2 holes L A3 A5 11 17 51 2 81 2 K A4 A5 81 2 11 51 2 81 2 4 holes L A3 11 17 K A4 81 2 11 4 holes type for Northern Europe 4 holes L A3 B5 JIS 11 17 71 4 10 1 2 K A4...

Page 141: ...ional Paper weight 52 128 g m2 14 34 lb Paper capacity 4 000 sheets 80 g m2 20 lb Power consumption Maximum 50 W power supplied from main unit Dimensions W D H optional unit 314 458 659 mm 12 4 18 25...

Page 142: ...2464 MHz 1 11 channels Metric version 2412 2472 MHz 1 13 channels Transmission Range 1 Mbps 400 m 1 2 Mbps 270 m 1 5 5 Mbps 200 m 1 11 Mbps 140 m 1 1 These figures are a guideline for outdoor use In g...

Page 143: ...at support USB 1 1 For Windows 98 SE Me be sure to install USB Printing Support included on the CD ROM supplied with this machine When USB 2 0 is used under Windows 98 SE Me only a speed equal to that...

Page 144: ...1 Installing the PostScript 3 Printer Driver Windows 95 98 Me NetBEUI 22 Installing the PostScript 3 Printer Driver Windows 95 98 Me IPP 24 Installing the PostScript 3 Printer Driver Windows 2000 TCP...

Page 145: ...rinting after Resetting the Printer 58 Installing the Printer Driver Using USB 59 Windows 98 SE Me USB 59 Windows 2000 USB 61 Windows XP Windows Server 2003 USB 62 Troubleshooting USB 63 Printing with...

Page 146: ...Printing 102 Other Print Operations Printing a PDF File Directly 104 Using DeskTopBinder Lite 104 Installing DeskTopBinder Lite 104 Using Commands 105 Sample Print 106 Printing the First Set 106 Print...

Page 147: ...arameters 167 PDF Menu 169 Changing the PDF menu 169 PDF Menu parameters 169 Language Menu 171 Changing the language menu 171 Language menu parameters 171 Monitoring and Configuring the Printer Using...

Page 148: ...nfig 199 info 200 ipp 200 netware 201 passwd 202 prnlog 203 rendezvous 203 route 205 set 206 show 207 slp 208 smb 208 snmp 209 sntp 212 spoolsw 212 sprint 213 status 213 syslog 214 upnp 214 web 214 wi...

Page 149: ...ng Commands 257 Mac OS Configuration Mac OS 260 Installing the PostScript 3 Printer Driver and PPD File 260 Setting Up PPD Files 261 Creating a Desktop Printer Icon 261 Setting Up Options 262 Installi...

Page 150: ...g a Dial up Router to a Network 290 Using DHCP 290 Configuring the WINS Server 292 Using the Dynamic DNS Function 294 Configuring SSL Encryption 296 SSL Secure Sockets Layer Encryption 296 User Settin...

Page 151: ...ions and dealing with paper jams and error messages Software Guide HTML this manual Provides basic information about installing the printer driver and software us ing the printer in a network environm...

Page 152: ...all applications currently running B Insert the CD ROM into the CD ROM drive The installer starts Auto Run may not work with certain operating system settings If this hap pens launch Setup exe on the...

Page 153: ...ttings If this hap pens launch Setup exe on the CD ROM root directory Select a printer to whose IP address is displayed in Connect To to install SmartDeviceMonitor for Client when using TCP IP Quick I...

Page 154: ...ions can be established through Ethernet IEEE 802 11b and IEEE 1394 IP over 1394 Available ports are determined based on the combination of Windows operating system version and connection method used...

Page 155: ...E 1394 IP over 1394 None Connection Method Available Ports Ethernet IEEE 802 11b SmartDeviceMonitor for Client port Standard TCP IP LPR port IEEE 1394 IP over 1394 SmartDeviceMonitor for Client port S...

Page 156: ...emote printer see p 56 Using as the Net Ware Print Server Remote Printer Local Connection Local connections can be established via parallel USB IEEE 1394 SCSI print and Bluetooth connections Windows o...

Page 157: ...the printer driver for each method of connection For the USB connection see p 59 Installing the Printer Driver Using USB For the parallel connection see p 65 Printing with Parallel Connection For the...

Page 158: ...ettings If this hap pens launch Setup exe on the CD ROM root directory C Select an interface language and then click OK The default interface language is English D Click SmartDeviceMonitor for Client...

Page 159: ...tings If this hap pens launch Setup exe on the CD ROM root directory C Select an interface language and then click OK The default interface language is English D Click PCL RPCS Printer Drivers E The s...

Page 160: ...numeric characters can be entered Neither alphabetic characters nor symbols are available O Select the Default Printer check box to configure the printer as default P Click Finish Installation starts...

Page 161: ...to display the printer settings The details shown in Comment Driver and Port vary depending on the operating system printer model and port I Click Port and then click Add J Click SmartDeviceMonitor an...

Page 162: ...ancel before installa tion is complete A message appears if there is a newer version of the printer driver already installed If there is you cannot install the printer driver using Auto Run If you sti...

Page 163: ...s address If the server authentification is issued to enable SSL a protocol for encrypted communication enter https printer s address printer Internet Explorer 5 01 or a higher version must be instal...

Page 164: ...tall the printer driver use Add Printer See p 77 If a Message Appears during Installation Installing the PostScript 3 Printer Driver Windows 95 98 Me TCP IP A Quit all applications currently running B...

Page 165: ...Search A list of printers using TCP IP appears P Select the printer you want to use and then click OK Only printers that respond to a broadcast from the computer appear To use a printer not listed her...

Page 166: ...box for selecting the printer manufacturer and model name appears G Select the name of the printer whose driver you want to install and then click Next H In the Available ports box click Printer Port...

Page 167: ...er to complete installation A user code can be set after the printer driver installation For information about user code see the printer driver Help Installing the PostScript 3 Printer Driver Windows...

Page 168: ...ox enter http printer s address printer as the printer s address If the server authentification is issued to enable SSL a protocol for encrypted communication enter https printer s address printer Int...

Page 169: ...the CD ROM drive The installer starts Auto Run may not work with certain operating system settings If this hap pens launch Setup exe on the CD ROM root directory C Select an interface language and the...

Page 170: ...r information about user code see the printer driver Help Installing the PostScript 3 Printer Driver Windows 2000 NetBEUI Installing this printer driver requires Administrators permission Log on using...

Page 171: ...path in the format of Computer name Share name Use instead of at the beginning You cannot print using printers beyond routers K Check that the name of the printer whose driver you want to install is s...

Page 172: ...dress If the server authentification is issued to enable SSL a protocol for encrypted communication enter https printer s address printer Internet Explorer 5 01 or a higher version must be installed e...

Page 173: ...mission A Quit all applications currently running B Insert the CD ROM into the CD ROM drive The installer starts Auto Run may not work with certain operating system settings If this hap pens launch Se...

Page 174: ...ser code can be set after the printer driver installation For information about user code see the printer driver Help Installing the PostScript 3 Printer Driver Windows XP Windows Server 2003 IPP Inst...

Page 175: ...Enter a name for identifying the printer in IPP Port Name Use a name dif ferent from the one of any existing port If a name is not specified here the address entered in the Printer URL box becomes the...

Page 176: ...nstalled when the following language is selected Cestina Magyar Polski Portugues Suomi D Click PostScript 3 Printer Driver Add Printer Wizard starts E Click Next F Click Add Port G Click SmartDeviceMo...

Page 177: ...drive The installer starts Auto Run may not work with certain operating system settings If this hap pens launch Setup exe on the CD ROM root directory C Select an interface language and then click OK...

Page 178: ...lt L Specify whether or not to print a test page and then click Finish The printer driver installation starts M Restart the computer to complete installation A user code can be set after the printer d...

Page 179: ...inter in IPP Port Name Use a name dif ferent from the one of any existing port If a name is not specified here the address entered in the Printer URL box becomes the IPP port name K Click Detailed Set...

Page 180: ...t menu B In the Printers window click the icon of the printer you want to use On the File menu click Properties C On the Ports tab click Configure Port The Port Settings dialog box appears Windows XP...

Page 181: ...hen select the Set Recovery Par allel Printing for each port check box D Click OK to close the Extended Features Settings dialog box User proxy and timeout settings can be configured for IPP For infor...

Page 182: ...e agreement appears in the License Agreement dialog box After reading the agreement click I accept the agreement and then click Next F Select a printer driver you want to use in the Printer Program di...

Page 183: ...allation of the selected software click Cancel before installa tion is complete A message appears if there is a newer version of the printer driver already installed If there is you cannot install the...

Page 184: ...ars select RICOH NetworkPrinter Driver C Model K Click Finish in the Add Standard TCP IP Printer Port Wizard dialog box L Check that the name of the printer whose driver you want to install is se lect...

Page 185: ...then click Next G Click Create a new port H Click Standard TCP IP in Create a new Port and then click Next I Click Standard TCP IP and then click OK J Click Next in the Add Standard TCP IP Printer Por...

Page 186: ...Preparing for Printing 43 A user code can be set after the printer driver installation For information about user code see the printer driver Help...

Page 187: ...is English D Click PCL RPCS Printer Drivers E The software license agreement appears in the License Agreement dialog box After reading the agreement click I accept the agreement and then click Next F...

Page 188: ...inter driver use Add Printer See p 77 If a Message Appears during Installation Installing the PostScript 3 Printer Driver Windows 2000 Installing this printer driver requires Administrators permission...

Page 189: ...her or not to print a test page and then click Next O Click Finish The printer driver installation starts A user code can be set after the printer driver installation For information about user code s...

Page 190: ...and then click OK K Check that the name of the printer whose driver you want to install is se lected and then click Next L Change the printer name if you want and then click Next Select the Yes check...

Page 191: ...lick Add Port G Select LPR Port and then click OK H Enter the printer s IP address in the Name or address of server providing lpd box box I Enter lp in the Name of printer or print queue on that serve...

Page 192: ...rinter using the SmartDevice Monitor port Recovery Printing and Parallel Printing cannot be used from the client If you print with a Windows XP or Windows Server 2003 print server notifica tion functi...

Page 193: ...er the printer driver in stallation For information about user code see the printer driver Help O Select the Default Printer check box to configure the printer as default P Click Finish The printer dr...

Page 194: ...se for Printer window I Select the printer you want to use and then click OK J Check the location of the selected printer is shown and then click Next K Change the printer name if you want and then cl...

Page 195: ...Wizard starts E Click Next F Click Network printer and then click Next G Click Next H Double click the computer name you want to use as a print server in the Shared printers window I Select the printe...

Page 196: ...he default interface language is English The printer driver with the selected language will be installed The English printer driver is installed when the following language is selected Cestina Magyar...

Page 197: ...hap pens launch Setup exe on the CD ROM root directory C Select an interface language and then click OK The default interface language is English The printer driver with the selected language will be...

Page 198: ...Preparing for Printing 55 A user code can be set after the printer driver installation For information about user code see the printer driver Help...

Page 199: ...ample Operating system Windows 98 NetWare version 4 1 File server name CAREE Queue name R QUEUE A Insert the CD ROM into the CD ROM drive The installer starts Auto Run may not work with certain operat...

Page 200: ...3 open the printer properties from the Printers and Faxes window Q On the Printer Settings tab clear the Form Feed and Enable Banner check boxes Under Windows 2000 XP Windows Server 2003 or Windows NT...

Page 201: ...Settings tab in the printer properties dialog box Banner Page Do not use NetWare to configure a banner page Follow the procedure below to disable banner pages according to the operating system used U...

Page 202: ...SB port is added to the Printers window A Check that the power of the printer is off B Connect the printer and computer using the USB cable C Turn on the power of the printer The plug and play functio...

Page 203: ...box and then click Browse The Browse for Folder dialog box appears N Insert the CD ROM into the CD ROM drive When Auto Run starts click Exit To disable Auto Run press the Shift key when inserting the...

Page 204: ...and play is enabled and the icon of the printer connected to the USB port is added to the Printers window If the printer driver is not installed follow the plug and play instructions of the printer to...

Page 205: ...2003 USB Installing a printer driver requires Administrators permission Log on using an account that has Administrators permission If the printer driver has already been installed plug and play is en...

Page 206: ...river are stored in the following location RPCS D DRIVESRPCSWIN2K_XP Language DISK1 PCL 5e D DRIVESPCL5EWIN2K_XP Language DISK1 PCL 6 D DRIVESPCL6WIN2K_XP Language DISK1 PostScript 3 D DRIVESPS3WIN2K_...

Page 207: ...l Serial Bus controllers remove any conflicting devices Conflicting devices have a yellow or icon by them Take care not to accidentally remove required devices For details see Windows Help When using...

Page 208: ...ory C Select an interface language and then click OK The default interface language is English D Click PCL RPCS Printer Drivers E The software license agreement appears in the License Agreement dialog...

Page 209: ...g system settings If this hap pens launch Setup exe on the CD ROM root directory C Select an interface language and then click OK The default interface language is English The printer driver with the...

Page 210: ...irectory C Select an interface language and then click OK The default interface language is English The printer driver with the selected language will be installed The English printer driver is instal...

Page 211: ...cted language will be installed The English printer driver is installed when the following language is selected Cestina Magyar Polski Portugues Suomi D Click PostScript 3 Printer Driver Add Printer Wi...

Page 212: ...he selected language will be installed The English printer driver is installed when the following language is selected Cestina Magyar Polski Portugues Suomi D Click PostScript 3 Printer Driver Add Pri...

Page 213: ...alled connecting or disconnecting the optional IEEE 1394 cable causes the printer icon to change Windows 2000 If Found New Hardware Wizard appears every time the computer is started or the cable is co...

Page 214: ...connected If the printer driver has already been installed the printer icon is added to the Printers window In this case printer driver installation is not neces sary If printing does not work proper...

Page 215: ...sconnecting the optional IEEE 1394 cable causes the printer icon to change A Connect the printer and computer using the IEEE 1394 interface cable When the Found New Hardware Wizard dialog box appears...

Page 216: ...r If printing does not work properly after the installation delete the port and reinstall the printer driver For details see Printer Does Not Print Printer Reference If you do not want to install the...

Page 217: ...led in the printer Only one Bluetooth adaptor or Bluetooth equipped computer can be con nected via BIP Only JPEG images that can be printed using BIP User codes are disabled for BIP You cannot print i...

Page 218: ...ck the Ports tab J Under Port select the COMx check box X indicates the COM port num ber used by Bluetooth K Click OK Close the Printers window If a dialog box appears while transmitting a print job r...

Page 219: ...the password entry which is required to trans mit print jobs see p 76 Printing in the Security Mode Printing in the Security Mode A Send the print job to the printer in use Depending on the computer c...

Page 220: ...SWIN2K_XP or D DRIVERSRPCS T4 If the installer starts click Cancel to quit For Windows XP Professional and Windows Server 2003 A On the Start menu click Printers and Faxes B Click Add a printer C Foll...

Page 221: ...orts bidirectional communications and updates the printer status automatically The PCL printer driver supports bidirectional communications You can up date printer status manually The PostScript 3 pri...

Page 222: ...IEEE 1394 and Activate must be selected in the Bidi SCSI print Under Windows 2000 XP or Windows Server 2003 Enable bidirectional sup port must be selected and Enable printer pooling must not be select...

Page 223: ...area and then make the neces sary settings F Select the total amount of the memory in Total Memory when the option al SDRAM module is added G Under Paper source tray settings click and highlight the...

Page 224: ...e C On the File menu click Properties D Make the necessary settings and then click OK With some applications the printer driver settings are not used and the ap plication s own default settings are ap...

Page 225: ...s Making printer default settings the printer properties To change the printer default settings including option configuration settings log on using an account that has Manage Printers permission Memb...

Page 226: ...a specific application To make printer settings for a specific application open the Printing Preferences dialog box from that application The following explains how to make settings for the WordPad ap...

Page 227: ...pears B Click the icon of the printer you want to use C On the File menu click Properties The printer properties dialog box appears D Make the necessary settings and then click OK Settings you make he...

Page 228: ...e the properties displayed in the Print dialog box of an application Settings made here are used as defaults when printing from this application A On the File menu click Print The Print dialog box app...

Page 229: ...ve Full Control permission by default You cannot change the printer default settings for each user Settings made in the printer properties dialog box are applied to all users A On the Start menu point...

Page 230: ...in the following procedure are valid for the current ap plication only General users can change the properties displayed in the Print dialog box of an application Settings made here are used as defaul...

Page 231: ...t settings To make the printer default settings open the printer properties dialog box from the Printers window You cannot change the printer default settings for each user Settings made in the printe...

Page 232: ...es displayed in the Print dialog box of an application Settings made here are used as defaults when printing from this application A On the File menu click Print The Print dialog box appears B Select...

Page 233: ...You cannot change the printer default settings for each user Settings made in the printer properties dialog box are applied to all users A On the Start menu point to Settings and then click Printers T...

Page 234: ...indows XP Windows Server 2003 Accessing the Printer Properties Making printer default settings the printer properties To change the printer default settings including option configuration settings log...

Page 235: ...ettings and then click OK Settings you make here are used as the default settings for all applications For details see Printer Driver Help Making printer settings from an application You can make prin...

Page 236: ...e Full Control permission by default You cannot change the printer default settings for each user Settings made in the printer properties dialog box are applied to all users A On the Start menu point...

Page 237: ...ettings for all applications For details see Printer Driver Help Making printer settings from an application You can make printer settings for a specific application To make printer settings for a spe...

Page 238: ...elect the printer you want to use in the Name list and then click Prop erties The printer properties dialog box appears C Make the necessary settings and then click Apply D Click OK to start printing...

Page 239: ...rinters window appears B Click the icon of the printer you want to use C On the File menu click Properties The printer properties dialog box appears D Make the necessary settings and then click OK E C...

Page 240: ...operties Making printer default settings the printer properties To change the printer default settings including option configuration settings log on using an account that has Manage Printers permissi...

Page 241: ...n You can make printer settings for a specific application To make printer settings for a specific application open the Printing Preferences dialog box from that application The following explains how...

Page 242: ...and Faxes The Printers and Faxes window appears B Click the icon of the printer you want to use C On the File menu click Properties The printer properties dialog box appears D Make the necessary setti...

Page 243: ...or the current ap plication only General users can change the properties displayed in the Print dialog box of an application Settings made here are used as defaults when printing from this application...

Page 244: ...using an account that has Full Control permission Members of the Ad ministrators Server Operators Print Operators and Power Users groups have Full Control permission by default You cannot change the p...

Page 245: ...properties displayed in the Print dialog box of an application Settings made here are used as defaults when printing from this application A On the File menu click Print The Print dialog box appears B...

Page 246: ...e manuals provided with the Mac OS D Configure the settings and then click OK Setting up for printing from an application A Open the file you want to print B On the File menu click Print C Check that...

Page 247: ...available with some versions of DeskTopBinder Lite Use DeskTopBinder Lite installed from the CD ROM provided with this print er PDF Direct Print settings can be made from PDF Direct Print properties T...

Page 248: ...ructions on the display to install DeskTopBinder Lite If you are required to restart the computer after installing DeskTopBinder Lite restart the computer and continue the configuration Using Commands...

Page 249: ...ntrol panel will appear on the display panel However an error message will appear if you try to print or delete those Sam ple Print files You can identify the file you want to print by the user ID and...

Page 250: ...job and then use the control panel to print the remaining sets or delete them p 107 Printing the Remaining Sets p 108 Deleting a Sample Print File Printing the Remaining Sets A Press the Menu key The...

Page 251: ...to display Sample Print and then press the Enter key C Press the U or T key to display the file you want to delete and then press the Enter key D Press the U or T key to display Delete File and then p...

Page 252: ...ogs will be deleted A Press the Menu key The Menu screen appears B Press the U or T key to display Sample Print and then press the Enter key The user ID and the time when the job was stored appear C P...

Page 253: ...isplay panel However an error message will appear if you try to print or delete those Locked Print files Print jobs are not saved on the hard disk in the following cases You can check the error log fo...

Page 254: ...e a command to print The job is saved on the hard disk G Enter the password using the control panel and then specify whether to print or delete the job p 111 Entering a Password p 112 Deleting a Locke...

Page 255: ...screen appears B Press the U or T key to display Locked Print and then press the Enter key C Press the U or T key to display the file you want to delete and then enter the Enter key D Enter the passw...

Page 256: ...e sample print error log until the number of sample print error files reaches 20 If you turn off the power the logs will be deleted A Press the Menu key The Menu screen appears B Press the U or T key...

Page 257: ...s empty or when the paper in the paper tray is not of the same size or form as that specified by the printer driver You can form feed using tray A Press the Form Feed key and then select the paper tra...

Page 258: ...eiving data if the Data In indicator is lit or blinking B Press the Job Reset key The Job Reset screen appears C Select the current job or all jobs including the current job using the U or T key It is...

Page 259: ...work printer print jobs from other users computer cannot be canceled from a client computer When the print job you selected starts printing it takes some time before the print job disappears from the...

Page 260: ...s too short Set a longer period of time for I O Timeout on the Host Interface menu If the print job you want to cancel is not being printed A Double click the printer icon on the desktop A window appe...

Page 261: ...aper by installing the optional finisher Make sure you read the following precautions when using the optional finisher For information about optional finishers see Printer Reference To use the staple...

Page 262: ...stapled individually when printing multiple sets Staple Position The specified staple position varies depending on paper size type quantity and feed orientation The following table shows staple posit...

Page 263: ...application If a collate option is selected in the application printing will not be as intended Be sure to set paper size and orientation in the printer driver when stapling Depending on the software...

Page 264: ...h Position The specified punch position varies depending on paper feed and print data ori entation The following table shows punch positions Punch positions will vary slightly from page to page as hol...

Page 265: ...fixed for punching are specified If there are inconsistencies between the orientation in duplex mode and the punch position When feeding paper from the bypass tray When the punch receptacle has become...

Page 266: ...ngs can be made using telnet or Web Image Monitor Using Web Image Monitor In System on the Cancel menu click Enable in Spool Printing For details see Web Image Monitor Help Using telnet Enter spoolsw...

Page 267: ...same size and orientation as the body of the paper If Auto Tray Select is set as the paper feed tray for the body paper the paper will be delivered from a tray containing paper in the K orientation Th...

Page 268: ...er printed on both sides Front cover printed on one side Blank When printing one side When printing both sides Front Back covers Prints the first and last page of the document as the cover and back co...

Page 269: ...the cover sheets when duplex printing is selected Front cover printed on both sides back cover page face inside and the number of pages is even Front cover printed on both sides back cover page face i...

Page 270: ...rations 127 Front cover printed on one side back cover page face inside and the number of pages is odd Blank When printing one side When printing both sides Slip Sheets Inserting a slip sheet between...

Page 271: ...ray for the body paper the paper will be delivered from a tray containing paper in K orientation Therefore when the cover paper has been set to L orientation the orienta tion of the output cover paper...

Page 272: ...printing methods see the printer driver Help Up to 20 pages can be specified as the front pages of chapters using the print er driver No slip sheets This function is only valid with duplex printing T...

Page 273: ...rom a tray containing paper in K orientation Therefore when the cover paper has been set to L orientation the orien tation of the output cover paper and body paper will be different The same paper fee...

Page 274: ...ion where the tab is not present toner may dirty the back of the paper If there are any inconsistencies between the position of the tab the staple and the punch hole the tab position will be prioritiz...

Page 275: ...Other Print Operations 132 Duplex printing 1200 x 1200 dpi 384 MB standard A6 A5 B5 JIS A4 Letter and Legal sized paper printing is guaranteed A3 and 11 x 17 sized paper can be printed...

Page 276: ...ameters included in each menu Sample Print For details see p 106 Sample Print Locked Print For Details see p 110 Locked Print Paper Input List Test Print Maintenance Menu Bypass Size Tray Paper Size P...

Page 277: ...u Prt Err Report Auto Continue Memory Overflow Copies Printer Lang Sub Paper Size Page Size Edge Edge Print Def Print Lang Duplex Blank Pages Output Tray Job Separation Rotate 180 deg Energy Saver Aut...

Page 278: ...94 Setup appears when the optional IEEE 1394 interface board is installed IEEE 802 11b appears when the optional IEEE 802 11b interface unit is in stalled PCL Menu PS Menu Menu I O Buffer I O Timeout...

Page 279: ...Making Printer Settings Using the Control Panel 136 PDF Menu Language Menu PDF Change PW PDF Group PW Resolution Menu English German French Italian Dutch Swedish Norwegian Danish Spanish Finnish...

Page 280: ...he Menu screen appears B Press the U or T key to display Paper Input and then press the Enter key C Press the U or T key to display Tray Locking and then press the Enter key D Press the U or T key to...

Page 281: ...ameters This section explains about parameters that can be set on the Paper Input menu Bypass Size You can specify the paper size for Bypass tray For details about the size of paper loaded in the bypa...

Page 282: ...Plain Paper Only the installed trays and LCT appear on the display panel Tray Locking If you use various types of paper you can lock a tray to prevent printing on different types of paper such as lett...

Page 283: ...Making Printer Settings Using the Control Panel 140 It is recommended that you load paper of the size and orientation you use most frequently in the tray selected in Tray Priority...

Page 284: ...Letter 8 1 2 x 11 size paper so load them in the same paper tray A Press the Menu key The Menu screen appears B Press the T or U key to display List Test Print and then press the Enter key C Press th...

Page 285: ...options are installed Printer Language The version number of the printer language is displayed Options The options installed are displayed Consumption Status The amount of toner remaining is displayed...

Page 286: ...rmation Interface information is displayed List Test menu parameters This section explains about parameters that can be set on the List Test menu Config P Er Log You can print the configuration page a...

Page 287: ...mp You can print the data sent by the computer using Hex Dump Operations Test Perform a print test to check that paper trays optional trays and the finisher tray s staple and punch functions are opera...

Page 288: ...e Menu key The Menu screen appears B Press the T or U key to display Maintenance and then press the Enter key C Press the T or U key to display HD Format and then press the En ter key D Read the HD fo...

Page 289: ...status can be measured in Infrastructure under Comm Mode of the wireless LAN If Ad hoc or 802 11 Ad hoc is selected in Comm Mode sig nal status cannot be measured To measure signal status select Comm...

Page 290: ...eless LAN setting is reset After about three seconds the initial screen appears Maintenance menu parameters This section explains about parameters that can be set on the Maintenance menu Registration...

Page 291: ...s and settings one at a time Default On Menu Protect This procedure protects menu settings from accidental changes A key oper ation is required to change menu settings In a network environment only ne...

Page 292: ...he wrong password 10 times the file is automatically locked On Off Default Off While the printer is online press the Enter key then press the Es cape key and then press the Menu key You can access Fil...

Page 293: ...nergy Saver Timer A Press the Menu key The Menu screen appears B Press U or T key to display System and then press the Enter key C Press U or T key to display Energy Saver and then press the Enter key...

Page 294: ...s 10 minutes 15 minutes Default Off When set to on and certain errors occur the current job may be canceled and the printer automatically perform the next queued job Memory Overflow You can specify wh...

Page 295: ...e default paper size 8 1 2 14 8 1 2 11 5 1 2 8 1 2 7 1 4 10 1 2 8 13 8 1 2 13 8 1 4 13 A4 210 297 B5 JIS 182 257 A5 148 210 A6 105 148 11 17 A3 297 420 B4 257 364 Custom Size Default Metric version A4...

Page 296: ...tional duplex unit is installed Blank Pages You can specify whether or not to print blank pages Do not print Print Default Print Output Tray You can select the default output tray Fin Upper Tray Fin S...

Page 297: ...or stays lit E Saver Timer You can select the lead time needed to switch to the Energy Saver mode The Energy Saver mode reduces electric power consumption 1 minute 5 minutes 15 minutes 30 minutes 45 m...

Page 298: ...Priority Unit of Measure You can specify the unit of measurement in mm or inch for the custom pa per size mm inch Default value is destination dependant Edge Smoothing You can set whether edge smooth...

Page 299: ...Off On Default Off Spooling temporarily stores a sent print job in the printer and then prints it First pages take longer to print when using spool printing Letterhead Mode You can select the letterhe...

Page 300: ...inter Settings Using the Control Panel 157 On default Off While the printer is online press the Enter key then press the Es cape key and then press the Menu key You can access Email Date from the disp...

Page 301: ...reen appears B Press the U or T key to display Host Interface and then press the Enter key C Press the U or T key to display I O Timeout and then press the Enter key D Press the U or T key to select t...

Page 302: ...20 seconds 25 seconds 60 seconds Default 15 seconds Network Setup You can make network related settings For details see Configuration Printer Reference DHCP You can select On or Off to use DHCP with...

Page 303: ...gateway address cannot be changed To change it set DHCP to off Contact your network administrator for infor mation about the network configuration Default 000 000 000 000 Frame Type NW You can select...

Page 304: ...ngs for wireless LAN This menu appears only when the optional 802 11b interface unit is installed Comm Mode You can select the transmission mode for IEEE 802 11b 802 11 Ad hoc Infrastructure Ad hoc De...

Page 305: ...same SSID is used for the 802 11 ad hoc mode and the infrastructure mode If blank is specified in SSID for 802 11b adhoc mode or adhoc mode ASSID appears An SSID can also be set using Web Image Monito...

Page 306: ...ettings Using the Control Panel 163 Full Speed Auto Default Auto While the printer is online press the Enter key then press the Escape key and then press the Menu key You can access USB Setting from t...

Page 307: ...to display PCL Menu and then press the En ter key C Press the U or T key to display Orientation screen and then press the Enter key D Press the U or T key to select the orientation and then press the...

Page 308: ...DD you can select only fonts downloaded to the hard disk Font Number You can specify the ID of the default font you want to use 0 to 50 Internal 1 to 50 Download Point Size You can specify the point s...

Page 309: ...egal ISO 4 ISO 6 ISO 11 ISO 15 ISO 17 ISO 21 ISO 60 ISO 69 Win 3 0 Default PC 8 Courier Font You can select a courier type font Regular Dark Default Regular Ext A4 Width You can extend the width of th...

Page 310: ...hen press the Enter key C Press the U or T key to display Data Format and then press the Enter key D Press the U or T key to select TBCP and then press the Enter key Wait for two seconds The PS Menu s...

Page 311: ...you use an Ethernet connection the print job is canceled if The printer driver data format is TBCP and the data format selected using the control panel is Binary Data The printer driver data format i...

Page 312: ...Menu and then press the Enter key C Press U or T key to display Resolution and then press the Enter key D Press U or T key to select the resolution and then press the En ter key Wait for two seconds T...

Page 313: ...lt no password set PDF Group PW You can set a group password specified using DeskTopBinder Lite Current PW The password can be set using Web Image Monitor but must be sent through the network For incr...

Page 314: ...Press the U or T key to display Language and then press the En ter key C Press the U or T key to select the language and then press the Enter key Wait for two seconds The Menu screen appears D Press t...

Page 315: ...rations from Web Image Monitor become available Recommended Web browser Windows Internet Explorer 5 5 or higher Netscape Navigator 7 0 or higher Mac OS 8 1 or higher Netscape Navigator 7 0 or higher S...

Page 316: ...r page is divided into the following areas 1 Header area The link to help and dialog box for keyword search appears 2 Menu area The dialog box for switching to the user mode and administrator mode app...

Page 317: ...ing the amount of remaining paper in paper trays and the amount of remaining toner is displayed 2 Job Allows you to display list of Spooled print Job Job History Error Log Locked Print and Sample Prin...

Page 318: ...low to access Web Image Monitor in the administrator mode A On Top Page click Login The dialog box for entering the user name and password appears B Enter your user name and password and then click OK...

Page 319: ...he path to the location of the decompressed file Linking the URL of the Help File to the Help Button You can link the URL of the help file on a computer or Web server to the Help button A Log on to We...

Page 320: ...CP IP IPX SPX NetWare Novell Client for Windows NT 2000 XP Windows Server 2003 TCP IP IPX SPX Windows XP TCP IP IPX SPX Novell Client for Windows NT 2000 XP Windows NT 4 0 TCP IP IPX SPX Client Servic...

Page 321: ...ification e mail to a computer Installing SmartDeviceMonitor for Admin Follow the procedure below to install SmartDeviceMonitor for Admin A Quit all applications currently running B Insert the CD ROM...

Page 322: ...ist of printers using the selected protocol appears Select the protocol of the printer whose configuration you want to change C In the list select a printer whose configuration you want to change D On...

Page 323: ...m page of Web Image Monitor appears F Select Level 1 or Level 2 in the Protect Printer Operation Panel list G Click Apply H Quit Web Image Monitor For details about setting items see Help in the Gener...

Page 324: ...restricted by user codes Starting User Management Tool Follow the procedure below to start User Management Tool A Start SmartDeviceMonitor for Admin B On the Group menu point to Search Device and then...

Page 325: ...Management Tool C On the File menu click Export User Statistics List D Specify the save location and file name and then click Save E Click Finish on the File menu to quit User Management Tool Resetti...

Page 326: ...add new users and set functions applicable to them A Start SmartDeviceMonitor for Admin B Click the Access Control List tab of User Management Tool C On the Edit menu click Add New User D Enter the u...

Page 327: ...t By Group to make the settings for all printers in the selected group and then click On or Off E Quit SmartDeviceMonitor for Admin For details about the setting value for Energy Saver mode see SmartD...

Page 328: ...to check printer status A Start SmartDeviceMonitor for Admin B On the Group menu point to Search Device and then click TCP IP IPX SPX or TCP IP SNMPv3 The status of printers is indicated by icons in t...

Page 329: ...l starts when the network interface board is default Follow the instructions on the screen E Enter the user name and password and then click OK Top Page of Web Image Monitor appears To use the default...

Page 330: ...r Client Options dialog box appears D Click the printer you want to monitor and then select the To Be Monitored check box in the Monitoring Information Settings area To display the printer status in t...

Page 331: ...onitor for Client is interrupted and the network printer cancels the job because something went wrong send the print job again Print jobs sent from another computer do not appear in the print queue wi...

Page 332: ...f Web Image Monitor appears When setting SSL a protocol for encrypted communication under environ ment which server authentification is issued enter https printer s ad dress C Click Login on Top Page...

Page 333: ...to Notify column To make detailed settings for these items click Edit next to Details of E mail Notification Settings C Click Apply D Quit Web Image Monitor On demand E mail Notification A In the menu...

Page 334: ...nter your user name and password To use default account enter admin as user name and leave the password blank C Enter a command D Quit telnet msh logout The configuration message about saving the chan...

Page 335: ...d to restore the default settings so that all access ranges become 0 0 0 0 The access range restricts computers from use of the printer by IP address If you do not need to restrict printing make the s...

Page 336: ...terface_name You can give interface s AutoNet parameter priority Priority settings are available when multiple interfaces are installed ip1394 can be specified only when the IEEE 1394 interface is ins...

Page 337: ...alization msh devicename clear name Reset the printer name to its default dhcp Use the dhcp command to configure DHCP settings View settings The following command displays the current DHCP settings ms...

Page 338: ...tion msh dhcp domainname dhcp static Specify whether to obtain the domain name from the DNS server or use the domain name set by a user To obtain the domain name from the DHCP server specify dhcp To u...

Page 339: ...nd displays current DNS settings msh dns DNS server configuration The following command enables or disables the DNS server address msh dns number server server address The following command displays a...

Page 340: ...ged A records registration msh dns arecord dhcp own dhcp You can specify the method of registering an A record when the dynamic DNS function is enabled and DHCP is used own To register an A record usi...

Page 341: ...11b interface will have the same do main name ip1394 can be specified only when the IEEE 1394 interface is installed wlan can be specified only when the IEEE 802 11b interface is installed Deleting t...

Page 342: ...IP IP address subnet mask broadcast address default gateway address for the printer View settings msh ifconfig Configuration msh ifconfig interface_name parameter address If you did not enter an inter...

Page 343: ...mask and broadcast address are the same as that for the ethernet interface and IEEE 802 11b interface When installing the optional 1394 Interface board set the IP address and sub net mask so that it...

Page 344: ...f User authorization settings are basic and digest Use off to remove a user s authorization If user authorization is specified register a user name You can register up to 10 users IPP user configurati...

Page 345: ...mode rp NDS context name msh netware context SAP interval msh netware sap_interval Setting login mode for file server msh netware login server Setting login mode for NDS tree msh netware login tree S...

Page 346: ...the Network rendezvous Use the rendezvous command to display rendezvous related settings View settings Rendezvous settings are displayed msh rendezvous Current computer name display msh rendezvous cn...

Page 347: ...ndezvous clear cname location cname Reset the computer name The default computer name will be displayed when the computer is restarted location Reset the location information The previous location inf...

Page 348: ...oute add host net destination gateway Adds a host or network route to destination and a gateway address to gateway in the table Specify the IP address to destination and gateway Host becomes the defau...

Page 349: ...when the IEEE 1394 interface is installed msh set protocol When protocol is specified information about TCP IP appletalk netware and smb appears msh set lpr msh set ftp msh set rsh msh set diprint ms...

Page 350: ...down msh set ftp up down msh set rsh up down msh set diprint up down msh set web up down msh set snmp up down msh set ssl up down If Secured Sockets Layer SSL an encryption protocol function is not av...

Page 351: ...TTL value is increased The acceptable TTL value is between 1 and 255 smb Use the smb command to configure or delete the computer or workgroup name for SMB Computer Name settings msh smb comp Set comp...

Page 352: ...p is added you can view settings one by one To display the current community specify its registration number Display msh snmp Community name configuration msh snmp number name community_name You can c...

Page 353: ...number ip addr ipx address You can configure a host address according to the protocol used The network interface board accepts requests only from hosts that have addresses with access types of read on...

Page 354: ...sable SNMP v3 TRAP configuration display msh snmp v3trap msh snmp v3trap 1 5 If a number from 1 5 is entered settings are displayed for that number only Configuring a sending address for SNMP v3 TRAP...

Page 355: ...ress Interval configuration msh sntp interval polling_time You can specify the interval at which the printer synchronizes with the op erator specified NTP server The default is 60 minutes The interval...

Page 356: ...sw lpr on off msh spoolsw ipp on off msh spoolsw smb on off msh spoolsw ftp on off You can specify the settings for diprint lpr ipp and smb sprint Use the sprint command to make settings for IEEE 1394...

Page 357: ...ring web Use the web command to display and configure parameters on Web Image Monitor View Settings msh web URL Configuration You can set URLs linked by clicking URL on Web Image Monitor Specify 1 or...

Page 358: ...nfig View IEEE 802 11b settings msh wiconfig cardinfo If IEEE 802 11b is not working correctly its information is not displayed Configuration msh wiconfig parameter Parameter Value configured mode ap...

Page 359: ...ed by key phrase is overwritten To use this function set the same key num ber and WEP key for all ports that transmit data to each other You can omit the numbers with val The key number is set to 1 wh...

Page 360: ...e the following command to configure a WINS server IP address msh wins interface_name primary secondary IP ad dress auth open shared You can set an authorization mode when us ing WEP The specified val...

Page 361: ...IP Scope ID Selection You can specify the NBT scope ID msh wins interface_name scope scope ID The scope ID can be entered using up to 31 alphanumeric characters Be sure to specify the interface ip139...

Page 362: ...For details see SNMP Setup Tool Help The default community names are public and admin You can get MIB informa tion using these community names Start SNMP Setup Tool Windows 95 98 Me Windows 2000 Windo...

Page 363: ...The machine is initializing or calibrating Call Service Center There is a malfunction in the machine Canceled The job is reset Canceling Job The job is being reset Card Counter not inserted The machi...

Page 364: ...or Memory Switch A memory switch error has occurred Error Optional Font An error has occurred in the font file of the ma chine Error Optional RAM An error has occurred in the optional memory unit Erro...

Page 365: ...ted The machine is waiting for key card or key counter to be inserted Key Counter not inserted The machine is waiting for key counter to be left in it Loading Toner Toner is being supplied Low Black T...

Page 366: ...per of selected size and type Mismatch Paper Type Indicated paper tray does not contain paper of selected type Near Replacing Black PCU Prepare the new black photoconductor unit Near Replacing Color P...

Page 367: ...y The paper feed tray is not correctly set Not Detected Interposer Interposer unit is not correctly set Not Detected LCT A large amount of paper feed tray is not cor rectly set Not Detected Magenta To...

Page 368: ...jammed in the input tray Paper Misfeed Internal Output The paper has jammed inside the machine Paper Misfeed Output Tray The paper has jammed in output tray Paper on Finisher Shift Tray 2 The paper re...

Page 369: ...ace PCU It is time to replace the photoconductor unit Replace Transfer Belt It is time to replace the transfer belt SD Card Authentication failed SD card authentication failed Setting Remotely The RDS...

Page 370: ...scription No ID number of the paper tray Name Name of the paper tray PaperSize Size of paper loaded in the paper tray status Current status of the paper tray Normal Normal NoInputTray No tray PaperEnd...

Page 371: ...o commands see p 200 info Print Log Information This is a record of the most recent 16 jobs printed Use the following command to display print log information UNIX Use the prnlog command and rsh rcp a...

Page 372: ...ot completed normally Canceled An rcp rsh or lpr command print request was canceled possibly due to the printing application Not applicable to the ftp or rprinter command Time Time the print requested...

Page 373: ...tion Soft switch appletalk mode AppleTalk protocol in selection Net Network number Object Macintosh printer name Type Type of printer Zone Name of the zone that the printer belongs to TCP IP mode up m...

Page 374: ...te printer number Print server name Print server name File server name Name of the connect file server Context name Context of print server Switch mode Active mode NDS Bindery this value is fixed Pack...

Page 375: ...face transmitting mode Authentication TX Rate IEEE 802 11b interface speed WEP encryption WEP enabled or disabled Encryption key WEP key IP over 1394 Host name DHCP DHCP on off Address IP address netm...

Page 376: ...lti I F Ethernet ether IEEE 802 11b wlan appears when IEEE 802 11b is se lected IP over 1394 ip1394 appears when IEEE1394 is selected DDNS ether Dynamic DNS function on an Ethernet connection on off w...

Page 377: ...Monitoring and Configuring the Printer 234 v1Trap v2Trap v3Trap SNMPv1v2Remoto Setting SNMPv3 Privacy Shell mode Mode of the remote maintenance tool Item Description...

Page 378: ...ready exists Use another community name add_sess_ipx bad trap addr IPXaddress community community name The IPX address 00 00 00 00 00 00 is un available when the community access type is TRAP Specify...

Page 379: ...Speed of the network 10 Mbps or 100 Mbps Current IP address current IP address The IP address current IP address was re ceived from the dhcp server Current IPX address IPX address Current ipx address...

Page 380: ...OS name with the IP address nbtd start The nbtd service has started available only in the DHCP mode NetBEUI Computer Name computer name The NetBEUI computer name is specified nmsd start NetBEUI The nm...

Page 381: ...uested community name is not de fined session_ipx community name not defined The requested community name is not de fined Set context to NDS context name An NDS context name has been set shutdown sign...

Page 382: ...ied SMTP server name is incor rect An incorrect SMTP server is specified The specified SMTP server IP address could not be found in the DNS server A server other than the SMTP server has been specifie...

Page 383: ...mpt to log in to the network Access to the network was denied Verify that the print server name and password are correct Login to the file server failed The print server is not registered or a passwor...

Page 384: ...o use On the File menu click Properties The printer properties appear C On the Sharing tab click Shared as D To share the printer with users using a different version of Windows click Additional Drive...

Page 385: ...after the spooler pauses briefly When the expansion function is not used the function is automatically set as available Setting a Client A From the Start button on the task bar point to Program point...

Page 386: ...rver This procedure assumes an environment is already prepared for normal Net Ware running the printing service setting The procedure is explained with the following example settings File server s nam...

Page 387: ...Next G Click Bindery mode enter the file server name in the File Server Name box and then click Next In the File Server Name box enter the name of the file server in which a print server is created Yo...

Page 388: ...4 x NetWare 5 5 1 or NetWare 6 0 set it to the NDS mode When using NetWare 5 5 1 or NetWare 6 0 set the printer as a print server A Log on to the file server as a supervisor or supervisor equivalent...

Page 389: ...are applied and NIB Setup Tool quits J Turn the printer off and then on again To check that the configuration is made correctly enter the following from the command prompt F NLIST USER A B If the prin...

Page 390: ...twork connection is established based on the string entered in the File Server Name F box When NDS mode is selected the network connection is established based on the string entered in the NDS Tree bo...

Page 391: ...then click Create H Select the object in which the printer is located and then click Create on the Object menu I In the Class of new object box click Printer and then click OK For Net Ware 5 click Pri...

Page 392: ...ver To start CAREE load pserver print_server_name Setting Up as a Remote Printer NetWare 3 x Follow the procedure below to use the printer as a remote printer under NetWare 3 x Setting up using NIB Se...

Page 393: ...the ENTER key H To create a new print server press the INSERT key and then enter a print server name For a currently defined print server select a print server in the Print Server list Use the same p...

Page 394: ...server by entering the following from the console of the NetWare server If the print server is in operation quit and restart it To quit CAREE unload pserver To start CAREE load pserver print_server_na...

Page 395: ...acters I In the NDS Tree T box enter the NDS tree name and create the file serv er You can also click Browse to browse through available NDS trees and NDS contexts Enter up to 32 alphanumeric characte...

Page 396: ...Select the Define additional properties check box and then click Create L Assign print queues to the created printer Click Assignments and then click Add in the Assignments area M In the Available obj...

Page 397: ...Enter the printer number and then click OK Check the settings and then click OK Use the same printer number specified as the remote printer number using NIB Setup Tool X Start the print server by ent...

Page 398: ...network administrator for the local setting information C To print under Windows 2000 XP Windows Server 2003 or Windows NT 4 0 install Printing service for UNIX as the network application To print und...

Page 399: ...format 192 168 15 16 host NP 192 168 15 16 is the IP address host is the printer s host name and NP is replaced by comments Insert a space or tab between 192 168 15 16 and host between host and NP re...

Page 400: ...NT 4 0 Start Programs Command Prompt Match the data format of the file to be printed with the emulation mode of the printer If the message print requests full appears no print jobs can be accepted Try...

Page 401: ...t name host to print a PostScript file named file 1 or file 2 located in the C PRINT directory the command line is as fol lows c rcp b C PRINT file1 C PRINT file2 host filetype RPS For details about r...

Page 402: ...ples of printing a PostScript file named file 1 in the C PRINT directory and printing file 1 and file 2 ftp put C PRINT file1 filetype RPS ftp mput C PRINT file1 C PRINT file2 E Quit ftp ftp bye _ and...

Page 403: ...File It is necessary to install a printer driver and PPD files to print from a Mac OS Follow the procedure below to install a printer driver and a PPD file into a Mac OS using Mac OS 8 6 and higher Po...

Page 404: ...be PS icon appears at the left of the printer name in the list Follow the procedure on p 262 Setting Up Options to make option settings otherwise close the Chooser dialog box Creating a Desktop Printe...

Page 405: ...If the option you want to select is not displayed PPD files may not be set up correctly To complete the setup check the name of the PPD file dis played in the dialog box Installing the ColorSync Profi...

Page 406: ...particular settings need to be created by Col orSync For details see the appropriate manuals for your computer dis play Installing Adobe Type Manager Quit all applications currently running before in...

Page 407: ...k the Mac OS 8 and 9 folder E Double click the Fonts folder F Double click the Screen font folder G Double click the TrueType or Type1 folder Select the font type you want to use H Copy the fonts you...

Page 408: ...Mac OS supports only the standard USB ports for this printer When printing with a USB connection to a Macintosh computer printer lan guage does not change automatically Use the control panel on this p...

Page 409: ...Mac OS Configuration 266 For information about installing applications required for EtherTalk see the Mac OS manuals...

Page 410: ...below to install a PPD file to print from Mac OS X You need an administrator name and a password phrase For details con sult your network administrator A Insert the CD ROM into the CD ROM drive B Dou...

Page 411: ...er models and then click Add F Close the Printer List dialog box and then quit Print Center When printing with a USB connection to a Macintosh computer printer lan guage does not change automatically...

Page 412: ...r language to Auto Detect or PS before print ing Changing to EtherTalk You need an administrator name and a password phrase For details con sult your network administrator Follow the procedure below t...

Page 413: ...Mac OS Configuration 270 Configuring the Printer Use the control panel to enable AppleTalk The default is active...

Page 414: ...contents of the print images At most the printer can save 30 jobs or 1000 pages for Sample Print and Locked Print If you turn off the power the job saved on the hard disk will be deleted Sample Print...

Page 415: ...al hard disk must be installed on the printer The number of pages the printer can save varies depending on the contents of the print images At most the printer can save 30 jobs or 1000 pages for Sampl...

Page 416: ...this to identify the user associated with the job E After making the necessary settings you want click Print The Locked Print job is sent to the printer F Enter the password using the control panel an...

Page 417: ...tton on the Print Quality tab Black and White Prints everything including color documents in black and white Black and White printing is faster than Color To stop black and white areas being printed w...

Page 418: ...iate CRD for the document you are printing The selected CRD is also referred to when Fine or Super Fine is selected for Color Setting The following items are avail able Auto Photographic Presentation...

Page 419: ...is function to set the Image Rendering mode Photographic Performs dithering in an appropriate form for photographs Text Performs dithering in an appropriate form for text Gray Reproduction Use this fu...

Page 420: ...se steps to install Printer Utility for Mac on the machine A Start the Macintosh B Insert the CD ROM into the CD ROM drive The CD ROM icon appears C Double click the hard disk icon to open it D Double...

Page 421: ...se If you change zones select a name from Available Network Zones Click Choose Printer on the Printer Utility for Mac menu if you want to change the printer D Select the printer you want to use Printe...

Page 422: ...ompletion message appears click OK G Click Cancel Some fonts cannot be downloaded Before downloading read the documentation about the fonts you want to use Displaying Printer Fonts You can display the...

Page 423: ...m the control panel all of the data on the printer hard disk drive is deleted Before initializing be sure to check the data on the hard disk drive Do not turn off the power switch until initializing i...

Page 424: ...nters on the network assign different names so you can identify them If several printers have the same name a digit appears next to the printer name in Chooser You can enter up to 31 digits and letter...

Page 425: ...estart Printer on the File menu B Confirm the message that appears on the screen and then click Restart The printer restarts The fonts downloaded in the printer memory will be deleted If the printer r...

Page 426: ...lk zone list select the zone you changed H In the Select a PostScript Printer list select the printer you want to use I Close the Chooser dialog box Mac OS X A On the Utility menu click Select Zone Th...

Page 427: ...Console is recommended for users with an understanding of PostScript Do not download any file other than PostScript files to the printer Launch Dialogue Console must be used at your own responsibilit...

Page 428: ...users to manage their network print status SmartDeviceMonitor for Client Help 1394 Utility For the optional IEEE 1394 interface unit For details see the Readme file or the manual provided with the op...

Page 429: ...and the PPD files are included on the CD ROM pro vided with this printer PostScript printer drivers allow the computer to com municate with the printer using a printer language PPD files allow the pri...

Page 430: ...ided with Windows 95 98 Me NetWare Client provided with Windows 95 98 Novell Client provided with Windows 95 98 Windows 2000 TCP IP provided with Windows 2000 IPX SPX provided with Windows 2000 NetWar...

Page 431: ...dows 95 98 Me NetWare Client provided with Windows 95 98 Me Novell Client provided with Windows 95 98 Me Windows 2000 TCP IP provided with Windows 2000 IPX SPX provided with Windows 2000 NetBEUI provi...

Page 432: ...monitors multiple printers in use Checks the printer s network settings and detailed information of print ers Enables you to check the print job log using the user ID For Recovery Printing or Paralle...

Page 433: ...nting a configuration page see p 141 Printing a Configuration Page For details about configuring the printer if the router cannot be configured see the instructions below Configuring the printer with...

Page 434: ...interface is IEEE 1394 IP over 1394 Gateway address DNS server address domain name Settings are made for DHCP acquired values that have the highest interface priority If the gateway address is outside...

Page 435: ...ddress is not assigned by a DHCP server automatically a tem porary IP address starting with 169 254 which is not used on the network can be automatically selected by the printer You must change this s...

Page 436: ...ge of Web Image Monitor appears C Click Login The dialog box for entering the user name and password appears D Enter the user name and password and then click OK To use the default account enter admin...

Page 437: ...ting For a static IP setting If the IP address or host name is changed the A and PTR records are updat ed If the A record is registered CNAME is also registered CNAMEs that can be registered are as fo...

Page 438: ...s BIND 8 2 3 or higher For DHCP setup when the DHCP server updates records Microsoft DNS servers with standard Windows 2000 Server Windows Server 2003 features BIND 8 2 3 or higher DNS servers with st...

Page 439: ...ificate using Web Image Monitor B Enabling SSL Enable the SSL TLS setting using Web Image Monitor Configuration flow certificate issued by a certificate authority A Creating the server certificate Cre...

Page 440: ...server certificate for the printer has been installed J Log off from the printer Click Delete to delete the server certificate from the printer Creating the Server Certificate Certificate Issued by a...

Page 441: ...ot send the application Click Cancel Request to cancel the request for the server certificate Installing the Server Certificate Certificate Issued by a Certificate Authority Install the server certifi...

Page 442: ...strator can log on Enter the login user name and login password D Click Cancel then click Security and then click SSL TLS The SSL TLS page appears E Click Enable for SSL TLS F Click Apply The SSL sett...

Page 443: ...Install Certificate Certificate Import Wizard starts C Install the certificate by following the Certificate Import Wizard instruc tions For details about how to install the certificate see the Web bro...

Page 444: ...tions by Auto Run requires administrator permission To install a printer driver by Auto Run log on using an account that has administrator per mission A Quit all applications currently running B Inser...

Page 445: ...folder For PageMaker 6 0 default installation The directory is C PM6 RSRC PPD4 For PageMaker 6 5 default installation The directory is C PM65 RSRC USENGLISH PPD4 The USENGLISH may vary depending on y...

Page 446: ...inter driver is not supported Some RPCS printer driver functions do not work if Windows Terminal Service is installed Limitations The following limitations apply to the Windows Terminal Service enviro...

Page 447: ...rver in a WAN environment over dial up lines such as ISDN printing may not be possible or errors may occur depending on data transfer rates When using MetaFrame XP 1 0 or higher versions we recommend...

Page 448: ...fy merge publish distribute sublicense and or sell copies of the Software and to permit persons to whom the Software is furnished to do so subject to the following conditions The above copyright notic...

Page 449: ...s software developed by the NetBSD Foundation Inc and its contributors D Neither the name of The NetBSD Foundation nor the names of its contributors may be used to endorse or promote products derived...

Page 450: ...sity of California Lawrence Berkeley Laboratory and its contributors This product includes software developed by Christos Zoulas This product includes software developed by Christopher G Demetriou for...

Page 451: ...anty of MERCHANTABILITY or FIT NESS FOR A PARTICULAR PURPOSE See the GNU General Public License for more details You should have received a copy of the GNU General Public License along with this progr...

Reviews: