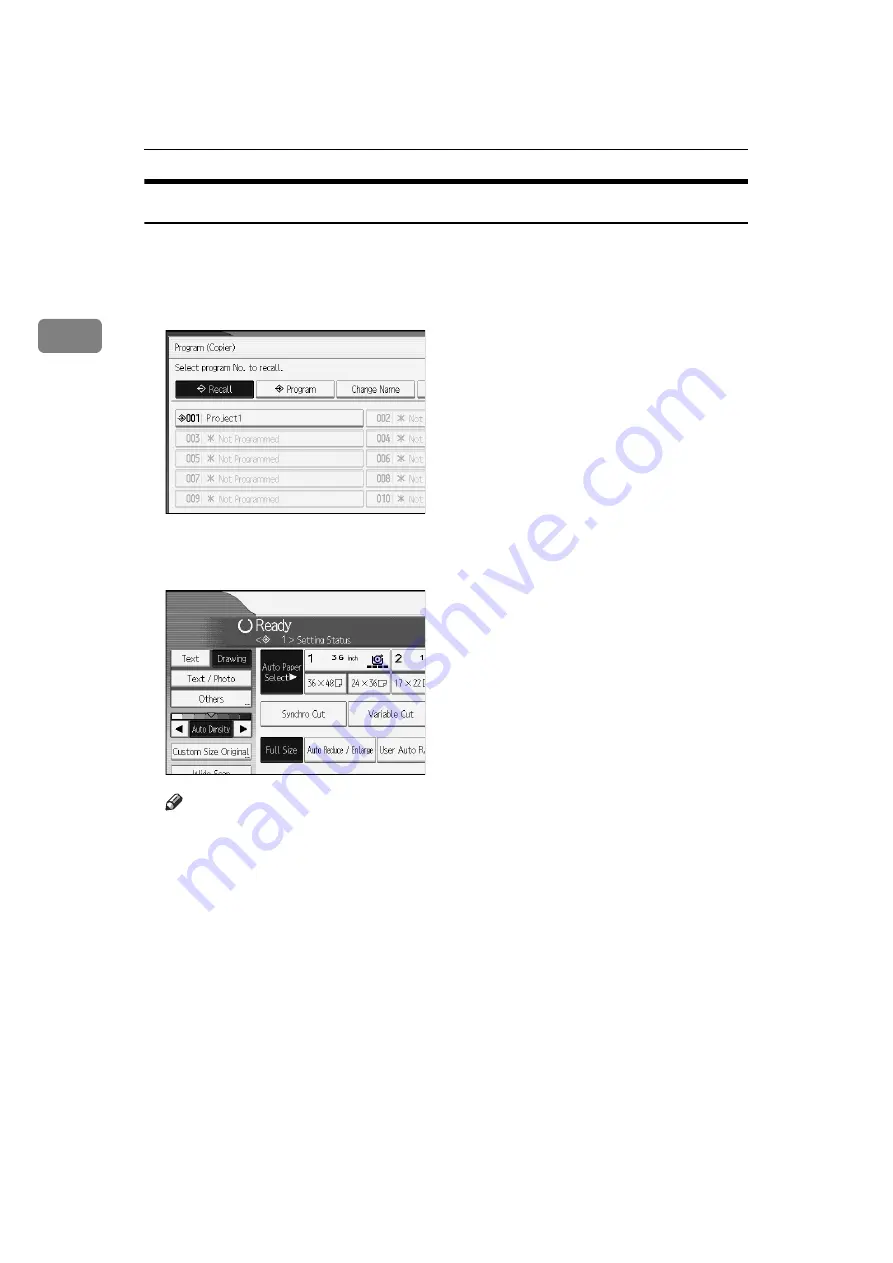
Ricoh GWD2004 Operating Instructions Manual Download Page 146

Copying

128

2

Recalling a Program

Recalls a stored program to make copies using the stored settings.

A

Press the 

{

Program

}

 key.

B

Press 

[

Recall

]

.

C

Press a program number you want to recall.

The stored settings are displayed.

Note

Only programs with 

m

 against them contain a program in step 

C

Summary of Contents for GWD2004

Page 1: ...this manual carefully before you use this machine and keep it handy for future reference For safe and correct use be sure to read the Safety Information in About This Machine before using the machine...

Page 2: ...is not inclusive We assume no responsibility for its completeness or accuracy If you have any questions concerning the legality of copying or printing cer tain items consult with your legal advisor N...

Page 3: ...ns User Tools settings and Address Book procedures such as register ing e mail addresses and user codes Also refer to this manual for explana tions on how to connect the machine Troubleshooting Provid...

Page 4: ...skTopBinder Introduction Guide Auto Document Link Guide Note Manuals provided are specific to machine types For UNIX Supplement please visit our Web site or consult an authorized dealer PostScript3 Su...

Page 5: ...tions Reference See p 3 Functions Requiring Optional Configurations Assembling Copies as Sets in Sequential Order Sort Copies are assembled as sets in sequential order See p 118 Sort Rotate Sort Every...

Page 6: ...om You can change the reproduction ratio in increments of 0 1 See p 61 Zoom Auto Reduce Enlarge The machine selects an appropriate reproduction ratio based on the paper and original sizes you select S...

Page 7: ...ical reproduction ratios individually See p 69 Directional Magnification Directional Magnification inch You can specify the horizontal and vertical lengths of the original and copy image See p 72 Dire...

Page 8: ...mage See p 78 Erase Border Same Width and p 79 Erase Border Different Width Erase Inside Copies the original while erasing a specified area See p 81 Erase Inside Erase Outside Copies the original whil...

Page 9: ...vii Margin Adjustment When Synchro Cut is selected you can create a margin on the copy s leading and trailing edge See p 84 Margin Adjustment ATY052S...

Page 10: ...viii Adjust Print Position Moves shifts the copy image up down left or right to create a margin See p 116 Adjust Print Position ZEDG110E...

Page 11: ...ix Types of Combine Combines several pages onto one side of a sheet See p 76 Combine GCSHVY7E...

Page 12: ...peatedly copies the entire image See p 105 Image Repeat Double Copies One original image is copied twice on one sheet See p 106 Double Copies Positive Negative Copies an image inverted See p 107 Posit...

Page 13: ...of the original See p 108 Partial Copy Mirror Image Copies by reversing the image from left to right as reflected in a mirror See p 110 Mirror Image Format Overlay Combines two images onto one copy Se...

Page 14: ...Prints numbers on the background of copies See p 86 Background Numbering Preset Stamp Preset messages are stamped on copies See p 87 Preset Stamp User Stamp Copies a scanned image as a stamp See p 90...

Page 15: ...xiii Date Stamp Prints dates on copies See p 96 Date Stamp Page Numbering Prints page numbers on copies See p 99 Page Numbering AMG062S CP2G0100...

Page 16: ...ns 3 Display 4 Simplified Display 5 User Tools Menu Copier Document Server Features 6 1 Placing Originals Original and Copy Output Locations 9 Original Output Locations 9 Copy Output Locations 12 Orig...

Page 17: ...Auto Reduce Enlarge 66 Size Magnification 68 Directional Magnification 69 Directional Magnification inch 72 Fine Magnification 74 Combine 76 Erase Border Same Width 78 Erase Border Different Width 79...

Page 18: ...a Stored Document 142 Checking the Details of a Stored Document 143 Searching for a Stored Document 144 Printing a Stored Document 146 Deleting a Stored Document 152 Displaying a Stored Document with...

Page 19: ...g these notes could result in moderate or minor injury or damage to the machine or to property Be sure to read these notes They can be found in the Safety Information section of About This Machine Ind...

Page 20: ...d to as follows Roll Feeder Type 240A Paper roll tray 1 Roll Feeder Type 240B Paper roll tray 2 Paper Cassette Type 240 Cut paper tray Table Type 240 Table Folder FD6500A Folding finisher Terms Long l...

Page 21: ...Cut paper tray Synchro Cut Paper roll tray 1 Paper roll tray 2 Preset Cut Paper roll tray 1 Paper roll tray 2 Cut paper tray Variable Cut Paper roll tray 1 Paper roll tray 2 Fan Fold Folding finisher...

Page 22: ...pearing as cannot be used Initial copy display 1 Use this area to specify the origi nal type original orientation image density level and other settings 2 Displays operational status and messages 3 Di...

Page 23: ...the simplified display Letters and keys are displayed at a larger size making operations easier Example of a simplified display 1 Key Color Press to increase screen contrast This is available only fo...

Page 24: ...the same size in two or more trays the ma chine automatically shifts to the other when the first tray runs out of paper when Auto Paper Select is selected This function is called Auto Tray Switching T...

Page 25: ...ore a format background image for use with Format Overlay You can store up to four formats Margin Adjustment Priority Specify the default setting for the margin size Partial Copy Size Specify the defa...

Page 26: ...ition P 1 P 2 Specify how each of stamp is printed Stamp Position 1 2 Specify how each of stamp is printed Stamp Position 1 1 1 2 Specify how each of stamp is printed Superimpose You can have page num...

Page 27: ...y original and copy output locations before copying Original Output Locations Two types of original output locations are available Original Upper Output This is the basic original output location Orig...

Page 28: ...ch original af ter it is ejected by holding its leading edge Note If the original is larger than A1 D L select original rear output If the original is heavier than 157 g m2 41 8 lb select original rea...

Page 29: ...ations 11 1 Original rear output Originals are ejected onto the original output guides A Remove the upper output stackers B Lower the upper output guide and the original exit switching lever at the ma...

Page 30: ...e lecting upper copy output Lower Copy Output Copies come out to the lower output stacker through the lower output exit and lower output tray at the machine s rear When copying A1 D K or A0 E K select...

Page 31: ...edge of the copied film remove it from the stacker and then place it on a level surface Reference p 3 Functions Requiring Optional Configurations Upper copy output Copies come out between the upper o...

Page 32: ...lower copy output is selected for the copy output location the original in the lower output auxiliary guide may interfere with copy output This may damage originals or cause paper jams In such case se...

Page 33: ...st sheet to be ejected may remain in the out put exit If this happens remove it Do not pull out the lower output auxiliary guide when lower copy output is selected Otherwise copies may not be stacked...

Page 34: ...nals for this machine Metric version JIS Japanese Industrial Standard ISO International Organization for Standardization Where original is placed Original size Original weight Original table Standard...

Page 35: ...sted originals Originals with a damaged leading edge Originals with surfaces that attach to glass easily such as photographs Originals drawn in pencil Reference p 28 Setting the Carrier Sheet Where or...

Page 36: ...projecting parts Thin and soft originals such as translucent paper Bound originals such as books Damp originals Badly curled originals Originals that vary in thickness Originals with sticky tape or a...

Page 37: ...Originals 19 1 Missing Image Area Part of the original may not be copied as shown below full size copying on pa per roll 1 Left and right less than 5 mm 0 2 ABB523S...

Page 38: ...ful not to put the trailing edge into the en trance of the bypass tray This will cause an original jam Note Place originals after any correction fluid or ink has completely dried Not taking this preca...

Page 39: ...original do not try to handle it Support it if necessary so as not to interrupt feeding When copying rolled originals use the lower output auxiliary guide You can change the original feed delay setti...

Page 40: ...Scanner Stop key the original stops immediately which can cause it to jam When this happens see Clearing Misfeeds Troubleshooting When you have set original rear output as the original output location...

Page 41: ...rection When you cannot place the original as the above you may not make copies as you want with particular functions If this happens change the orientation by selecting or The relationship between Or...

Page 42: ...nals 24 1 A Under Original Orientation select an original orientation that is suitable for your original Note It is recommended that you use this function together with Auto Paper Se lect or Preset Re...

Page 43: ...h the number keys and then press q C Enter the vertical size of the original with the number keys and then press q D Press OK Note Paper with a vertical size of 210 15000 mm 8 3 590 5 and a horizontal...

Page 44: ...ustom size original without specifying its horizontal and verti cal sizes If the paper size you want to copy onto is larger than that of the original this function sifts the image to the upper center...

Page 45: ...xi mum width of Wide Scan is 914 mm 36 When originals are scanned and stored in Document Server using this function the stored original size is the paper size of the selected paper tray Depending on t...

Page 46: ...cation is set to original upper output the original may be damaged A Open the carrier sheet with the transparent sheet face up and then insert the original also face up Align the original with the fol...

Page 47: ...e to the front Note Originals of 157 g m2 41 8 lb or heavier cannot be used Setting Rolled Originals When setting rolled originals you can make copies using the lower output aux iliary guide A Pull th...

Page 48: ...D Using both hands carefully insert the original between the original guides copy side down Note Do not apply excessive force to the lower output auxiliary guide Close the lower output auxiliary guide...

Page 49: ...re originals at a time Up to A0 D size originals can be placed on the hangers Attach each of the original hangers to the front of the machine When placing originals space the hangers according to the...

Page 50: ...Placing Originals 32 1...

Page 51: ...the machine accepts copy jobs Ask the administrator for the login user name and password For details see When the Authenti cation Screen is Displayed About This Machine A Make sure Ready appears on th...

Page 52: ...Press Yes to cancel the copy job press No to resume the interrupted copy job To cancel all copy jobs and return the machine to the default condition press the Clear Modes key To clear entered values...

Page 53: ...Basic Procedure 35 2 Check Modes You can confirm the current settings on the screen A Press Check Modes The Check Modes screen appears...

Page 54: ...hat will be stored in the copy out put tray Resetting the original counter Reset the number of scanned originals displayed on the screen A Press Original in the top right corner of the screen The numb...

Page 55: ...al you want to copy face down The original feeds into the machine and copying starts automatically D When copying is complete remove the originals and copies E Press the Interrupt key again The interr...

Page 56: ...t You return to the copy screen After the current copy job the next copy job starts automatically Note You can switch the display to the current copy job by pressing ToCopyingScreen You can switch the...

Page 57: ...t is displayed for each of the functions When Job Order is selected The job list is displayed for all functions in the order of print jobs A Switches between job lists for each function B Switches bet...

Page 58: ...B Select a job whose contents you want to check C Press Details and then check the contents D Press Exit Changing the order of jobs You can change the order of jobs in the job list A Press Job List B...

Page 59: ...re suspended Suspending is displayed at the left of the jobs in the job list that are suspended Note To resume the suspended jobs press Resume Printing This function is available only if Job Order is...

Page 60: ...can view the history and contents of completed print jobs A Press Job List B Press Job History A list of completed print jobs appears C Select a job whose contents you want to check D Press Details an...

Page 61: ...10 12 78 74 can be copied from the bypass tray Insert the paper in the bypass tray lengthwise or sideways to fit it onto the feeding orientation Insert the paper in the bypass tray lengthwise when yo...

Page 62: ...th your hands until it feeds in Do not copy on both sides of the paper Do not use paper already copied or printed on To make multiple copies insert an additional sheet after each feeds in For details...

Page 63: ...en press the q key B Make sure that Regular Size is selected C Press Select Size D Select the paper size E Press OK twice F Place your original and let it be scanned G Adjust the bypass tray s paper g...

Page 64: ...keys and then press q D Enter the vertical size of the paper with the number keys and then press q E Press OK F Place your original and let it be scanned G Adjust the bypass tray s paper guides to the...

Page 65: ...f the paper with the number keys and then press q D Enter the vertical size of the paper with the number keys and then press q E Press Program The confirmation screen appears F Press Exit Recalling th...

Page 66: ...hen press the q key B Select a paper type Translucent Paper or Film in the special paper settings C Set the paper size D Press OK E Place your original and let it be scanned F Adjust the bypass tray s...

Page 67: ...For originals that contain both text and photographs or pictures Photo For photographs or pictures Background Lines For images drawn on section paper green sectioned graph paper without copying the li...

Page 68: ...d Lines Patched Original or Generation Copy select Others first When you select Photo Auto Image Density is automatically canceled When you select Patched Original thick lines text or solid images in...

Page 69: ...oduced Manual image density You can adjust the density of the overall original in seven steps Combined auto and manual image density Adjusts the density of an image only for dark texture originals Aut...

Page 70: ...moves Combined auto and manual image density Adjusts the density of an image only for dark texture originals A Make sure Auto Density is selected When Auto Density is not selected press Auto Density...

Page 71: ...a ratio of 100 Metric version A0K A1KL A2KL A3KL A4K B1 JISK B2 JISKL B3 JISKL B4 JISK Inch version Engineering E 34 44 K D 22 34 KL C 17 22 KL B 11 17 KL A 81 2 11 K 81 2 14 K Architecture E 36 48 K...

Page 72: ...er of the required size in a paper tray Alternatively you can select a suitable magnification ratio for the paper currently loaded in the paper trays After doing one of the above set your original aga...

Page 73: ...is select ed See Auto Paper Select and Auto Reduce Enlarge The default setting for Auto Tray Switching is With Image Rotation You can not use Rotate Copy if this setting is changed to Without Image Ro...

Page 74: ...e minimum cut length is 280 mm 11 and the maximum length is 15000 mm 590 5 for plain paper of 841 mm 34 or 36 or more in width For other paper the maximum length is 3600 mm 141 8 If you specify a leng...

Page 75: ...r 2 Note The preset cut size differs depending on the paper roll width It is cut in the following sizes or standard lengths Metric version Paper roll width Preset K Preset L 841 mm A0K A1L 594 mm A1K...

Page 76: ...set K Preset L 34 inch 34 44K 22 34L 22 inch 22 34K 17 22L 17 inch 17 22K 11 17L 11 inch 11 17K 8 1 2 inch 8 1 2 11K 8 1 2 14K Paper roll width Preset K Preset L 36 inch 914 mm 36 48K 24 36L 30 inch 3...

Page 77: ...ntered A Select Variable Cut B Enter the length with the number keys and then press q C Press OK The entered length is displayed on the screen D Select a paper roll tray Note If you make a mistake pre...

Page 78: ...rgement ratios 141 4 200 0 282 8 400 0 Reduction ratios 25 0 35 4 50 0 70 7 Inch version Engineering Enlargement ratios 129 4 200 0 258 8 400 0 Reduction ratios 25 0 32 4 50 0 64 7 Architecture Enlarg...

Page 79: ...See Reproduction Ratio General Settings Guide For details about the relationship between the original and paper sizes for preset ratios see Magnification Ratio Chart Reference p 156 Supplementary Inf...

Page 80: ...one you want to set from Preset Reduce Enlarge and then press o or n to adjust the ratio A Press Reduce Enlarge B Select a preset ratio which is close to the desired ratio C Adjust the ratio with o or...

Page 81: ...pecifying a ratio with the number keys A Press Reduce Enlarge B Press Number keys C Enter the desired ratio with the number keys and then press q D Press OK twice Note Use the key to enter a decimal p...

Page 82: ...n the paper and original sizes you select This is useful to copy different size originals to the same size paper To ensure the print result you require is produced specify Original Orientation before...

Page 83: ...12 18 KL A 9 12 K Others 81 2 13 K 30 21 L 30 42 K A Press Auto Reduce Enlarge B Select the paper size Note The machine selects one of the following ratios Metric version 400 0 282 8 200 0 141 4 100...

Page 84: ...n select the following combinations Metric version Inch version Original size Copy size A0K A0 A1 A2 A3 A4 B1 JIS B2 JIS B3 JIS B4 JIS A1KL A2KL A3KL A4KL B1 JISK B2 JISKL B3 JISKL B4 JISKL Original s...

Page 85: ...t setting is to copy at the same size full size You can change the combination with Copier Document Server Features in User Tools Make sure the Original Orientation setting matches the actual orientat...

Page 86: ...he original and copy Measure and specify the lengths of the original and copy by comparing A with a A Press Reduce Enlarge B Press Size Magnification C Enter the length of the original with the number...

Page 87: ...1 to 9999 mm 0 1 to 99 9 in 1 mm 0 1 steps Reference p 156 Supplementary Information Directional Magnification Specify the horizontal and vertical reproduction ratios individually Copies can be reduce...

Page 88: ...cify a ratio with the number keys A Press Reduce Enlarge B Press Direct Mag C Press Horizontal D Enter the desired ratio with the number keys and then press q E Press Vertical F Enter the desired rati...

Page 89: ...g C Press n o keys D Press Horizontal E Adjust the ratio using n or o Pressing n or o changes the ratio in increments of 0 1 Pressing and holding down n or o changes it in increments of 1 F Press Vert...

Page 90: ...ged at different reproduction ratios horizontally and vertically A Horizontal original size A mm inch B Vertical original size B mm inch C Horizontal copy size a mm inch D Vertical copy size b mm inch...

Page 91: ...E Enter the vertical size of the original with the number keys and then press q F Enter the vertical size of the copy with the number keys and then press q G Press OK twice Note To change a length in...

Page 92: ...expand or shrink This can result in a mismatch between the size of the original and copy This function uses the measurements of the original and the copy to calculate a ratio to produce copies that a...

Page 93: ...type or exposure to humid conditions see Fine Ratio Adjustment Copier General Settings Guide You can also make these settings in Fine Ratio Adjustment Copier un der System Settings If you specified t...

Page 94: ...this function There are three types of Combine available 1 Sided 2 Pages Combine 1 Side Copies 2 one sided originals to one side of a sheet 1 Sided 4 Pages Combine 1 Side Copies 4 one sided originals...

Page 95: ...image position of Combine Portrait K originals Landscape L originals A Press Combine B Select the number of originals to combine C Select the paper size D Press OK Reference p 156 Supplementary Infor...

Page 96: ...h Erases the edge margin of the original image The default erase border setting is 10 mm 0 4 Important You cannot use the bypass tray with this function A Press Edit Stamp B Press Erase C Press Erase...

Page 97: ...ess n and o to set a new value For details about the scan size limitations when using Erase Border togeth er with the other functions see Scan Size Limitations by Function Reference p 156 Supplementar...

Page 98: ...0 1 Pressing and holding down the relevant key changes the width in increments of 10 mm 1 F Press OK twice Note To change the value entered in step E press n and o to set a new value For details about...

Page 99: ...use the bypass tray with this function To specify the area you want to erase you have to define the value of X1 Y1 X2 and Y2 on the original Measure the area you want to specify before entering the a...

Page 100: ...ss OK F To specify multiple areas specify areas 1 to 5 and then repeat steps D to E G Press OK Note When using this function with magnification the actual size will be the specified value multiplied b...

Page 101: ...area Important You cannot use the bypass tray with this function To specify the area you want to erase you have to define the value of X1 Y1 X2 and Y2 on the original Measure the area you want to spec...

Page 102: ...and then press OK F Press OK Note When using this function with magnification the actual size will be the specified value multiplied by the reproduction ratio Reference p 162 Scan Size Limitations by...

Page 103: ...C Press Top Margin or Bottom Margin D Use o or n to specify the margin and then press OK Synchro Cut is automatically selected Note You can specify the margin from 0 to 200 mm 7 9 in 1 mm 0 1 incre m...

Page 104: ...rt the same numbers are printed on each set of copies helping you keep track of confidential documents Important You cannot use the bypass tray with this function A Press Edit Stamp B Press Stamp C Pr...

Page 105: ...lementary Information p 162 Scan Size Limitations by Function Stamp General Settings Guide Preset Stamp Preset messages are stamped on copies The following eight messages are available for Preset Stam...

Page 106: ...tation The stamp positions differ according to the orientation in which you place your originals A Press Edit Stamp B Press Stamp C Press Preset Stamp D Select the desired message You can change the p...

Page 107: ...change the priority of the selected stamp Reference p 156 Supplementary Information p 162 Scan Size Limitations by Function Stamp General Settings Guide Changing the stamp position size and density C...

Page 108: ...ered Important You have to register a user stamp before using this function You cannot use the bypass tray with this function Only one message can be stamped each time Stamp position and original orie...

Page 109: ...ess OK G Press OK Note You can combine this function with up to four other stamp functions Up to four user stamps can be registered When User Stamp is selected it may take longer to print the first co...

Page 110: ...pying 92 2 Changing the stamp position Changes the stamp position A Press Edit Stamp B Press Stamp C Press User Stamp D Press Change under Stamp Position E Select the desired position and then press O...

Page 111: ...7 wide and 10 432 mm 0 4 17 0 high However if the value exceeds the maximum value of the area 5 000 mm2 7 75 inch2 it is corrected within the range of the area automatically 1 Base point 2 Original fe...

Page 112: ...ginal for user stamp on the original table K Press Start Scanning The original will be scanned and the stamp will be registered L Press Exit M Press Exit The display returns to the User Tools Counter...

Page 113: ...Counter key B Press Copier Document Server Features C Press Stamp D Press User Stamp E Press Program Delete Stamp F Press Delete and then press the stamp number you want to delete G Select Yes and the...

Page 114: ...ot use the bypass tray with this function You can select from the following formats MM DD YYYY MM DD YYYY DD MM YYYY DD MM YYYY YYYY MM DD Stamp position and original orientation The date stamp positi...

Page 115: ...d position of the date to be stamped E Press All Pages or 1st Page Only to select the print page F After making all settings press OK G Press OK Note You can combine this function with up to four othe...

Page 116: ...tamp C Press Date Stamp D Press Change Format under Current Date E Select the date format and then press OK Changing the stamp position Changes the stamp position A Press Edit Stamp B Press Stamp C Pr...

Page 117: ...ortant You cannot use the bypass tray with this function There are six types of page numbering available P1 P2 1 5 2 5 1 2 P 1 P 2 1 2 1 1 1 2 Stamp position and original orientation The page stamp po...

Page 118: ...can specify the position and pages to be stamped and numbering E After making all settings press OK F Press OK Note You can combine this function with up to four other stamp functions Reference p 156...

Page 119: ...n and then press OK Specifying the first printing page and start number P1 P2 1 2 P 1 P 2 1 2 Explains the example when P1 P2 is selected The steps are the same for other cases A Press Edit Stamp B Pr...

Page 120: ...press q If you want to number all pages to the end press to the End H When page designation is complete press OK I Press OK twice Note To change the numbers entered in steps E G press Clear and then...

Page 121: ...example if Total Pages is ten if you want to print up to seven pages and do not want to print from page 8 on enter 7 for Last Number Normally you do not need to enter the number H Press Total Pages e...

Page 122: ...mber keys and then press q F Press First Chapter No enter the chapter number from which to start num bering with the number keys and then press q G Press First Printing Number enter the page number fr...

Page 123: ...l size copy paper size and reproduction ratio For example you can copy eight A4 A images to one sheet of A1 D size paper A Press Edit Stamp B Press Edit Image C Press Image Repeat D Press OK E Select...

Page 124: ...mitations by Function Edit General Settings Guide Double Copies One original image is copied twice on one copy as shown Important You cannot use the bypass tray with this function A Press Edit Stamp B...

Page 125: ...as the original When using Reduce Enlarge consider the magnification ratio when selecting the paper size Reference p 156 Supplementary Information p 162 Scan Size Limitations by Function Edit General...

Page 126: ...ous copies image density may deteriorate Reference p 162 Scan Size Limitations by Function Partial Copy Use this function to copy only a specified portion of the original A Press Edit Stamp B Press Ed...

Page 127: ...eys G Press q H Press OK twice Note To change the value press Clear and then enter a new value The copy size Y2 should be at least 210 mm 8 3 The maximum length of copy sizes Y1 Y2 is 15000 mm 590 6 I...

Page 128: ...irror Image Copies by reversing the image from left to right as reflected in a mirror A Press Edit Stamp B Press Edit Image C Press Mirror Image D Press OK Reference p 162 Scan Size Limitations by Fun...

Page 129: ...t You cannot use the bypass tray with this function There are two types of Format Overlay available Format Overlay Combines two images onto one copy using the first original as the background Programm...

Page 130: ...s Format Overlay E Make the necessary settings F Place the first original and let it be scanned G Place the second original and let it be scanned The machine makes a composite copy of the first and se...

Page 131: ...ed Format Overlay E Select a stored format number F Make the necessary settings G Place your original and let it be scanned The machine makes a copy overlaying the scanned original onto the stored for...

Page 132: ...nnot store long length originals A Make sure the machine is ready to copy B Press the User Tools Counter key C Press Copier Document Server Features D Press Edit and then press Program Delete Format E...

Page 133: ...Format E Select a format number you want to overwrite F Press Yes Press Stop if you do not want to overwrite the existing format G Select the original orientation H Place the original and then press S...

Page 134: ...o move shift the copy image up down left or right to create a margin You can also shift in a combination of up down and left right You can select the following types of margin for this function Top sh...

Page 135: ...tion B Use or to specify the horizontal position C Use or to specify the vertical position D Press OK Note The default setting is Bottom 20 mm 0 8 and Right 20 mm 0 8 Reference p 156 Supplementary Inf...

Page 136: ...with same size and type paper but in different orientation KL are required You cannot use the bypass tray with Rotate Sort Sort Copies are assembled as sets in sequential order Rotate Sort Every othe...

Page 137: ...y select Press Start Key under Feed Start Method in Sys tem Settings You cannot make sample copy when Auto is selected To confirm the type of finishing press the Sample Copy key in step G To cancel So...

Page 138: ...t Sort or Rotate Sort and any other necessary functions and then place the originals B Press the Sample Copy key One copy set is delivered as a sample C If the sample is acceptable press Continue The...

Page 139: ...press the Clear Stop key B Press Change Quantity C Enter the number of copy sets with the number keys and then press the q key D Press Continue Copying starts again Note The number of sets you can en...

Page 140: ...40 170 210 or 297 mm 81 2 9 11 and 12 When 81 2inch Margin Fold is selected paper is folded so as to have a binding margin For details about the Fold function see the manuals for your folding finisher...

Page 141: ...ry and print them as you want Important Data stored in the machine might be lost if some kind of failure occurs The manufacturer shall not be responsible for any damage that might result from the loss...

Page 142: ...r which the stored data is deleted automatically For details about changing settings see Admin istrator Tools General Settings Guide To check if the document has been stored press the Document Server...

Page 143: ...Defaults in Initial Display Paper settings are stored based on paper size So if you place more than one paper tray of the same size the paper tray prioritized with User Tools Sys tem Settings will be...

Page 144: ...en showing the program number fol lowed by the program name The screen returns to the initial copy display af ter a short time Note Program numbers with m against them already have settings made for t...

Page 145: ...ial copy display af ter a short time Note When you want to check the contents of a program recall the program When it is overwritten the previous program is deleted Reference p 128 Recalling a Program...

Page 146: ...a stored program to make copies using the stored settings A Press the Program key B Press Recall C Press a program number you want to recall The stored settings are displayed Note Only programs with m...

Page 147: ...Print Position Copy Output Location Fold Type paper cut method and the number of copies A Specify scan settings and any other settings you require in the initial display B Press the Program key C Pres...

Page 148: ...Copying 130 2...

Page 149: ...r Functions Storing method Personal computer List display Available Printing Available Transmission Unavailable Scanner Functions Storing method Scanner List display Unavailable When documents are sto...

Page 150: ...ays keys for the operation 5 Displays an icon that indicates the function used to stored the document 6 Displays keys for switching the dis play between list and thumbnails In thumbnail view miniature...

Page 151: ...ial display to the simplified display Letters and keys are displayed at a larger size making operations easier Example of a simplified display 1 Key Color Press to increase screen contrast This is ava...

Page 152: ...nfirming contents of the scanned documents Preview display 1 Moves the display area in the direction indicated by the arrow 2 Zoom Out Zoom In Scales the displayed page down or up 3 Exit Closes the pr...

Page 153: ...review is already selected from another function the preview dis play function may become unusable The preview display is also not available when the paper size is larger than A2 C Reference Displayin...

Page 154: ...ose who don t know the password After the operation be sure to press the Clear Modes key to cancel the selected state of the document User names registered to the stored documents of the Document Serv...

Page 155: ...the name will be automatically set D Specify the original scanning conditions E Place the original The original feeds into the machine automatically If Press Start Key is selected for Feed Start Meth...

Page 156: ...for Auto Delete File in Document Server before storing the document If you specify On for Auto Delete File in Document Server after that Auto Delete File in Document Server will be enabled for the doc...

Page 157: ...Name The user name input screen will appear C Select the user name and then press OK Registering or changing a user name When using a user name not registered to the Address Book Following describes...

Page 158: ...inal B Press User Name C Enter the user name and then press OK Changing a file name Following describes the procedure for changing a name to be attached to a stored document A Press Scan Original B Pr...

Page 159: ...ure for setting or changing a password to be at tached to a stored document A Press Scan Original B Press Password C Enter the password with the number keys and then press OK You can use four to eight...

Page 160: ...name or password is to be changed When a password is set enter it and then press OK C Press File Management D Press Change User Name Change File Name or Change Password E From the respective change sc...

Page 161: ...red document A Press the Document Server key B Select the document whose details are to be displayed When a password is set enter it and then press OK C Press Details Details of the document will be d...

Page 162: ...r Lite enables to search and reorder stored docu ments from computers For details about DeskTopBinder Lite see Instruction Manual and Help of DeskTopBinder Lite Reference Instruction Manual and Help o...

Page 163: ...ered user name select the user name When using a not registered user name proceed to the next step D When the user name is not registered press Manual Entry and then enter the user name from the input...

Page 164: ...inting two or more documents at a time repeat the operation in step B Up to 30 documents can be selected D When specifying printing conditions press To Printing Screen The printing condition screen wi...

Page 165: ...tings are available for the printing conditions For respective printing results see Copier Functions Reduce Enlarge Zoom Fine Magnification Auto Reduce Enlarge Stamp Background Numbering Preset Stamp...

Page 166: ...ob A Press the Clear Stop key B Press Stop Changing the number of print copies while printing is in progress Following describes the procedure for changing the number of print copies after printing is...

Page 167: ...check the printing order of the selected documents and the printing conditions Important This feature is enabled when the sort function is selected in the printing conditions A Select the document to...

Page 168: ...ct the document to be printed confirmed When a password is set enter it and then press OK B Press Print Specified Page C Press 1st Page D Press the Start key Printing a specified page You canprinta sp...

Page 169: ...cument selected on the Select File screen A Select the document to be printed When a password is set enter it and then press OK B Press Print Specified Page C Press Specify Range D Specify the printin...

Page 170: ...le to select two or more documents and delete them You can search the target document using File Name or User Name situat ed in the left side of the screen In the display order field you can sort the...

Page 171: ...hine to the address The top page of Web Image Monitor will be displayed C Click Document Server The list of documents in the Document Server will be displayed D Click of the document you want to confi...

Page 172: ...Converter A Start a Web browser B Enter http IPv4 address of this machine to the address The top page of Web Image Monitor will be displayed C Click Document Server The list of documents in the Docum...

Page 173: ...d first will be the mode you are working in These functions cannot be used together The function selected second will be the mode you are working in 1 When there is no appropriate preset cut size pape...

Page 174: ...tart When Auto Paper Select is selected copying may take slightly longer since the machine selects the copy paper after scanning the original Preset Reduce Enlarge The reproduction ratios you can spec...

Page 175: ...production ratios you can specify are 25 0 400 0 You can select a ratio regardless of original or paper size or paper roll cut method With certain ratios parts of the image might not be copied or mar...

Page 176: ...f the calculated ratio is under the minimum ratio it is automatically ad justed to within available range However with some ratios parts of the image might not be copied You cannot use custom size pap...

Page 177: ...e parts of the stamp might not be printed When you set the stamp position to Bottom Left Bottom Center or Bottom Right and then use Rotate Sort or Rotate Copy the stamp posi tion may shift User Stamp...

Page 178: ...You can use Format Overlay for paper sizes up to A0 E When scanning a format background original the output image may be blurred If this happens copy the format and then use it as the background orig...

Page 179: ...be scanned for Sort and Rotate Sort is as follows A0 E 100 sheets A1 D 100 sheets A2 C 200 sheets A3 B 400 sheets You can use the following paper sizes with Rotate Sort Metric version 420 mm 297 mm A3...

Page 180: ...0 E or smaller 5 locations Erase Erase Outside A0 E or smaller Erase Erase Border A0 E or smaller Erase Erase Inside Erase Border and Format Overlay Combinations A0 E or smaller Erase Erase Outside an...

Page 181: ...Settings Record Sheet 163 4 Settings Record Sheet Program Record Sheet Print this sheet to keep a record of your program settings AHD014S...

Page 182: ...Appendix 164 4 Stored Format Record Sheet Print this sheet to keep a record of your format settings AHD015S...

Page 183: ...Settings Record Sheet 165 4 User Stamp Record Sheet Print this sheet to keep a record of your user stamps ATY031S...

Page 184: ...py size B1 JIS B2 JIS B3 JIS B4 JIS Original size B1 JIS 100 0 70 7 50 0 35 4 B2 JIS 141 4 100 0 70 7 50 0 B3 JIS 200 0 141 4 100 0 70 7 B4 JIS 282 8 200 0 141 4 100 0 Copy size E D C B A Original siz...

Page 185: ...n Architecture Width Length mm A0 841 1189 A1 594 841 A2 420 594 A3 297 420 A4 210 297 B1 JIS 728 1030 B2 JIS 515 728 B3 JIS 364 515 B4 JIS 257 364 B1 ISO 707 1000 Width Length inches E 34 44 D 22 34...

Page 186: ...rom the bypass tray 43 Copying onto special paper 48 Copy output location 9 12 Copy paper 53 Custom size original 25 26 Custom size paper 46 47 Cut paper tray 2 3 D Date format 98 Date Stamp xii 96 15...

Page 187: ...riginal Switching lever 29 Original table 20 Original upper output 9 Overwriting a stored format 115 P Page Numbering xii 99 101 156 Paper roll tray 2 3 Partial Copy x 108 Password 141 142 Patched Ori...

Page 188: ...Sort iii 118 156 Specifying the ratio 62 71 Stamp 6 Stamp density 89 Stamp position 87 89 90 92 96 98 99 101 Stamp size 89 Storing a format 114 Storing a program 125 Storing data 123 136 Supplementary...

Page 189: ...achine uses the following symbols for the anti humidity heater switch a means POWER ON b means POWER OFF Trademarks Acrobat is a registered trademark of Adobe Systems Incorporated Other product names...

Page 190: ...Operating Instructions Copy Document Server Reference Type for 2404WD GWD2004 LW324 Aficio MP W2400 Type for 2406WD GWD2006 LW326 Aficio MP W3600 EN USA B286 7607...

Reviews: