background image

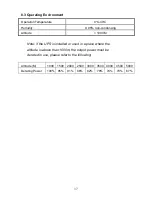
8.3 Operating Environment 

Operation Temperature 

0

°

C-40

°

Humidity 

0- 95% non-condensing 

Altitude 

< 1000 M 


Note: if the UPS is installed or used in a place where the 

altitude is above than 1000m, the output power must be 

derated in use, please refer to the following: 


Altitude (M) 

1000  1500  2000  2500  3000  3500  4000  4500  5000 

Derating Power 

100%  95% 

91% 

86% 

82% 

78% 

74% 

70% 

67% 


37 

Summary of Contents for RP-UPH104T

Page 1: ...USER S MANUAL On Line 6K 10KVA Uninterruptible Power Supply...

Page 2: ...NTENTS 1 Safety Instructions 1 2 Introduction 4 3 System Description 5 4 Connection and Installation 8 5 UPS Operation 15 6 Trouble Shooting Guide 27 7 Communication Port 33 8 Product Specification 35...

Page 3: ...e of at least two hours Do not install the UPS system near water or in damp environments Do not install the UPS system where it would be exposed to direct sunlight or near heat Do not block off ventil...

Page 4: ...PS system The UPS operates with hazardous voltages Only qualified maintenance personnel may carry out repairs 1 5 Maintenance servicing and faults The UPS system operates with hazardous voltages Only...

Page 5: ...have a high short circuit current Please take the precautionary measures specified below and any other measures necessary when working with batteries remove wristwatches rings and other metal objects...

Page 6: ...e inverter On the basis of this DC voltage the inverter generates a sinusoidal AC voltage which permanently supplies the loads Computers and periphery are thus powered entirely by the mains voltage In...

Page 7: ...e to select upward the UPS status on LCD Display 3 Down key Use to select downward the UPS status on LCD Display Beside press it simultaneously with the Up key to switch off the UPS 4 Enter Key It is...

Page 8: ...ly 3 2 Front panel description for LED module 1 Line LED green To indicate the AC power is applied to the UPS input In case this LED blinks it means the main AC source is out of tolerance 2 Bypass LED...

Page 9: ...of the batteries LEDs light up to indicate the following information No 9 LED 0 25 battery low level No 8 9LEDs 26 50 No 6 7 8 9 LEDs 76 95 No 7 8 9 LEDs 51 75 No 5 6 7 8 9 LEDs 96 100 10 Fault LED r...

Page 10: ...the carrier and dealer immediately if there is any damage or lacking of some parts 4 2 Input and output power cords and protective earth ground installation 1 Notes for installation a The UPS must be...

Page 11: ...wire or other insulated wire which complies with AWG Standard for the UPS input and output wirings e For 10K L it is recommended to select the UL1015 8AWG 10mm2 wire or other insulated wire which com...

Page 12: ...t the load with the UPS please turn off all the loads first then perform the connection and finally turn on the loads one by one k No matter the UPS is connected to the utility power or not the output...

Page 13: ...ted by 10AWG 6mm2 If the UPS is used in parallel mode the Jumper between JP1 and JP2 must be removed 4 3 Procedure for connecting the long backup time UPS with the external battery 1 The nominal DC vo...

Page 14: ...in OFF position and connect the 20 pieces of batteries in series c Must connect the external battery cable to the battery first The positive pole of the battery is connected to the UPS in parallel wi...

Page 15: ...UPS number that the total load needs X represents the redundant UPS number i e the fault UPS number that the system can handle simultaneously The bigger the X is the higher reliability of the power sy...

Page 16: ...quirement of the output wiring is as follows When the distance between the UPSs in parallel and the breaker panel is less than 20 meters the difference between the wires of input output of the UPSs is...

Page 17: ...ight up immediately to display first the main menu of greeting context and the Normal LED is blinking to indicate ready to switch on the inverter 2 By pressing the Enter key and the Down key simultane...

Page 18: ...5 3 LCD display menu Use Up Down key to select menu displays of the LCD described below This screen will refresh once the system power is enabled Rated Spec Status Voltage Frequency 17...

Page 19: ...Battery Status Output Power Temperature History Record 18...

Page 20: ...o protect the load the function of bypass auto transfer is activated only when the AC main voltage is within the range of LO low and HI high In this screen press Enter key to enter the following steps...

Page 21: ...ate the output voltage and frequency newly selected C Use Up or Down key to adjust the output voltage 220V 230V and 240V Press Enter key to confirm voltage and then the cursor will move to frequency s...

Page 22: ...light up immediately to indicate ready to switch on the inverter In case this LED blinks it means the main AC source is out of tolerance 2 Press both of the Control Key and the ON TEST MUTE key simul...

Page 23: ...en JP1 and JP2 d Turn off UPS system when all UPS work at bypass model please take apart every UPS repaired board turn all UPS repaired switches from UPS to BPS and then turn off all UPS input switch...

Page 24: ...model and measure the voltage difference of every UPS ports JP2 j Turn off all UPS take apart maintain board of all UPS unless they all have turned to bypass mode Turn all the maintain switches from...

Page 25: ...Take apart UPS parallel cover and combine line when the UPS have to remove then lock up the cover of parallel ports again g Shut input line switch of leaving UPS system turn maintain switch from BPS t...

Page 26: ...is dependent on the external battery pack capacity and the load level as well as other factors The backup time of standard model may vary from different models and load level Please refer to the foll...

Page 27: ...charged every 2 months The standard charging time should be at least 12 hours Under normal conditions the battery life lasts 3 to 5 years In case if the battery is found not in good condition earlier...

Page 28: ...nd negative of the battery electrode otherwise it may result in electric shock or fire Make sure that there is no voltage before touching the batteries The battery circuit is not isolated from the inp...

Page 29: ...mal UPS is running normally but battery capacity is low referring to Battery Status Menu Buzzer beeps once every second for battery low Charger may break down Please replace charger board 2 AC utility...

Page 30: ...rloaded Warning LED lits up and buzzer beeps per second Please reduce the critical load to POWER 100 4 AC utility power is normal but UPS is overloaded up to 125 Warning LED does not fade out and buzz...

Page 31: ...Warning LED lits up and buzzer beeps continuously Please reduce the critical load to POWER 100 6 AC utility power fails The full load is supplied by battery power in UPS Buzzer alarm sounds every 4 se...

Page 32: ...hing low level Buzzer alarm beeps every second UPS will shut down automatically Please save data soon 8 AC utility power fails and battery runs out UPS has shut down automatically UPS will restart up...

Page 33: ...its up and buzzer beeps continuously Please contact your agent for service 3 AC utility power is normal but UPS is overloaded Warning LED lits up and buzzer beeps per second Please reduce the critical...

Page 34: ...please check the rated input or connected line 7 AC utility fails UPS is in battery backup mode and battery power is approaching low level Buzzer alarm beeps every second UPS will shut down automatica...

Page 35: ...col as mentioned above this series UPS has AS400 card an optional accessory for AS400 communication protocol Please contact your local distributor for details The following is the pin assignment and d...

Page 36: ...DB 9 Interface of AS400 communication protocol 35...

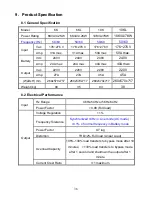
Page 37: ...45A 45A WxDxH mm 260x570x717 260x570x717 260x570x717 260x570x717 Weight kg 90 35 93 38 8 2 Electrical Performance Input Hz Range 46Hz 54Hz or 56Hz 64Hz Power Factor 0 98 Full load Output Voltage Regul...

Page 38: ...nsing Altitude 1000 M Note if the UPS is installed or used in a place where the altitude is above than 1000m the output power must be derated in use please refer to the following Altitude M 1000 1500...

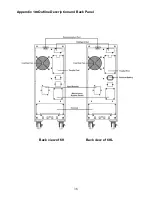
Page 39: ...Appendix 1 Outline Description and Back Panel Back view of 6K Back view of 6KL 38...

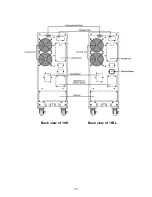
Page 40: ...Back view of 10K Back view of 10KL 39...

Page 41: ...40...

Reviews: