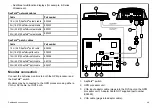
5.
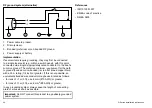
DVI cable (plugs into the DVI input on GPM processor unit).
6.
Network selector switch (must be in UP position for connection
to a SeaTalk
hs
network).
7.
Monitor’s DVI input.
8.
Monitor’s VGA input.
9.
Monitor.
10. Power connection.
IP address label
There are 3 labels on your monitor containing the IP address. You
will need to know the IP address when setting up the G-Series
system and associated monitors.
Example IP address label
Re ta in for Ins ta lla tion a nd P e rma ne nt Re cord
IP Addre s s : 192.168.101.82
Loca tion:
• The label on the front of the monitor should be left in place for
reference when commissioning the G-Series system.
• The removable label on the rear of the monitor should be removed
and attached to the handbook or a suitable log book for future
reference. Ensure that you write the monitor location onto this
label.
• The remaining label on the rear of the monitor should be left in
place.
IP selector switch
The IP selector switch at the rear of the monitor must be in the UP
position.
Screen resolution and aspect ratio
G-Series monitor screen resolution and aspect ratio.
Each GPM processor unit provides an identical screen resolution
and aspect ratio to both its monitor outputs (DVI and VGA).
If you want to connect 2 displays to your system featuring different
screen resolutions or aspect ratios (for example a widescreen
television and a G-Series monitor), you must use 2 separate GPM
processor units.
G-Series Monitor cables
Cables for connecting the monitor to the G-Series system.
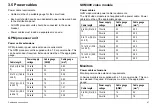
DVI connection to GPM400
Cable
Part number
Notes
5 m (16.4 ft) DVI to DVI
(digital) cable
E06021
Supplied with the
monitor
10 m (32.8 ft) DVI to DVI
(digital) cable
E06022
SeaTalk
hs
cables
Cables to connect from the monitor to the SeaTalk
hs
switch. These
are required for control of monitor functions with the G-Series
keyboard.
Cable
Part number
Notes
1.5 m (4.9 ft) SeaTalk
hs
patch cable
E06054
5 m (16.4 ft) SeaTalk
hs
patch cable
E06055
50
G-Series installation instructions
Summary of Contents for G-Series system
Page 1: ...G Series system Installation instructions...
Page 2: ......
Page 4: ......
Page 8: ...8 G Series installation instructions...
Page 14: ...14 G Series installation instructions...
Page 98: ...98 G Series installation instructions...
Page 124: ...124 G Series installation instructions...
Page 142: ...142 G Series installation instructions...
Page 146: ...146 G Series installation instructions...
Page 158: ...158 G Series installation instructions...
Page 180: ...www raymarine com...


