7.1 Web interface overview
The thermal camera includes a web interface that can be used
to control and change settings of the thermal camera. The web
interface requires a username and password.
To access the web interface the camera must be networked to a
web enabled device (e.g. laptop PC). The settings on the web
enabled device must be configured correctly to allow access.
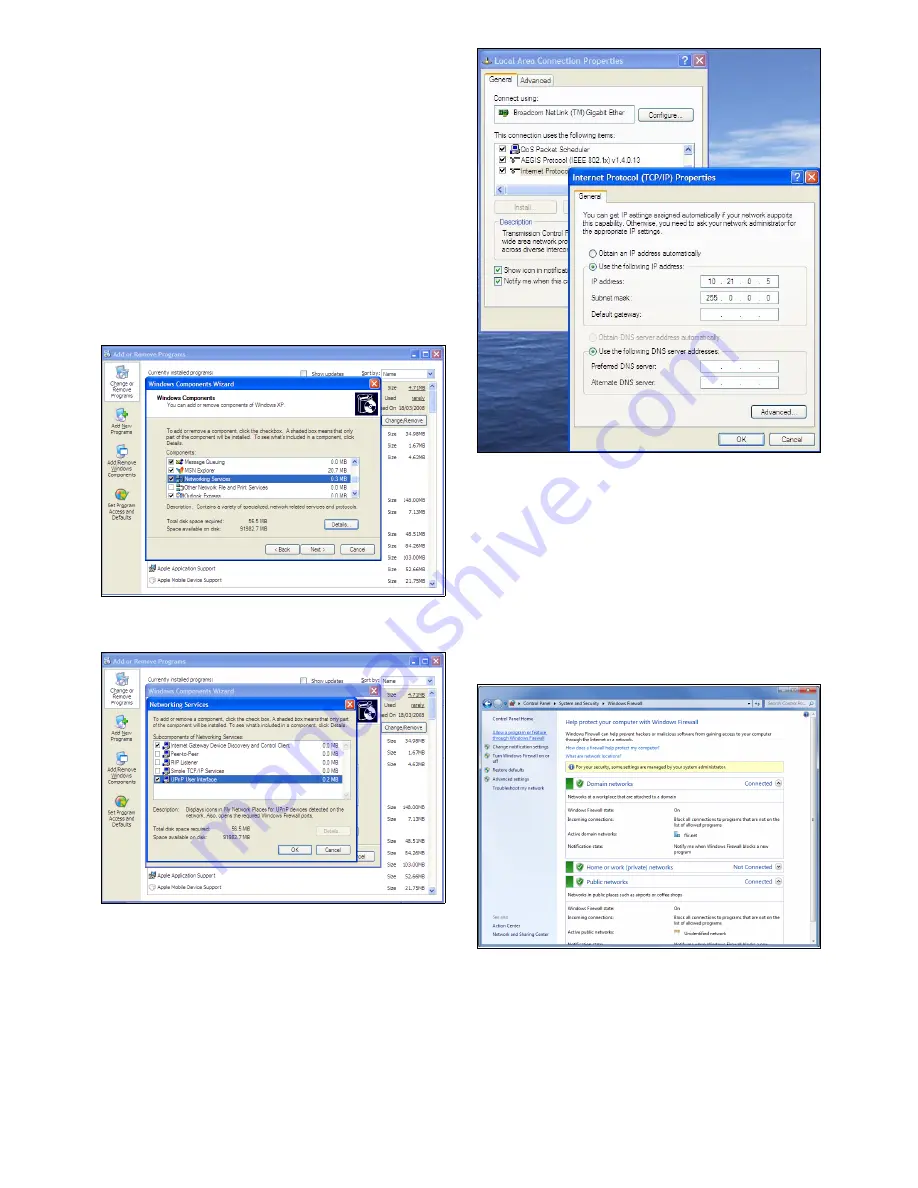
Changing network settings — Windows XP
In order to control and view camera settings on a PC using
Windows XP you need to enable UPnP devices and set a static
IP address.
With the camera networked to the PC (as described in section
4.8 PC Connection
):
1. Click
Start
.
2. Click
Control Panel
.
3. Click
Add or Remove Programs
.
4. Click
Add/Remove Windows Components
.
5. Click
Networking Services
.
6. Click the
Details
button.
7. Select the
UPnP User Interface
check box.
8. Click
OK
.
9. Click
Next
in the Windows Components Wizard.
10. You may be asked for the Windows XP installation CD.
11. When the installation has completed click
Start
.
12. Select
Connect To
.
13. Click
Show all connections
.
14. Right click on the network connection that the camera is
connected to.
15. Click
Properties
.
16. Select
Internet Protocol (TCP/IP)
.
17. Click the
Properties
button.
18. Click on
Use the following IP address
.
19. Enter an IP address that is in the same range as the thermal
cameras IP address (e.g. 10.21.0.5).
20. Enter the following Subnet Mask:
255.0.0.0
.
21. Click on the
OK
button.
You should now be able to access the web interface using a
compatible web browser.
Changing network settings - Windows 7
To configure the necessary network settings on a Windows 7 PC
follow the steps below
With the camera networked to the PC (as described in section
4.8 PC Connection
):
1. Click
Start
.
2. Click
Control Panel
.
3. Click
System and Security
.
4. Click
Windows Firewall
.
5. Click
Allow a program or feature through Windows
Firewall
.
6. Scroll down the list to
Network Discovery
.
T200


