Fan Installation F45FK
FDV451 / MQFDV453
⚠
WARNING
Electrical Grounding Instructions
This appliance is equipped with a three prong (grounding) plug for your
protection against shock hazard and should be plugged directly into a
properly grounded three-prong receptacle. Do not cut or remove the
grounding prong from this.
Before Servicing
1. Ensure all power supply is shut off.
2. Label all wires prior to disconnecting when servicing control.
Wiring errors can cause improper and dangerous operation.
3. For fan servicing: Vacuum and clean lint/dirt build-up on the fan
blades and motor.
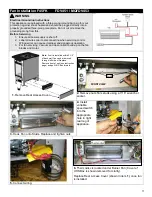
2.
Remove nuts from studs using a 7/16” wrench or
socket.
3.
Hook Fan onto Studs. Replace and tighten nuts
4.
Install
variable
speed switch
into the
appropriate
hole in right
rear leg of
appliance.
5.
Connect wiring.
6.
Thermodisc is located under Burner Pan (Cover of
UHS Box is shown removed for clarity).
Replace Rear Access Cover (shown in item
1.
) once fan
is installed.
Studs
1.
Remove Rear Access Cover.
Thermodisc
Note:
If unit is installed within 2-1/2”
of back wall, fan can be removed
through left side of fireplace.
Remove front of unit (see instruction
page) and pull UHS Box forward.
FRONT VIEW
11
Summary of Contents for Kingsman FDV451LP
Page 42: ...Gas Conversion for Modulator PART C 42...
Page 47: ...Configuration 1 Basic manual HI LO and manual ON OFF capabilities 47...
Page 48: ...Receiver Module 584 523 521 221 1001 P221SI Receiver Module 584 523 521 221 1001 P221SI 48...
Page 55: ...Proflame 2 Remote Control 55...
Page 57: ...57...

