—
;
Hotlink 3-27
Parallel
Reloading system software 5-32
Testing communication 5-14
Parallel port 5-14
Path, media 4-3
PC
Testing parallel port 5-14
Testing serial port 5-15
PCL
Error codes 5-13
Please wait message 5-5
PostScript
Errors 5-22
PostScript operators
showpage 5-14
Power LED
Will not light 5-18
Preventive maintenance 2-21
Print density 3-6
Print quality
Image defects 5-27
Print Quality menu 3-6
Print quality problems 5-26
Blurred background 5-30
Distortions 5-27
Irregular print 5-31
Printout too dark 5-28
Printout too light 5-29
Solid black image 5-28
Specific 5-28
Toner smudges 5-29
Uneven blacks 5-27
Uneven print density 5-30
White lines 5-27
Printer
All pages do not print 5-26
Blank pages 5-26
Cleaning 2-19
Cleaning, exterior 2-19
Handling 2-18
Home page 3-20
Jobs, hotlink 3-31
Lifting 2-18
Maintenance
Preventive 2-21
Name, assigning 3-18
Preventive maintenance 2-21
Printer Setting, hotlink 3-25
Problem checklist 5-18
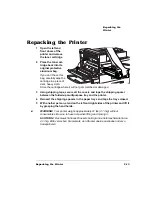
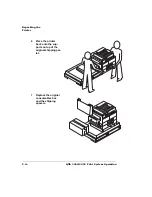
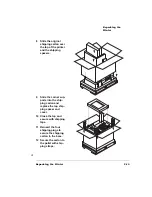
Repacking C-13
Replacement packaging C-2
Resets 5-22
Webpage 3-18
Webpage, setting up 3-18
Printer description files 5-23
Printing
Envelopes 2-7
Labels 2-7
Letterhead 2-8
Memo media 2-8
Quality, troubleshooting 5-26
Transparencies 2-9
Printing status message 5-7
Printout too dark 5-28
Printout too light 5-29
Problem
See Troubleshooting
Put paper in input bin message 5-7
Put thick stock in input bin message 5-8
Put thick x in x bin message 5-8
Put transparency in x bin message 5-8
Put x paper in x bin message 5-7
Put x trans in x bin message 5-7
Q-FAX A-2
QMS
Contact A-4
Customer Response Center (CRC) A-3, A-4
National Service A-4
Service 5-35
World-wide offices A-4
QMS, Inc. page
Hotlink 3-40
Summary of Contents for 3260
Page 1: ......
Page 8: ......
Page 9: ...Introduction on page 1 2 About This Manual on page 1 2...
Page 12: ......
Page 39: ...2 Lift up the handles to unlock the transfer roller 3 Remove the transfer roller...
Page 46: ...1 Pull out the tray 6 2 Open the lower left door of the high capacity input feeder...
Page 48: ......
Page 87: ...2 3 2 1...
Page 90: ......
Page 106: ...4 5 8 1 Open the duplexer 2 Open the upper left door 3 Open the lower left door...
Page 111: ...4 4 5 8 1 Pull on the latch to open the duplexer 2 Open the cover inside of the duplexer...
Page 114: ...4 3 Reinsert the enve lope feeder...
Page 152: ......
Page 153: ...Sources of Support on page A 2 QMS World wide Offices on page A 4...
Page 184: ......
Page 194: ......


