run the
XYZ calibration
from the
Calibration
menu on the LCD panel. This should not be
necessary on the assembled printers as those are factory calibrated.
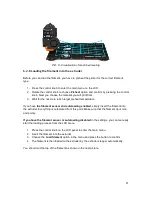
Place a sheet of a regular office paper (for example, the checklist shipped with
every order) and hold it under the nozzle during the first round (first 4 points
being checked) of calibration. If the nozzle catches on the paper during the
process, power off the printer and lower the PINDA probe slightly. See the
PINDA probe response diagram in
6.2.10.2 Check probe height
. The paper
will not affect the calibration process. The nozzle must not touch the print
surface or deflect the bed by any means. If everything went correctly, continue
with the calibration process.
Initiating this routine performs a series of measurements in three rounds: In the first round,
without the steel sheet installed
, 4 sensor points on the print bed are searched for
carefully, so as not to touch the print bed with the nozzle. In the second round, the point
locations are being improved. In the last round,
with the steel sheet on
, the height above
the 9 sensor points is measured and stored in nonvolatile memory for reference. This
finishes the Z axis calibration.
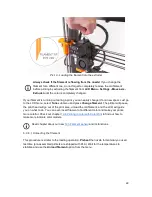
At the start of the XYZ calibration procedure the printer homes the X and Y axis. After that,
the Z axis will begin to move up until both sides touch the printed parts at the top.
Please make sure the print head went all the way up the Z axis and that you heard a rattling
sound as the Z stepper motors skip steps. This procedure ensures, that 1) the X axis is
perfectly horizontal, 2) the print nozzle is in a known distance from the print bed. If the print
head did
not
touch the end stoppers at the top of the Z axis, the printer could not possibly
know the distance the print nozzle is from the print bed and it could, therefore, crash into the
print bed during the first round of the X/Y calibration procedure.
The XYZ calibration procedure also prompts you to
"Please clean the nozzle for
calibration. Click when done."
If this advice is not followed and there is plastic debris on the print nozzle, then the debris
may touch the print bed or even push the print bed away from the PINDA probe, so the
PINDA probe will not trigger properly and the calibration will fail.
After the calibration is passed, the values can be reviewed for tweaking later. If you have the
axes
perpendicular
or
slightly skewed
, nothing needs to be tweaked because the printer
will perform with the best accuracy. Learn more in chapter
8.3 View XYZ calibration details
(Optional)
under
8 Advanced calibration
.
6.2.5.1 Calibrate XYZ e
rror messages and resolution
17
Summary of Contents for i3 MK2.5
Page 1: ......
Page 64: ...Pict 40 Nozzle change 64 ...


