Proxim Symphony-HRF Manual Download Page 105

105

During installation, the Composer wizard will prompt you to decide if you
want to use this prompt.  If you chose to install this feature, then the DOS
prompt will appear during boot-up each time you restart the computer.

Select the profile you want to use and click <Enter>.  This prompt also
includes an automatic timer so if you do not wish to change the profile, it
will automatically load your current profile after a brief countdown.

You can disable this feature by unchecking the box labeled Always prompt
user at startup
 within the Switcher configuration screen.  If this prompt does
not appear automatically and you want to utilize this feature, place a check
mark next to the box labeled Always prompt user at startup within the
Switcher configuration screen.

Note:

The Always prompt user at startup option is not available on
computers running Windows ME.

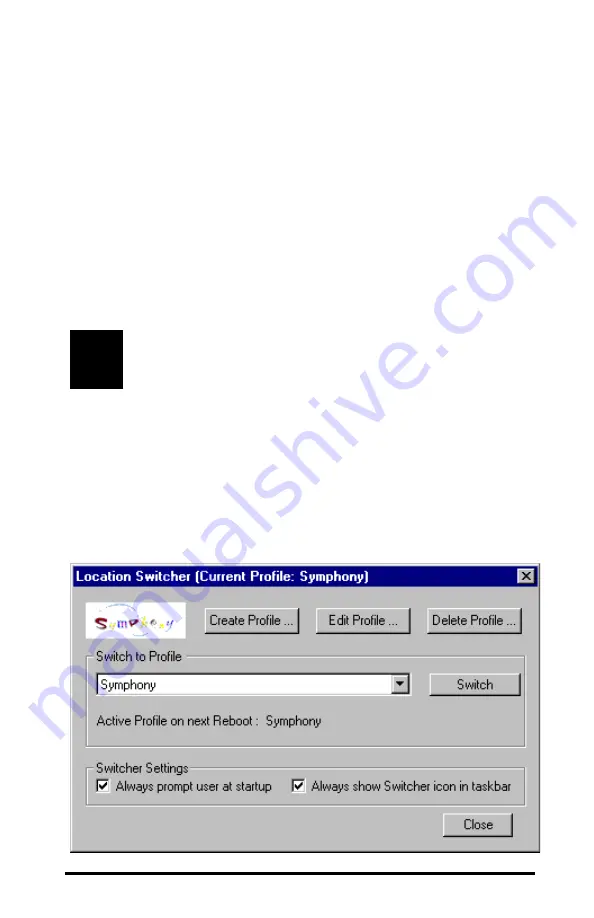
At any time, you may edit an existing profile or create a new one using the
Location Switcher configuration screen.  Simply double-click the Switcher
icon to display the Location Switcher configuration screen, shown below.

Alternatively, you can right-click the Switcher icon and choose Edit or select
the Symphony Location Switcher entry found in the Symphony section of
the Start Menu’s Programs group to display this screen.

Summary of Contents for Symphony-HRF

Page 1: ...customer Proxim warrants the Symphony HRF Cordless Gateway against defects in materials and workmanship If a product is found defective during the warranty period Proxim will repair or replace the pr...

Page 2: ...arranty Return Policy If you have a problem with your Symphony product please call Proxim Technical Support at 408 731 2780 Proxim Technical Support will assist with resolving any technical difficulti...

Page 3: ...to an Ethernet Network That Provides Shared Internet Access 15 Connectivity to a Network Server 17 3 Installing the Symphony Hardware 18 Symphony HRF Cordless Gateway 18 LED Indicators Ports and Butto...

Page 4: ...the Symphony HRF Cordless Gateway 53 Monitor the Cordless Gateway s Status 53 Maestro Networking Features 54 Obtain Network Status Information 54 Test Cordless Connection 55 Configure Network Paramete...

Page 5: ...ring 90 Remote Drive Sharing 93 Printer Sharing 96 Designating a Network Printer as the Default Printer 101 8 Symphony Location Switcher 103 Switching Between Profiles 106 Editing a Profile 107 Creati...

Page 6: ...Home Network 130 Sharing Software Applications 130 Sharing a Scanner with the Home Network 130 Frequently Asked Technical Support Questions 131 Operational Issues 131 General Questions 134 A Advanced...

Page 7: ...a Symphony Cordless Network you can provide high speed Internet access to cordless computers from a cable modem DSL modem or ISDN router or you can connect cordless computers to an existing Ethernet...

Page 8: ...a cordless network in your home or small office The Symphony HRF USB Adapter has a built in antenna and includes a six foot cable to connect the adapter to a computer s USB port G The Symphony HRF Cor...

Page 9: ...and network configurations for multiple networks A user may switch between locations with a single keystroke during boot up The Location Switcher is described in Chapter 8 Proxim also offers Symphony...

Page 10: ...dows ME or Windows 2000 Professional with a minimum 486 66 MHz processor a minimum of 16 MB of RAM and a minimum of 10 MB of hard disk space available Note The Symphony software does not support Windo...

Page 11: ...cable A cordless telephone is identical to a telephone except the handset communicates to the base station over radio waves rather than over a telephone cord Like a cordless telephone a cordless netw...

Page 12: ...hapter 7 for more information on how to configure the cordless network in each of these scenarios Connectivity to a Cable Modem DSL Modem or ISDN Router The Symphony HRF Cordless Gateway can communica...

Page 13: ...t device that can provide high speed Internet access to a network Note that these devices must be external stand alone units that support 10 Mbps Ethernet and have an RJ 45 10Base T connector devices...

Page 14: ...Gateway with the account information assigned to you by the ISP See Chapter 7 for more information on how to configure the Cordless Gateway sTCP IPparameters ConnectivitytoanEthernetNetwork If you ha...

Page 15: ...ateway and for more information on File and Printer Sharing Note The Cordless Gateway is designed to provide connectivity to small Ethernet networks It cannot support more than eight 8 devices on its...

Page 16: ...s more than eight 8 Ethernet devices attached Figure 3 Cordless Network and Wired Network Sharing High Speed Internet Access Simply connect the Cordless Gateway to a 10Base T cabling hub using the 10B...

Page 17: ...performs Transparent Bridging to link the two networks so that to each node there appears to be only one local area network LAN By default the Cordless Gateway performs both Network Address Transla ti...

Page 18: ...with the Cordless Gateway using the Symphony Composer Installation Wizard This phase is described in Chapter 5 This chapter describes the step by step procedure for the physical installa tion of the...

Page 19: ...ing considerations G If you intend to use the 10Base T cable included with the product the distance between the Cordless Gateway and the 10Base T port of the hub high speed Internet device or other Et...

Page 20: ...e Note Make sure that the Ethernet device is powered on before pro ceeding 3 Attach one end of the supplied AC power adapter to the back of the Cordless Gateway and the other end to the wall outlet No...

Page 21: ...G Try connecting the Ethernet cable to another 10Base T port on the Ethernet device G Contact Symphony Technical Support for assistance if none of these suggestions solve the problem Note Do not proc...

Page 22: ...f during boot up while the Cordless Gateway searches for a HomeRF or OpenAir network to join If the Cordless Gateway cannot locate an existing HomeRF or OpenAir network it will start a new HomeRF netw...

Page 23: ...e modem or DSL modem G 10Base T Port II This port is wired like an Ethernet hub Use a standard 10Base T cable to connect Port II to a stand alone PC or to a device wired like an Ethernet NIC network i...

Page 24: ...essPCCardAdapter The Symphony HRF Cordless PC Card fits into a standard Type II PCMCIA slot in your computer The PC Card and antenna are shown in Figure 7 Link LED Teach button Learn button 10Base T P...

Page 25: ...f not already connected 3 Shut down the laptop computer 4 Insert the PC Card into the laptop computer 5 Turn on the laptop computer and refer to the software installation procedure described in Chapte...

Page 26: ...n in Figure 8 below Figure 8 Symphony HRF Cordless USB Adapter Follow these steps to install the Symphony HRF Cordless USB Adapter 1 Shut down the computer 2 Place the USB Adapter on top of your desk...

Page 27: ...ed to a USB port or when it is not receiving power from the computer G The LED is yellow when the USB Adapter is not installed or when the device is initializing G The LED is green when the USB Adapte...

Page 28: ...y software on each computer in which you installed a Symphony HRF or Symphony adapter The following procedure provides an overview of how to install the software for a Symphony HRF PC Card and Symphon...

Page 29: ...commends that you do not proceed with the installation until you have confirmed that you have one of these Windows instal lation media available Note to Customers Using a Laptop Without a CD ROM Drive...

Page 30: ...eps Follow these steps to install the Symphony software on a Windows 98 or Windows ME computer 1 Install the Symphony HRF adapter as described in Chapter 3 2 Turn on the computer When the Symphony HRF...

Page 31: ...10 Double click the CD ROM drive icon typically this is drive D to browse the Symphony Installation CD 11 If the installation program shown below does not launch automati cally double click the icon l...

Page 32: ...When the Symphony HRF adapter is inserted for the first time the Windows operating system will automatically detect the card as a new device and launch the Found New Hardware Wizard Windows will recog...

Page 33: ...will launch automatically as shown below 13 If the installation program does not launch automatically open the folder that contains the Symphony software files and double click the icon labeled SETUP...

Page 34: ...epending on which version of Windows is installed on the computer Windows will recognize the Symphony HRF PC Card as a HomeRF LAN PCCARD Note The Symphony HRF USB Adapter cannot be installed in a Wind...

Page 35: ...le click the CD ROM drive icon typically this is drive D to browse the Symphony Installation CD 8 Double click the icon labeled SETUP EXE to manually launch the installation program 9 Follow the on sc...

Page 36: ...to Step 4 Alternatively click Customize to change the default installation directory and proceed to Step 2 Choosing the Customize button will display the following dialog box By default the Symphony...

Page 37: ...have a Windows CD or diskettes but the computer has the Windows Cabinet files direct Windows to look for the Windows files in the Cabinet directory which is typically located in C WINDOWS OPTIONS INS...

Page 38: ...choose the Cancel option Note Write down your User name and Password for future use you will need to enter this information each time you logon to the cordless network 10 The Symphony Composer Instal...

Page 39: ...y HRF and Symphony adapter installed in Phase 1 This phase is described in Chapter 4 Phase 3 Configure the cordless network to communicate with the Cordless Gateway using the Symphony Composer Install...

Page 40: ...to the next screen At any time you may choose the Back button to return to an earlier screen and change a previous selection Repeat the steps below for each computer on the cordless network Note Confi...

Page 41: ...network enter a Security Code that will be easy for you to remember and click Next The Symphony HRF Cordless Gateway will adopt this Security Code Remember to use the same Security Code when configur...

Page 42: ...ork configuration as shown below Follow these steps to locate the Cordless Gateway 1 If you are prompted to select a network type as shown above then the Cordless Gateway is G Not powered on G The Sec...

Page 43: ...inue 4 If the Composer cannot locate the Cordless Gateway you will be prompted to reenter the Security Code 4a Reenter the Security Code and click Next to continue If you do not know the Security Code...

Page 44: ...y Also you may want to contact Symphony Technical Support for assistance and additional suggestions Step 3 Configure TCP IP Information When configuring the first cordless computer on a network the Co...

Page 45: ...Computer Name to validate the Internet connection If your ISP has assigned you a Host Name enter that Host Name in the field provided Otherwise the Composer will use the Computer Name of the computer...

Page 46: ...rent Bridging mode only to communicate with a wired Ethernet network leave these fields blank Refer to Chapter 7 for more information on these parameters Click Next once you have configured the TCP IP...

Page 47: ...nerate a list of the computer s hard drives CD ROM drives floppy drives and printers that may be shared with other computers on the cordless network as shown below Check the box to the left of each re...

Page 48: ...on Tool See the File Sharing discussion in Chapter 7 for details Step 6 Configure Switcher Prompt at Boot up The Symphony Location Switcher includes an optional startup prompt that will appear each ti...

Page 49: ...to register your Symphony product on line as shown below Click Yes Register Now to be taken to the Symphony Registration Web site If you choose not to register at this time you can click the button la...

Page 50: ...ransparent Bridging Mode only In addition you must configure the TCP IP settings for each cordless computer if you do not have a DHCP server on your Ethernet network In order for Ethernet computers an...

Page 51: ...llation of the cordless network the Maestro Configuration Tool will display a Symphony icon in the Windows System Tray of each cordless computer as shown below Double click the Symphony icon to launch...

Page 52: ...s you to configure and monitor the following Cordless Gateway functions Monitor the State of the Cordless Gateway On the main page of the Maestro Configuration Tool under the Symphony HRF Cordless Gat...

Page 53: ...on these parameters UpgradetheSymphony HRFCordlessGateway If a new firmware file becomes available for the Symphony HRF Cordless Gateway you may upgrade the unit to this new version using the Maestro...

Page 54: ...d try recycling power to the unit Refer to Chapter 7 for more information on these parameters Maestro Networking Features The Symphony Maestro Configuration Tool allows you to configure and monitor th...

Page 55: ...etwork in the Symphony Network Map You may test the strength of the cordless connection between your computer and any other member of the cordless network from this screen Follow these steps to test t...

Page 56: ...entries in the Symphony Network Map will also open the Test Cordless Connection window ConfigureNetworkParameters From within the Maestro Configuration Tool you may change the Security Code and which...

Page 57: ...on the network Refer to the section entitled File Sharing in Chapter 7 for additional details Remote Drive Sharing Symphony Maestro allows you to attach a remote shared drive or directory to a drive l...

Page 58: ...software versions currently in use right click the Symphony icon in the Windows System Tray and choose About as shown below This will display the About Symphony Maestro Configuration Utility screen R...

Page 59: ...he Cordless Gateway may be configured to operate in NAT mode only in Transparent Bridge mode only or in both modes simultaneously from within the Symphony Maestro Configuration Tool The Cordless Gatew...

Page 60: ...ther sends messages over radio waves However when the Cordless Gateway is connected to both networks and is operating in Transparent Bridging mode all devices Ethernet and cordless appear to be on the...

Page 61: ...using a router a proxy server or an Ethernet device that already performs NAT OR You want the cordless network to communicate with an Ethernet network and you do not want the cordless network to have...

Page 62: ...way Network heading 3 Choose the Topology tab as shown below Within the Topology screen the first option refers to NAT mode only the second option refers to Transparent Bridging mode only and the thir...

Page 63: ...to configure these TCP IP settings Also refer to the section entitled TCP IP Configuration for Cordless Computers in NAT Topologies for information on the TCP IP settings that the cordless client comp...

Page 64: ...ithin the Cordless Gateway Configuration screen as shown below Note TheISPTCP IPparametersarenotapplicablewhentheCordless Gateway is operating in Transparent Bridging mode only Each of the three ISP T...

Page 65: ...1 Open the Symphony Maestro Configuration Tool on one of the cordless computers 2 Click the Configure button under the Symphony HRF Cordless Gateway Network heading 3 Click the ISP TCP IP tab within t...

Page 66: ...is a temporary IP address assigned to you by your ISP that must be renewed periodically Most ISPs use a protocol called Dynamic Host Configuration Protocol DHCP to dynamically assign IP addresses When...

Page 67: ...nstallation the Symphony Composer Installation Wizard will configure the Cordless Gateway to accept a dynamic IP address by default Also the Cordless Gateway will attempt to use the Computer Name of t...

Page 68: ...en the Symphony Maestro Configuration Tool again 9 Click the Status button under the Symphony HRF Cordless Gateway Network heading 10 Confirm that the DHCP Successful entry reports Yes This indicates...

Page 69: ...Symphony Maestro Configuration Tool Note Once you have configured the Cordless Gateway to use PPPoE do not use the PPPoE client program installed on your cordless computer s to connect to the Interne...

Page 70: ...e g a cable modem during its boot up cycle in order to obtain an IP addressfromtheISPviaDHCPorPPPoE Ifyoubelievethatthe CordlessGatewayshouldhavereceivedanIPaddressautomati cally from the ISP but it...

Page 71: ...internal IP settings will conflict with this other network s IP settings In this case the Cordless Gateway will automatically detect this conflict and change its IP address and subnet mask to new valu...

Page 72: ...validfortheclassofIPaddress you entered and provides at least 4 bits of addressing space for the local network 6 Click OK to save these changes 7 The Cordless Gateway will be restarted automatically E...

Page 73: ...ion of WORKGROUP If the computer already has an existing workgroup name this name will be overwritten and saved in the Original Profile During installation each Symphony HRF or Symphony adapter is con...

Page 74: ...during boot up To find out what address has been assigned to a particular Symphony HRF adapter in a Windows 2000 Professional computer follow these steps 1 Open the Start Menu s Accessories folder and...

Page 75: ...ng NAT you should not need to change the TCP IP parameters for the Symphony adapters Configuring a Cordless Network to Use Transparent Bridging The Symphony HRF Cordless Gateway performs a function kn...

Page 76: ...ti cally configure itself with an IP address in the 169 254 0 0 network this address range is reserved for private networks and is not valid on the Internet If your Ethernet network uses DHCP to assig...

Page 77: ...lease to provide uninterrupted connectivity In the event that the client loses its lease it simply requests another address assignment at which time the client should receive either the same address...

Page 78: ...Click Release to cancel any existing address assignment 4 Click Renew to request a new address Alternatively try restarting the computer the computer should request an address assignment during boot...

Page 79: ...bnet mask default gateway and DNS Domain Name System entries also do not expire once configured If you do not have a DHCP server on your Ethernet network then you must configure the Symphony HRF and S...

Page 80: ...oll through the list of network components and highlight the TCP IP Symphony Adapter entry or the TCP IP entry if only one exists as shown below 4 Click Properties 5 Select the Specify an IP address o...

Page 81: ...t network and not already assigned to another device 7 Enter the Ethernet network s subnet mask 8 Click the Gateway tab 9 Enter the address of the Ethernet network s default gateway in the field provi...

Page 82: ...ave the changes 16 Restart the computer when prompted Follow these steps to configure a Symphony HRF adapter in a Windows 2000 Professional computer with static IP addressing information 1 Double clic...

Page 83: ...83 4 Click Properties 5 Select the Use the following IP address option as shown in the following example...

Page 84: ...84 6 Enter an IP address that is valid on the Ethernet network and not already assigned to another device 7 Enter the Ethernet network s subnet mask 8 Enter the Ethernet network s default gateway...

Page 85: ...rk you have installed for configuration instructions A Cordless Gateway Connected Directly to a Cable Modem DSL Modem or ISDN Router If you have a device which provides high speed Internet access such...

Page 86: ...the ISP TCP IP Parameters earlier this chapter for details Changes to Cordless Gateway Clients No change is required for computers that have a Symphony HRF or Sym phony adapter installed A Cordless G...

Page 87: ...Parameter Configure the Cordless Gateway so that it performs Transparent Bridging only See the section entitled Configuring the Topology Parameter earlier this chapter for details Changes to the Cord...

Page 88: ...n NAT mode to provide Internet connec tivity to the entire cordless network using a single IP address In this configuration a Cordless Gateway connects to a hub on an Ethernet network as shown below T...

Page 89: ...nd use the TCP IP protocol to access the Internet However configure all of your computers both Ethernet and Symphony to use a second networking protocol such as NetBEUI or IPX SPX to allow them to sha...

Page 90: ...tware the drives you specified will be available to other users on the network At any time you may change which drives are shared from within the Symphony Maestro Configuration Tool by clicking the Co...

Page 91: ...is made generally available to the rest of the network and what information should reside only on the local computer After you select a folder or drive to share the Maestro tool will prompt you to ch...

Page 92: ...word you may set two different passwords one for Read Write access and the other for Read Only access to allow full access to some users and partial access to others At any time you can reset the acce...

Page 93: ...ple the C drive of a remote computer may be assigned to the I drive of the local computer Once this remote drive share has been established the remote drive will appear to be another drive in the loca...

Page 94: ...you may simply double click the name of the remote computer In the example above the local computer is called Mom s computer and the remote computer is called Kids computer 4 Click the Remote Drive S...

Page 95: ...Share button 7 Select the drive letter on the local computer to assign to the shared resource using the drop down menu In the example below from a Windows 95 98 ME computer the C drive on the computer...

Page 96: ...shared drive will appear to be another drive on the local com puter In the future if you want to disconnect a shared drive mapping highlight the name of the remote shared resource in the Remote Drive...

Page 97: ...ithin the Symphony Maestro Configuration Tool Once the Symphony installation is complete the network computers will be ready to share printers Follow these instructions to install a remote printer 1 L...

Page 98: ...below the remote computer named Kids computer is sharing a printer called printer Hint The Network Neighborhood or My Network Places icon is typically located below the My Computer icon on the Windows...

Page 99: ...or diskette s available during the installation You may be prompted to insert the CD or diskette s if Windows cannot find the appropriate driver files 5 Confirm that the Printer Has Been Successfully...

Page 100: ...n each application s Print screen as shown below If you are having difficulty printing to a network printer refer to Chapter 12 and the Symphony Web site for troubleshooting suggestions Also refer to...

Page 101: ...appear as the designated printer within an application s Print screen Follow these directions to assign a computer a default printer 1 Open the Control Panel and double click the Printers icon to dis...

Page 102: ...102 The network printer that you designated as the default printer will now have a check mark next to its entry as shown below to indicate that it is the default printer...

Page 103: ...network configuration in a profile called Original The Symphony Composer then reconfigures the network settings so that the computer will communicate with the cordless network These new network settin...

Page 104: ...n taskbar within the Location Switcher configuration screen If this icon does not appear automatically you can enable this feature by checking the box labeled Always show Switcher icon in taskbar with...

Page 105: ...her configuration screen If this prompt does not appear automatically and you want to utilize this feature place a check mark next to the box labeled Always prompt user at startup within the Switcher...

Page 106: ...nd select the Switch option from the pop up menu to choose between profiles as shown below Method2 Select a profile when prompted during boot up as described above Method3 Launch the Switcher configur...

Page 107: ...t restart Note Methods 1 and 3 above require that you restart the computer each time you change to a new profile in order for the new settings to take effect Editing a Profile To edit the network sett...

Page 108: ...he Domain and Roaming parameters are grayed out in the Symphony Profile Symphony products do not support these RangeLAN2 OpenAir parameters In the example below a Symphony Conductor computer is using...

Page 109: ...ption configures the IPX SPX parameters that the computer will use for the selected profile IPX SPX is a network protocol like TCP IP By default the cordless network does not use this protocol but it...

Page 110: ...ng highlight one of the entries in the Drive Mapping table and click the appropriate button To change a profile s default printer select another installed printer from the Default Printer drop down me...

Page 111: ...Monitor so the Maestro EConduct and Conductr entries should have a check mark and the Statmon entry should not as shown below Note A Windows 2000 Professional computer does not have the EConduct and...

Page 112: ...nges click the X box in the upper right hand corner of the screen 5 Restart the computer when prompted for these changes to take effect Creating and Deleting Profiles Within the Location Switcher conf...

Page 113: ...puter From the Home to the Office Follow these steps when moving a laptop computer from the home to the office 1 Shut down the computer 2 Eject the Symphony HRF PC Card from the PCMCIA slot 3 Take the...

Page 114: ...etwork card from the PCMCIA slot or undock the laptop 3 Take the computer home 4 Insert the Symphony HRF PC Card into the PCMCIA socket 5 Turn on the computer 6 Select the Symphony Profile at the Swit...

Page 115: ...rk with a Symphony HRF Cordless Gateway then simply follow the installation instructions in Chapters 3 4 and 5 to configure this new addition to the cordless network Adding a Symphony HRF Cordless Gat...

Page 116: ...ck Next and follow the on screen instructions to configure the Symphony HRF or Symphony adapter to communicate with the Cordless Gateway Refer to Chapter 5 for additional information on the Composer I...

Page 117: ...ymphony Web Site 1 Confirm that no cordless computer is using the Symphony HRF Cordless Gateway to access the Internet or communicate with an Ethernet network while attempting an upgrade 2 Confirm tha...

Page 118: ...upgrade process Otherwise proceed to Step 7 7 Click the button labeled Upgrade from Symphony Web Site 8 Follow the on screen instructions to complete the upgrade process Note The Cordless Gateway s P...

Page 119: ...l If an update occurred then the version number should have increased from what was reported in Step 6 Method 2 Upgrade from Disk 1 Confirm that no cordless computer is using the Symphony HRF Cordless...

Page 120: ...Cordless Gateway already has the latest version installed there is no need to continue with this upgrade process Otherwise proceed to Step 6 6 Click the button labeled Upgrade from Disk 7 When prompte...

Page 121: ...omplete the upgrade process The Cordless Gateway will be automatically rebooted after it has completed the download of the new firmware 10 Click OK when notified that the upgrade process is complete a...

Page 122: ...ndows System Tray 2 Select the About option from the drop down menu to view the About Symphony Maestro Configuration Utility screen 3 Write down the version of Symphony software currently installed on...

Page 123: ...13 Restart the computer if prompted 14 After the upgrade process is completed right click the Symphony icon located in the Windows System Tray 15 Select the About option from the drop down menu to vie...

Page 124: ...the Symphony software 1a Go to the Start Menu and choose Uninstall from the Programs group s Symphony folder 1b Alternatively go to the Add Remove Programs icon in the Control Panel and remove the Sy...

Page 125: ...work settings stored in the Original Profile if any exist For more information on location profiles refer to Chapter 8 If you decide to reinstall the Symphony HRF adapter at a later date follow the in...

Page 126: ...nd other cordless products available in the marketplace Proxim s Symphony products use two cordless protocols to communicate OpenAir and HomeRF Proxim s original line of Symphony Cordless Networking p...

Page 127: ...all adapters for cordless networks that contain HomeRF certified products from multiple manufacturers Interoperability Matrix Symphony OpenAir Symphony HRF OpenAir HomeRF Symphony HRF for Compaq Home...

Page 128: ...pping spread spectrum technology in the 2 4 GHz band to communicate This is the same frequency band used by microwave ovens and 2 4 GHz phones Frequency hopping technology is designed to minimize inte...

Page 129: ...ssingE Mail Each computer on the cordless network can send and receive e mail exactly as if you were directly connected to the Internet Each computer that accesses e mail must have e mail software ins...

Page 130: ...en if you can share a program over the network keep in mind that gener ally when you purchase software applications you are authorized by the software manufacturer to install and run a single copy of...

Page 131: ...an IP address Refer to Chapter 7 for details 7 All of the computers on the cordless network and the computers on the Ethernet network have access to the Internet However I cannot share resources betw...

Page 132: ...iles during the installation of my printer Certain printer manufacturers require that network computers run a proprietary software program to use the printer over the network Consult your printer docu...

Page 133: ...oes not light up when the cable is connected to either port try another Ethernet cable your cable may be damaged 3 The Cordless Gateway s Power Indicator LED is blinking on and off The Cordless Gatewa...

Page 134: ...y to my office network so that my laptop can access the network The Symphony HRF Cordless Gateway can only be connected to small hubs with no more than 8 devices attached If your office has more than...

Page 135: ...ce is known as the Master A device which follow a Master s pattern is known as a Station Two Masters cannot communicate with each other Two Stations can communicate with each other if they have the sa...

Page 136: ...y default this parameter is set to Light in order to maximize throughput and reduce overhead However if you have 9 to 10 Symphony devices on the same Symphony network you may see improved communicatio...

Page 137: ...ter configures the protocol that a Symphony HRF adapter will use to communicate with other devices The options are Dual Mode HomeRF only and OpenAir only When set to Dual Mode the default setting the...

Page 138: ...rk configuration is your cordless network using G What were you doing when the error occurred G What error message did you see G Can you reproduce the problem G What version of the software are you us...

Page 139: ...ulations may vary from country to country Proxim Inc will only ship products that are type approved in the destination country NetworkInterface Ethernet 10Base T Twisted Pair Data Rate 1 6 Mbps Radio...

Page 140: ...rference to radio or television reception which can be determined by turning the equipment off and on the user is encouraged to try to correct the interference by one or more of the following measures...

Page 141: ...ding a Symphony HRF Cordless Gateway 115 ADSL SeeDSLmodem Alternate Master 135 See Station Type ARP 137 ATMF 25 13 C CAB files See Windows Cabinet CAB files Cable modem 10 13 15 54 70 85 86 88 133 Cha...

Page 142: ...namic IP addressing Cordless Gateway 66 68 Symphony HRF adapter 77 79 E E mail 129 EConduct 110 Ethernet Bridge See Symphony Ethernet Bridge Ethernet LED 22 See also Symphony HRF Cordless Gateway LEDs...

Page 143: ...IP parameters 44 45 63 70 86 89 L LAN See Local Area Network Learn button 23 Limiting Access to a Shared Drive See also File and Print Sharing File Sharing Link LED 20 21 23 54 70 133 See also Symphon...

Page 144: ...34 O OpenAir 10 22 126 135 136 137 Original Profile See Profiles Output power 139 P Password Network 97 PPPoE 70 Read Only 92 Read Write 92 Shared resources 92 129 Power Indicator LED 20 22 43 118 12...

Page 145: ...ies See File and Print Sharing File Sharing Spread spectrum Frequency hopping 128 135 139 Static IP addressing Cordless Gateway 64 66 Symphony HRF adapter 79 85 Station 135 136 See Station Type Statio...

Page 146: ...62 63 LEDs 22 24 Limitation 15 16 17 86 87 88 134 Placement 20 Power adapter 20 Symphony HRF PC Card Description 8 Symphony HRF USB Adapter LED 27 No Windows 95 support 34 Product description 8 Syste...

Page 147: ...n conflict Voltage 8 25 W Warranty information 1 Welcome screen See also Symphony Composer Installation Wizard Windows Cabinet CAB files 29 37 SystemTray 49 51 52 106 122 123 Version conflict 37 Windo...

Reviews: