background image

392

V676

®

 / V476

®

 CONTROL CONSOLE USER MANUAL

SPECIFICATIONS

V676 Control Console

Console Function Capacities:

 +

Channels: 4,000 multiple parameter luminaires

 +

Color Palettes: 1,000

 +

Beam Palettes: 1,000

 +

Presets: 1,000

 +

Macros: 2,000

 +

Effects: 1,000

 +

Sets: 1,000

 +

Sequences: 1,000

 +

Dynamics: 500

 +

System Snapshots: 1,000

 +

Cue Snapshots: 10,000

 +

Cues: 10,000

 +

Stacks: 1,000

 +

Submasters: 30

 +

CPU: Apple® Mac® Pro

External Equipment:

 +

Up to 3 additional touchscreen displays.

 +

Channel Select Panel for fast and intuitive access to 
2,000 luminaires.

 +

External PRG Node Plus provides 6 additional 
DMX512 universes. 

 +

PRG Series 400 Ethernet Switch allows 2 or more 
V476 or V676 consoles to be linked together.

Interfaces:

 +

Copper and Fiber Optic Ethernet connections for 
communications protocol

 +

SMPTE Time Code input

 +

MIDI Time Code input

 +

MIDI Show Control input and output

 +

MIDI Notes input

 +

External Trigger

Physical Specifications:

 +

Power Consumption: Console (with displays) - Less 
than 600 watts

 +

CPU: Apple® Mac® Pro - Dual 2.8 GHz Quad-Core 
Intel Xeon 5400 Series processors

 +

Displays: 

-

5 integrated, full-color touchscreen displays.

-

3 external, full-color touchscreens.

 +

External Channel Select Panel: 10,000 channels

 +

Weight and Dimensions:

-

120 lbs. (54.43 kg) with accessories

-

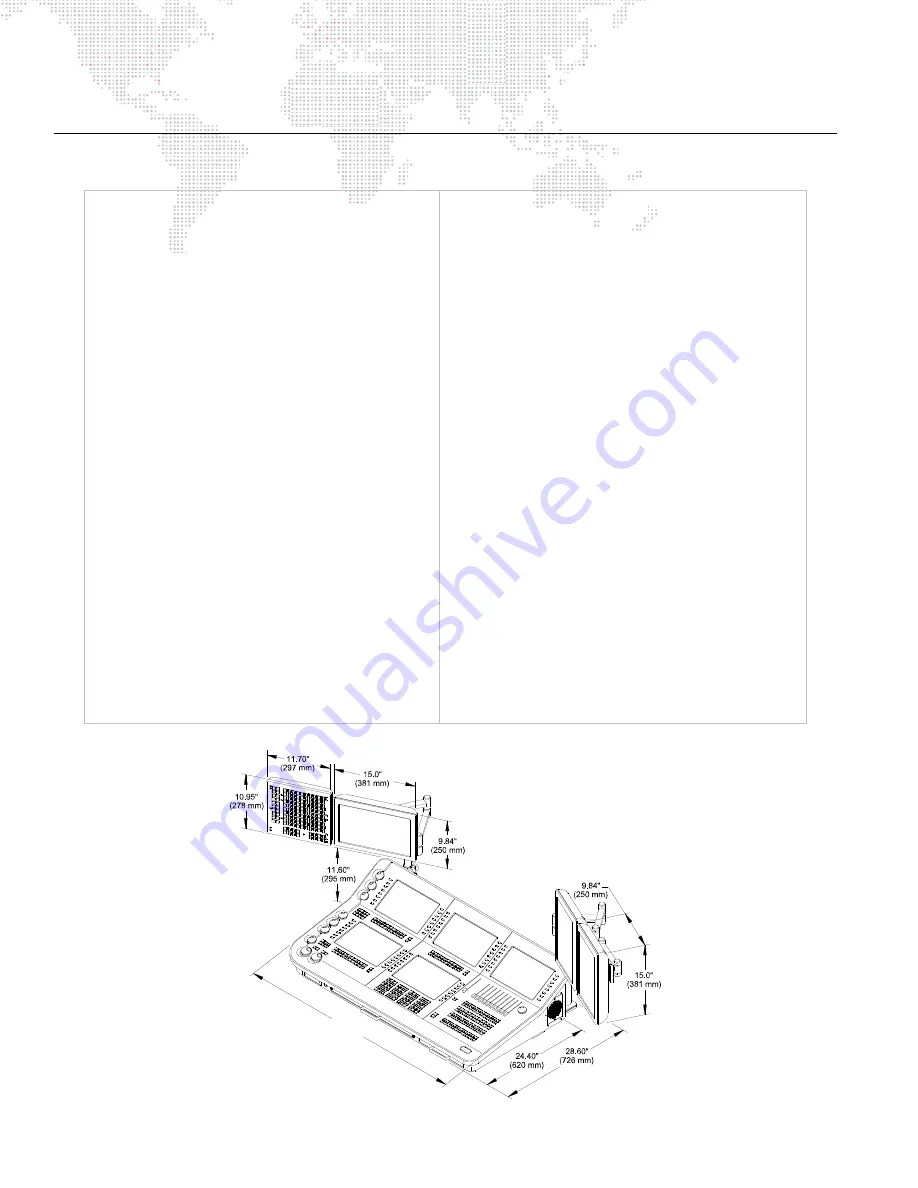
46.8" (118.9 cm) W x 11.6" (29.5 cm) H x 28.6" 
(72.6 cm) D (including mounting brackets)

Outputs: 

 +

Fiber Optic: 1 - 702 Universes possible.

 +

Ethernet: 1 - 702 Universes possible.

 +

Art-Net: 6 Universes available with the addition of 
each PRG Node Plus.

 +

DMX512: 8 Universes.

(1,189 mm)

46.80"

Summary of Contents for V476

Page 1: ...SOFTWARE VERSION 3 5 WWW PRG COM V676 CONTROL CONSOLE V476 CONTROL CONSOLE USER MANUAL...

Page 2: ...their respective companies This manual is for informational use only and is subject to change without notice Please check www prg com for the latest version PRG assumes no responsibility or liability...

Page 3: ...any provision of this License Upon termination you must destroy the Software and all copies thereof 5 Export Control Requirements This License and any technical information supplied during the term o...

Page 4: ...d in Clause 52 227 19 of the Federal Acquisition Regulations FAR and is Commercial Computer Software as that term is defined in Subpart 227 471 of the Department of Defense Federal Acquisition Regulat...

Page 5: ...e center Compliance and Safety Notice FCC This device complies with part 15 of the FCC rules Operation is subject to the following two conditions 1 This device may not cause harmful interference and 2...

Page 6: ...rmation 11 November 5 2010 Updated to software version 1 1 20 April 4 2011 Updated to software version 2 0 25 September 14 2011 Updated to software version 2 5 Added V476 console Added Palette Store D...

Page 7: ...and Rear Panels 20 Installation V476 Console V476 Unpack and Setup Procedure 21 Display Setup for the V476 Console 24 Using a Standard DVI Monitor with the V476 Console 24 System and Device Connectio...

Page 8: ...ED Fixture Control 53 Patching Ranges 53 Patch Editing 54 Using Command Line 54 Using Patch Spreadsheet 54 Using Plan View 54 Patch Spreadsheet 55 Dimmer Curves 57 Overview 57 Dimmer Curves Window 57...

Page 9: ...Overview 99 Manual Change Filter 101 Customizing Luminaire Status Window 101 Customizing Luminaire Status Toolbar 102 Selecting Channels from Luminaire Status Window 102 Parameter Columns Window 103 I...

Page 10: ...Area 135 Presets Overview 136 Storing Modifying and Recalling Presets 137 From Palettes 137 From Keypad 139 Preset Global Delete 139 Preset Data Window 140 Colors Overview 141 Storing and Recalling Co...

Page 11: ...ic Guidelines 174 Methods For Storing Dynamics 174 Dynamics Operation Canned Dynamics 175 Playing Back a Canned Dynamic 177 Using the Encoders with Dynamics 179 Warning Messages 180 Fanning Dynamic Of...

Page 12: ...he Command Line 217 Storing Effects as Cues 218 Utility Menu 218 Chapter 10 Special Features Advanced Control Manual Timing 220 QuickFocus 221 Park 223 Highlight 224 Data Copy and Move Copy Channel 22...

Page 13: ...72 Link 272 Loop 273 Wait Trail Time 273 Global Cue Time 274 Out Time 275 Advanced Cue Storing and Modifying How Faders Affect Intensity 276 Grand Master Black Out 276 Submaster Faders 276 Command Lin...

Page 14: ...302 Clear 303 Priority 304 Bump Modes 305 Intensity Mode 305 Add Solo Mode 306 Go Fader Mode 306 IFCB Faders 307 Rate 308 Timing Disable 310 Board Control Disable 311 Dynamic Disable 312 Freeze 313 I...

Page 15: ...334 Multi Console Features Setting Up Backup Secondary Consoles 335 Primary and Secondary Setups 335 Online Backup 335 Power Up 335 Configuring Multiple Consoles 336 Channel Partition 337 Off Line Pro...

Page 16: ...512 Channel Tests 370 Dimmer Check Commands 371 Clear Status Errors 371 Chapter 17 Control by External Devices Concepts About MIDI SMPTE 374 Input Options 374 MIDI In Thru Out 374 SMPTE Input 374 Swit...

Page 17: ...Control Console 393 Appendix B Reference Front Panel and Keyboard Shortcuts Front Panel Submaster Keypad Combinations 396 Front Panel Palette Keypad Combinations 397 Mac Keyboard Shortcuts 398 Pre Pr...

Page 18: ...XVI V676 V476 CONTROL CONSOLE USER MANUAL Notes...

Page 19: ...except in a few cases where hardware buttons and or knobs may be involved It is assumed that instructions in this manual apply to both versions of the console except where otherwise noted Additional D...

Page 20: ...act information for all PRG office locations can be found on our website at www prg com about us locations PRG Dallas International Service 8617 Ambassador Row Suite 120 Dallas Texas 75247 USA Phone 2...

Page 21: ...e these equivalent buttons on the Mac keyboard and front panel command line keypad Button Front panel hard button Example Press Cue 1 Enter to recall Cue 1 Button Optional desk button press Example Pr...

Page 22: ...4 V676 V476 CONTROL CONSOLE USER MANUAL Notes...

Page 23: ...n overview of console features and components along with instructions for setting up the console and connecting to the system OVERVIEW V676 CONSOLE INSTALLATION V676 CONSOLE OVERVIEW V476 CONSOLE INST...

Page 24: ...pshots 10 000 Cues 10 000 Stacks 1 000 Submasters 30 Mac Pro CPU External Equipment Up to 3 additional touchscreen displays Channel Select Panel for fast and intuitive access to 2 000 luminaires Exter...

Page 25: ...perating a lighting system The desk supports three 3 external touchscreen monitor displays and one 1 external channel select panel Computer Rack An Apple Mac Pro computer provides the operating system...

Page 26: ...p B ac k Go B ac k G o Bac k G o R u n S to p Ste p R un S to p Step Sto p S tep B ac k S ol o B ump S olo Bum p 5 6 7 S o lo B ump S ol o Bum p 8 10 9 So lo Bum p So lo Bump R un S to p Ste p B ac k...

Page 27: ...le power System Comm Trigger Tx Rx Lk In Out In In Thru Out In Rx Tx Serial Data SMPTE In MIDI 1 USB Ethernet LINK Tx 2 Video In 3 4 Rx Accessories 5 3 2 1 6 7 8 1 3 Displays 2 Desk Lamp Connector Des...

Page 28: ...Unpack and Setup Procedure Step 1 Remove lid from console case Figure 1 4 Step 2 Remove table from case Figure 1 4 V676 Console Case Contents Lid Console Case Console Table Channel Monitor 3 Monitor P...

Page 29: ...1 5 Step 4 Adjust table legs to desired height and place table into position CAUTION Ensure that table is placed on a sturdy surface and that legs are securely locked in place before placing console...

Page 30: ...6 Step 6 At rear of console install four support arms as shown in Detail B of Figure 1 6 Step 7 Slide Channel Select panel and monitors down onto support arm quick release connectors as shown in Detai...

Page 31: ...ONSOLE USER MANUAL 13 Step 8 Remove covers from computer rack Figure 1 7 Figure 1 7 Removing Covers from V676 Computer Rack Step 9 Place computer rack near console Figure 1 8 Final V676 System Compute...

Page 32: ...ponents and Computer to V676 Console Locking Clips Red Dot Key Up Grip Ring 8 Video Power Data Power Data Aux Ethernet 3 2 USB Ethernet On On 1 2 Local Displays 1 Enable On Video Out 3 4 6 5 7 Video P...

Page 33: ...15 Step 12 At rear of console install desk lamps Figure 1 10 Figure 1 10 Installing V676 Desk Lamps USB Ethernet Video In 1 2 3 4 In Tx Rx Out Thru In Tx Rx Lk In Out In System Comm Trigger MIDI SMPTE...

Page 34: ...reen indicates a good video signal Yellow indicates no video Using Standard DVI Monitors with the V676 Console The V676 console is shipped with three touchscreen monitors However it is possible to con...

Page 35: ...sets 1 000 Macros 2 000 Effects 1 000 Sets 1 000 Sequences 1 000 Dynamics 500 System Snapshots 1 000 Cue Snapshots 10 000 Cues 10 000 Stacks 1 000 Submasters 30 CPU Apple Mac Mini External Equipment 1...

Page 36: ...and displays for the purpose of operating a lighting system The desk supports one 1 external touchscreen monitor display and one 1 external channel select panel The following main components are inclu...

Page 37: ...trol of various luminaire parameters Palette Used to store and recall Preset Color Beam Group Macro Snapshot Effect Dynamic and Stack settings Intensity Buttons Applies an intensity state to selected...

Page 38: ...s 1 2 Accessories 3 1 Enable Aux Ethernet Serial Data SMPTE In MIDI System Comm Trigger Tx Rx Lk In Out In In Thru Out In Rx Tx Power Button 10A Breaker Switch console power Desk Lamp Connector Power...

Page 39: ...Step 1 Remove lid from console case Figure 1 15 Step 2 Remove console from case and place on a sturdy table or other flat surface Figure 1 15 V476 Console Case Contents Lid Console Case Console Channe...

Page 40: ...on page 24 Step 3 At rear of console install two support arms as shown in Detail B of Figure 1 16 Step 4 Slide Channel Select panel and monitor down onto support arm quick release connectors as shown...

Page 41: ...ure 1 17 Connecting Components and Computer to V476 Console V476 Console Channel Select Displays Out Thru In In Out In In Tx Rx Trigger MIDI Serial Data SMPTE In 2 Accessories 3 1 Enable Aux Ethernet...

Page 42: ...ped with one touchscreen monitor However it is possible to connect a standard DVI monitor instead of the included monitor Installation Guidelines Either the included monitor must be used or a user sup...

Page 43: ...at the console rear panel allow for system connection Refer to illustrations on the next two page for each console type Connecting Additional Devices Inputs at the console rear panel also allow for co...

Page 44: ...em Fiber System Service Port 1 USB Ethernet LIN K Tx 2 Video In 3 4 Rx Accessories 5 3 2 1 6 7 8 1 3 Displays 2 Auxiliary Component Inputs Channel Select Panel etc Monitor Touchscreen Inputs USB Ether...

Page 45: ...ial Data SMPTE In MIDI System Comm Trigger Tx Rx Lk In Out In In Thru Out In Rx Tx Displays 1 2 Accessories 3 1 Enable Aux Ethernet SYSTEM INTERFACE CONSOLE INTERFACE SMPTE Input Connection Switch Clo...

Page 46: ...28 V676 V476 CONTROL CONSOLE USER MANUAL Notes...

Page 47: ...2 GENERAL OPERATION This chapter provides guidelines for general operation setting console preferences and opening a show file GENERAL OPERATION SETTING PREFERENCES SHOW FILES...

Page 48: ...console and Mac computer and to launch the software application To power up and launch Step 1 At rear of console set breaker switch to ON position Refer to Figure 1 3 on page 9 Step 2 V676 console onl...

Page 49: ...will automatically load and Task Progress window will show progress of data downloads Power Down Console When the console s blue power down button is pressed a shutdown dialog will be displayed on th...

Page 50: ...standard touchscreen display The console s external monitors are also touch enabled For applicable software screens the touchscreen interface may be used Touch icons and menus to access features Sampl...

Page 51: ...as Cue Data in the example to the right Select the name of any visible window to bring it to the front Entering Editing Window Data The computer keyboard can be used to type in alpha numeric entries o...

Page 52: ...Primary Load The console is loading data from the show file PS Primary Select The console is waiting on a user selection U Unknown The console is in an unknown state Error The console is in an error...

Page 53: ...efer to Live Preview Mode on page 351 Preview Mode used for preview editing While in Preview mode any manual control actions are stored to the appropriate luminaires but are not executed on stage Refe...

Page 54: ...r backlights c Freeze button controls desk lamps d Rate button controls external monitors e Clear button controls internal monitors front panel displays Step 2 While holding down button turn Rate enco...

Page 55: ...desk is smaller these controls are displayed using the sliding sidebar The sidebar appears in the same space as the central and palette displays when an encoder is turned or an encoder function butto...

Page 56: ...monitor to match the three external monitors available with the V676 console To switch between monitor display views press the appropriate button on the right side of the palette display When switchi...

Page 57: ...screen or 2 using the Show File Manager window available in the Mac menu bar These controls allow show files to be opened duplicated renamed deleted imported and or archived to an external storage dev...

Page 58: ...enamed duplicated or deleted Step 1 At left Console showfile list select show file Step 2 Press Delete Rename or Duplicate button as required Delete will require a confirmation Show File Manager Windo...

Page 59: ...3 CONFIGURATION AND PATCH This chapter provides instructions for configuring the system and patching fixtures SYSTEM CONFIGURATION PATCH PLAN VIEW...

Page 60: ...Note that the System button must be pressed to view the system info Pressing Palettes will display a palette The main configuration screen allows access to the following items Console Name and Details...

Page 61: ...Setting Up Backup Secondary Consoles on page 335 The console name can be set or changed at any time using the System Configuration screen or Version Info window To name a console using System Configur...

Page 62: ...be indicated in a darker gray color To store system configuration Step 1 Press This Console Step 2 Press gear icon to bring up Store and Clear options Step 3 Press Store Config To clear stored config...

Page 63: ...uired Node Step 3 Press Clear Errors and or Reset as required Update Configuration In the event a new device s is added to your system while the console is powered up the system can be repolled so tha...

Page 64: ...he Vx76 control network is designed to work on the 10 67 x x subnet One of the computer s built in ports should be configured to an address in this subnet If the software cannot find an active port se...

Page 65: ...particular front panel Normally this is handled automatically at startup and does not require user intervention However if the mechanism for automatic pairing fails it is possible to do a manual pair...

Page 66: ...up table that the console uses to translate a fixture s associated DMX address es into a single control channel Patching can be done via the command line or Plan View Profiles DMX fixtures must be pa...

Page 67: ...nce to next line For instructions on using DMX diagnostics refer to DMX512 Channel Tests on page 370 Streaming ACN Each PRG Node Plus output port can be configured to send ANSI E1 31 Streaming ACN sAC...

Page 68: ...ered in Plan View Layouts on page 63 Enabling Disabling Patch Editing To enable patch editing Press the Patch button on the touchscreen It will be highlighted in yellow and display Patch Editing when...

Page 69: ...ine keypad press Patch button Patch dialog will open in central touchscreen and Patch Editing mode will be enabled Step 2 First select a Manufacturer then the Fixture type then an Option if applicable...

Page 70: ...only the address the entry would be address Entering Patch Commands A patch command has the following format Patch Chan channel At universe address If the channel number or DMX address is not included...

Page 71: ...c scroller types Note Scroller color control is controlled by the Wheel encoder LED Fixture Control The console supports LED fixtures where the light output is a function of 3 5 color channels and no...

Page 72: ...tions edited The DMX address can also be changed using the usual At syntax You can also change the universe assignment for multiple luminaires with one command For example to move patched luminaires 1...

Page 73: ...re in the console This can be useful to label floor lights specials etc Settings The Settings tab displays settings such as swap reverse preheat and dimmer curve It also indicates which fixtures are a...

Page 74: ...ll only show channels that are selected on the console Set Local sets any current channel selection as a local view filter In other words whatever channels are currently selected will be the only chan...

Page 75: ...mer Curve column Step 4 At drop down menu select dimmer curve configuration Dimmer Curves Window The Dimmer Curves window allows import export updating and deleting of dimmer curves Dates of dimmer cu...

Page 76: ...dimmer curve file can be created in any text or spreadsheet program The file must contain intensity values for each step 0 255 separated by commas For example entries in a dimmer curve file look like...

Page 77: ...d Select Lo ad Select Lo a d 8 5 2 Thru 0 Fill Track Undo S neak Update Copy Move Delete Shift Option Lab el Re call Cmd Store Sel Store Col or S et Dynam Group Help Patch Effect Present Step Seq Beam...

Page 78: ...ed using the zoom controls To zoom into a selected area Step 1 At Plan View touch white Zoom icon When Zoom mode is active luminaire icons will not be selected when dragging to create a box Step 2 Usi...

Page 79: ...ons appear at the right of the Plan View To nudge a fixture s Step 1 Enter Patch Edit mode by pressing Patch Editing button Step 2 Select fixture icon and use nudge arrows to move fixture The arrows w...

Page 80: ...d size visibility snap option Display sets the attribute which will be displayed under the fixture icon in the Plan View By default the channel numbers are displayed but this can be changed using the...

Page 81: ...Plan View beyond the included 2D and 3D layouts Guidelines Each custom layout can have its own settings Fixtures may be hidden from custom layouts as desired When creating a new layout the console st...

Page 82: ...to open layout selection menu Step 2 Press and hold Label while touching a layout name Step 3 At keypad enter alpha numeric label and press Enter To delete a custom layout Step 1 Press Layout to open...

Page 83: ...p 1 Press Layout to open layout selection menu Step 2 At menu select a new layout Layout will load into Plan View window Caution If another layout is opened without first saving the patch edit any cha...

Page 84: ...This action only works with custom layouts and will be grayed out when the standard 2D or 3D layouts are active Note Hidden fixtures only show up in Patch Edit mode They are displayed in a lighter ou...

Page 85: ...s desired Regions are exclusive to the layout on which they are drawn To create a region Step 1 At console s central touchscreen press Plan View Step 2 Press Layout and choose a target layout for the...

Page 86: ...3 To resize drag bottom right corner enlarge or reduce Step 4 Double tap outside of box to turn off editing mode To delete a region Press and hold Delete while touching the region s name on the Plan V...

Page 87: ...Enabling Disabling Patch Editing on page 50 Step 2 Press Add Fixture icon It will highlight Step 3 Touch within the Plan View area to place fixture at the touched location The placement icon will rem...

Page 88: ...70 V676 V476 CONTROL CONSOLE USER MANUAL Notes...

Page 89: ...4 MANUAL CONTROL This chapter provides instructions for controlling luminaires in order to build cues CHANNEL SELECT LAMP CONTROL ENCODER CONTROL KEYPAD CONTROL LUMINAIRE STATUS...

Page 90: ...an View refer to Plan View on page 59 For selecting channels via the 3D Graphic software window refer to Using 3D Graphic Window on page 347 Selecting Channels Channel numbers can be selected or desel...

Page 91: ...available These apply only to selected luminaires Start starts lamp for all selected arc luminaires with remote start capability Douse douses lamp for all selected arc luminaires with remote start cap...

Page 92: ...e pages Step 1 At Century Buttons press 0 through 1900 as required Button will light Step 2 At 100 Button Array press button of first channel number to be selected Then while holding down first button...

Page 93: ...the pin icon at the top right corner to keep the Channel Select on top of other windows When pinning is active the pin icon will turn from gray to white Century Buttons 0 900 Routes the 100 button ar...

Page 94: ...naire utility buttons are also available Arm must pressed first it will latch on before pressing Douse or Home Reset to complete those commands This prevents accidental dousing or reset actions Start...

Page 95: ...0 through 900 as required Button will light Step 3 Select button of first channel Then while holding mouse button down drag across range of channels mouse or drag finger across range of channels touc...

Page 96: ...hen used during command line construction For example Chan n Thru t Clear s Enter results in the selection of channels n thru s When Clear is used after an Enter fully terminated command line the comm...

Page 97: ...e range Last decrements channel selection by one If a single channel were selected either with the keypad or the 100 button array pressing Last will decrement the channel selection by one If a range o...

Page 98: ...on Step 1 Select required channels Step 2 Set luminaire s in recommended starting position according to manufacturer s specifications Step 3 At Channel Select panel press Start Douse Douse will functi...

Page 99: ...channels Step 2 Press and hold Arm while pressing Home Reset once or select Home from Special menu Reset recalibrate luminaires Step 1 Select required channels Step 2 Press and hold Arm while pressing...

Page 100: ...ls X Y and Z coordinates for pan and tilt Dynamics modifies rate size and offset for dynamics Frame controls framing shutters By selecting a function the soft encoders change to control the parameters...

Page 101: ...eel2 close open Wheel close open Magenta close open Amber close open Blue close Function Buttons Press to map a function to the soft encoders Press once to view first page press again to view second p...

Page 102: ...title of the range while the value below the encoder label shows the parameter value or label such as open or full The range labels and defined values are set in the fixture profile The displayed val...

Page 103: ...an Tilt Control To release track ball pan tilt control Click console trackpad or press ESC on the Mac keyboard Note Highlight is an advanced function not associated with pan tilt Refer to Highlight on...

Page 104: ...other Y Index open other X Index open other Color 8 open close Color 7 open close Color 6 open close Beam When Beam is selected the soft encoder mapping is as follows Page 1 Beam 2 open close Frost i...

Page 105: ...n other w Shift button pressed Rotate stop max Rotating Gobo2 open other w Shift button pressed Rotating Spin stop max Fixed Gobo2 open other w Shift button pressed Spin stop max 3D When 3D is selecte...

Page 106: ...e offset is fanned across channels Note that the minimum is 0 degrees Refer to the Dynamics chapter on page 171 for more information about using the encoders with dynamics Frame When Frame is selected...

Page 107: ...if Channel 1 is patched as a Bad Boy luminaire you could select its channel and then store appropriate min max settings You could then deselect Channel 1 and select Channel 2 which for example is patc...

Page 108: ...rols are displayed using the sliding sidebar The sidebar appears in the same space as the central and palette displays when an encoder is turned or an encoder function button is pressed Guidelines Whe...

Page 109: ...ecrease the parameter value Apply Shift Control Fan and Slow features by clicking the buttons at the top of the window Switch between encoder types using the drop down menu at the top of the window Cl...

Page 110: ...election order The fan mode can be changed from two locations the Special menu or the front panel These operations are as follows 1 At Special menu select Encoder Fan then choose the mode 2 At front p...

Page 111: ...ONTROL CONSOLE USER MANUAL 93 Encoder Fan Examples The following are a few examples of fanning as shown in the 3D Graphic window Tilt Center Fan Tilt Ends Fan Tilt Right Fan Pan Out Fan Pan In Fan Til...

Page 112: ...fine tune luminaire parameters Step 4 Double click Slow button again to turn high resolution mode off To use high resolution quick adjust mode Step 1 At front panel select desired encoder function Pre...

Page 113: ...made with the keypad are referred to as command line entries and will be displayed in the command line display as they are entered Command Line Log Line Cue Advance Arrows Increment Value Display Cue...

Page 114: ...r keypad entry is ignored until the error condition is cleared When working from the command line keypad parameters will assume their new values at full speed unless Manual Timing is currently enabled...

Page 115: ...Color palette refer to Colors on page 141 Examples Chan n Color m Enter applies color m to the selected channel n where m is the discrete color number Chan n Thru q Color m Enter applies color m to t...

Page 116: ...100 Chan n Full Enter changes the intensity level of the selected channel to 100 The and buttons can be used in combination with the At button to increment or decrement a current intensity value by a...

Page 117: ...iting functions At Operation menu select Luminaire Status Data will be displayed for all luminaires Note Multiple Luminaire Status windows can be open at the same time with different settings for each...

Page 118: ...lay filter toggle action Keyboard Shortcuts and Tips WIN R Reset Order WIN SHIFT R Size To Fit Holding down ALT on the Mac keyboard or Option on the front panel and clicking a column will lock the col...

Page 119: ...aire Status Window can be customized using Column resizing including Size Columns To Fit in View Menu Click on the column divider to resize Column repositioning Click on column header and drag to new...

Page 120: ...ndow To customize toolbar Step 1 At View menu select Customize Toolbar Step 2 Drag icons or default set into toolbar Selecting Channels from Luminaire Status Window Channels can be selected from the L...

Page 121: ...four individual color columns which would provide data for each filter wheel plate mechanism in the luminaire When the single Focus Color box is checked the column will display the Preset Color sourc...

Page 122: ...tions For example if channels are brought up manually using an encoder the channel numbers turn to red to indicate that they are manually controlled Next if a cue is played back which overrides the in...

Page 123: ...below the intensity level This can be used for scrollers to show the color value or for any other single parameter Once selected the window will display the parameter type at the top The default setti...

Page 124: ...106 V676 V476 CONTROL CONSOLE USER MANUAL Notes...

Page 125: ...5 TIMING FILTERS AND SNEAK This chapter provides instructions for using the timing filter function filter and sneak features OVERVIEW TIMING FILTER FUNCTION FILTER SNEAK TEMPLATES...

Page 126: ...y Timing Filter used to apply timing delay and speed values to any and all combinations of parameters Function Filter used to withhold or mask information from a preset or a cue and to control what is...

Page 127: ...not have to be visible for selected filters to affect console operation Note If a store command is initiated while the touchscreen is in the Timing Filter then the screen will automatically switch to...

Page 128: ...eed can be entered along with a delay but not both These values can be different for each parameter of each luminaire as required Example Cue 1 contains Luminaire 1 and Luminaire 2 A different timing...

Page 129: ...ontribute to these times Masked values do not contribute to these times A parameter cannot have both a time and a speed although it can have a time and delay or speed and delay Time is entered at the...

Page 130: ...Time Delay or Speed as required followed by time value Time value will appear in cells of selected parameters Step 3 Repeat steps 1 and 2 selecting different parameters and entering new values Step 4...

Page 131: ...down fade time to 1 2 seconds Set intensity up and down time while storing a cue For this shortcut the first Time entered is always Up and the second is Down Step 1 Select channels as required Step 2...

Page 132: ...holding down Fan button or double clicking Fan button Step 3 Select required channels Step 4 Rotate encoder to set value From Keypad Step 1 Using Function Filter set parameter filters Step 2 Select re...

Page 133: ...t the Function Filter screen its data would be transferred during any subsequent store or recall operations When a parameter is filtered i e not selected highlighted its data would be withheld from a...

Page 134: ...or selected filters to affect console operation For this reason the touchscreen provides an indication that filters are selected by highlighting them in the parameter grids located at the bottom left...

Page 135: ...yback functions Applying Filters To Cues The Function Filter To Cue button is used to apply filters to a cue store operation Using filters while storing cues Step 1 Set filters as required Step 2 Pres...

Page 136: ...es a means of creating manual control moves on the fly Attribute values presets color beam and cue data can all be assigned to parameters and then recalled using manual time or speed or by pressing En...

Page 137: ...the value range 0 1023 For luminaires with a larger range the sneak value will be converted and will display correctly in the Luminaire Status window Home position 512 Note Sneak does not work with s...

Page 138: ...s and hold Sneak while pressing Preset Palette Button Step 5 Press Timing Filter s ENTER button or Function Filter s TO CUE button Selected luminaires will move into the new position as defined by the...

Page 139: ...an Sneak Cue 10 Enter will input cue data from Cue 10 into Pan Pan Sneak Speed 20 Enter will input a speed of 20 Sneak 3D The Sneak 3D fields available at the Function Filter allows direct entry of 3D...

Page 140: ...n this case enter a sneak command as usual such as Sneak Enter where the is either a value or percentage based on the Parameter setting Using Encoder Sidebar When using the Encoder Sidebar press a par...

Page 141: ...d Step 2 Press and hold Store while pressing Template Palette Button The settings will be stored Label a template When labeling the name can be entered on the console touchscreen keyboard or computer...

Page 142: ...124 V676 V476 CONTROL CONSOLE USER MANUAL Notes...

Page 143: ...6 PALETTES This chapter provides instructions for using the Palettes feature GENERAL PALETTE OPERATION PRESETS COLORS BEAMS GROUPS OTHER PALETTE TYPES DESKTOP PALETTES...

Page 144: ...naps Snapshots Effects Dynamics and Stacks Cue Stacks The second is by using the Palettes window available at the Operations menu This window allows the same store update and recall features as the fr...

Page 145: ...th intensity of that type regardless of selection Lowest Selected Device draws data from the lowest selected channel number of that type regardless of intensity state Use Function Filter on Color Stor...

Page 146: ...n Lab el Re call Cmd Store Sel Store Col or S et Dynam Group Help Patch Effect Present Step Seq Beam 1 4 Mac ro Ch an Type Unpark Park F an B oard Cu e Cu e Sho t S nap Dimmer 7 Block Speed Full Cle a...

Page 147: ...splay as a century screen Press the Century button to display the 100 button array To display a super palette editing screen Press the Edit button to display editing controls To return to the standard...

Page 148: ...press Beam as shown below to bring up options then press Color The Color palette will become the new selection To access a different page within a display Press desired page button at top of palette T...

Page 149: ...ample Beam as shown below Step 3 Access required bank by pressing and holding Bank button while pressing the desired Bank Bank 1 Bank 2 Bank 3 etc Step 4 Access required page by pressing any one of fi...

Page 150: ...g any bank page or palette button Step 2 Enter alpha numeric label Soft Keyboard Copy Paste Buttons for Copy and Paste are available on the soft keyboard These can be used to copy the entire label to...

Page 151: ...Store User slot to store data into a shortcut field For example Store User 3 would store the data into the User 3 slot To recall a selection Press a User slot to bring the word into the current label...

Page 152: ...dow The Century palette is a resizable window which displays a full bank of palettes To open Century palette window At Operation menu select Century Palette Note Multiple instances of this window can...

Page 153: ...and System buttons on the left switch between viewing the palette and the system overview Due to limited space it will not switch to century or super palette mode but it can be set to any function or...

Page 154: ...is feature provides a way of saving time during the initial programming of a show and for updating focuses or other parameters throughout all of your cues if something on stage changes For example a P...

Page 155: ...a Preset If a Preset is already stored the Store command can add new channels to that Preset provided those channels are selected If the channel already has data for the Preset that data will be overw...

Page 156: ...Ensure Presets are selected on at least one palette Refer to page 130 Step 3 Press required Preset Palette Button Recall a preset using command line keypad Step 1 Select required channels only select...

Page 157: ...set n Label xxxxxx Enter Accept where n is the discrete Preset number Delete a Preset Note If cues are referenced in a Preset the Preset cannot be deleted but it can be moved or copied Step 1 Select a...

Page 158: ...play the numeric value which has been stored into each parameter The Dynamic D will display any associated dynamic state information The V and D toggle buttons allow you to display one or both types o...

Page 159: ...ore operation the color parameters stored will be drawn from either the lowest active luminaire or lowest selected luminaire as determined by the console s default setting refer to System Wide Palette...

Page 160: ...been changed refer to Settings Window on page 328 Step 2 Press Store Color n Enter where n is the discrete Color number Label an existing color page or bank When labeling the name can be entered on t...

Page 161: ...lette Data window At Data menu select Color Palette Data It is possible to copy data from luminaire type to luminaire type using the Color Palette Data window During the copy process data will be appr...

Page 162: ...t top of column select name box of source luminaire for example VL5 Step 2 At Mac keyboard press WIN C to copy Step 3 At top of column selected name box of destination luminaire for example VL5Arc Ste...

Page 163: ...palette can store different settings for Bad Boy and VL6C luminaires but multiple settings cannot be stored for multiple Bad Boy luminaires During a store operation the beam parameters stored will be...

Page 164: ...hannels Step 2 Using manual controls set all required parameters Step 3 Filter attributes as required using touchscreen display Step 4 Press Store Beam n Enter or Store Beam n Label Enter xxxxxx Enter...

Page 165: ...its previous state When recalled Beams are not routed through the filters Recall a Beam using Beams palette Step 1 Select required channels only selected channels of types that have data stored in th...

Page 166: ...on will display the numeric value which has been stored into each parameter The Dynamic D will display any associated dynamic state information The V and D toggle buttons allow you to display one or b...

Page 167: ...existing data does not exist in the destination and will not over write existing data Replace All clears out all of the existing destination data and replaces it with the source data To perform a Pas...

Page 168: ...Group super palette Refer to Group Super Palette Advanced Operation on page 152 for more information Storing Modifying and Recalling Groups Basic Operation During a basic store operation all selected...

Page 169: ...nter selects all channels in Group n Group n m Enter selects all channels in Group n plus Channel m Group n Group m Enter selects all channels in Group n and Group m Ordered Groups Channel selection o...

Page 170: ...Group palette When the super palette is opened it will default to the current settings for the selected group A different group can be selected using the palette banks at the bottom of the screen The...

Page 171: ...The Arrangement component specifies how the channels are arranged in the group The arrangement can be Automatic or Manual unless the Channels are rule based in which case Manual will be disabled Manua...

Page 172: ...the New Rule button or deleted using the X button Rules can be additive or subtractive is or is not and can be applied to specific channels as determined by the Fixture Type selection Additional condi...

Page 173: ...channels to be manually stored into individual divisions Note that channels cannot be stored to an automatically arranged division If the channels are None the tab switches to the Automatic arrangeme...

Page 174: ...plishes this task by allowing you to select channels based on information such as all channels in a specific preset or all channels in a specific color Ad Hoc groups can be created using the palettes...

Page 175: ...uch as Fixture Type Intensity State Color Beam Preset etc Select a criteria in each successive column to narrow down and refine the selection Select options to create an ad hoc group Refresh If any ch...

Page 176: ...and recalled using the palettes Instructions for storing and recalling these types of events are covered elsewhere in this manual as follows Dynamics chapter on page 171 Effects chapter on page 191 S...

Page 177: ...g Palettes from the Operation menu These desktop palettes are fully functional and scalable with the same 4x20 Century and Super palette views found in the front panel Guidelines Multiple instances of...

Page 178: ...160 V676 V476 CONTROL CONSOLE USER MANUAL Notes...

Page 179: ...s and instructions for storing a basic cue and playing it back Once you are familiar with these basic operations the Advanced Cue Features chapter on page 271 will allow you to fully utilize all of th...

Page 180: ...ion and the Black Out feature Because of the complexity of this subject intensity state level discussions are provided in stages throughout this manual as follows The Four Intensity States There are f...

Page 181: ...ed channel to 100 Fader Levels Since the intensity level plays a large part in storing cues it is important to note that intensity levels stored in a cue are calculated after the contribution of any s...

Page 182: ...Change or add a cue label Cue n Label Enter xxxxxx enter save or Label Cue n Enter xxxxxx enter save or Label Cue n Enter xxxxxx enter save Label the current cue Label Enter xxxxxx enter save Soft Key...

Page 183: ...ld and press Store User slot to store data into a shortcut field For example Store User 3 would store the data into the User 3 slot To recall a selection Press a User slot to bring the word into the c...

Page 184: ...not affected When deleted the cue will also be removed from the cue list Note When Delete is pressed the keypad defaults to Cue mode Therefore the Cue button press is noted as optional Delete a cue De...

Page 185: ...utes cue stack macros etc The display can also show board cue or effect information Options To view effect information touch the effect number To view board cue information press the Board button To r...

Page 186: ...ntial cue from the cue sheet or any linked cue in its pending file Linked cues without wait times will await manual execution Press Go again to play next cue Play previous cue Press Back to play previ...

Page 187: ...bed If no channels selected it would ungrab all Grab channel select expression Enter Sets grab selection to expression all others ungrabbed Grab 0 Enter Sets grab selection to none ungrabs all Grab ch...

Page 188: ...o change the function filter grab it again with a different filter A grab command with the function filter empty will be ignored When the grab selection is not empty the Grab button will slow blink Th...

Page 189: ...8 DYNAMICS This chapter provides instructions for using the dynamics feature DYNAMICS OVERVIEW DYNAMICS OPERATION...

Page 190: ...for immediate use while up to a total of 500 custom dynamics may be created and stored in the Dynamics palette Dynamics may also be stored into presets or directly into cues Refer to Methods For Stor...

Page 191: ...Help Patch Effect Present Step Seq Beam 1 4 Mac ro Ch an Type Unpark Park F an B oard Cu e Cu e Sho t S nap Dimmer 7 Block Speed Full C le ar At 3 6 Delay Time Enter Sub T rail Lo op 9 W ait Link Tim...

Page 192: ...an important point which is discussed in the following section Methods For Storing Dynamics Like other palette items color beam group etc dynamics are given a discrete number Once stored they can be...

Page 193: ...cle Fast Fast Circle for selected channels 1 1 6 Figure 8 Slow Slow Figure 8 for selected channels 1 1 7 Figure 8 Fast Fast Figure 8 for selected channels 1 1 8 Roller Slow Slow Roller Coaster for sel...

Page 194: ...ROL CONSOLE USER MANUAL Four additional canned dynamics are available in the Dynamics super palette These can be used when building custom dynamics and are not to be confused with the bank of 20 pre p...

Page 195: ...icon to bring up Dynamics super palette Step 4 At Dynamics palette select a canned dynamic A white box will appear around the selected item The dynamic will be immediately applied to the selected chan...

Page 196: ...more random as the fan is applied Double clicking the Fan button will latch the encoder fan mode on LED will flash Double click again to turn the fan mode off Note Dynamics stored in the palette will...

Page 197: ...Offset is measured in degrees where a complete waveform is 360 degrees 1 cycle This function can be used to create multi looks when the offset is fanned across channels Note that the minimum is 0 degr...

Page 198: ...nsity at its maximum value Try setting bias and or Size Autofit See About Clipping below About Clipping Dynamics are often partially or fully clipped by the parameters maximum and or minimum value For...

Page 199: ...up offset options a 30 Degrees 30 Degrees 120 Degrees 180 Degrees 360 1 Cycle 360 1 Cycle Selecting one of these options will fan that particular offset evenly across all of the selected channels b Yo...

Page 200: ...To store in a preset When storing in a preset you must first select the parameters in the Function Filter and then press Dynamic Step 1 Open Function Filter by pressing filter in central touchscreen R...

Page 201: ...s can be viewed in the Luminaire Status window by using the P and D buttons located at the bottom of the window This is useful because it shows what is the value and what is the dynamic The Function F...

Page 202: ...ere the filter selection is not used all the color parameters still store the dynamic data Gravity Roller Coaster Effect When enabled the Gravity setting adds a roller coaster type effect to a dynamic...

Page 203: ...ion in the Dynamics super palette to stop dynamic Step 13 Recall second stored pan tilt preset Pan tilt should now be synchronized and selected fixtures will appear to chase each other like roller coa...

Page 204: ...8 Press either of the Set Point 2 buttons as desired Dynamic will begin running Step 9 Modify as necessary Refer to Storing Dynamics in the Dynamics Palette on page 187 Note Size cannot be modified f...

Page 205: ...acros To create a new dynamic Step 1 Select required channels Step 2 At front panel bring up Dynamics palette Refer to Dynamics Super Palette on page 173 for additional information Step 3 Press Edit i...

Page 206: ...mation Step 9 Press and hold Store while pressing any open Dynamic Select Button to store Step 10 Label dynamic When labeling the name can be entered on the console touchscreen keyboard or computer ke...

Page 207: ...e dynamic number Dynamics Palette Data Window The Dynamics Palette Data window can be used to view create and edit dynamics Open Dynamics Palette Data window At Data menu select Dynamics Palette Data...

Page 208: ...190 V676 V476 CONTROL CONSOLE USER MANUAL Notes...

Page 209: ...9 EFFECTS This chapter provides instructions for using the effects feature EFFECTS OVERVIEW CREATING EFFECTS EFFECT ATTRIBUTES EFFECT TIMING PLAYING BACK EFFECTS ADVANCED OPERATIONS...

Page 210: ...rs or channel ranges may be used to compose set parts with the limitation that a channel may only appear once within the set Up to 2000 parts can be created within a single set 2 Sequence The sequence...

Page 211: ...n R un S to p S tep Select Lo ad Ba nk Fu n c 10 20 9 19 Lo a d Select O ut B lack Grand Master Select Lo ad Lo ad Select Select Lo a d Select Lo ad Select Lo a d Select Lo a d Select Lo ad Select Lo...

Page 212: ...are made up of specified channels luminaire groups with the limitation that a channel may only appear once within the set The following diagram shows an example set consisting of four parts Set 0 Def...

Page 213: ...le sequence consisting of four steps Steps may contain either a single cue a cue range or up to three action items in any combination of the following Beam Color Preset Stop Flag Any single parameter...

Page 214: ...dditional information Step 2 Press Edit icon to bring up Effects super palette By default the Effect Edit screen will be displayed first Step 3 At Effects palette select a blank effect to be created A...

Page 215: ...ss and hold Set Channels or Store while selecting p6 then while continuing to hold Set Channels Store drag finger across touchscreen until p1 is reached Release Set Channels Store button Note To creat...

Page 216: ...hannels across two or more parts the channels may be loaded interlaced or sequentially Change loading method Step 1 At Effect Edit screen press Sequential Interlaced area to bring up options Step 2 Ch...

Page 217: ...a Background State has been defined however parts will run through each active step as determined by the distribution patterns for the effect and assume their Background State until a subsequent inst...

Page 218: ...fects palette select effect A white box will appear around the selected item Step 2 Make changes as required Step 3 Press and hold Store while pressing Effect Select Button to store changes Keypad sho...

Page 219: ...on determines which direction the sequence steps will run Forward The sequence steps will run forward Step 1 Step 2 Step 3 etc and then start over when the last step is reached Reverse The sequence st...

Page 220: ...ence or a portion of a sequence Continuous Once started all parts are in some step at all times during the effect Once a part reaches the last step it automatically goes back to the first step and rep...

Page 221: ...appens at each stage of the effect whether it is a complete sequence or a portion of a sequence Action Action determines how an effect will behave when loaded into a submaster Run By default the effec...

Page 222: ...at only effects which have intensity included will respond to this value In addition if another submaster has intensity for those channels Highest Takes Precedence rules apply Refer to HTP Highest Tak...

Page 223: ...nels involved in the incoming cue would immediately cease activation in the effect and fade to their new cue levels in the time provided by the incoming cue If there is no Fade Out Time all channels w...

Page 224: ...iagrams represents the new action Step The time between activation of a sequence step and the next sequential step On an effects level Step Time can be used in two ways either to set all sequence step...

Page 225: ...of a step and the next sequential step This can also be controlled on a universal level in the effects timing attributes refer to Effect Level Timing on page 205 Attack Transition time between current...

Page 226: ...ut effect Fade In effect Decay step Sustain step Attack step Step step Pressing Shift while using an encoder allows step times to be set for individual steps Note The Effects super palette can be acce...

Page 227: ...will appear around the selected item Step 2 Using encoders set times as required Note When setting step times the default is to change all steps globally To set step times for individual steps first s...

Page 228: ...nges Assign step timing using tap sync Step time can also be set using the tap sync method Hold Cmd and repeatedly tap the Stop Step button a few times at the desired rate on a submaster while running...

Page 229: ...un to replay effect once it is active Play next effect The submaster always sequences placing the next available effect in the pending file Press Go to play back pending effect Play previous effect Th...

Page 230: ...nto the specified submaster To set Autoload Submaster mode At Effect Edit screen press and hold Autoload Submaster button while choosing a submaster Choose is activated by touching the specific submas...

Page 231: ...the Run mode to the Stop Step mode The effect will resume playback when Run is pressed again Add stop flag to a step Step 1 At Effects super palette select an effect to be edited A white box will app...

Page 232: ...ress Edit Set button An Effect Set palette is provided at the bottom of the screen which provides access to all stored sets When a set is selected in the palette its parts will be displayed at the top...

Page 233: ...utton An Effect Sequence palette is provided at the bottom of the screen which provides access to all stored sequences When a sequence is selected in the palette its steps will be displayed at the top...

Page 234: ...re while pressing Effect Select Button This will store the set and sequence selections into that effect number Groups as Effect Sets A Group can be used as a Set within an effect Guidelines Groups mus...

Page 235: ...o the group super palette where the arrangement can be changed The Edit Effect button located above the pile on button can be used to navigate back to the effect super palette Creating Effects From th...

Page 236: ...ace channels in a desired state before the effect starts running Link an effect to a cue Store Cue n Link Effect x Enter stores effect x into the specified cue number n Current stage look is not inclu...

Page 237: ...pter contains instructions for controlling luminaires and media servers with the console s advanced features and for copying and moving programmed data ADVANCED CONTROL DATA COPY AND MOVE FUNCTION KEY...

Page 238: ...e control state It will be active until de selected Activate Manual Timing using front panel button Step 1 At front panel press Manual Timing toggle button button will flash Step 2 Press button again...

Page 239: ...QuickFocus is an alternate control state It will be active until de selected Guidelines During QuickFocus the entire preset is brought up live and all other outputs are disabled as long as the console...

Page 240: ...ring up the preset live Step 3 Press Next First channel will stay active while all other channels go to inactive state Step 4 Modify focus or other parameters as required Step 5 Press Next to go to ne...

Page 241: ...for setting up work lights or other special lights that won t be part of the show Park a luminaire using menu bar Step 1 Select required channels Step 2 At Special menu select Park Selected channels w...

Page 242: ...pressed all highlighted channels but one will go to the defined lowlight state and the single selected channel will be highlighted As long as highlight is active selected channels will go to the high...

Page 243: ...o the parameter s by utilizing absolute data Copy a single channel Step 1 Select target channel s Step 2 At touchscreen set filters Refer to Function Filter on page 115 Step 3 At keypad press Recall C...

Page 244: ...on the touchscreen select the source and then the destination submaster Copy Data The Copy Data feature allows you to copy all the data from one channel to another or to multiple channels This is usef...

Page 245: ...ions During the copy process data will be appropriately mapped to the new luminaire Merge copies data only where existing data does not exist in the destination and will not over write existing data R...

Page 246: ...oard cue Step 2 Press F1 Store window will open Step 3 Select item to store Step 4 Enter number for future recall Step 5 Click OK Note Plus is used with cue store operations Selecting Plus and clickin...

Page 247: ...dow will open Step 2 Select Filter tab Step 3 Select parameters to be recalled Step 4 Press F4 Selective Recall window will open Step 5 Select item from which data will be recalled Step 6 Enter number...

Page 248: ...OK Sneak F9 Step 1 Press and hold ALT while pressing F9 Step 2 Select parameter for sneak operation Step 3 Enter parameter value Step 4 Click OK Select F10 Step 1 Press and hold ALT while pressing F1...

Page 249: ...he 3D Graphic window to adjust the camera angle The following quick keys can be used with the palettes B Beam M Macro C Cue O Board Cue D Delay P Preset E Effect Q Sequence F Full S Snapshot or Speed...

Page 250: ...a media server is patched it can be edited using the Media Server Setup window available from the Setup menu All servers are listed along the left side of the screen while settings for the selected s...

Page 251: ...using Shift or Command When multiple servers are selected their settings can be changed universally Channels displays a list of channels that are assigned to the selected media server This cannot be e...

Page 252: ...outputs Force Refresh forces a refresh of the media thumbnails To refresh multiple servers at once select multiple servers in the left column by using Shift or Command and then press the force refresh...

Page 253: ...ry folder must have a numerical prefix can have a descriptive name if desired and must have a three letter file extension Each of these parts should be separated by a period 001 Great Lawn jpg or 001...

Page 254: ...r and layers via CITP To view and or edit server properties touch the server s palette button Navigation tabs will appear at the top of the palette as the server properties are navigated Navigation Ta...

Page 255: ...NSOLE USER MANUAL 237 Media Super Palette A Media super palette can be accessed by pressing the super palette icon at the right of any visible Media palette The Media super palette displays the conten...

Page 256: ...The currently selected media clip will be displayed in the layer s thumbnail and the library media file number will be displayed at the right side of the screen as shown below Note For more detailed i...

Page 257: ...ues be sent out Server View Lock When viewing a media server at the Server level the view can be locked so that the palette can be used as a visual channel select When locked a small lock icon will ap...

Page 258: ...s applicable to the particular type of media server that is selected For example press the playmode button from Layer 1 as shown below The play mode options will be displayed in the super palette Sele...

Page 259: ...ng Legacy Media Setup from the Setup menu The Legacy Media Setup window works with the old version of the Media control window A new Media palette was introduced with Vx76 software version 3 0 refer t...

Page 260: ...nched it will atomically launch the Mbox Daemon application You can confirm that Mbox Daemon is running by pressing D while Mbox Extreme server is in Window mode To connect a Vx76 console to an Mbox E...

Page 261: ...CONSOLE USER MANUAL 243 Step 5 At Network section select Ethernet 2 from CITP pull down bar Step 6 At Mbox Extreme desktop select System Preferences from Apple menu Step 7 At System Preferences window...

Page 262: ...244 V676 V476 CONTROL CONSOLE USER MANUAL Step 8 At Network window be sure Ethernet 2 is green and IP Address and Subnet Mask match the numbers shown below...

Page 263: ...Step 9 At Vx76 console desktop select System Preferences from Apple menu Step 10 At System Preferences window click on Network Step 11 At Network window be sure Ethernet 2 is green and IP Address and...

Page 264: ...E USER MANUAL Step 12 Be sure Vx76 console profiles are up to date Refer to Updating Profiles on page 368 for more information Step 13 Patch an Mbox Extreme Media Server Refer to Patch Procedures on p...

Page 265: ...At Media Server Setup window be sure Show Server Previews is checked Step 16 At Setup menu select Ethernet Front Panel Step 17 At Ethernet Front Panel window be sure Media Server Interface pull down...

Page 266: ...248 V676 V476 CONTROL CONSOLE USER MANUAL Step 18 Open Media palette choose a server and verify that CITP is sending frames back to the console...

Page 267: ...S MACROS BOARD CUES This chapter provides instructions for storing custom console setups and frequently used programming actions and for configuring submaster playback with board cues SNAPSHOTS MACROS...

Page 268: ...current selected channels When the snapshot is recalled it is displayed at the Channel Select window and Channel Select panel if applicable Monitor 1 stores the windows layout on monitor 1 Monitor 2...

Page 269: ...palettes refer to the Palettes chapter on page 125 Store a snapshot using the palette Step 1 Configure console as required Step 2 At central touchscreen press Snapshot button Snapshot Filter will open...

Page 270: ...tep 3 At Snapshot Filter select console areas to be snapshot They will be highlighted in gray Step 4 Press Store Snap Shot n Enter Label a snapshot When labeling the name can be entered on the console...

Page 271: ...ach snapshot created this way will be unique to that cue Commonly used snapshots should first be created and then linked to a cue using the Link command Refer to Link on page 272 Create a snapshot cue...

Page 272: ...ange m is the last snapshot in the range and y is the new location for the range Cue Snapshot Effect Loading When a cue or effect is loaded into a submaster with a cue snapshot and another snapshot is...

Page 273: ...cro The macro can be played back using this timing information or played back without so that events execute immediately one after the other instead of in real time The Timing feature can be turned on...

Page 274: ...he macro record function can be initiated from the keypad Timing can be specified using command line entry When Enter is pressed the Macro Record toggle button will flash indicating that the recording...

Page 275: ...s of macros Copy Move Macro n Thru m At y Enter where n is the first macro in the range m is the last macro in the range and y is the new location for the range Macro Recording Prompt When using the S...

Page 276: ...window Edit times as required Delete a step Step 1 Using trackpad select step s to be deleted Step 2 Click on trash can icon Step s will be removed Replace a step Step 1 Using trackpad select step to...

Page 277: ...xxxxxx Enter Accept Insert new step s Step 1 Using trackpad select step prior to where you wish to insert new step Step 2 Click insert icon Console Macro button will begin flashing Step 3 At front pa...

Page 278: ...pidly The Canned Macros which can be found in the Macros Palette Bank 20 of the Untitled show file were especially designed to work with the Century Palette window The Canned Macros are organized into...

Page 279: ...7 10 Subtract 10 from Intensity 20 1 1918 Palette Hi Lite Off Reselects channels and bumps the color to Color Palette 299 20 1 1919 Palette Hi Lite Forward Steps through channel selection in ascending...

Page 280: ...ec Sends Fanned delay of 0 to 2 seconds to the current selection using the current fan 20 3 1946 Fanned Delay 4 Sec Sends Fanned delay of 0 to 4 seconds to the current selection using the current fan...

Page 281: ...ntly channel selection 20 4 1981 Offset 0 Degrees Sets Offset to 0 Degrees for current channel and filter selection 20 4 1982 Offset 90 Degrees Sets Offset to 90 Degrees for current Channel Fan and Fi...

Page 282: ...Multi M A B Dynamic Creates a fanned multi color dynamic using color mix Mag Amb Blue 20 5 1999 Solid M A B Dynamic Creates a solid color dynamic using color mix Mag Amb Blue 20 5 2000 Stop All Dynam...

Page 283: ...in effect when the board cue is recorded Board cues like standard cues are stored as numbers which can be randomly accessed for modification or playback at any time The console can store up to 1 000...

Page 284: ...oard Cue Data Display Board cue data can be displayed on the central touchscreen Options To view board cue information press the Board button To return to the cue details touch the cue number Press Bo...

Page 285: ...Board Cue n Enter or Store Board Cue n Label Enter xxxxxx Enter Accept where n is a discrete board cue number Board Control Go button will light Step 4 Board Cue Record toggle button will stop flashin...

Page 286: ...discrete board cue number Board Control Go button will light Deleting Board Cues Delete a board cue or a range of board cues Delete Board Cue n Enter deletes the entire board cue Delete Board Cue n Th...

Page 287: ...e Attributes on page 272 Unless links are provided which will run cues out of sequence any playback sequences will observe the numerical order found in the sheet The Delete Replace Punch In and Insert...

Page 288: ...Board Cue button will begin flashing Step 3 At front panel perform new series of actions Note Board Cue can be updated or re stored as a new number Step 4 Store by one of the following methods a To s...

Page 289: ...r storing and modifying cues utilizing advanced console features These instructions build on the basic store and playback instructions provided in the Basic Cues chapter on page 161 SPECIAL CUE ATTRIB...

Page 290: ...r s pending file when the cue that carries the link instruction is activated In addition link instructions may also be provided to snapshots macros and effects In the case of a linked effect special c...

Page 291: ...Enter links Cue n and Cue m with a loop of x times Add a loop to an existing linked cue Cue n Loop x Enter Cue n and its linked cue will loop x times Remove a loop instruction from a linked cue Cue n...

Page 292: ...s Cue n thru t Wait Enter removes the wait or trail time from the specified cue range n thru t To add a wait trail time to the currently selected cue press Wait n Enter where n is the desired time or...

Page 293: ...on page 328 to change the default Out Time The Cue Out Time key in the upper right of the command keypad is used to enter an Out Time The first click on the button will be Cue Time a double click will...

Page 294: ...re stored into the cue with an intensity value of 100 Submaster Faders Submaster faders can affect the intensity output of selected luminaires prior to the Grand Master contribution provided the subma...

Page 295: ...Enter will store Cue 1 Pressing Store Enter will store Cue 2 Pressing Store Enter will store Cue 3 etc Using with a 0 1 increment value Pressing Store 1 Enter will store Cue 1 Pressing Store 1 Enter w...

Page 296: ...Link n Enter where n is the linked cue To link a snapshot macro or effect to the currently selected cue press Link Macro n Enter where n is the number of the macro you wish to link Snap Shot or Effect...

Page 297: ...ommand line display If a cue by that number does not exist no cue will be displayed At command line display press Cue Forward or Cue Backward arrows The next higher or lower cue numbers nearest the cu...

Page 298: ...Selective Store on page 282 Any channel transferred to an independent submaster or parked in patch will not be updated All other cue data remains as originally set Note Unlike Selective Store Update...

Page 299: ...or example changing the dynamic rate for a ballyhoo will track through successive ballyhoo dynamics that have the same original rate The track will stop when a cue is encountered that has no dynamic o...

Page 300: ...er in a range of cues Step 1 Select required channels Step 2 At touchscreen modify a parameter s as required For example color Step 3 Press Sel Store Cue n Thru m Enter The new color parameters will b...

Page 301: ...e data Step 1 Using Function Filter select parameters to be recalled Refer to Function Filter on page 115 Step 2 If timing is desired press Man Time Recalled parameters will change in the luminaire s...

Page 302: ...ommands For more information refer to Update on page 280 and Selective Store on page 282 Modify a cue in a submaster Step 1 Run cue in submaster Step 2 Using manual control modify parameters as requir...

Page 303: ...activated by touching the specific submaster on the touchscreen Once the mode has been activated the cue title will show Synced to sub Any advances in the cue sequence at the submaster will automatica...

Page 304: ...as the current cue after other cues have been selected When the cue selection is synchronized to a submaster and another cue is manually selected the cue selection can be re synced to the submaster by...

Page 305: ...oolbar will be visible when a Cue Stack is selected Refer to Cue Stacks on page 295 for complete instructions on this window feature Access Cue Sheet Step 1 At Operation menu select Cue Sheet Cue Shee...

Page 306: ...r At Cue Sheet window select separator by name from pop up menu Cue Sheet will scroll to beginning of separator line Renumbering Cues The cue number field is editable Note The Move function also effec...

Page 307: ...load and play in the submaster specified in the Track pull down menu Submaster Stop Step A running cue can be stopped using the Stop Step button Step 1 Press Stop Step to stop a running autofollow Ste...

Page 308: ...ow read Disable Cue Editing The Edit button is also available to enable disable editing Step 3 Edit data according to guidelines in Cue Editing on page 292 Step 4 Click Save Cue to save changes or cli...

Page 309: ...ng Cells appear red when editing is enabled Keyboard Shortcuts and Tips WIN R Reset Order WIN SHIFT R Size To Fit Holding down ALT on the Mac keyboard or Option on the front panel and clicking a colum...

Page 310: ...t Customize Toolbar Drag icons or default set into toolbar Cue Editing Cue data can be edited in the Cue Data window when editing is Enabled To enable editing click Enable Editing button Spreadsheet f...

Page 311: ...eneral it is not possible to edit copy or paste any parameter column that is not in the table The exception is the Focus and Color columns Pasting into one of these columns is equivalent to pasting th...

Page 312: ...that will be used for the replace Step 3 In Template Row select cells columns to be used as the search pattern this is based on the pre edit values of these cells Step 4 Click Find Replace button Step...

Page 313: ...done with stacks such as selective storing and tracking Stacks in the Command Line Cue Stacks can be stored in the command line much the same as standard cues with the addition of the Cue Stack prefi...

Page 314: ...cros and Effects or from the keypad For instructions on using the palettes refer to the Palettes chapter on page 125 A Stack can be stored directly into a palette by holding the Store button down whil...

Page 315: ...from the Operation menu The Cue Stack toolbar will only be visible when a Cue Stack is selected The Stack pop up menu will display the currently selected Cue Stack when the window is first opened Use...

Page 316: ...on page 301 Pressing and holding Store while choosing a submaster with a stack will create a new cue at the end of the stack Note that Store Choose on a submaster cue in the main cue list will store t...

Page 317: ...13 SUBMASTERS This chapter contains instructions for operating the playback masters SUBMASTER OVERVIEW SUBMASTER MODES PLAYBACK INTENSITY LEVEL PLAYBACK...

Page 318: ...t Stop Back Go Board Control Select Load Run Stop Step Back Go Solo Bump Select Load Run Stop Step Back Go Solo Bump Select Load Run Stop Step Back Go Solo Bump Select Load Run Stop Step Back Go Solo...

Page 319: ...o Fader or Intensity Bump it will also be displayed It is possible to set up all submaster modes without having the submaster selected except Manual Assign Submaster Choose The submaster choose functi...

Page 320: ...on at this screen and defaults may be reset Refer to Submaster Modes on page 301 for more information about mode settings Pressing Setup will bring up a summary of additional mode settings for each ba...

Page 321: ...plied modes and clears any active or pending cues returning the submaster to its default state This clear feature is a two step process so that mode setting and cue information can be cleared separate...

Page 322: ...lled on stage Submaster 2 is assigned to priority of 1 with Cue 101 audience bally loaded into the submaster When Submaster 2 is selected its contents will override Submaster 1 recalling Cue 101 When...

Page 323: ...lting in a bump from the current fader position to full To set Bump mode using submaster touchscreen Step 1 Choose a submaster to bring up its Setup options Choose is activated by touching the specifi...

Page 324: ...parameters bump and all other sumbaster s parameters go to zero Example Step 1 Set submaster to Add Solo mode see previous page Select will begin flashing Step 2 Press Go button to execute an add bum...

Page 325: ...e towards the goal of the active cue in Sub 2 Once the Sub 2 fader is all the way up the lower priority data is no longer used Note Timing is ignored unless the fader is at full or zero in which case...

Page 326: ...waits and trails are affected by the rate modification proportionally If a cue is complete the rate adjustment will affect the pending cue When the pending cue is activated the adjusted rate is used...

Page 327: ...een Step 2 Deselect Rate checkbox or press Clear to clear all submaster settings Step 3 Press Close to close Setup screen To select rate control for a submaster using choose method Step 1 Press and ho...

Page 328: ...ess Close to close Setup screen To release a submaster from Timing Disable mode using submaster touchscreen Step 1 Choose a submaster to bring up its Setup options Choose is activated by touching the...

Page 329: ...to bring up its Setup options Choose is activated by touching the specific submaster on the touchscreen Step 2 Select Board Control Disable checkbox Step 3 Press Close to close Setup screen To release...

Page 330: ...en Step 1 Choose a submaster to bring up its Setup options Choose is activated by touching the specific submaster on the touchscreen Step 2 Select Dynamic Disable checkbox Step 3 Press Close to close...

Page 331: ...aster on the touchscreen Step 2 Select Freeze checkbox This will instantaneously halt the cue or effect Step 3 Press Close to close Setup screen Step 4 Press the Run button to resume cue or press Back...

Page 332: ...o Channel Filter on page 318 To set Inhibitive mode using submaster touchscreen Step 1 Choose a submaster to bring up its Setup options Choose is activated by touching the specific submaster on the to...

Page 333: ...mode using submaster touchscreen Step 1 Choose a submaster to bring up its Setup options Choose is activated by touching the specific submaster on the touchscreen Step 2 Select Independent checkbox S...

Page 334: ...ing cue or effect If filters are being used with the submaster they will modify the manually assigned channels accordingly refer to Function Filter Submaster on page 319 The submaster must first be se...

Page 335: ...ng the Manual Assign function the current intensity value for the selected channels at the time of being assigned becomes the full intensity range which can be adjusted by the submaster fader Example...

Page 336: ...ching the specific submaster on the touchscreen Step 2 Select Channel Filter checkbox Step 3 Press Close to close Setup screen To release a channel filter using submaster touchscreen Step 1 Choose a s...

Page 337: ...the Function Filter to update the filter changes in the submaster Filters can be used with Effects to withhold information from cues beams and presets when they are part of an effect sequence When cu...

Page 338: ...layed back Final intensity is determined by the following combination Intensity value stored in the cue or effect being played back Fader setting of the submaster being used to playback the event If m...

Page 339: ...e 52 has a stored intensity value of 100 Submaster fader playing Cue 52 is set at 50 Grand Master fader is set at 100 Cue 52 will play back at an intensity level of 50 Playback Scenario 2 Cue 54 has a...

Page 340: ...Cue 2 which has an intensity value of 100 and the fader is dropped to 50 halfway through the transition then the result would be a 5 second fade from 0 intensity to 50 intensity followed by a 5 second...

Page 341: ...ked cue in its pending file Linked cues without wait times will await manual execution Press Go again to play next cue Play previous cue Press Back to play previous cue previously active on that subma...

Page 342: ...rked and zero instructions will use the intensity down time associated with the channel Cues with an out inactive state instruction will follow the out time associated with the cue Direct Mode To assi...

Page 343: ...aders will go to the current levels The Submaster HUD window will always show the current levels The top right of the Settings window allows you to set the Value Takeover behavior This defines the log...

Page 344: ...326 V676 V476 CONTROL CONSOLE USER MANUAL Notes...

Page 345: ...apter provides instructions for setting console preferences network and control settings display settings and multi console system options SETTINGS DISPLAY FILTERS MULTI CONSOLE FEATURES OFF LINE PROG...

Page 346: ...distances Sets the internal date time stamp Configures console for Last Takes Precedence operation for intensity LTP mode is console wide affecting all submasters Configures internal clock to take ove...

Page 347: ...ature and its settings Sets the default Out Time to be used in cues unless a different time is specified Chooses which value is stored during a Beam or Color palette store command Configures alert saf...

Page 348: ...Show Control Go command The MIDI show control fields are used as follows The stack and cue number Q number field is sent in n n n format For example cue 2 1 5 would be sent as 2 1 5 When using MIDI No...

Page 349: ...s them from the rest of the system The highlight and lowlight states are defined at the Highlight tab Guidelines The settings are applied in sequence and can overwrite each other Items that are not ch...

Page 350: ...snapshot Date Time Stamp Sets the computer s internal date and time values for the console Units Default English This sets the unit of measure used with the 2D 3D location configuration Palette Store...

Page 351: ...3D Graphic window Load a display filter Step 1 Select only channels you wish to be displayed in status or 3D Graphic windows Step 2 At front panel press Display Filter toggle button button will flash...

Page 352: ...fective for all status and data windows To enable display filtering Step 1 At front panel press Auto Display Filter toggle button button will flash or at Special menu select Auto Display Filter A chec...

Page 353: ...ol Each system must have a primary console Only one primary console per system is allowed Secondary Console This console is hosted by the primary console It receives show data from the primary and mir...

Page 354: ...console Step 1 At console to become primary at Vx76 menu select Takeover as Primary Console Step 2 At confirmation window click OK to proceed or Cancel to abort To name a console using System Configur...

Page 355: ...abel will turn yellow and indicate the number of channels currently loaded in the partition Add channels to a partition Step 1 At Channel Select panel select current channels by pressing All Step 2 Se...

Page 356: ...System Configuration window which will display errors for any of the previously connected system devices Set console to Off Line mode At Vx76 menu select Offline When in Off Line mode indications will...

Page 357: ...ces that require an update The Version Info window will display the current software version and date for all connected system devices To update system software Step 1 Create new show file without a p...

Page 358: ...340 V676 V476 CONTROL CONSOLE USER MANUAL Notes...

Page 359: ...15 3D GRAPHIC DISPLAY This chapter provides instructions for using the 3D Display features 3D FEATURES 3D DISPLAY WINDOW LIVE PREVIEW MODE...

Page 360: ...s camera angles ambient lighting and rendered detail level The window also contains built in control interface features which allow luminaire parameter modification within the 3D graphic environment T...

Page 361: ...version of console software does not support files in AutoCAD 2000 format or files which contain 3D solids information Drawings created in AutoCAD 2000 should be saved as an AutoCAD R14 drawing Note...

Page 362: ...ole will recognize this indicator and not clip beams when they meet objects in this layer Match 3D The Match 3D feature available in the Drawing Size window allows importing of the size and window pos...

Page 363: ...s An X Y and Z location for each luminaire is defined in its patch information These coordinates can be entered in the Location section of the Patch dialog at the time the luminaire is initially patch...

Page 364: ...height sets the top position for the luminaire s hook in the 3D graphic For example to place a luminaire on a pipe at a height of 20 0 to the bottom of the pipe the luminaire should be placed at 20 2...

Page 365: ...aving defined a new venue or imported a venue you will be asked to define the venue size Refer to Defining a New Venue on page 342 Guidelines Luminaires are focused along a focus line which reflects t...

Page 366: ...e within the graphic with these cross hairs will refocus the camera angle to that center point When the Center Lines Mode is selected the lines beam representations will change color according to inte...

Page 367: ...depending on how many rendering options are currently active Adjusts overall brightness of the 3D venue Adjusts virtual smoke level in venue The brighter the smoke level the more visible the luminaire...

Page 368: ...attached track ball or other mouse device When enabled this will be indicated by an X Y Control watermark on the monitor desktop To enable track ball X Y control At Operation menu select X Y Control T...

Page 369: ...ar in the status bar and command line display as shown below Guidelines The submasters are not affected by the Live or Preview mode selection Any active events on a submaster will still execute normal...

Page 370: ...352 V676 V476 CONTROL CONSOLE USER MANUAL Step 6 Press Live Preview toggle button again to return to Live mode When Live is highlighted the Live mode is on Live Preview Toggle Button...

Page 371: ...his chapter provides instructions for managing show files importing exporting patch data updating the operating system and using the off line diagnostics SHOW FILE AND DATA MANAGEMENT UPDATING PROFILE...

Page 372: ...sole s central touchscreen or 2 using the Show File Manager window available in the Mac menu bar These controls allow show files to be opened duplicated renamed deleted imported and or archived to an...

Page 373: ...file in one step Step 1 At right External showfile list select an external source using pop up menu Step 2 Select archived show file Step 3 Press Launch button to unarchive and open To rename duplicat...

Page 374: ...ature If fixture profile information is present in the incoming show file data then patch information cannot be imported at the same time In this case the patch must be imported first refer to Importi...

Page 375: ...ecific type from another show Step 1 Press the selective button then specify the type and range Step 2 Press Import Data button to import Importing Cues This feature allows the import of cue data from...

Page 376: ...plied to those cues Preset data may also be required Note Cue numbers effects etc loaded by an imported Cue Snapshot may not exist in the current show file If importing Effects where the Sequence step...

Page 377: ...t window click Cleanup This action will remove Unk fixture types Revert to Defaults This command can be used to delete bad palette data and duplicate fixture types This will restore defaults from the...

Page 378: ...e is open select Save A Copy at the File menu Save As window will open Step 2 Type a new file name or use default name Step 3 Click Save Show File Manager Window The Show File Manager software window...

Page 379: ...all cues to the main cue list Submaster information will import to cue stacks Sub 1 2 3 to Stack 1 2 3 respectively Import Groups Presets Imports all groups and converts them to presets To import sho...

Page 380: ...rting Patch Patch data exported from a show file may be imported into a different show file The patch data file can be resident on the hard drive or portable disk Note The Import Patch option will onl...

Page 381: ...limit of 1Mb After it is full messages will no longer be logged although they will still appear in the information bar as they occur Press Clear to empty log so that new messages will be displayed Us...

Page 382: ...c interface which allows you to configure the printing options The console allows four extra options when Vx76 is selected from the bottom popup menu Summary Current All and From Refer to Print window...

Page 383: ...select Print Step 3 At Print window use pop up menu to select Vx76 in order to bring up Vx76 options Step 4 If printing from a special Vx76 window select which data you wish to print see previous page...

Page 384: ...re Patch windows Refer to Patch on page 48 The Profiles are stored in a Vx76 system folder which is accessed each time a new show file is opened It is possible to import new Profiles and update older...

Page 385: ...file s to console Step 2 At File menu select Import Profiles Load Profiles window will open Step 3 Locate Profiles on your storage device select and click Open The Profile s will be copied to the cons...

Page 386: ...o update profiles Step 1 At File menu select Update Profiles Step 2 Update Profiles window will open and all profiles in the open show file will be compared to the latest profiles in the console s Pro...

Page 387: ...n the patch To delete a profile Step 1 If required unpatch any profile s you wish to delete Step 2 At File menu select Update Profiles Step 3 Update Profiles window will open and all profiles in the o...

Page 388: ...nel Assignment grid Step 3 To test a specific channel at DMX Diagnostics section of window enter channel number in Channel field and a value for example 100 in Value field Click Send to send value dir...

Page 389: ...e Enter Set dimmer at universe channel to value Dimmer advance to next dimmer Dimmer return to previous dimmer Dimmer Dimmer exit dimmer check When dimmer check is active the Dimmer key on the keypad...

Page 390: ...372 V676 V476 CONTROL CONSOLE USER MANUAL Notes...

Page 391: ...TROL BY EXTERNAL DEVICES This chapter provides instructions for controlling shows by use of an external MIDI SMPTE or switch closure trigger device CONCEPTS MIDI NOTES MIDI SMPTE TIMECODE MIDI SHOW CO...

Page 392: ...with motion images This is essentially the same as MIDI timecode except that it is analog while MIDI timecode is digital However once either of these signals enters the console they are stored as dig...

Page 393: ...at will supply the short such as a hand held switch a relay a footswitch etc The switch closure trigger port will accept a 2 conductor mini mono phone plug which can be purchased from PRG or other ele...

Page 394: ...G 2 7 Eb1 39 B3 71 G6 103 G 2 8 E1 40 C4 72 G 6 104 A 2 9 F1 41 C 4 73 A7 105 Bb 2 10 F 1 42 D4 74 Bb7 106 B 2 11 G1 43 Eb4 75 B7 107 C 1 12 G 1 44 E4 76 C7 108 C 1 13 A1 45 F4 77 C 7 109 D 1 14 Bb1...

Page 395: ...zing Protocol To prevent unexpected interruptions in the MIDI execution of events a synchronizing protocol is built into the system This feature can be turned off and on using the Timecode Autoswitch...

Page 396: ...be re recorded in order to make a change The Time column may also be edited To allow creation of multiple scripts only the selected script will be run Any action may change the times of all cues If a...

Page 397: ...ndow To open at Data menu select Timecode Scripts Click on Steps drop down arrow to view content of steps Edit as necessary Delete a step Step 1 Using trackpad select step s to be deleted Step 2 Click...

Page 398: ...ad select line of script for playback Step 2 Click in the L Link column to place a bullet next to each script to be played To edit timecode Step 1 Using trackpad select step Step 2 At keyboard press r...

Page 399: ...external device This value can be defined as anything from 0 126 The system will accept an incoming value of 127 for an All Call The MIDI ID default is zero The MIDI ID of the console must match the e...

Page 400: ...ny type of Vx76 item Q_Number Q_List Q_Path Stop Will generate either a board cue stop back or a submaster stop even based on Q_List 0 30 Q_List Resume Will generate a submaster run event based on Q_L...

Page 401: ...go next simulating a simple press of the board cue go button Q_Number empty Q_List 1 30 submaster Q_List go next simulating a press of that submaster s Go button Q_Number N Q_List 0 board cue number...

Page 402: ...ct Settings from the Setup menu Step 2 Click Midi tab Step 3 At MIDI Output configure device port and other settings MIDI Show Control Message Format When a Cue Number is sent as data additional infor...

Page 403: ...18 OFF LINE MODE VISIONARY This chapter provides instructions for operating the Vx76 software off line without a console VISIONARY OPERATION...

Page 404: ...nt panel it will automatically launch in the Visionary mode Main Window In Visionary mode the panel displays front panel touchscreens show up in a special tabbed window The tabs can be moved and are d...

Page 405: ...the Operation menu As with the panel windows the HUD windows can be resized by dragging the bottom right corner There is also an option to pin the HUD to keep it on top of other windows To pin a HUD c...

Page 406: ...nd requires a subsequent action the entry will be yellow to indicate that it is waiting for the next action For example if Delete is pressed it will require a subsequent entry such as Cue before a num...

Page 407: ...feedback Use the cursor to turn the virtual encoder knobs Apply Shift Control Fan and Slow features by clicking the buttons at the top of the window Switch between encoder types using the drop down me...

Page 408: ...display by clicking the appropriate button at the top of the window Switch between submaster banks 1 10 11 20 21 30 using the drop down menu at the top of the window The colors of the Submaster HUD ma...

Page 409: ...A TECHNICAL SPECIFICATIONS This appendix contains technical specifications for the consoles SPECIFICATIONS...

Page 410: ...les to be linked together Interfaces Copper and Fiber Optic Ethernet connections for communications protocol SMPTE Time Code input MIDI Time Code input MIDI Show Control input and output MIDI Notes in...

Page 411: ...et Switch allows 2 or more V476 or V676 consoles to be linked together Interfaces Copper and Fiber Optic Ethernet connections for communications protocol SMPTE Time Code input MIDI Time Code input MID...

Page 412: ...394 V676 V476 CONTROL CONSOLE USER MANUAL Notes...

Page 413: ...B REFERENCE FRONT PANEL AND KEYBOARD SHORTCUTS PRE PROGRAMMED CANNED FEATURES GLOSSARY...

Page 414: ...le timing disable Label Choose Enter label for cue effect in submaster Cue Choose Set current cue from submaster D1 mode Group Choose Select all lights active in submaster Store Choose Store cue in su...

Page 415: ...ore Label Select Store item and enter label PCBGMSE Update Select Update item P Label Select Label item PCBGMSE Group Select Select channels currently using item PCB Sel Store Select Selective store i...

Page 416: ...amera right up arrow 3D rotate camera up down arrow 3D rotate camera down SHIFT left arrow move venue left relative to camera SHIFT right arrow move venue right relative to camera SHIFT up arrow move...

Page 417: ...selected channels 1 1 6 Figure 8 Slow Slow Figure 8 for selected channels 1 1 7 Figure 8 Fast Fast Figure 8 for selected channels 1 1 8 Roller Slow Slow Roller Coaster for selected channels 1 1 9 Roll...

Page 418: ...os No Name Macro Description Bank Page 1901 Auto Display Filter Turn on Auto Display Filter 20 1 1902 Load Display Filter Loads Display Filter 20 1 1903 Clear Display Filter Clears Display Filters 20...

Page 419: ...s for the current selection to 3 seconds 20 2 1930 All Time 4 Sec Sets time to all parameters for the current selection to 4 seconds 20 2 1931 Down Time 0 Sec Sets Down Time for current selection to 0...

Page 420: ...rent window state 20 3 1953 Media Window Brings up Media Window to its current window state 20 3 1954 Plan View Window Brings up Plan View Window to its current window state 20 3 1955 Luminaire Status...

Page 421: ...or currently channel selection 20 4 1981 Offset 0 Degrees Sets Offset to 0 Degrees for current channel and fil ter selection 20 4 1982 Offset 90 Degrees Sets Offset to 90 Degrees for current Channel F...

Page 422: ...Pan Wave Dynamic Creates fanned Pan wave for the current selection 20 5 1997 Intensity Dynamic Creates fanned Intensity wave for the current selec tion 20 5 1998 Multi M A B Dynamic Creates a fanned...

Page 423: ...als transmitted from the control console to the luminaires and interface devices The signal is received by all luminaires simultaneously and interpreted by each individually Bump A submaster mode in w...

Page 424: ...or effect 10 000 cues can be recorded numbered from 01 to 9999 99 Cue Attribute Data which is programmed in association with a given cue number Cue attributes include labels out time for luminaires as...

Page 425: ...me fade out time duration and decay time Emergency Cue The state a luminaire will assume if communication between the luminaire and the console is disrupted for more than 15 seconds It is possible to...

Page 426: ...nd line keypad Also see Ordered Group Group Palette A function of the palettes which allows channels to be stored and recalled as groups Highlight A method for identifying a particular fixture or set...

Page 427: ...has no intensity data but does have other parameter data When the luminaire is zero it has intensity data at 0 but does not have other parameter data opposite of marked An inactive luminaire out has...

Page 428: ...which can be used in an effect sequence The Null action will return the fixtures to their previous state before the effect was started for example the previous cue recalled by the submaster The Null...

Page 429: ...vailable in some luminaires Sometimes called an effects wheel Quick Focus QuickFocus allows stepping through a selected preset one channel at a time to verify its parameter data At the conclusion of a...

Page 430: ...et or beam state Sequence A component of an effect which is made up of a number of steps The steps specify what action the applied set groups of lights are to take in an effect Also see Set Set A comp...

Page 431: ...intensity value parameter attribute group selection or timing information into a specified target e g cue palette preset etc Submaster A playback device that can be used to execute cues board cues an...

Page 432: ...d to store modified channels back into their source cues or to add new channels to cues Update is not routed through channel or filter selections Upfade Time A timing value associated with channel int...

Page 433: ...C INDEX...

Page 434: ...r 117 Black out 276 Board control disable submaster 311 Board cue connecting external trigger 25 375 deleting 268 overview 265 recalling 268 recording 267 268 window 269 270 Brightness level front pan...

Page 435: ...ng 292 293 forward back buttons 287 freeze state 279 314 global time 274 import 357 label shortcuts 165 labeling 164 linking 272 324 links 287 locate stored 279 looping 273 modifying 166 out time 275...

Page 436: ...n 201 duration 201 204 duration time 205 206 editing 200 encoder 89 encoders 193 fade in 205 208 fade out 205 208 forward direction 201 from command line 217 group as set 216 keypad shortcuts 200 load...

Page 437: ...Global cue time 274 Gobo image encoder 87 Grand master 276 Group ad hoc 152 156 157 advanced operations 152 allocation 156 arrangement 152 153 155 as effect set 216 automatic 155 channels 152 153 154...

Page 438: ...y move 225 data window 258 overview 158 255 palette 255 256 260 recalling 260 recording 255 256 Manual assign submaster 316 317 Manual control 3D delay 87 3D time 87 ad hoc groups 156 beam 86 color 86...

Page 439: ...mics super palette 173 edit screen 129 effect 193 194 196 effect super palette 193 general operation 128 129 130 group 150 152 label 132 label shortcuts 133 macro 255 256 260 overview 126 page 130 pre...

Page 440: ...284 Sequence attack time 207 copy move 225 creating 197 decay time 207 edit 215 216 overview 192 195 step time 207 sustain time 207 timing 207 Sequential 198 Set copy move 225 creating 197 default se...

Page 441: ...ard control disable 311 board cue Go 268 324 bump 305 channel filter 318 choose 301 clear 303 control screen 302 copy move 324 creating ad hoc groups 156 cue autoload 289 cue direct mode 285 324 cue s...

Page 442: ...on 281 Trackball with pan tilt 85 350 U Undo command 166 283 manual changes to cue 284 Units of measure 328 332 Universe Bus 49 defining 52 Unpark 223 Update function key 228 system configuration 45 u...

Page 443: ...V676 V476 Control Console User Manual Version as of November 30 2012 PRG part number 02 9814 0001 35...

Page 444: ...Production Resource Group LLC Dallas Office 8617 Ambassador Row Suite 120 Dallas Texas 75247 www prg com...

Reviews: