27
Thermocouple
Connect Thermocouple Positive (+) to terminal 31 and Negative (-) to terminal 32 as shown in
Figure 11.2 (a). Use the correct type of Thermocouple extension lead wires or compensating cable
for the entire distance ensuring the correct polarity throughout. Avoid joints in the cable.
31
32
33
Figure 11.2 (a)
RTD Pt100, 3-wire
Connect single leaded end of RTD bulb to terminal 31 and the double leaded ends to terminal 32
and 33 (interchangeable) as shown in Figure 11.2 (b).
Use copper conductor leads of very low
resistance ensuring that all 3 leads are of the same gauge and length. Avoid joints in the cable.
31
32
33
Figure 11.2 (b)
DC Linear Voltage (mV / V)
Use a shielded twisted pair with the shield grounded at the signal source for connecting mV / V
source. Connect common (-) to terminal 32 and the signal (+) to terminal 31, as shown in Figure 11.2
(c).
Figure 11.2 (c)
31
32
33
DC Linear Current (mA)
Use a shielded twisted pair with the shield grounded at the signal source for connecting mA source.
Connect common (-) to terminal 32 and the signal (+) to terminal 31, as shown in Figure 11.2 (d).
Make sure that the Jumper Pins for Input selection are shorted using the Shorting-Link (Refer
S
ection 9 Hardware Assembly and Configurations, Input-Jumper Settings).
Figure 11.2 (d)
31
32
33
User Manual
neuro 100EX
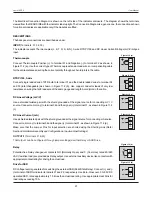
The Electrical Connection Diagram is shown on the left side of the indicator enclosure. The diagram shows the terminals
viewed from the REAR SIDE with the indicator label upright. The Connection Diagram is a generic one; the connections shown
for optional modules are applicable only if the modules are fitted.
DESCRIPTIONS
The back panel connections are described as under:
INPUT
(Terminals : 31, 32, 33)
The indicator accepts Thermocouples (J, K, T, R, S, B, N), 3-wire RTD Pt100 and DC Linear Current/Voltage (mV/V/mA) as
input.
OUTPUT-1
(Terminals 21 & 22)
The Output-1 can be configured (through jumper settings) as either Relay or SSR Drive.
Relay
Potential-free Relay changeover contacts NO (Normally Open) and C (Common) rated 2A/240
VAC (resistive load) are provided as Relay output. Use external auxiliary device like contactor with
appropriate contact rating for driving the actual load.
21
22
NO
C
Figure 11.3 (a)
Drive for SSR
DC Voltage level is generated for switching the external SSR (Solid State Relay). Connect (+) and (-
) terminals of SSR to indicator terminals 21 and 22, respectively. Use Zero-Crossover, 3 to 30 VDC
operated SSR, rated approximately 1.5 times the actual load rating. Use appropriate Heat Sink for
load rating exceeding 10A.
Figure 11.3 (b)
21
22

