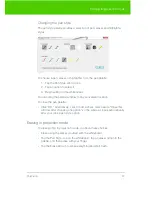
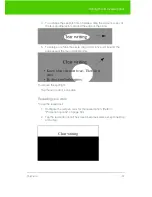
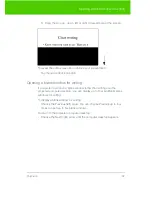
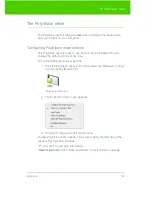
background image

PolyVision

18

Using dry-erase markers

2. Tap at the location where you want to move the cursor for entering 

text.

3. To enter text, tap keys on the on-screen keyboard. 

4. To move the keyboard, drag the title bar to another location. 

5. To close the keyboard, tap the “close” button at the upper corner of 

the window or tap keyboard again.

Using dry-erase markers

The whiteboard sends writing and erasing data to your computer by 
detecting a single point of pressure. Whenever you write on the 
whiteboard, make sure there is only one point of contact at a time. 

note:

NOTE:

Use only the recommended markers and erasers. The whiteboard surface 
can be damaged by sharp objects, such as ballpoint pens and rulers. 
Scratches can cause permanent ink stains and data loss due to electrical 
malfunctions. 

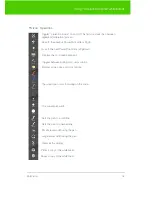
Use standard dry-erase markers to write on the TS and TSL whiteboard. To 
specify the color that is recorded in the software, tap the corresponding ink 
color icon on the icon strip. 

To write on the board so you can save or print: 

1. Choose a dry-erase marker.

2. Tap one of the ink color buttons on the icon strip to specify the color 

that is recorded in the software. A selected ink color (or eraser) stays 
in effect until you select a different one.

3. Write on the board.

When you choose an ink color and write, sounds from the board provide 
audible feedback to confirm that the software is recording. 

The default ink color recorded in the software is black. To change the 
default color at startup, refer to "Configuring PolyVision driver options" on 
page 24.

Erase the board using the large circular felt eraser provided, or using your 
finger for small erasures. 

To record erasures for printing or saving:

Tap the Small or Large Eraser icon on the board before you erase. 

Summary of Contents for TS 6 Series

Page 1: ...Part number 370 0364 02 2011 PolyVision Corporation All rights reserved TS Series interactive whiteboard user guide...

Page 2: ...uct is covered by one or more of the following patents Canada 2 100 624 EPO 600 576 EPO 871 935 Germany 69 321 445 WO 98 14888 US 4 777 329 US 5 248 856 US 5 327 161 US 5 434 370 US 5 583 323 US 5 585...

Page 3: ...00 model 10 Getting started in projection mode 12 Using TS series interactive whiteboards 14 Getting started with TS interactive whiteboards 14 The TS icon strip 15 Control icon options 17 Cursor cont...

Page 4: ...S or TSL whiteboard 37 Caring for dry erase markers and erasers 38 How to obtain replacement parts 39 Summer maintenance 39 Technical support 40 FCC compliance 41 Warranty 42 Appendix 1 Installing the...

Page 5: ...ed computer screen on the whiteboard with your finger and print or save your work You can capture a snapshot of anything you write or project by tapping the Print or Save icon along the edge of the bo...

Page 6: ...d and your computer Refer to Appendix 1 Installing the TS 600 Bluetooth option on page 44 Register your PolyVision product By registering your product you receive enhanced customer service with inform...

Page 7: ...unt the TS interactive whiteboard on a wall on page 4 2 Install the PolyVision driver on the computer Refer to Install the PolyVision driver on page 7 3 Connect power and data to the whiteboard Refer...

Page 8: ...3 4 5 6 7 8 9 10 11 12 13 1 whiteb oard 1 whiteb oard stylus 1 round eraser 4 self tap ping sheet rock anchor s varies by model 4 Phillips screws 2 mount ing bracke ts 2 Velcro strips 1 AC power cord...

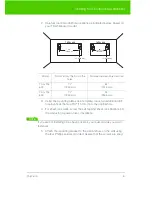
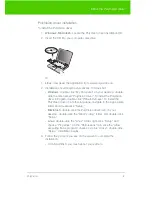
Page 9: ...apping sheet rock anchors into the wall using a power driver if available note NOTE If you are not installing on a sheet rock wall you must provide your own fasteners 5 Attach the mounting bracket to...

Page 10: ...istant lift the board and hang it on the mounting plates using the slots at the top corners of the board 7 Peel the backing off the front and back of the two Velcro strips 8 Attach Velcro strips to lo...

Page 11: ...ocessor 512 MB Ram Windows XP SP2 Tablet XP SP2 Vista or Windows 7 VGA HD 15 video port USB port Your Macintosh computer must have PowerBook G4 iBook or iMac PowerPC G3 or higher or Intel based proces...

Page 12: ...ver To install the PolyVision driver in English double click PVAutoRun exe To install the PolyVision driver in another language navigate to the appropriate folder and double click Setup Macintosh doub...

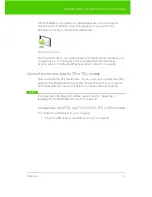
Page 13: ...ing PolyVision driver options on page 24 Connect power and data for TS or TSL models After you install the PolyVision driver on your computer connect the cable between the whiteboard and computer Ensu...

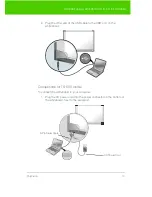
Page 14: ...ther end of the USB cable to the USB port on the whiteboard Connections for TS 600 model To connect the whiteboard to your computer 1 Plug the AC power cord into the power connector on the bottom of t...

Page 15: ...lug the 9 pin male end of the serial port cable into the whiteboard and tighten the screws 4 Plug the other end into your computer s serial port note NOTE The maximum serial port cable length is 25 fe...

Page 16: ...ocate your projector s video cable and connect it to the video port of your computer 2 Connect the other end of the video cable to your projector 3 Connect the projector s power cord to an outlet 4 Tu...

Page 17: ...you are ready to begin interacting with your computer The alignment between your projector and the PolyVision driver is important PolyVision offers three levels of alignment good better best The defau...

Page 18: ...Refer to Printing and saving on page 21 5 To save a copy of the whiteboard as a file on the computer tap the Save icon on the whiteboard Refer to Printing and saving on page 21 6 To project your comp...

Page 19: ...lyVision 15 Using TS series interactive whiteboards The TS icon strip The TS whiteboard includes icons that you tap with your finger to interact with your computer The icon functions are described bel...

Page 20: ...lide or PgDown Displays the on screen keyboard Toggles between writing and cursor control Displays all pen size and color options The current pen color for writing on the board The current pen width S...

Page 21: ...teboard once To double click tap twice rapidly For a right click Windows or control click Macintosh hold your finger to the whiteboard for one second To page up or down through a document tap the Next...

Page 22: ...alfunctions Use standard dry erase markers to write on the TS and TSL whiteboard To specify the color that is recorded in the software tap the corresponding ink color icon on the icon strip To write o...

Page 23: ...tap the Pen Cursor icon again 2 Write over the projected computer image using your finger To change the pen style Tap the black red blue or green Ink Color icon on the whiteboard To choose from a vari...

Page 24: ...to any convenient location To close the pen palette Click OK Alternatively click to add a check mark beside Close this window after choosing one option so the window closes automatically after your c...

Page 25: ...or Linux You can change the default file type and destination Refer to Save options on page 29 Spotlight and reveal options The red pen color control icon has three possible functions which you can co...

Page 26: ...To enlarge or shrink the circle drag it from any point around the edge except the four cardinal points To remove the spotlight Tap the red control icon again Revealing your work To use the reveal tool...

Page 27: ...dow for writing If you prefer to write on a blank window rather than writing over the projected computer desktop you can display up to four additional blank windows for writing To display a blank wind...

Page 28: ...hange the default options at any time To configure PolyVision driver options 1 Click the PolyVision driver icon in the system tray Windows or Linux or menu extras Macintosh 2 The PolyVision driver men...

Page 29: ...eck for driver updates Low Battery Warning Enable the PolyVision driver to display a warning on your computer desktop when the no stylus battery is getting low Reset Notifications If a user disables P...

Page 30: ...ff Desktop Alert window size Choose between a large or small desktop alert window when Desktop Alert is enabled Left Handed Cursor Enable or disable the left handed cursor Per User Settings When enabl...

Page 31: ...at is used when the PolyVision driver launches on your computer The options are Remember last used The PolyVision driver remembers the last active pen style and uses it when the program is next launch...

Page 32: ...Print You see these options Select Printer Specify the printer used when you print a snapshot The drop down list includes printers currently installed on your computer You can click Change to specify...

Page 33: ...dth of your monitor Save as file type Specify the format of the snapshot file saved on your computer when you save an image Options include PDF JPEG TIFF PNG or BMP In Windows you can also save as GIF...

Page 34: ...om the whiteboard in projection mode Fixed projector If your whiteboard and projector remain in the same positions check this box to use the same projection alignment each time No alignment screen dis...

Page 35: ...pen to view or edit its settings in the lower section of the window Settings that you can edit are highlighted Pair Stylus Click to initiate automatic Bluetooth pairing between the computer and an no...

Page 36: ...s or web sites The no interactive whiteboard s magnetic icon strip includes two user defined icons User defined icons appear in the on screen icon strip only if they are defined to link to an applicat...

Page 37: ...re installed and communicating with the computer but are inactive or in a sleep mode The status information is updated when a change occurs Choosing alignment accuracy The alignment between your proje...

Page 38: ...projection mode Follow the alignment instructions that are projected from the computer on your PolyVision product Using on screen tools You can operate your interactive product using on screen tools t...

Page 39: ...nected to the Internet A system check reveals whether the version number available on the web agrees with the version installed on your system If the version numbers are not the same you can choose to...

Page 40: ...n driver To uninstall the PolyVision driver on a Macintosh To uninstall the PolyVision driver using a Macintosh 1 Navigate to Applications and then to PolyVision 2 Launch PolyVision driver Uninstaller...

Page 41: ...be removed using isopropyl alcohol Do not use spray cleaners such as whiteboard cleaner Spray cleaners will damage the board Do not use abrasive cleaners or cloths Use the care instructions below if y...

Page 42: ...the surface Do not use abrasive cleaners on the surface To erase pen strokes made with permanent markers write over the marks with a dry erase marker of the same or similar color then erase To avoid d...

Page 43: ...d Clean ONLY with a soft dampened cloth Back up your work Any files you have created or images stored on your computer should be saved onto disk USB drive or network server Coordinate storage of data...

Page 44: ...ontact PolyVision USA Technical Support Phone 1 800 620 7659 POLY 678 542 3100 24 hour support Monday through Friday E mail support polyvision com Internet www polyvision com Or outside the USA contac...

Page 45: ...ment This equipment generates uses and can radiate radio frequency energy and if not installed and used in accordance with the instruction manual may cause harmful interference to radio communications...

Page 46: ...COVERED 1 Any product that is sold or used outside of North America and Europe unless the product was specifically labeled for sale in that country 2 Any product on which the serial number has been de...

Page 47: ...EPT AS EXPRESSLY SET FORTH HEREIN POLYVISION MAKES NO WARRANTY OF ANY KIND EXPRESSED OR IMPLIED POLYVISION DISCLAIMS ANY IMPLIED WARRANTY OF MERCHANTABILITY OR FITNESS FOR A PARTICULAR PURPOSE POLYVIS...

Page 48: ...1 Installing the TS 600 Bluetooth option Installing the TS BT adapter TS Bluetooth is available for the TS 600 model only The Bluetooth adapter kit includes the following 1 TS 600 Bluetooth adapter 2...

Page 49: ...nstall the TS 600 Bluetooth adapter 1 Write down the number printed on the adapter s label PV 00500 for example You will need that number in a later step 2 Connect the TS series interactive whiteboard...

Page 50: ...ooth adapter to the serial port on the whiteboard 4 Use a screwdriver to install and tighten the two screws supplied for the adapter 5 Finish installing the TS 600 interactive whiteboard 6 Register th...

Page 51: ...r computer using Bluetooth software provided with Windows Linux and Macintosh operating systems If you installed Bluetooth capability on your computer that was made by another company the menus and Wi...

Page 52: ...you use Bluetooth software not provided by Windows your menu may differ 2 Choose Add a Bluetooth Device from the menu You see the dialog box shown below 3 Make sure that the whiteboard Bluetooth adap...

Page 53: ...tooth option 5 Click Next You see the dialog box shown below 6 Select your whiteboard from the list and click Next You see the dialog box shown below 7 Click the radio button beside Use the passkey fo...

Page 54: ...port is COM36 10 Your whiteboard is now accessible via the Bluetooth connection 11 This Bluetooth communication link appears in the list of active connections on your computer and automatically reconn...

Page 55: ...intosh For each whiteboard that you want to share wireless Bluetooth communication with your computer you must register the whiteboard with your computer 1 To see the Bluetooth menu click the Bluetoot...

Page 56: ...option 3 Click Continue You see the Select Device Type dialog 4 Select Any device 5 Click Continue A list of discoverable Bluetooth devices appears 6 Select the Polyvision Bluetooth Serial adapter id...

Page 57: ...600 BT Bluetooth option 7 Click Continue The system gathers information about your adapter 8 Click Continue when the setup assistant has completed gathering information about your device You are prom...

Page 58: ...ision 54 Appendix 2 Using the TS 600 BT Bluetooth option 10 Click Continue You see the Bluetooth Device Setup window No services are available 11 Click Continue You see the Conclusion window 12 Click...

Page 59: ...r each whiteboard that you want to share wireless Bluetooth communication with your computer you must register the whiteboard with your computer 1 To see the Bluetooth menu click the Bluetooth icon in...

Page 60: ...BT Bluetooth option 3 Select Forward A list of discoverable Bluetooth devices appears 4 Select the PolyVision Bluetooth Serial adapter identified by a number in the form PV 11083 for example 5 Click...

Page 61: ...PolyVision 57 Appendix 2 Using the TS 600 BT Bluetooth option 7 Click Close Device setup continues automatically 8 When setup is completed click Close...

Page 62: ...r from the menu 3 Click the Hardware tab Your Bluetooth device appears in the list using an identification number in the form PV 10346 for example 4 Some whiteboards may not be listed If your device i...

Page 63: ...less option only words with TS interactive whiteboards Ceiling height and material also make a difference in performance The higher the ceiling the closer together the transceivers need to be A non IR...

Page 64: ...have two green lights without the transceivers being plugged into the serial ports of the board or the computer and when either the board or the computer is not turned on Under certain circumstances t...

Page 65: ...ower Re establishing a broken link It is possible to break the link in several ways The two most obvious ways are to cover one of the transceivers or to unplug one of the transceivers from power It is...

Page 66: ...such as Palm HotSync One transceiver light is GREEN and the other is AMBER 1 The transceiver with the AMBER light is shadowed Move the AMBER transceiver away from any tall or overhanging objects such...

Page 67: ...he connection keeps breaking and re connecting while using the board Something moving in the room is periodically shadowing one of the transceivers This is likely to be someone standing in front of th...

Page 68: ...ns 27 driver menus and options 24 updates 35 dry erase markers 18 E Enable automatically check for updates 25 Enable desktop alert window 26 Enable Per User Settings 26 erasing 20 Exit PolyVision driv...

Page 69: ...d 18 spotlight 21 drag to ellipse 22 enlarge or shrink 22 removing 22 Start PolyVision driver 35 Startup Pen Style 27 system requirements 7 T technical support 40 transceiver positioning 59 TS BT adap...

Page 70: ...PolyVision 66 In W wall mounting instructions TS models 4 whiteboard care and maintenance TS models 37 writing in projection mode 19...

Reviews: