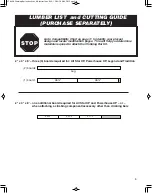
2"
x 4" x
45
¹⁄₂
"
2"
x 4" x
45
¹⁄₂
"
2"
x 4" x 48"
⁵⁄₄
" x
6" x 3
7
¹⁄₂
"
4" x 4"
x
96
"
4" x 4"
x
96
"
88"
ALL STAR XP - SILVER
13
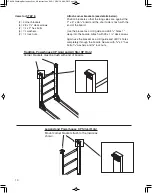
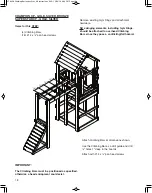
Remove Climbing Wall.
Remove (2)
⁵⁄₄
" x 6" x 24" vertical railings
from backside (not shown).
Remove (2) 2" x 4" x 38" vertical boards (not
shown).
Remove top (2) 2" x 4" x 13
¹⁄₄
" horizontal
boards (not shown).
Relocate horizontal 2" x 4" x 48" board up to
88" as shown.
Attach (2) 2" x 4" x 45
¹⁄₂
" vertical boards
(using #8 x 2
¹⁄₂
" deck screws) to replace
removed ones.
Items for this STEP:
(2) 2" x 4" x 45
¹⁄₂
" boards (cut from lumber listed above)
(2)
⁵⁄₄
" x 6" x 37
¹⁄₂
" boards (cut from lumber listed above)
(24) #8 x 2
¹⁄₂
" deck screws (reused from removed boards)
(2) Corner Brackets
(8) #8 x 1
¹⁄₄
" deck screws
(2)
³⁄₈
" x 3" lag screws
(2)
³⁄₈
" x 2" hex bolts
(2)
³⁄₈
" lock nuts
(4)
³⁄₈
" washers
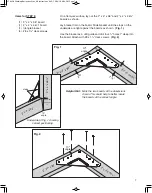
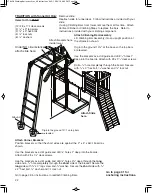
Attach Corner Brackets
Position brackets so that the short
sides are against the 2" x 4" x 48"
board.
Use the brackets as a drill guide
and drill
¹₈
" holes 1" deep into the
boards. Attach with #8 x 1
¹₄
" deck
screws.
Use the brackets as a drill guide
and drill
¹⁄₄
" holes 2
¹⁄₂
" deep through
the
long
side and a
³⁄₈
" hole
completely through the
short
side
of the bracket. Secure the
long
side with a
³⁄₈
" x 3" lag screw and
³⁄₈
" washer. Secure the
shor
t side
with a
³⁄₈
" x 2” hex bolt,
³⁄₈
" washer
and
³⁄₈
" lock nut.
Attach (2)
⁵⁄₄
" x 6" x 37
¹⁄₂
" vertical
panels (using #8 x 2
¹⁄₂
" deck
screws) to replace removed ones.
Back View
Additional Materials Required (Purchase Separately)
⁵⁄₄
" x 6" x 8' – One board required
2" x 4" x 8' – One board required
LT 6456 Climbing Bar Instructions_AS Instructions '04 R1 2/24/10 3:04 PM Page 13


