background image

2H

2H

Denotes Use Zone with Protective Surfacing

Use Zone for Single-Axis Swings

6 ft.

6 ft.

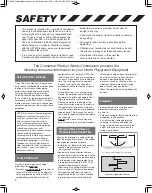
The Consumer Product Safety Commission provides the

following consumer information for your Home Playground Equipment

• This product is intended for single-family residential 

use only, by children ages two to ten and a maxi-
mum weight of 105 pounds. Any recommendation 
over 10 years of age or 105 pounds exceeds the 
upper limits specified in the American Society for 
Testing and Materials (ASTM) Home Playground 
Safety Standard. In order for PlayStar to comply 
with the ASTM Standard, we cannot recommend 
anyone above these limits.

• It is a misuse of this product when installed or used 

in places of public assembly such as schools or parks.

Select Protective Surfacing

Poured-In-Place Surfaces or 
Pre-Manufactured Rubber Tiles

Placement

One of the most important things you can
do to reduce the likelihood of serious head
injuries is to install shock-absorbing
protective surfacing under and around
your play equipment. The protective
surfacing should be applied to a depth
that is suitable for the equipment height in
accordance with ASTM F1292. There are
different types of surfacing to choose from;
whichever product you select, follow these
guidelines:

NOTE: Do not install home playground
equipment over concrete, asphalt, or
any other hard surface. A fall onto a
hard surface can result in serious
injury to the equipment user. Grass
and dirt are not considered protective
surfacing because wear and
environmental factors can reduce their
shock absorbing effectiveness.
Carpeting and thin mats are generally
not adequate protective surfacing.
Ground level equipment -- such as a
sandbox, activity wall, playhouse or
other equipment that has no elevated
play surface -- does not need any
protective surfacing.

• Maintain a minimum depth of 9 inches of 

loose-fill materials such as wood mulch / 
chips, engineered wood fiber (EWF), or 
shredded/recycled rubber mulch for 

PlayStar Playsets require fall-height
protection from eight feet.

equipment up to 8 feet high. NOTE: An 
initial fill level of 12 inches will compress 
to about a 9-inch depth of surfacing over 
time. The surfacing will also compact, 
displace, and settle, and should be 
periodically refilled to maintain at least a 
9-inch depth.

• Use containment, such as digging out 

around the perimeter and/or lining the 
perimeter with landscape edging. Don’t 
forget to account for water drainage.

• Check and maintain the depth of the 

loose-fill surfacing material. To maintain 
the right amount of loose-fill materials, 
mark the correct level on play equipment 
support posts. That way you can easily 
see when to replenish and/or redistribute 
the surfacing.

Do not

install loose fill surfacing over 

hard surfaces such as concrete or asphalt.

This height should be equal to or greater 
than the 

fall height

- vertical distance 

between a designated play surface 

(elevated surface for standing, sitting, or 
climbing)

and the protective surfacing 

below - of your play equipment.

• Check the protective surfacing frequently 

for wear.

• Follow the instructions provided, do not alter its 

design in any way.

• Construction requires at least two adults capable of 

heavy lifting.

• Thoroughly read all safety instructions before 

beginning.

• Children must remain clear of construction site until 

this product is properly installed and ready for use.

• Save these instructions in the event the 

manufacturer has to be contacted.

Proper placement and maintenance of
protective surfacing is essential. 
Be sure to;

• Extend surfacing at least 6 feet from the 

equipment in all directions.

• For to-fro swings, extend protective 

surfacing in front of and behind the 
swing to a distance equal to twice the 
height of the top bar from which the 
swing is suspended.

SAFETY

Loose-Fill Materials

You may be interested in using surfacing
other than loose-fill materials -- like rubber
tiles or poured-in-place surfaces.

• Installations of these surfaces generally 

require a professional and are not 
“do- it-yourself” projects.

• Review surface specifications before 

purchasing this type of surfacing. Ask the 
installer/manufacturer for a report showing
that the product has been tested to the 
following safety standard: ASTM F1292 

Standard Specification for Impact 
Attenuation of Surfacing Materials within 
the Use Zone of Playground Equipment.

This report should show the specific 
height for which the surface is intended 
to protect against serious head injury. 

2

LT 6456 Climbing Bar Instructions_AS Instructions '04 R1  2/24/10  3:04 PM  Page 2

Summary of Contents for Play Action Climbing Bar Kit

Page 1: ...e re Here To Help Play Action Important Intended for residential use by children ages 2 to 10 only on properly installed PlayStar playsets Before use refer to complete safety guidelines in your original playset at www playstarinc com or at 1 888 752 9782 LT 6456 Climbing Bar Instructions_AS Instructions 04 R1 2 24 10 3 04 PM Page 1 ...

Page 2: ...facing will also compact displace and settle and should be periodically refilled to maintain at least a 9 inch depth Use containment such as digging out around the perimeter and or lining the perimeter with landscape edging Don t forget to account for water drainage Check and maintain the depth of the loose fill surfacing material To maintain the right amount of loose fill materials mark the corre...

Page 3: ...oint of component and top of shock absorbing surfacing material WARNING Lawn swings are designed for use by children two years of age and older Use by children under the age of two can result in entrapment between the seat and backrest NEVER place children in a rearward facing position or with legs between the seat and backrest because the child s body may pass through the opening causing entrapme...

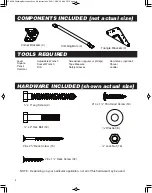
Page 4: ...or phillips Tape Measure Safety Glasses NOTE Depending on your particular applicaton not all of this hardware may be used Climbing Bars 4 Corner Brackets 4 Triangle Brackets 4 1 000 1 000 1 000 1 000 1 000 1 000 x 3 Lag Screw 4 14 x 1 Pan Head Screw 16 x 2 Hex Bolt 16 Washer 8 Lock Nut 16 8 x 2 Deck Screw 15 8 x 1 Deck Screw 32 LT 6456 Climbing Bar Instructions_AS Instructions 04 R1 2 24 10 3 04 P...

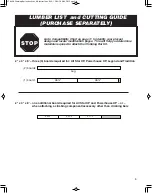
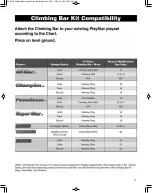
Page 5: ...required to attach the Climbing Bar Kit STOP 2 x 4 x 8 three 3 boards required for All Star XP Powerhouse XP Legend and Tradition 2 x 4 x 8 one additional board required for All Star XP and Powerhouse XP or when attaching a climbing component accessory other than climbing bars 46 46 24 24 21 2 boards 1 board Leg LT 6456 Climbing Bar Instructions_AS Instructions 04 R1 2 24 10 3 04 PM Page 5 ...

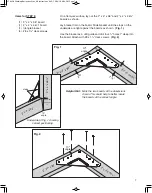
Page 6: ...he underside are tight against the boards as shown Fig 1 Use the bracket as a drill guide and drill four holes 1 deep into the board Attach with 8 x 1 deck screws Fig 2 2 x 4 x 46 2 x 4 x 96 10º angle stops gap must be about Underside of Fig 1 showing correct positioning Fig 1 Fig 2 CLIMBING BAR ASSEMBLY Helpful Hint Mark the two boards at the dimensions shown This could help to better locate the ...

Page 7: ...wn Lay bracket flat on the board Slide bracket until the stops on the underside are tight against the boards as shown Fig 1 Use the bracket as a drill guide and drill four holes 1 deep into the board Attach with 8 x 1 deck screws Fig 2 Fig 1 Fig 2 Underside of Fig 1 showing correct positioning Helpful Hint Mark the two boards at the dimensions shown This could help to better locate the boards at t...

Page 8: ...oards as in previous step Use the bracket as a drill guide and drill four holes 1 deep into the boards Attach with 8 x 1 deck screws Fig 1 Use the bracket as a drill guide and drill five holes completely through the board Attach with x 2 hex bolts and lock nuts Fig 2 Repeat for second Climbing Bar Assembly Figs 3 4 Right Assembly Left Assembly Fig 1 Fig 2 Fig 3 Fig 4 LT 6456 Climbing Bar Instructi...

Page 9: ...semblies 21 apart Use the Climbing Bar as a drill guide and drill holes 1 deep in the boards Attach with 14 x 1 pan head screws 21 21 10 21 32 43 IMPORTANT The climbing bars must be positioned as specified otherwise a head entrapment could exist LT 6456 Climbing Bar Instructions_AS Instructions 04 R1 2 24 10 3 04 PM Page 9 ...

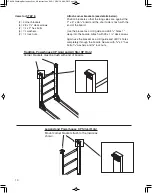
Page 10: ...e bracket as a drill guide and drill holes 1 deep into the boards Attach with 8 x 1 deck screws Again use the bracket as a drill guide and drill holes completely through the boards Secure with x 2 hex bolts washers and lock nuts Tradition Powerhouse XP Gold and All Star XP Only Corner brackets must be flush with end of boards Legend and Powerhouse XP Silver Only Mount corner brackets flush to the ...

Page 11: ...11 LT 6456 Climbing Bar Instructions_AS Instructions 04 R1 2 24 10 3 04 PM Page 11 ...

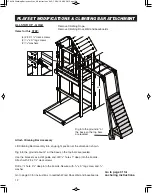
Page 12: ...into the boards Attach with 8 x 1 deck screws Drill a hole 2 deep into the boards Secure with x 3 lag screw and washer Go to page 30 for instructions to reattach Wood Rock Wall and baseboards PLAYSET MODIFICATIONS CLIMBING BAR ATTACHMENT ALL STAR XP GOLD Remove Climbing Rope Remove Climbing Rock Wall and baseboards 92 Go to page 31 for anchoring instructions Dig into the ground 6 at the base so th...

Page 13: ...deck screws 2 x 3 lag screws 2 x 2 hex bolts 2 lock nuts 4 washers Attach Corner Brackets Position brackets so that the short sides are against the 2 x 4 x 48 board Use the brackets as a drill guide and drill holes 1 deep into the boards Attach with 8 x 1 deck screws Use the brackets as a drill guide and drill holes 2 deep through the long side and a hole completely through the short side of the b...

Page 14: ...se the brackets as a drill guide and drill holes 1 deep into the boards Attach with 8 x 1 deck screws Drill a hole 2 deep into the boards Secure with a x 3 lag screw and washer Go to page 24 for instructions to reattach Climbing Wall ALL STAR XP SILVER 88 Go to page 31 for anchoring instructions Dig into the ground 10 at the base so the top bars are leveled LT 6456 Climbing Bar Instructions_AS Ins...

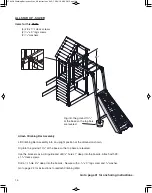
Page 15: ...to the boards Attach with 8 x 1 deck screws Drill a hole 2 deep into the boards Secure with x 3 lag screw and washer Go to page 25 for instructions to reattach Arch Climber POWERHOUSE XP GOLD Remove Arch Climber Remove 1 2 x 4 x 21 and 2 2 x 4 x 28 boards used to attach Arch Climber to playset not shown 92 15 Go to page 31 for anchoring instructions Dig into the ground 6 at the base so the top bar...

Page 16: ...eep into the boards Attach with 8 x 1 deck screws Use the brackets as a drill guide and drill holes 2 deep through the long side and a hole completely through the short side of the bracket Secure the long side with a x 3 lag screw and washer Secure the short side with a x 2 hext bolt washer and lock nut Items for this STEP 2 Corner Brackets 8 8 x 1 deck screws 2 x 2 hex bolts 2 x 3 lag screws 2 lo...

Page 17: ...crews 4 8 x 1 deck screws 2 x 2 hex bolts 2 washers 2 lock nuts Reattach Wood Rock Wall Cut ten 10 x 6 x 28 boards removed from Wood Rock Wall down to 24 Position first x 6 x 24 board tight against the ground as shown Secure with 8 x 2 deck screws reused from Wood Rock Wall Position next x 6 x 24 board tight against the first board Secure with 8 x 2 deck screws reused from Wood Rock Wall Repeat fo...

Page 18: ...ing Gym Rings and attachment hardware NO swinging elements including Gym Rings should be attached to overhead Climbing Bars since they pose a conflicting fall hazard 13 12 12 12 Items for this STEP 4 Climbing Bars 16 14 x pan head screws IMPORTANT The Climbing Bars must be positioned as specified otherwise a head entrapment could exist 18 LT 6456 Climbing Bar Instructions_AS Instructions 04 R1 2 2...

Page 19: ...head screws SUPER STAR XP BRONZE Remove existing Gym Rings and attachment hardware NO swinging elements including Gym Rings should be attached to overhead Climbing Bars since they pose a conflicting fall hazard 15 12 12 12 Items for this STEP 4 Climbing Bars 16 14 x pan head screws IMPORTANT The Climbing Bars must be positioned as specified otherwise a head entrapment could exist 19 LT 6456 Climbi...

Page 20: ... at the base so the top bars are leveled Attach Climbing Bar Assembly Lift Climbing Bar Assembly into an upright position at the dimension shown making sure it is centered in the opening Dig into the ground 10 at the base so the top bars are leveled Use the brackets as a drill guide and drill holes 1 deep into the boards Attach with 8 x 1 deck screws Drill a hole completely through the boards Secu...

Page 21: ...h with 8 x 1 deck screws Use the brackets as a drill guide and drill holes 2 deep through the long side and a hole completely through the short side of the bracket Secure the long side with x 3 lag screw and washer Secure the short side with x 2 hext bolt washer and lock nut 21 Items for this STEP 2 Corner Brackets 8 8 x 1 deck screws 2 x 2 hex bolts 2 x 3 lag screws 2 lock nuts 4 washers LT 6456 ...

Page 22: ...ground 10 at the base so the top bars are leveled Use the brackets as a drill guide and drill holes 1 deep into the boards Attach with 8 x 1 deck screws Drill a hole completely through the board Secure with x 2 hex bolt washer and lock nut Attach Corner Brackets Position brackets so that the short sides are against the 2 x 4 x 46 board as shown Use the brackets as a drill guide and drill holes 1 d...

Page 23: ...D SILVER BRONZE Remove existing Gym Rings and attachment hardware NO swinging elements including Gym Rings should be attached to overhead Climbing Bars since they pose a conflicting fall hazard Items for this STEP 4 Climbing Bars 16 14 x pan head screws IMPORTANT The Climbing Bars must be positioned as specified otherwise a head entrapment could exist 23 11 3 11 11 Go to page 31 for anchoring inst...

Page 24: ...mensions shown Follow directions provided with your Climbing Wall to attach to end of frame 24 Dig into the ground so top bars are leveled 2 x 4 x 21 2 x 4 x 24 2 x 4 x 24 42 Detail for board placement Flush Go to page 31 for anchoring instructions Bottom board should be tight against the ground LT 6456 Climbing Bar Instructions_AS Instructions 04 R1 2 24 10 3 04 PM Page 24 ...

Page 25: ...own Follow directions provided with your Arch Climber to attach to end of frame 25 Dig into the ground so top bars are leveled 2 x 4 x 24 2 x 4 x 24 2 x 4 x 21 43 1 Back detail for board placement Go to page 31 for anchoring instructions Bottom board should be tight against the ground LT 6456 Climbing Bar Instructions_AS Instructions 04 R1 2 24 10 3 04 PM Page 25 ...

Page 26: ...shown Follow directions provided with your Rock Wall to attach to end of frame 26 Dig into the ground so top bars are leveled 2 x 4 x 24 2 x 4 x 24 2 x 4 x 21 42 1 Detail for board placement Go to page 31 for anchoring instructions Bottom board should be tight against the ground LT 6456 Climbing Bar Instructions_AS Instructions 04 R1 2 24 10 3 04 PM Page 26 ...

Page 27: ...n Follow directions provided with your Vertical Climber to attach to end of frame 27 Dig into the ground so top bars are leveled 45 2 x 4 x 24 2 x 4 x 24 2 x 4 x 21 Flush Back detail for board placement Go to page 31 for anchoring instructions Bottom board should be tight against the ground LT 6456 Climbing Bar Instructions_AS Instructions 04 R1 2 24 10 3 04 PM Page 27 ...

Page 28: ...attach to end of frame 28 Dig into the ground so top bars are leveled 2 x 4 x 24 2 x 4 x 24 48 Top Step flush with top of board Step mounting lip is flush to this edge on both sides 2 x 4 x 24 2 x 4 x 24 Back detail for board placement Go to page 31 for anchoring instructions Bottom board should be tight against the ground LT 6456 Climbing Bar Instructions_AS Instructions 04 R1 2 24 10 3 04 PM Pag...

Page 29: ...pment could exist These Climbing Bars may or may not be from existing playset Attach Climbing Bars at dimensions from ground as shown 12 24 36 48 Go to page 31 for anchoring instructions CLIMBING BARS Ground LT 6456 Climbing Bar Instructions_AS Instructions 04 R1 2 24 10 3 04 PM Page 29 ...

Page 30: ...boards at the dimensions shown Cut baseboards as shown Attach baseboards as shown reusing hardware Use scrap 2 x 4 boards as temporary spacers for proper alignment as shown Attach Wood Rock Wall as shown reusing hardware Go to page 31 for anchoring instructions Baseboards Baseboards Spacers 21 10º Baseboards Cut Guide LT 6456 Climbing Bar Instructions_AS Instructions 04 R1 2 24 10 3 04 PM Page 30 ...

Page 31: ...rs to be pulled out easily such as in sandy soil conditions cementing is required If your ground is too hard to screw in the anchors you can remove the earth with a shovel Install the anchors and compact the earth as you replace it Anchors must be placed below the level of the shock absorbing surfacing material to prevent tripping or injury resulting from a fall Reminder Be sure to install proper ...

Page 32: ... 034 US 7 253 951 US D548 760 US 7 304 810 CA D109 227 CA D109 226 CA D112 355 CA D113 437 CA D113 442 CA D114 067 CA D114 068 CA 2 304 896 CA D119 674 US D573 222 US 7 419 437 CA 2 304 068 CA 2 488 576 US D580 507 US D585 570 CA 2 490 923 CA 2 304 341 US 7 594 875 CA 2 304 043 CA 2 529 276 CA 2 633 628 CA 633 056 Please call us Toll Free at 1 888 PLAYSTAR 752 9782 Monday through Friday 8 00 A M t...

Reviews: