Six Head Open Fryer
Volume 2
Equipment, Cleaning, and Maintenance
June 10, 2002
Six Head Open Fryer – 11
L20-242 Rev 0 (7/02)
1
2
3
4
5
6
7
8
Page 1: ...Pitco SG6H Gas 6 Head Open Fryer Introduction 3 Description Pitco 6 Head Open Fryer 4 Description Pitco 6 Head Frypot 6 Description Pitco 6 Head Lift Assist 8 Description Pitco 6 Head Filter 10 Standards 14 Procedure Summary 16 Procedures 18 Problem Solving 31 Racking Diagrams 35 Set Point Matrix 39 ...
Page 2: ...Six Head Open Fryer Volume 2 Equipment Cleaning and Maintenance 2 Six Head Open Fryer L20 242 Rev 2 06 03 June 22 2003 ...
Page 3: ...hat fire electrical shock or burns may occur The equipment must be installed and serviced only by authorized service agents All operating procedures must be followed carefully Fryers are equipped with safety devices that minimize these hazards Fryers are equipped with safety devices that minimize these hazards If shortening begins to smoke excessively turn the fryer OFF and immediately contact you...
Page 4: ...Gas shut off valve Turns OFF gas to fryer 5 Heat Light Lights when computer is calling for heat 6 ON OFF PUMP switch Turns fryer heater ON OFF or turns pump ON OFF 7 Hi Limit Reset button Allows Hi limit to be reset if oil gets too hot 8 Filter pump breaker Trips when pump is overloaded OFF then ON resets 9 Oil flow selector Red Selects between oil polish and frypot refill 9A Adjustable Leg Allows...
Page 5: ...Six Head Open Fryer Volume 2 Equipment Cleaning and Maintenance June 10 2002 Six Head Open Fryer 5 L20 242 Rev 0 7 02 1 2 3 4 5 6 7 8 9 9A 9B ...
Page 6: ... basket holder rod Allows basket frying of snackable items 13 Oil FULL line Indicates when frypot is FULL of oil 14 Oil FILL line Indicates when oil needs to be added to the frypot 15 Float switch Cuts OFF gas flame when draining oil from fryer 16 Heat tubes Transfers heat to the cooking oil 17 Bun pan holders Holds pan while loading unloading rack holders 18 Computer sensor probe Sends oil temper...
Page 7: ...Six Head Open Fryer Volume 2 Equipment Cleaning and Maintenance June 10 2002 Six Head Open Fryer 7 L20 242 Rev 0 7 02 10 11 12 13 14 15 16 17 18 19 Lifter no shown for clarity ...
Page 8: ... lower product into fryer 21 rack holder Supports 1 6 racks 22 Oil FILL line Indicates when oil needs to be added to the frypot 23 Float switch Cuts off heat when draining oil from fryer 24 Lift assist Makes lifting product in and out easy 25 Lifter carriage assembly Attaches the rack holders to the lifter handle 26 bun pan rack Supports bone in chicken strips 27 rack cover Prevents float away whe...
Page 9: ...Six Head Open Fryer Volume 2 Equipment Cleaning and Maintenance June 10 2002 Six Head Open Fryer 9 L20 242 Rev 0 7 02 20 21 22 24 23 25 27 28 ...
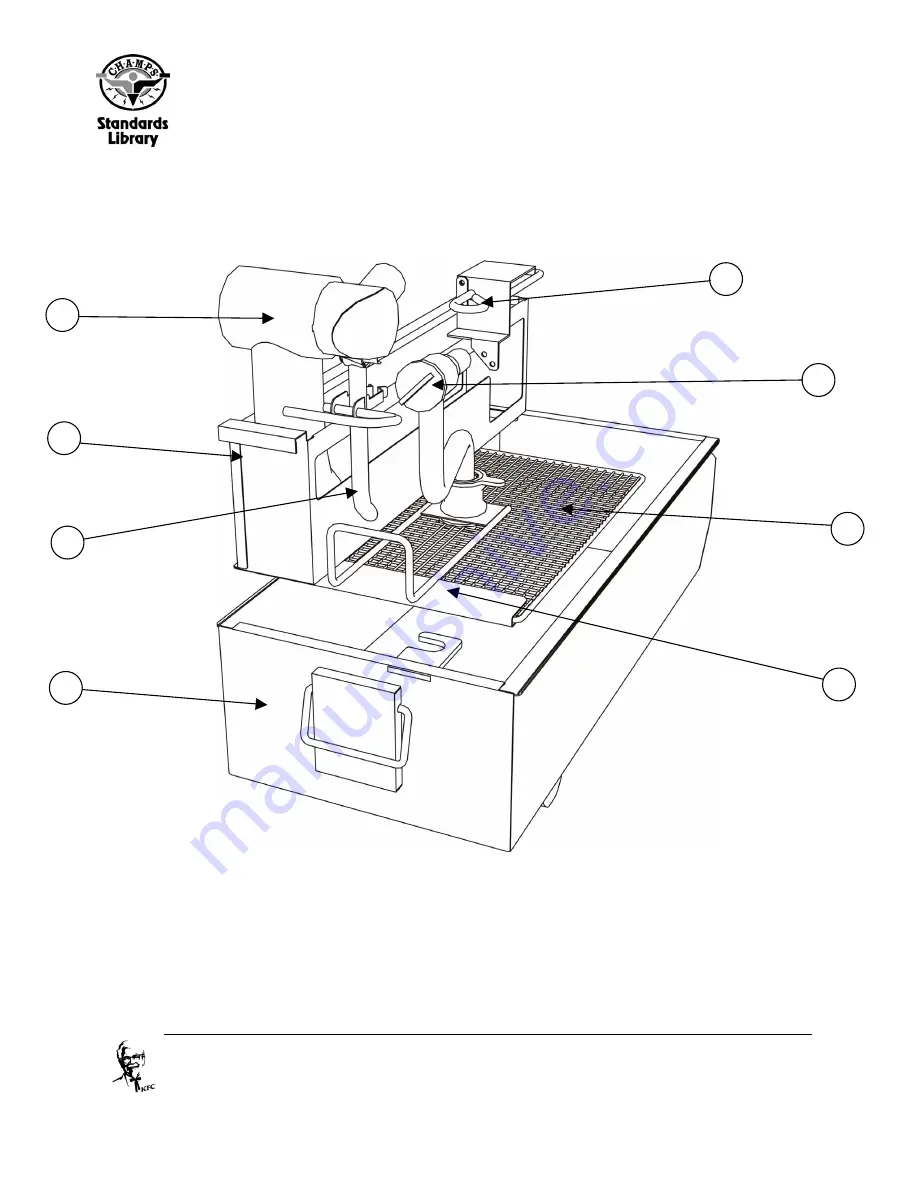
Page 10: ...sal 2 Crackling basket Traps larger cracklings 3 Oil polish swivel assembly Directs oil to filter swings out for easy oil disposal 4 Filter pan Holds oil during filtering and oil polishing 5 Oil Flow Selector Selects between oil polish and frypot refill 6 Filter standpipe with strainer Prevents cracklings from getting in the pump 7 Filter rack Supports the filter paper during filtering polishing 8...
Page 11: ...Six Head Open Fryer Volume 2 Equipment Cleaning and Maintenance June 10 2002 Six Head Open Fryer 11 L20 242 Rev 0 7 02 1 2 3 4 5 6 7 8 ...
Page 12: ...Fryer Volume 2 Equipment Cleaning and Maintenance 12 Six Head Open Fryer L20 242 Rev 2 06 03 June 22 2003 See Cooking Computers Timers Introduction section in this volume for a description of the various fryer timers ...
Page 13: ...Head Open Fryer Volume 2 Equipment Cleaning and Maintenance June 10 2002 Six Head Open Fryer 13 L20 242 Rev 0 7 02 Other Equipment with the Open Fryer Skimmer Cooking Basket Insulated Gloves Half Rack Cover ...
Page 14: ...t drop temperature 72 03 Shortening is not smoking and or foaming 72 04 Shortening temperature for drop is verified with thermometer to be correct per fryer spec Calibrate each fryer as needed 72 05 Fryers are filtered as required per standard for fryer 72 06 Fryers are in COOL mode or OFF when not needed for continuous cooking 72 07 Personal protective equipment is used Personal protective equipm...
Page 15: ...puter set points are verified to specification for fryer and product 73 03 Computer panel buttons are clearly labelled 73 04 Probe is in good condition straight accurate and clean with no carbon deposits 73 05 Fryer cook baskets are clean and in good condition with no build up or bent or missing wires 73 06 Shortening level is within 1 2in 1 25cm of the Shortening Level Line when frying 73 07 ...
Page 16: ...level Turn fryer ON and heat to cool Assemble filter and filter tank Filter polish shortening Begin morning start up Adjust shortening Heat shortening 2 Cooking and Cleaning Pitco 6Head Fryers Refer to Product Manual for details on cooking products Filter Fryer At close Prior to afternoon polish With every shortening change If volume dictates filter more often 3 Mid day Polish Drain flush refill c...
Page 17: ...fryer and discard Old Shortening Spray Fryer with Fryer Oven Cleaner Clean Surfaces Neutralize Fryer Rinse and dry Fryer Add New Shortening 6 Checking Fryer Recovery Rate Monthly Test fryer after morning start up pressing Controller hidden key for 1 second The recovery test shows how long it takes the fryer to heat up from 275 to 300 F 121 to 149 C Compare result against ideal recovery range of 2 ...
Page 18: ... CER measurement tool kit Digital thermometer probe Skimmer 1 Check Shortening Level Ensure the fryer is level using level in CER measurement tool kit Check that the shortening level in the fryer is above the domes heating elements Add shortening if necessary 2 Turn Fryer ON Turn the fryer ON Fryer automatically goes through a melt cycle Allow shortening to heat until display reads COOL Press EXIT...
Page 19: ... tube assembly Attach the stand pipe to the fitting on the metal screen coming through the filter envelope Tighten the nut HAND TIGHT ONLY 4 Set Up Filter Tank Install filter assembly in the filter tank Turn the standpipe to rest in the support bracket on the filter tank Place the crackling basket in the filter tank hook it onto the front edge of the filter pan Check that the standpipe strainer is...
Page 20: ...ow stay in the filter tank during the polish Turn pump ON Circulate the shortening for 30 minutes Turn pump OFF 10 Pump Shortening into cookpot Close drain valve Push the oil flow selector handle back to the Refill position Pump all shortening into cookpot Allow the pump to run for about 1 minute after steady stream ends Turn pump OFF 11 Turn Fryer ON Turn fryer ON if shortening is above the heat ...
Page 21: ... frypot to remove all crispies Turn the pump OFF Clean cook pot with damp towel Close drain valve Pump up shortening into cookpot After cooking each batch use the skimmer to remove any food particles from the surface of the shortening If volume dictates cleaning and filtering may be required more often to prevent the cold zone from filling with cracklings and flour When cleaning the frypot all cri...
Page 22: ...s you This puts the fryer in polish mode Oil will now stay in the filter tank during the polish Turn pump ON Circulate the shortening for 30 minutes Turn pump OFF 4 Pump Shortening into cookpot Close drain valve Push the oil flow selector handle in to the refill position Pump all shortening into cookpot Allow the pump to run for about 1 minute after steady stream ends Turn pump OFF 5 Turn Fryer ON...
Page 23: ...e brush Cleaning pad Cloths L shaped metal brush or rod Long handled scraper Metal tray Nylon scourer Protective gloves and goggles Scrubbing or knob brush Shortening drum barrel Shortening shuttle stockpot Stainless steel jug and stockpot Towels Z shaped rod 1 Turn OFF Turn the fryer OFF CAUTION Failure to turn the fryer off may result in a flash fire when the shortening level drains below the le...
Page 24: ... to the cookpot Close drain valve Pump all shortening into cookpot Turn pump OFF 4 Disconnect Standpipe Using towels to protect your hands Disconnect the standpipe 5 Cut Filter Envelope Cut filter envelope and let the shortening drain into filter tank Discard filter paper Take parts to the sink 6 Pour Shortening into Saucepan Using a spatula scrape crispies out of tank and discard Pour remaining s...
Page 25: ...ust be changed and the insides of the fryer cleaned when Shortening visibility is less than 3 in 7 5cm which is the bottom mark on the shortening visibility tester The shortening smokes too much 1 Melt Shortening Use liquid shortening or melt the required amount of shortening Refer to Shortening Management 2 Turn OFF Turn the fryer OFF Allow the shortening to cool ...
Page 26: ...in valve to drain shortening into a shortening shuttle stockpot Drain a small amount of shortening into a stainless steel jug and pour this shortening back into the stockpot to flush out any small scraps of food Use an L shaped metal brush or rod to expel any particles that may be blocking the drain valve Discard the old shortening from the shortening shuttle stockpot into a shortening drum barrel...
Page 27: ...e cleaner from the bottom of the cook pot up to rim Apply heavier amounts of cleaner to Heater Heater brackets and plate Thermostat bulb Crevices and corners around the bottom of the cook pot and drain port Areas with heavy carbon build up Place fryer baskets on a tray Spray cleaner over the mesh on the baskets Allow 15 to 20 minutes for cleaner to react and soften the carbon build up Use a tray s...
Page 28: ...o a stainless steel stockpot or filter tank Do not drain cooker cleaner solution into an aluminium stockpot or shortening filter unit as it will corrode them Caution Be very careful when handling stockpot or filter tank filled with cleaner to prevent splashing on skin clothing or in eyes 6 Neutralize Fryer Pour the solution from the stainless steel stockpot or filter tank down a floor drain and th...
Page 29: ...thoroughly with hot water 9 Start Up and Check Shortening Temperature Close the drain valve Lower heating elements back into cooking position Add enough melted shortening to cover the heating elements Pour liquid melted shortening from the stockpot into the fryer to cover the heating elements Break shortening into small pieces with a long handled scraper and slowly add to liquid shortening in frye...
Page 30: ...econd hand start timing once the display reads 275 F 135 C When the fryer reaches 300 F 121 C stop and note the length of time the fryer took to heat up Compare this to the ideal recovery range If the time is higher than the maximum recovery range contact maintenance If the fryer does not recover in the allotted time the product will not be cooked to KFC standards Do not use fryer until situation ...
Page 31: ...ric power Defective component Contact maintenance Float switch stuck Clear debris or solid shortening so switch can float freely Fryer wil not heat Defective component Contact maintenance Wrong button pressed Press correct button Wrong temperature or time programmed Reprogram computer Thermostat out of calibration Adjust thermostat Defective component Contact maintenance Carbon deposition thermost...
Page 32: ...iner needs to be cleaned or cap is not tight Unscrew the strainer cap and remove any debris accumulation Reinstall making sure the cap is screwed on tightly Filter pan not completely connected to fryer Ensure filter pan is pushed all the way into the fryer cabinet and that the standpipe is fully engaged in the fryer connector Slow Refill longer than 3 minutes O ring seal at fryer standpipe connect...
Page 33: ...r and contact maintenance Incorrect product key settings See set points page 39 Product scorched or burnt Incorrect gas pressure Contact maintenance Shortening will not drain Solid shortening or cracklings in drain line Clean drain line Shortening too old Discard shortening Excessive foam or smoking Cooking temperature set too high See set points info page 39 Filter pan does not slide into the fry...
Page 34: ...en heating Burner plugging up Orifices plugging up Gas pressure incorrect Burners not level Contact maintenance No gas to fryer Connect gas line turn gas and heat OFF turn valve ON Gas burner problems Burner fails to light Gas hose disconnected Check that float switch is free to move to up position Odor that smells like gas Contact maintenance CAUTION Turn units off contact maintenance Ensure no o...
Page 35: ...e 2 Equipment Cleaning and Maintenance June 10 2002 Six Head Open Fryer 35 L20 242 Rev 0 7 02 6hds Use 6 hd button 4hds Use 4 hd button 2hds Use 2 hd button Rack 4 Rack 3 Rack 3 Rack 2 Rack 2 Rack 1 Rack 1 TOP TOP Bottom Bottom ...
Page 36: ...en Fryer Volume 2 Equipment Cleaning and Maintenance 36 Six Head Open Fryer L20 242 Rev 2 06 03 June 22 2003 32 Breasts Use 6 hd button Rack 4 Rack 3 Rack 2 Rack 1 16 Breasts 2 hd Combo Use 6 hd button Bottom TOP ...
Page 37: ...Open Fryer Volume 2 Equipment Cleaning and Maintenance June 10 2002 Six Head Open Fryer 37 L20 242 Rev 0 7 02 48 wings Use 2 hd button Rack 4 Rack 3 Rack 2 Rack 1 Bottom TOP 24 wings 2 hds Combo Use 4 hd button ...
Page 38: ...er Volume 2 Equipment Cleaning and Maintenance 38 Six Head Open Fryer L20 242 Rev 2 06 03 June 22 2003 48 pcs Dark Meat Use 6 hd button Rack 4 Rack 3 Rack 2 Rack 1 24 pcs Dark Meat 2 hds Combo Use 6 hd button TOP Bottom ...
Page 39: ... 18 00 340 17 50 280 4 00 330 19 00 340 18 50 280 4 00 330 2 Head Set Points 17 30 340 17 29 280 4 00 320 18 15 340 18 14 280 4 00 320 17 30 340 17 20 280 4 00 330 18 15 340 18 05 280 4 00 330 Crispy Strips 4 30 340 Flex Time Potato Wedges 3 00 340 Flex Time Dipping Wings 9 30 340 Flex Time 1 Head Set Points 17 00 340 16 59 280 4 00 320 18 15 340 18 14 280 4 00 320 17 00 340 16 50 280 4 00 330 18 ...
Page 40: ...Six Head Open Fryer Volume 2 Equipment Cleaning and Maintenance 40 Six Head Open Fryer L20 242 Rev 2 06 03 June 22 2003 ...