Go to cover page
202P7 CRT
19
OSD Adjustments (Continued)
below.
Note: Use only if necessary. Remember: you must degauss the
monitor BEFORE adjusting the convergence.
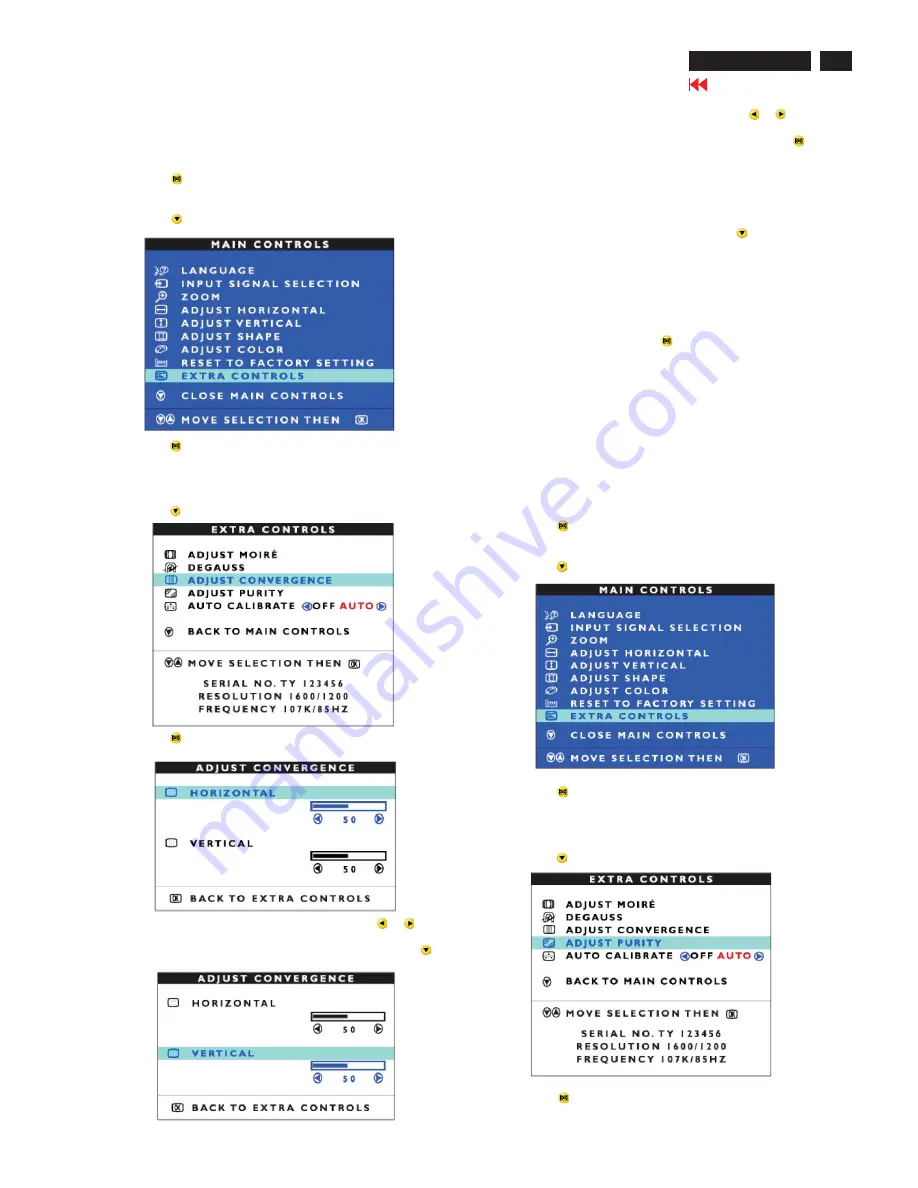
1) Press the
button on the monitor. The MAIN CONTROLS
window appears.
2) Press the
button until EXTRA CONTROLS is highlighted.
3) Press the
button. The EXTRA CONTROLS window appears.
Note: If you have not degaussed the monitor, please follow the
steps under the Extra Controls - Degauss section of this manual
before adjusting the convergence.
4) Press the
button until ADJUST CONVERGENCE is highlighted.
5) Press the
button. The ADJUST CONVERGENCE window
appears. ADJUST HORIZONTAL is highlighted.
6) To adjust the horizontal convergence, press the
or
button.
7) When the horizontal convergence is adjusted, press the
button
to highlight VERTICAL CONVERGENCE.
together (converge) then you may see unwanted red, green, or blue
lines or dots. To adjust the convergence, follow the steps
8) To adjust the vertical convergence, press the
or
button.
9) When the vertical convergence is adjusted, press the
button
to return to the EXTRA CONTROLS window. BACK TO MAIN
CONTROLS is highlighted.
Smart Help
After returning to EXTRA CONTROLS . . .
. . . to continue to ADJUST PURITY, press the
button until
ADJUST PURITY is highlighted. Next, start with step 4 under
EXTRA CONTROLS - ADJUST PURITY.
Note: If you have not degaussed the monitor, please follow the
steps under the Extra Controls - Degauss section of this manual
before adjusting the purity.
. . . to exit completely, press the
button twice.
ADJUST PURITY (Not available in all models)
EXTRA CONTROLS is a set of features, including ADJUST PURITY.
Purity is a process by which colors appear clear and untainted,
especially in the four corners of the monitor. Purity can be affected
by such things as the presence of a magnetic source near the
monitor or even by the ambient room temperature. For example,
you might see the color red in a corner of the monitor screen where
you should see only a pure white. To adjust the purity, follow the
steps below. Note:Use only if necessary. Remember: you must
degauss the monitor BEFORE adjusting the purity.
1) Press the
button on the monitor. The MAIN CONTROLS
window appears.
2) Press the
button until EXTRA CONTROLS is highlighted.
3) Press the
button. The EXTRA CONTROLS window appears.
Note: If you have not degaussed the monitor, please follow the
steps under the Extra Controls - Degauss section of this manual
before adjusting the purity.
4) Press the
button until ADJUST PURITY is highlighted.
5) Press the
. The ADJUST PURITY window appears. NS
PUTRITY is highlighted.
Summary of Contents for 202P70/00
Page 37: ...37 202P7 CRT Go to cover page Wiring Diagram ...
Page 41: ...41 202P7 CRT Go to cover page Main Board C B A 1 ...
Page 42: ...42 Main Board C B A 2 Go to cover page 202P7 CRT ...
Page 44: ...44 Go to cover page Video Board C B A 1 202P7 CRT ...
Page 45: ...45 202P7 CRT Go to cover page Video Board C B A 2 ...
Page 47: ...47 202P7 CRT Go to cover page TERMINAL Board C B A 1 ...
Page 48: ...48 TERMINAL Board C B A 2 Go to cover page 202P7 CRT ...
Page 50: ...50 Driver Board C B A Go to cover page 202P7 CRT ...
Page 51: ...51 202P7 CRT Go to cover page KEY CONTROL Schematic Diagram C B A ...
Page 52: ...52 MHR Schematic Diagram C B A Go to cover page 202P7 CRT ...


