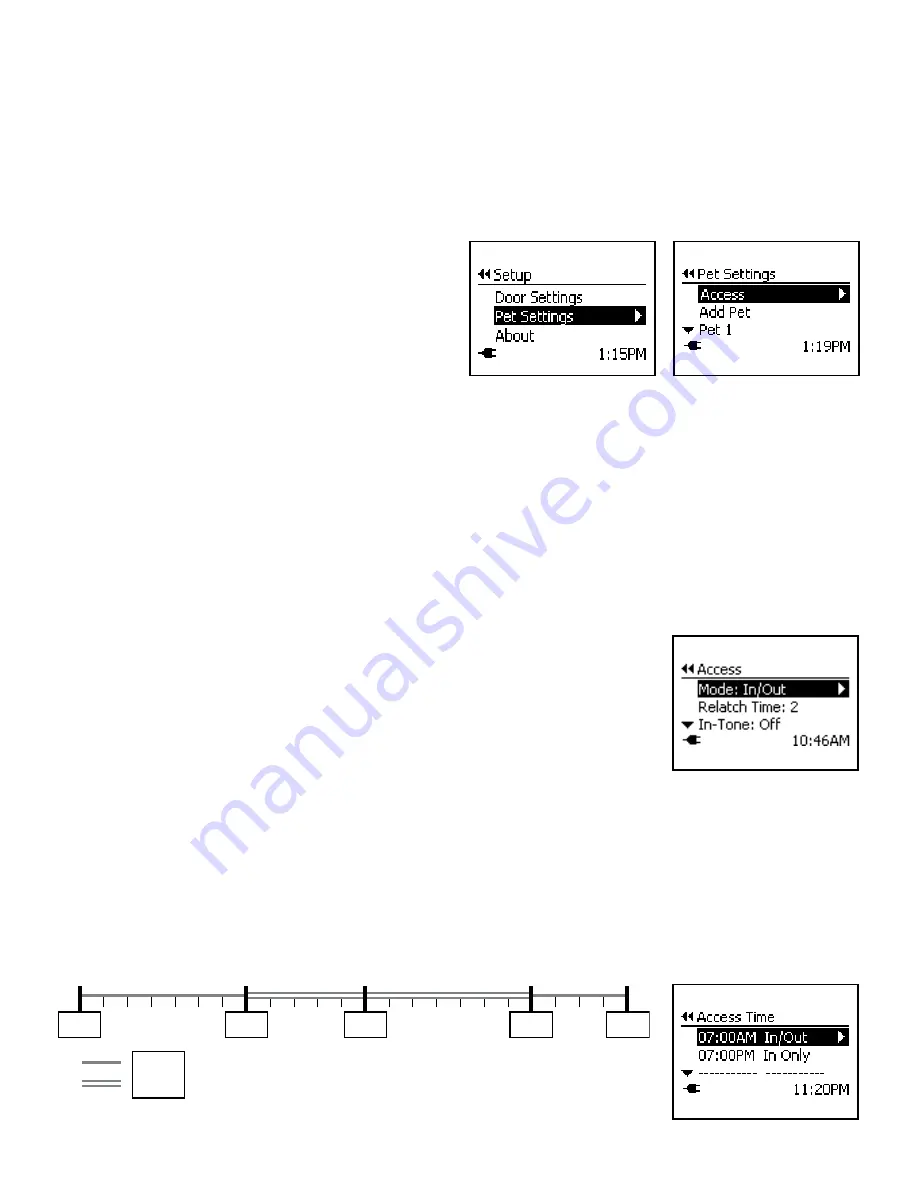
Petsafe PPA00-15930 Installation And Operating Manual Download Page 23

www.petsafe.net

23

Pet Settings  

The Pet Settings screen allows you to change the Access Mode for all pets with a programmed SmartDoor

 Plus Key, including In-

Only Mode, Out-Only Mode or Timer Mode. You can also change the re-latch time for the door flap, set an In-Tone or Out-Tone, 
add a pet, remove a pet, rename a pet and relearn a pet’s key.
To open the Pet Settings menu, from the 

Main Menu

 select 

Setup

 and use down arrow key to highlight > 

Pet Settings

. The Pet 

Settings screen displays the following options:

Access:

 Allows the pet access mode (In/Out, In-Only, Out-Only and Timer) to be changed. Also where the flap re-latch time can 

be changed and an In-Tone or Out-Tone to be set.

Add Pet:

 Allows additional pets to be programmed to the 

SmartDoor Plus pet door with a SmartDoor Plus Key (additional 
keys sold separately). Up to 20 pets can be programmed.

Pet 1 (or pet name):

 All pets that have been successfully 

programmed to the pet door with a SmartDoor Plus Key will show 
below Add Pet.  Each programmed pet will show as “Pet n” (with n 
being the number assigned when programmed), or as pet name if 
name was changed.

Access Modes 

There are four different Access Mode options for your pet: In/Out Mode, In-Only Mode, Out-Only Mode and Timer Mode. Door 
Operational Mode must be set to “Smart Mode” for Access modes to work.

In/Out Mode:

 The default Access Mode and allows any pet wearing a programmed SmartDoor Plus Key to enter or exit 

as needed.

In-Only Mode:

 Allows any pet wearing a programmed SmartDoor Plus Key to enter through the pet door, but pets cannot exit. This 

is useful if you want to take your pet to the vet or if you want to keep your pet inside at nighttime.

Out-Only Mode:

 Allows any pet wearing a programmed SmartDoor Plus Key to exit through the pet door, but pets cannot enter. 

Timer Mode:

 Allows the other access modes (In/Out, In-Only, Out-Only) to be programmed at specific times of day for all pets 

wearing a programmed SmartDoor Plus Key. Four programmable time slots are available.

To Change Access Mode:

1.  From 

Main Menu

 select 

Setup

 > 

Pet Settings

 >

 Access

. Use right arrow key to select. 

Mode is displayed at top of Access menu

2.  Use right arrow key to scroll through and select desired mode option

 (In/Out, In-Only, 

Out-Only or Timer)

. When desired mode is displayed, press left arrow/back key to return 

to Main Menu. 

Timer Mode 

Timer Mode allows you to set one of the other access options 

(In/Out, In-Only, or Out-Only)

 at specific times of day for all 

pets wearing a programmed SmartDoor Plus Key.  This is useful if you want your pet(s) to have a certain access during a specific time 
period (for example at nighttime). There are four programmable time slots available, but 

a minimum of two programmed 

times are required to prevent your pet from being locked in or out.
Timer Mode Example: 

It might be helpful to think of Timer Mode in the form of a 24 hour timeline. If you want your pet to have full access during the daytime 
(for example, from 7am in the morning until the late evening), but want your pet to be indoors at night (for example starting at 7pm), 
you would want to set the access mode to

 In/Out

 at 7am and then the access mode to 

In-Only

 at 7pm. 

12 am

7 am

12 pm

7 pm

11 pm

In Only
In/Out

Example: 

After using Timer Mode to program the example 
listed, the Access Time menu screen would display:

Summary of Contents for PPA00-15930

Page 1: ...PPA00 15930 PPA00 15931 SmartDoor Plus Please read this entire guide before installing Installation and Operating Guide...

Page 2: ...eates Power tools can cause severe injury Follow all safety instructions for your power tools Be sure to always wear your safety goggles and other proper safety equipment Ensure the power adapter is u...

Page 3: ...amaged plug or use charger if damaged in any way The user prior to installation must become familiar with all building codes that may affect the installation of the pet door and determine along with a...

Page 4: ...y When applying the cutting template there should be a minimum of 3 inches between the bottom and sides of the door and the outer edge of the template to maintain the structural integrity of the door...

Page 5: ...Indicators 7 Key Definitions 7 Pet Door Icon Definitions 9 Pet Door LED Indicator 9 Prepare Setup and Test 10 Install Clock Battery and Power Source 10 Rechargeable Battery LED Indicator and Specifica...

Page 6: ...ay Programming is easy using the LCD screen and keypad The SmartDoor Plus is programmable for up to 20 pets SmartDoor Plus Key Worn on your pet s collar the SmartDoor Plus Key uses RFID technology by...

Page 7: ...your pet s key Clock Battery The 3 V lithium coin cell battery size CR2032 which keeps the clock s time during any power loss Clock Battery Cover Covers and protects 3 V lithium coin cell clock batte...

Page 8: ...ow If the battery dies the default factory setting is off for the beep and locked for the flap An alert ATTENTION screen will appear on the LCD screen and LED will blink red twice every 6 seconds when...

Page 9: ...es required Door operational mode must be set to Smart Mode for Timer Mode to work Volume Turns speaker On or Off Default factory setting is On Pet Door Icon Definitions Pet Door LED Indicator Icon Fu...

Page 10: ...battery slot Make sure battery is fully inserted Reinsert battery cover and push to snap into place To Install Power Adapter The SmartDoor Plus comes supplied with a low voltage AC adapter for power I...

Page 11: ...nce Prior to installation it is recommended to setup program and test the SmartDoor Plus pet door in the intended installation location to check for possible radio frequency interferences These interf...

Page 12: ...erent location to install the pet door Also avoid installing the pet door in a narrow hallway The SmartDoor Plus may be unable to read the SmartDoor Plus Key if your pet approaches at a sharp angle Ke...

Page 13: ...your pet s key is successfully programmed you will hear three beeps The Rename Pet screen will appear Pet 1 will be listed at the bottom of the screen You can leave pet name as Pet 1 or rename 4 To r...

Page 14: ...s programmed SmartDoor Plus Key 8 to 10 inches away and parallel to flap Slowly move the key toward the flap until the pet door reads the key and flap system unlocks Push through flap with your hand...

Page 15: ...rammed to the pet door Each programmed SmartDoor Plus Key has been tested in the installation location on both interior and exterior side with the pet door reading each key If installing in a door no...

Page 16: ...ful Tip Clamp down or weight the door to prevent it from moving The Pet Door can be installed with the door hanging based on your skill level 2C Match the marked lines on the door with the shoulder an...

Page 17: ...me frame with flap inside the cut out and check the fit Then place the exterior frame into the underside of the cut out to check the fit If the frames do not easily fit inside the opening you may need...

Page 18: ...e wire guide excess wire into space between top edge of door cut out and tunnel on exterior frame Align interior frame into cut out View both sides of door to ensure the exterior and interior telescop...

Page 19: ...t might be helpful to lock the exterior U flap so it does not move and scare your pet To lock exterior U flap make sure interior U flap and main flap are securely taped open while in Open Mode Next ch...

Page 20: ...o work for you and your pet Programming the pet door can be done by using the door control panel Main Menu This is the default screen If navigating a lower level menu the screen will time out and retu...

Page 21: ...buttons to be disabled by setting a 4 digit PIN This is helpful to prevent a child from changing the door or pet settings To Lock Keypad 1 From Main Menu select Setup Door Settings and use down arrow...

Page 22: ...flap in Smart Mode the pet door will change to a preset traditional mode This can be set to either Open or Locked for the shutdown position An alert will appear on the LCD screen when the pet door ent...

Page 23: ...it This is useful if you want to take your pet to the vet or if you want to keep your pet inside at nighttime Out Only Mode Allows any pet wearing a programmed SmartDoor Plus Key to exit through the p...

Page 24: ...rammed you will receive an error screen The Access Mode will then default back to In Out Mode To Remove Timer Mode Note Timer Mode can be disabled by setting a different Access Mode while keeping the...

Page 25: ...f the pet door could prevent it from programming properly To Add Pet 1 Go to Main Menu Setup Pet Settings Add Pet The 30 second countdown screen will appear 2 Hold the SmartDoor Plus Key 5 inches to 6...

Page 26: ...ly read key when worn by your pet 3 When your pet s SmartDoor Plus Key is successfully relearned you will hear three beeps and the LCD screen will return to Pet n menu screen Press left arrow back key...

Page 27: ...for pet Check re latch time is set to 1 or 2 seconds see Re latch Time page 24 May have an error or ATTENTION screen Check LCD screen for message In Tone or Out Tone is not working Check to make sure...

Page 28: ...another power adapter if one is available pet door uses same adapter ATTENTION screen Low Battery Mode Recharge battery Reset Button If a problem continues or if you still have issues after turning of...

Page 29: ...e it was purchased in order that it can be placed in our recycling system If this is not possible please contact the Customer Care Center for further information Battery Disposal Separate collection o...

Page 30: ...first year of ownership after the first year a service or upgrade charge will apply relative to replacement of the Product with new or refurbished items at Radio Systems sole discretion The limited wa...

Page 31: ...d to a replacement or refund for a major failure and for compensation for any other reasonably foreseeable loss or damage You are also entitled to have the goods repaired or replaced if the goods fail...

Page 32: ...Radio Systems Corporation 10427 PetSafe Way Knoxville TN 37932 1 800 732 2677 www petsafe net 400 2052 2016 Radio Systems Corporation...

Reviews: