Customer Care Center 1-800-732-2677
10
Prepare, Setup and Test
Install Clock Battery and Power Source
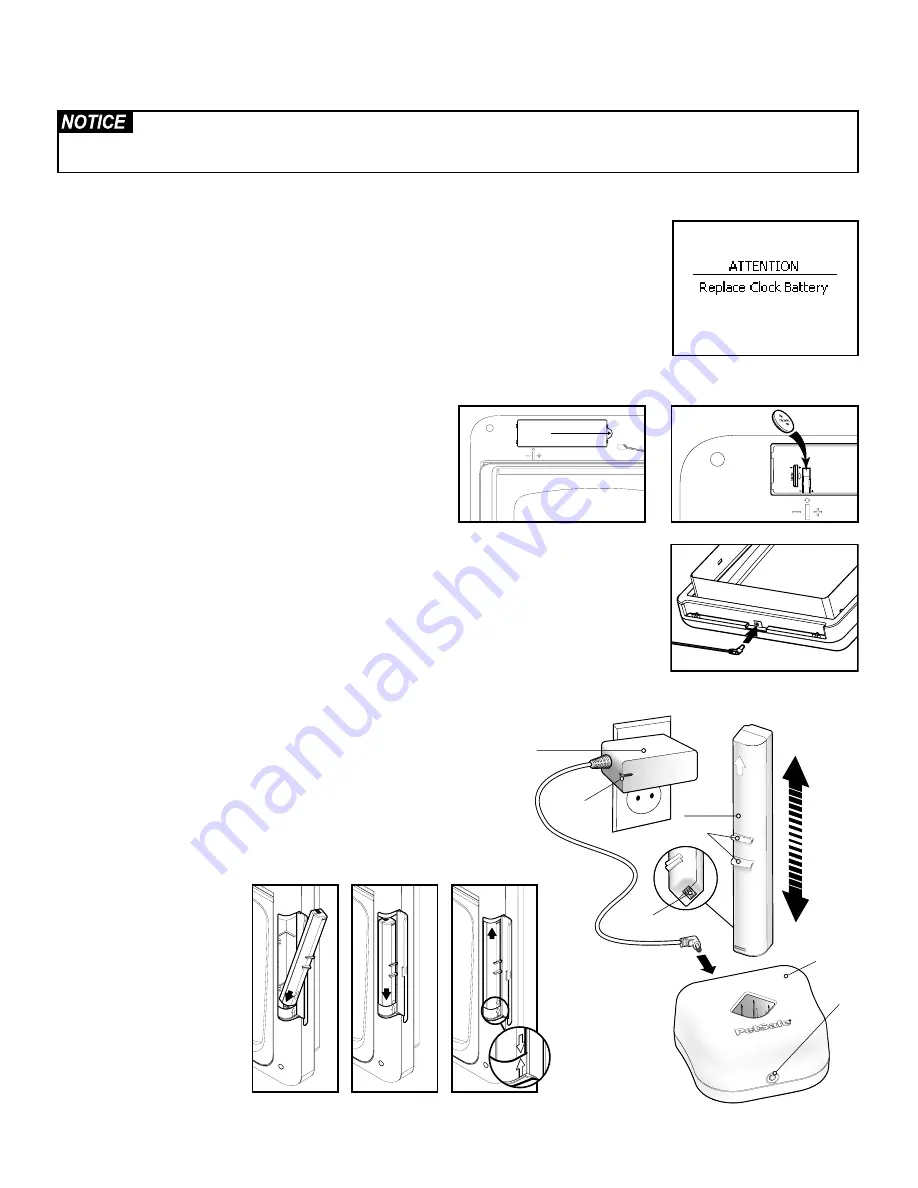
The SmartDoor Plus pet door is shipped with the clock battery not installed. This is to prevent loss of
battery life before purchase and use. The 3-V Lithium coin cell battery (size CR2032) needs to be
installed before proceeding with setup, testing and installation. The battery is required to keep the
clock’s time during any power loss. Typical clock battery life is about 1 year with normal use and
operating power from power adapter or rechargeable lithium-ion battery. With no operating
power, expected clock battery life is about 10 weeks. If you will not be using the pet door or have
no operating power for an extended period of time, it is recommended to remove the clock battery
to prevent loss of battery life. When the clock battery needs replaced, if the battery has not been
installed or it has been installed incorrectly, you will receive an alert on the LCD Screen.
Choose your power source for your SmartDoor Plus pet door
to operate. A power adapter and a rechargeable lithium-ion
battery are included. The rechargeable lithium-ion battery can
be used for full operation of the pet door or as a battery back-
up option for the power adapter in case of a power loss.
To Install Clock Battery:
Remove clock battery cover from
back of interior frame. Battery slot is located on left side of
circuit board. Insert battery with positive (+) side facing the right side of the battery slot. Make sure
battery is fully inserted. Reinsert battery cover and push to snap into place.
To Install Power Adapter:
The SmartDoor Plus comes supplied with a low-voltage AC adapter
for power. Insert power adapter into concealed power connection located underneath bottom of
interior frame.
To Install Rechargeable Battery:
1. For safety reasons, the lithium-ion battery is shipped not fully charged.
The battery will need to be fully charged before use. To charge battery
connect supplied power adapter to charging station and plug adapter
into a standard household 120 volt AC circuit outlet. Insert lithium-ion
battery into charging station with battery contacts facing down. The
charging station LED will remain illuminated with a red light until the
battery is fully charged. After battery is fully charged, unplug power
adapter and disconnect from charging station. Remove battery.
2. Open battery compartment cover. With battery contacts pointed
up and arrow on battery pointed down, insert bottom of battery into
battery compartment.
3. Using the battery grips,
push battery down to
compress spring inside
bottom of battery
compartment and insert
top of battery.
4. Release grips until
arrow on battery and
arrow inside battery
compartment are aligned.
Close battery cover.
Read this entire guide prior to cutting or modifying an opening in your door or wall. Do not proceed with cut-out
or installation until your SmartDoor
™
Plus is assembled, powered up, programmed for your pet and all steps under
“Prepare, Setup and Test” have been completed.
Pull and lift
here
Power Adapter
Lithium-ion
Battery
Charging
Station
Battery
Contacts
Power
Adapter
LED
LED
Indicator
Battery Grips


