background image

www.petsafe.net

11

To Remove Rechargeable Battery:

 Open battery compartment door. Use battery grips and push down battery to 

compress spring in bottom of battery compartment. While pushing down, pull out top of battery then pull out bottom of battery to 
completely remove.

Rechargeable Battery LED Indicator and Specifications

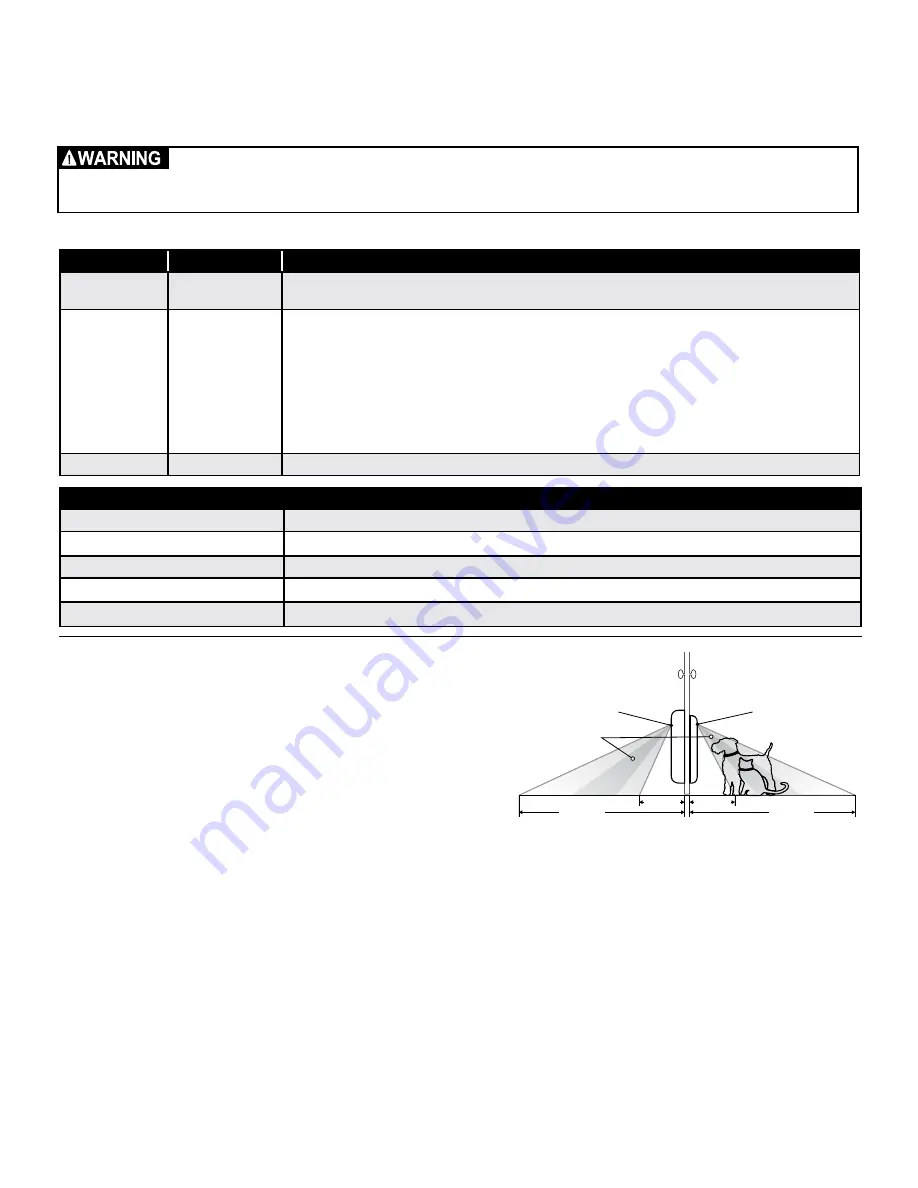
Understanding Motion Sensors

Note:

 For testing purposes, the motion sensor wire should have been 

connected from the interior frame to exterior frame at the factory. Before 
proceeding with the next steps, make sure the motion sensor wire is 
connected, or the SmartDoor

 Plus will not detect the SmartDoor Plus 

Key to open from the outside during testing. (See “Installation in a Non-
Glass Door” Step 4F page 18 for connecting motion sensor wire).
Understanding how the interior and exterior motion sensors work is 
important when selecting your installation location. When the motion 
sensors detect movement, they trigger the reader to turn on which 
detects and reads the SmartDoor Plus Key. The areas where the motion sensors detect motion are called Motion Sensing Zones. 
Where your pet is detected within the Motion Sensing Zones can depend on your pet’s size and hair type, surrounding temperatures 
and the location where the pet door is installed. For example, if your pet has longer hair, it may take longer for the motion sensors to 
detect your pet. The motion sensors may also detect you pet differently in summer than winter. Also, if your pet door is installed in a 
location with stairs on one side, the motion sensor will detect your pet differently on the side with the stairs than the side without the 
stairs. Blind Zones are areas where the motion sensors cannot detect your pet and the pet door will not read your pet’s key.

Check for Radio-Frequency Interference

Prior to installation, it is recommended to setup, program and test the SmartDoor Plus pet door in the intended installation location to 
check for possible radio-frequency interferences. These interferences could negatively affect the pet door from working properly and 
receiving the signal of the SmartDoor Plus Key. Common household appliances and electronic products should be located at least 
two feet (61cm) away from the location where the pet door will be installed. Typical household products to consider are microwaves, 
televisions, wireless telephones, computers, garage door openers and handheld electronic devices such as remote controls or 
game stations.

For long term storage, the battery should be stored at room temperature (around 68° F/ 20° C), charged at 
about 30% to 50% of its capacity. We recommend that spare batteries are charged and used at least once per 
year to prevent over-discharge.

Light Color

Light Function

Status

Red

Off

•Battery charge is complete.
•No power to the charging station.

Red

Blinking

•Under normal conditions charging station is receiving power from power supply but battery is not inserted in 

charging station. 

•Battery may be inserted upside down with the contacts facing up.
•Battery is not fully seated in charging station for battery contacts to make a good connection.
•Battery temperature is less than 32° F (0°C) or above 140° F (60°C).
•Voltage to battery charging station is too high or low. This can be caused by a faulty AC power adapter or by 

use of an incorrect AC power adapter.

•Battery failure. 
•Charging station failure.

Red

On

•Battery is charging.

Product Specifications

Lithium-ion Battery

11.1 VDC / 2.2 Ah / 24.42 Wh

Power Adapter Input

100 to 240 VAC 50 Hz to 60 Hz 0.8 A Max

Charging Station Output

12.6 VDC 1.1 A

Charge Time

Less than 4 hours

Estimated Battery Life

5 to 7 days depending on usage and temperature

1’–1½ ft.

1’–1½ ft.

2½– 3½ ft.

2½– 3½ ft.

Motion Sensing 

Zones

Interior 

Motion Sensor

Exterior 

Motion Sensor

OUTSIDE

INSIDE

Blind 

Zone

Blind 

Zone

Summary of Contents for PPA00-15930

Page 1: ...PPA00 15930 PPA00 15931 SmartDoor Plus Please read this entire guide before installing Installation and Operating Guide...

Page 2: ...eates Power tools can cause severe injury Follow all safety instructions for your power tools Be sure to always wear your safety goggles and other proper safety equipment Ensure the power adapter is u...

Page 3: ...amaged plug or use charger if damaged in any way The user prior to installation must become familiar with all building codes that may affect the installation of the pet door and determine along with a...

Page 4: ...y When applying the cutting template there should be a minimum of 3 inches between the bottom and sides of the door and the outer edge of the template to maintain the structural integrity of the door...

Page 5: ...Indicators 7 Key Definitions 7 Pet Door Icon Definitions 9 Pet Door LED Indicator 9 Prepare Setup and Test 10 Install Clock Battery and Power Source 10 Rechargeable Battery LED Indicator and Specifica...

Page 6: ...ay Programming is easy using the LCD screen and keypad The SmartDoor Plus is programmable for up to 20 pets SmartDoor Plus Key Worn on your pet s collar the SmartDoor Plus Key uses RFID technology by...

Page 7: ...your pet s key Clock Battery The 3 V lithium coin cell battery size CR2032 which keeps the clock s time during any power loss Clock Battery Cover Covers and protects 3 V lithium coin cell clock batte...

Page 8: ...ow If the battery dies the default factory setting is off for the beep and locked for the flap An alert ATTENTION screen will appear on the LCD screen and LED will blink red twice every 6 seconds when...

Page 9: ...es required Door operational mode must be set to Smart Mode for Timer Mode to work Volume Turns speaker On or Off Default factory setting is On Pet Door Icon Definitions Pet Door LED Indicator Icon Fu...

Page 10: ...battery slot Make sure battery is fully inserted Reinsert battery cover and push to snap into place To Install Power Adapter The SmartDoor Plus comes supplied with a low voltage AC adapter for power I...

Page 11: ...nce Prior to installation it is recommended to setup program and test the SmartDoor Plus pet door in the intended installation location to check for possible radio frequency interferences These interf...

Page 12: ...erent location to install the pet door Also avoid installing the pet door in a narrow hallway The SmartDoor Plus may be unable to read the SmartDoor Plus Key if your pet approaches at a sharp angle Ke...

Page 13: ...your pet s key is successfully programmed you will hear three beeps The Rename Pet screen will appear Pet 1 will be listed at the bottom of the screen You can leave pet name as Pet 1 or rename 4 To r...

Page 14: ...s programmed SmartDoor Plus Key 8 to 10 inches away and parallel to flap Slowly move the key toward the flap until the pet door reads the key and flap system unlocks Push through flap with your hand...

Page 15: ...rammed to the pet door Each programmed SmartDoor Plus Key has been tested in the installation location on both interior and exterior side with the pet door reading each key If installing in a door no...

Page 16: ...ful Tip Clamp down or weight the door to prevent it from moving The Pet Door can be installed with the door hanging based on your skill level 2C Match the marked lines on the door with the shoulder an...

Page 17: ...me frame with flap inside the cut out and check the fit Then place the exterior frame into the underside of the cut out to check the fit If the frames do not easily fit inside the opening you may need...

Page 18: ...e wire guide excess wire into space between top edge of door cut out and tunnel on exterior frame Align interior frame into cut out View both sides of door to ensure the exterior and interior telescop...

Page 19: ...t might be helpful to lock the exterior U flap so it does not move and scare your pet To lock exterior U flap make sure interior U flap and main flap are securely taped open while in Open Mode Next ch...

Page 20: ...o work for you and your pet Programming the pet door can be done by using the door control panel Main Menu This is the default screen If navigating a lower level menu the screen will time out and retu...

Page 21: ...buttons to be disabled by setting a 4 digit PIN This is helpful to prevent a child from changing the door or pet settings To Lock Keypad 1 From Main Menu select Setup Door Settings and use down arrow...

Page 22: ...flap in Smart Mode the pet door will change to a preset traditional mode This can be set to either Open or Locked for the shutdown position An alert will appear on the LCD screen when the pet door ent...

Page 23: ...it This is useful if you want to take your pet to the vet or if you want to keep your pet inside at nighttime Out Only Mode Allows any pet wearing a programmed SmartDoor Plus Key to exit through the p...

Page 24: ...rammed you will receive an error screen The Access Mode will then default back to In Out Mode To Remove Timer Mode Note Timer Mode can be disabled by setting a different Access Mode while keeping the...

Page 25: ...f the pet door could prevent it from programming properly To Add Pet 1 Go to Main Menu Setup Pet Settings Add Pet The 30 second countdown screen will appear 2 Hold the SmartDoor Plus Key 5 inches to 6...

Page 26: ...ly read key when worn by your pet 3 When your pet s SmartDoor Plus Key is successfully relearned you will hear three beeps and the LCD screen will return to Pet n menu screen Press left arrow back key...

Page 27: ...for pet Check re latch time is set to 1 or 2 seconds see Re latch Time page 24 May have an error or ATTENTION screen Check LCD screen for message In Tone or Out Tone is not working Check to make sure...

Page 28: ...another power adapter if one is available pet door uses same adapter ATTENTION screen Low Battery Mode Recharge battery Reset Button If a problem continues or if you still have issues after turning of...

Page 29: ...e it was purchased in order that it can be placed in our recycling system If this is not possible please contact the Customer Care Center for further information Battery Disposal Separate collection o...

Page 30: ...first year of ownership after the first year a service or upgrade charge will apply relative to replacement of the Product with new or refurbished items at Radio Systems sole discretion The limited wa...

Page 31: ...d to a replacement or refund for a major failure and for compensation for any other reasonably foreseeable loss or damage You are also entitled to have the goods repaired or replaced if the goods fail...

Page 32: ...Radio Systems Corporation 10427 PetSafe Way Knoxville TN 37932 1 800 732 2677 www petsafe net 400 2052 2016 Radio Systems Corporation...

Reviews: