CCTVSET10
26/05/2011
©
Velleman nv
19
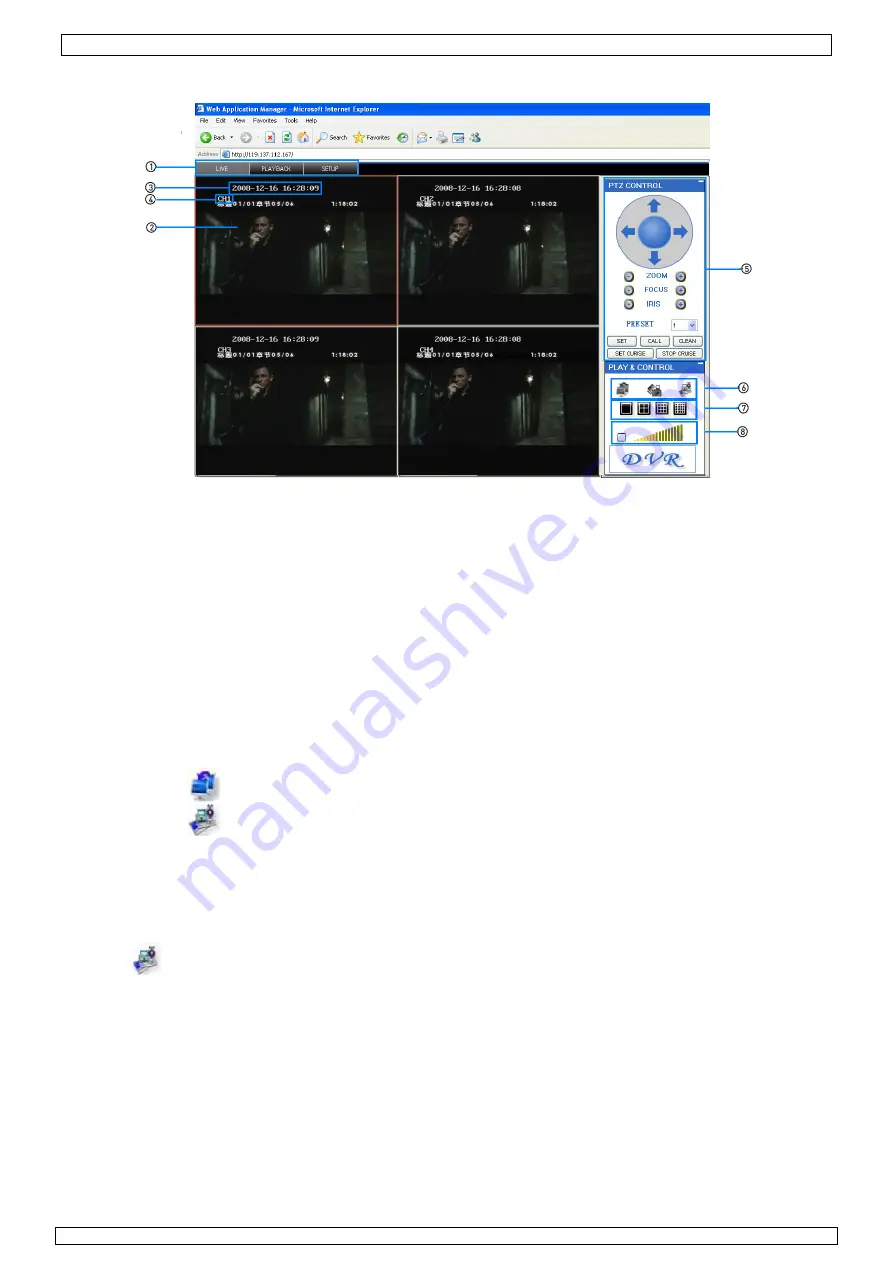
8.2 Remote surveillance main screen
Upon login, the Remote Surveillance main screen appears in your browser.
1)
Modes
: Click LIVE, PLAYBACK or SETUP.
2)
Main Screen
: Main display screen for live viewing and playback.
3)
Time Stamp
: Time stamp appears on each channel.
4)
Channel
: Channel number appears in the top left corner.
5)
PTZ Control
: PTZ control for any connected PTZ cameras (not included).
6)
Functions
: Click the icons to show/hide channels, take screen captures, and record.
7)
Display Modes
: Click the icons to view channels in single-channel full-screen, quad, and split-
screen configurations.
8)
Volume/Mute
: Select a channel (outlined in red) and then click the bars to increase/decrease
volume; click the icon to mute/un-mute volume.*
*Audio capable cameras (not included) required for audio listening and recording.
8.2.1 Live viewing
By default, remote surveillance opens in Live Viewing mode (split-screen).
To use Live Viewing:
1)
Click
LIVE
at the top of the main screen.
2)
Click the display mode icons to view the main screen in
single-channel
,
quad
, or
split-screen
configurations. You can also double-click a channel at any time to view it in single-channel.
3)
Click
to show or hide all the channel windows.
4)
Click
to start/stop manual recording to your PC on ALL channels. For more details see
RECORDING.
5)
Select a channel (outlined in red) and then click the audio bars to increase or decrease listen-in
volume*. Click the icon to mute/un-mute.
NOTE:
The Talk function is not supported.
*Audio capable camera (not included) required for listen-in audio.
8.2.1.1 RECORDING
You can record video directly to your PC using the remote surveillance software.
To record video to your PC:
From Live viewing, click to start/stop manual recording to your PC on ALL channels
NOTES:
•
You will record video to your PC regardless of the recording mode on the system itself.
•
By default, recorded files are saved in C:\DVR\[
ip_address
]\Record.


