background image

 2

0

2

2

-1

0

32

OHV210-F229-B15

Configuration

4.3

Configuration Using Control Codes

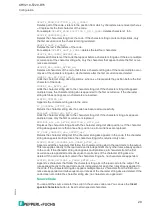
The handheld reader is configured using control codes. Control codes allow direct configura-
tion without using a PC. To change a parameter, scan the appropriate control code using the 
handheld reader.

4.3.1

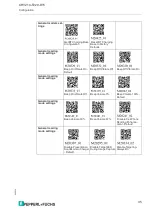
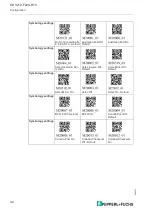
Data Matrix control codes

Bluetooth settings 

Clear connection 
(pairing) history on 
Bluetooth charging 
station

Clear connection 
(pairing) history on 
Bluetooth reader

Disable Beep During 
Reconnection - 
Default

Bluetooth settings 

Enable Beep Every 30 
seconds During 
Reconnection

Get Bluetooth parame-
ters

Communication 
mode settings

Enable Packet Mode

Enable Raw Mode - 
Default

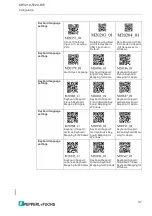
Data formatting: Pre-
fix - Suffix settings

Convert Barcode Data 
to Bracketed Hex Out-
put

Convert Barcode Data 
to Lowercase

Convert Barcode Data 
to Uppercase

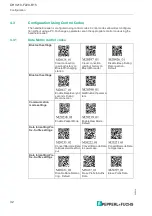
Data formatting: Pre-
fix - Suffix settings

Disable Data Format-
ting - Default

Erase Prefix & Suffix 
Data

Erase Prefix Data

Summary of Contents for OHV210-F229-B15

Page 1: ...OHV210 F229 B15 Handheld reader Manual ...

Page 2: ...rsion as well as the supplementary clause Expanded reservation of proprietorship Worldwide Pepperl Fuchs Group Lilienthalstr 200 68307 Mannheim Germany Phone 49 621 776 0 E mail info de pepperl fuchs com North American Headquarters Pepperl Fuchs Inc 1600 Enterprise Parkway Twinsburg Ohio 44087 USA Phone 1 330 425 3555 E mail sales us pepperl fuchs com Asia Headquarters Pepperl Fuchs Pte Ltd P F Bu...

Page 3: ...ion via Bluetooth 15 3 5 Connection to a Host 16 3 6 Locking Device Connections 17 4 Configuration 18 4 1 Selecting the Operating Mode 18 4 1 1 Keyboard Mode 18 4 1 2 Vision Configurator Mode 18 4 1 3 Bidirectional Communication 19 4 1 4 Keyboard Layout 21 4 2 Using Vision Configurator 21 4 2 1 Connecting to Vision Configurator 21 4 2 2 Layout of Application Window 23 4 2 3 Sensor Data 24 4 2 4 Te...

Page 4: ...22 10 4 5 2 Reading Codes 55 5 3 Orientation 56 5 4 Operation of the Charging Cradle 57 5 5 Using the Battery 59 5 6 Locating the Handheld Reader 60 5 7 Operating Modes 60 5 8 Notifications 61 6 Servicing 63 7 Troubleshooting 64 ...

Page 5: ... documents 1 2 Target Group Personnel Responsibility for planning assembly commissioning operation maintenance and dismount ing lies with the plant operator Only appropriately trained and qualified personnel may carry out mounting installation com missioning operation maintenance and dismounting of the product The personnel must have read and understood the instruction manual and the further docum...

Page 6: ...on 1 This symbol indicates a paragraph with instructions You are prompted to perform an action or a sequence of actions Danger This symbol indicates an imminent danger Non observance will result in personal injury or death Warning This symbol indicates a possible fault or danger Non observance may cause personal injury or serious property damage Caution This symbol indicates a possible fault Non o...

Page 7: ...sy integration into ERP systems The read data is transferred via the Bluetooth interface or by plugging the handheld reader into the charging cradle With its rugged housing and degree of protection IP65 the handheld reader is suitable for outdoor use Figure 2 1 Handheld reader The device is only approved for appropriate and intended use Ignoring these instructions will void any warranty and absolv...

Page 8: ...tion 2 2 Indicators and Operating Elements Handheld reader 1 Optical unit 2 Data LED 3 Wireless LED 4 Trigger button 1 5 Trigger button 2 6 Battery release 7 Battery status button 8 Battery status indicator 9 Trigger button 3 1 2 3 4 5 9 6 7 8 ...

Page 9: ...itional stability to the charging cradle when it is freestanding on a counter or table 1 Quick connection code 2 Wireless LED 3 Page button 4 Micro USB interface 5 Threaded mounting inserts M3 x 0 5 6 Cable guide groove 1 Cable output 2 Rubber feet 3 Cable entry guides 4 Cable output 2 4 5 6 1 3 1 2 3 4 ...

Page 10: ... ambient conditions must be considered see datasheet The device built in components packaging and any batteries contained within must be dis posed in compliance with the applicable laws and guidelines of the respective country 1 Battery status button 2 Battery Status Indicator 1 2 Designation Description OHV210 CHARGER B15 Charging cradle for OHV200 handheld readers with integrated Bluetooth modem...

Page 11: ...ace 2 Press any key on the handheld reader except the battery status key on the battery for half a second The handheld reader begins the start sequence When the handheld reader has success fully completed its start sequence approximately 2 seconds it emits a beep the LEDs flash and the handheld reader vibrates once Removing the Battery 1 Move the locking device on the bottom of the handheld reader...

Page 12: ...able along the cable guide groove on the bottom of the charging cradle 3 Insert the USB plug on the connection cable into a free USB port on the PC This step can be carried out even during operation 4 Place the charging cradle in the table mount The charging cradle can be attached to the table mount using the two flat head screws supplied Note When the charging cradle is placed in a table mount th...

Page 13: ...OHV210 F229 B15 Installation 2022 10 13 ...

Page 14: ...our secondsand lights up for one second When the battery is fully charged the battery status indicator lights up continu ously Note Charging Duration The battery will be fully charged in approximately 3 5 hours when the charging cradle is used with an external power supply Charging time may vary when the inductive charging cradle is connected to a PC USB connection Tip Before First Use It is recom...

Page 15: ...ected PC and to the currently opened program The handheld reader behaves like a keyboard Bluetooth Wireless Performance The handheld reader uses Class 2 Bluetooth wireless The output power in the handheld reader is set to 0 dBm by default but can be configured to lower or higher maximum values The default output power of the Bluetooth wireless on the handheld reader is 8 dBm and can also be adjust...

Page 16: ...t Connection 1 Scan the following control codes CC0066002_01 and finally M20381_01 to put the handheld reader into Bluetooth HID keyboard mode Figure 3 1 CC0066002_01 Figure 3 2 M20381_01 2 Open the Bluetooth settings menu on the mobile device or device manager on the PC find OHV210 under the available Bluetooth devices and connect When the handheld reader is successfully connected it emits a beep...

Page 17: ...ng cradle After the connection has been locked the charging cradle can only connect to the coupled read device Locking Device Connections 1 After you have coupled the handheld reader with the charging cradle scan the M20409_01 barcode to lock the connection and scan the M20410_01 barcode to unlock the connection Figure 3 3 M20409_01 and M20410_01 ...

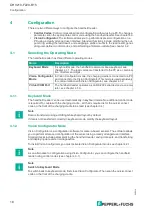
Page 18: ...ftware allows you to perform advanced configuration of the sensor using a clearly arranged user interface Standard tasks include parameterizing the handheld reader saving data sets and transferring and displaying data and error diagnostics To install Vision Configurator you must activate Vision Configurator mode see chapter 4 2 1 Mode Description Keyboard Mode In keyboard mode the handheld reader ...

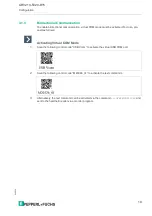
Page 19: ...ted To do so pro ceed as follows Activating Virtual COM Mode 1 Scan the following control code USB Vcom to activate the virtual USB COM port 2 Scan the following control code M20326_01 to activate the text commands 3 Alternatively the text command can be activated via the command FWCMSOR1 CR and sent to the handheld reader via a monitor program ...

Page 20: ...e text commands 3 If you have activated the text command via a monitor program you can deactivate it using the command FWCMSOR0 CR Example Sending Text Commands The Hercules program from HW group is one example of a monitor program that can be used In virtual COM mode you can send the commands for beep and trigger to the handheld reader for example The following figure shows the two commands Beep ...

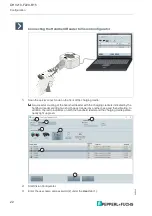
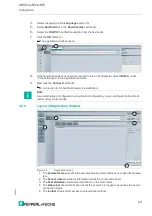
Page 21: ...g the handheld reader using control codes you do not need to switch to Vision Configurator mode 4 2 1 Connecting to Vision Configurator To install Vision Configurator and connect the handheld reader with Vision Configurator pro ceed as follows Installing Vision Configurator 1 Download the latest version of Vision Configurator from http www pepperl fuchs com 2 Run the setup file 3 Select a language...

Page 22: ...coupling of the hand held reader with the charging cradle is indicated by the handheld reader emitting two short beeps followed by another beep and then vibrating In addition the radio indicators on both the handheld reader and the charging cradle perma nently light up green 2 Start Vision Configurator 3 Enter the user name and password 2 under the User tab 1 1 2 5 4 6 7 3 ...

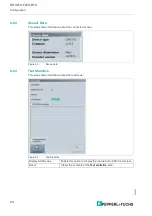
Page 23: ...to the handheld reader is established 4 2 2 Layout of Application Window Figure 4 2 Application screen 1 The parameter area is split into several subareas and contains sensor specific parame ters 2 The Sensor data area shows information about the connected sensor 3 The Test statistics area shows information on the read codes 4 The status bar shows information about the user who is logged in as wel...

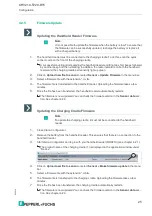
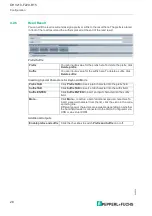
Page 24: ... about the connected sensor Figure 4 3 Device data 4 2 4 Test Statistics This area shows information about the read code Figure 4 4 Test Statistics Display ASCII value Enable this option to display the read result in ASCII characters Reset Clears the contents of the Test statistics area ...

Page 25: ...tion See chapter 4 2 3 Updating the Charging Cradle Firmware 1 Close Vision Configurator 2 Remove the battery from the handheld reader This ensures that there is no connection to the handheld reader 3 Start Vision Configurator and log in with your handheld reader OHV210 see chapter 4 2 1 The product name of the charging cradle 1 is displayed in the application window under Device 4 Click on Upload...

Page 26: ... To delete a suffix click Delete suffix Prefix TAB Click Prefix TAB to insert a tab character into the prefix field Suffix TAB Click Suffix TAB to insert a tab character into the suffix field Suffix ENTER Click Suffix ENTER to insert an input character into the suffix field More Click More to call up a list of additional special characters To insert a special character from the list click the icon...

Page 27: ...te control code for own settings If you check the First completely reset sensor check box a reset command is integrated in the control code When the control code is read all settings are first reset to factory defaults before the new settings are applied Note Scripts for processing the read result are not included in this overview Tip This function allows your configured settings to be transferred...

Page 28: ...ns the characters of the code that are between a character string abc and def If there are multiple occurrences of the character strings abc and def only the characters between the first occurrence are returned If the character string abc does not appear no characters are returned OUTPUT_ALL_CHARS_BEFORE_abc Returns the characters of the code that appear before a character string abc If there are ...

Page 29: ...read successfully REPLACE_STRING_abc_WITH_def Adds the character string abc to the character string def If the character string abc appears multiple times only the first occurrence is replaced REPLACE_ALL_abc_AFTER_POSITION_x_WITH_def Replaces the character string abc with the character string def after position x If the character string abc appears more than once after position x all occurrences ...

Page 30: ...cript to a local file Send script to sensor Saves the script on the sensor After pressing this button the handheld reader takes approx 30 seconds to complete and automatically recon nects to the Vision Configurator Delete script from sensor Deletes the script from the sensor After pressing this button the hand held reader takes about 30 seconds to complete and automatically reconnects to the Visio...

Page 31: ...nsert special characters click on Insert special characters 4 If the source code is green you can test the source code in the Example area To do this enter a sample value in the Read code field The commands from the Source code area are applied to the sample value in the Read code field and the result is displayed in the Output field Note Note that JavaScript must always be deleted separately To d...

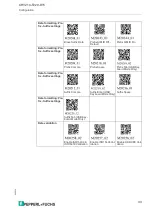
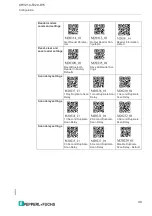
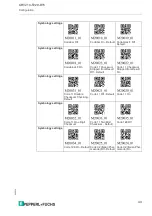
Page 32: ...y on Bluetooth charging station Clear connection pairing history on Bluetooth reader Disable Beep During Reconnection Default Bluetooth settings Enable Beep Every 30 seconds During Reconnection Get Bluetooth parame ters Communication mode settings Enable Packet Mode Enable Raw Mode Default Data formatting Pre fix Suffix settings Convert Barcode Data to Bracketed Hex Out put Convert Barcode Data to...

Page 33: ...ix Suffix settings Prefix Comma Prefix Space Prefix Tab USB Key board Mode Only Data formatting Pre fix Suffix settings Suffix Comma Suffix Enter USB Keyboard Mode Only Suffix Space Data formatting Pre fix Suffix settings Suffix Tab USB Key board Mode Only Data validation Enable ISO15434 ISO15418 Validation Enable ISO15434 Val idation Enable UDI HIBC Vali dation ...

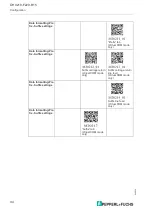
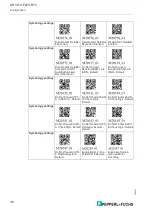
Page 34: ...M mode only Data formatting Pre fix Suffix settings Suffix carriage return Virtual COM mode only Suffix carriage return line feed Virtual COM mode only Data formatting Pre fix Suffix settings Suffix line feed Virtual COM mode only Data formatting Pre fix Suffix settings Suffix tab Virtual COM mode only ...

Page 35: ... Default Beep Off Vibrate Off Beep Off Vibrate On General reading mode settings Beep On Vibrate Off Beep Volume 0 Beep Volume 100 Default General reading mode settings Beep Volume 33 Beep Volume 67 Disable Cell Phone Reading Enhance ment Default General reading mode settings Disable Presentation Scan Mode in Charger Default Disable Target LED During Image Capture Disable Targeting Always On ...

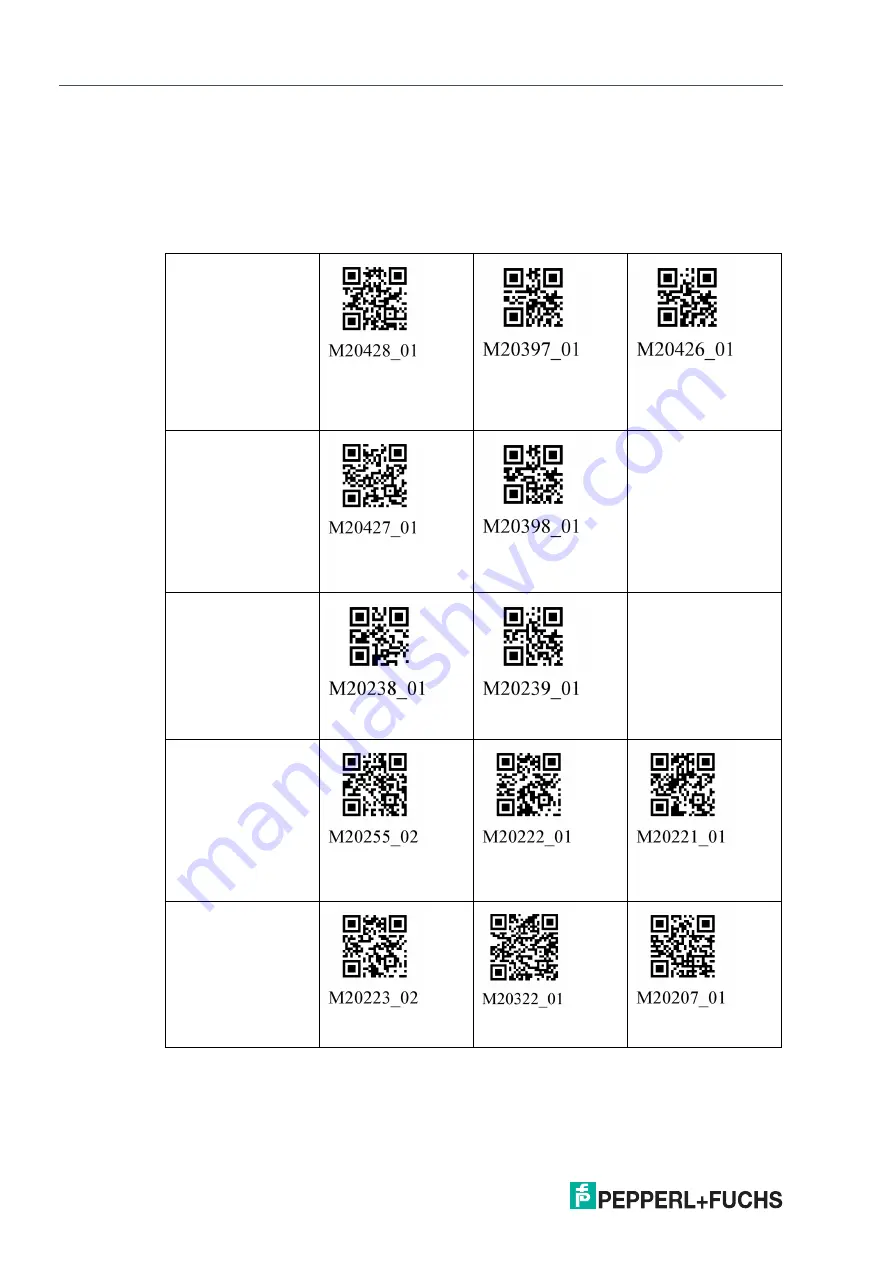
Page 36: ...Always On Reader Raw Text Commands Off Default Reader Raw Text Commands On General reading mode settings Set Motion Detect Maximum Brightness to 100 Default Set Motion Detect Maximum Brightness to 25 Set Motion Detect Maximum Brightness to 50 General reading mode settings Set Motion Detect Maximum Brightness to 75 General reading mode settings Control Character Input Alt Keypad Control Character I...

Page 37: ...e Keybord language settings Keyboard Support French Keyboard Mapping for Apple Keyboard Support French Belgian Key board Mapping for Windows Keyboard Support German Keyboard Mapping for Apple Keybord language settings Keyboard Support German Keyboard Mapping for Windows Keyboard Support German Swiss Key board Mapping for Windows Keyboard Support Italian Keyboard Map ping for Apple Keybord language...

Page 38: ...ard Mapping for Windows Keyboard Support US English Keyboard Mapping for Windows Default Keyboard Support US International Univer sal Keyboard Map ping for Windows Keybord language settings List Installed Lan guages Set Italian for Win dows as active lan guage Set Portuguese for Windows as active language Miscellaneous set tings Disable Upload Image Mode Default Enable Upload Image Mode Operating ...

Page 39: ...luetooth Reader to Factory Defaults Save All Reader Set tings Scan delay settings 1 Day Duplicate Scan Delay 1 Hour Duplicate Scan Delay 1 Second Duplicate Scan Delay Scan delay settings 10 Second Duplicate Scan Delay 2 Second Duplicate Scan Delay 3 Second Duplicate Scan Delay Scan delay settings 30 Second Duplicate Scan Delay 5 Second Duplicate Scan Delay Disable Duplicate Scan Delay Default ...

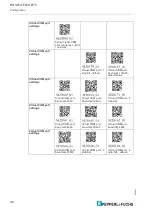
Page 40: ...aud rate 115200 default value Virtual COM port settings Virtual COM port baud rate 1200 Virtual COM port baud rate 19200 Virtual COM port 2 stop bits Virtual COM port settings Virtual COM port baud rate 2400 Virtual COM port baud rate 38400 Virtual COM port baud rate 4800 Virtual COM port settings Virtual COM port baud rate 57600 Virtual COM port 7 data bits Virtual COM port 8 data bits default ...

Page 41: ...210 F229 B15 Configuration 2022 10 41 Virtual COM port settings Virtual COM port baud rate 9600 Virtual COM port even parity Virtual COM port no parity Virtual COM port settings Virtual COM port odd parity ...

Page 42: ...Australian Post On Symbology settings Aztec Inverse Nor mal On Aztec Inverse Off Default Aztec Mirror Off Default Symbology settings Aztec Mirror On Aztec Off Aztec On Default Symbology settings BC412 Off Default BC412 On Canada Post Off Default Symbology settings Canada Post On Codabar Checksum Off Default Codabar Checksum On ...

Page 43: ...tripped from Result Off Default Code 11 Checksum Stripped from Result On Symbology settings Code 11 Disable Checksum Checking Default Code 11 Off Default Code 11 On Symbology settings Code 11 One Digit Checksum Code 11 Two Digit Checksum Default Code 128 Off Symbology settings Code 128 On Default Code 32 Italian Phar macode Off Default Code 32 Italian Phar macode On ...

Page 44: ...ult On Symbology settings Code 39 Extended Full ASCII Off Default Code 39 Extended Full ASCII On Code 39 Off Symbology settings Code 39 On Default Code 49 Off Default Code 49 On Symbology settings Code 93 Off Code 93 On Default Composite Off Default Symbology settings Composite On Convert Bookland EAN 13 to ISBN Convert Bookland EAN 13 to ISSN ...

Page 45: ...rse and Normal On Default Data Matrix Inverse Off Symbology settings Data Matrix Mirror Off Default Data Matrix Mirror On Data Matrix Off Symbology settings Data Matrix On Default Data Matrix Rectangu lar Extended Off Default Data Matrix Rectangu lar Extended On Symbology settings Data Matrix Rectangu lar Off Data Matrix Rectangu lar On Default Disable BC412 Regu lar and Reverse Default ...

Page 46: ... Default Do Not Convert Bookland EAN 13 to ISSN Default Symbology settings Do Not Convert UPC A to EAN 13 Default Do Not Transmit EAN 13 Check Digit Default Do Not Transmit EAN 8 Check Digit Default Symbology settings Do Not Transmit UPC A Check Digit Default Do Not Transmit UPC A Number System Default Do Not Transmit UPC E Check Digit Default Symbology settings Do Not Transmit UPC E Number System...

Page 47: ...s Enable GS1 DataBar Stacked and GS1 DataBar Stacked Omnidirectional Default Grid Matrix Inverse Off Default Grid Matrix Inverse On Symbology settings Grid Matrix Mirror Off Default Grid Matrix Mirror On Grid Matrix Off Default Symbology settings Grid Matrix On GS1 DataBar Off GS1 DataBar On Default Symbology settings Han Xin Inverse Off Default Han Xin Inverse On Han Xin Mirror Off Default ...

Page 48: ... Kong 2 of 5 On Symbology settings Interleaved 2 of 5 Checksum Off Default Interleaved 2 of 5 Checksum On Interleaved 2 of 5 Checksum Stripped from Result Off Default Symbology settings Interleaved 2 of 5 Checksum Stripped from Result On Interleaved 2 of 5 Off Interleaved 2 of 5 On Default Symbology settings Japan Post Off Default Japan Post On Keep Codabar Start and Stop Delimiters Default ...

Page 49: ...utch Post On Symbology settings Korean Post Off Default Korean Post On Matrix 2 of 5 Off Default Symbology settings Matrix 2 of 5 On Maxicode Off Default Maxicode On Symbology settings Micro PDF417 Off Default Micro PDF417 On Micro QR Code Off Default Symbology settings Micro QR Code On Mode 1 QR Code Off Default Mode 1 QR Code On ...

Page 50: ...ssey Check sum Off Default MSI Plessey Check sum Stripped from Result Off Default MSI Plessey Check sum Stripped from Result On Symbology settings MSI Plessey Off Default MSI Plessey On NEC 2 of 5 Check sum Off Symbology settings NEC 2 of 5 Check sum On Default NEC 2 of 5 Off Default NEC 2 of 5 On Symbology settings Output Telepen as ASCII Output Telepen as Numeric Default Pharmacode Color Off Def...

Page 51: ...harmacode On Pharmacode Reverse Barcode Decoding Right to Left QR Code Inverse and Normal On Symbology settings QR Code Inverse Only QR Code Mirror On QR Code Off Symbology settings QR Code On Default QR Code Standard Only Default Reboot Reader Symbology settings Remove Codabar Start and Stop Delimit ers Remove Trioptic Start and Stop Delimiters Default Reverse BC412 Off Default ...

Page 52: ...al Mail Checksum Off Royal Mail Checksum On Straight 2 of 5 Off Default Symbology settings Straight 2 of 5 On Telepen Off Default Telepen On Symbology settings Transmit EAN 13 Check Digit Transmit EAN 8 Check Digit Transmit UPC A Check Digit Symbology settings Transmit UPC A Num ber System Transmit UPC E Check Digit Transmit UPC E Num ber System On ...

Page 53: ...gy settings UK Plessey On UK Royal Mail Off Default UK Royal Mail On Symbology settings UPC E Expansion Off Default UPC E Expansion On UPC Supplemental Off Default Symbology settings UPC Supplemental On UPC EAN Off UPC EAN On Default Symbology settings UPU ID Tags Off Default UPU ID Tags On USPS Intelligent Mail Off Default ...

Page 54: ...2022 10 54 OHV210 F229 B15 Configuration Symbology settings USPS Intelligent Mail On USPS Planet Off Default USPS Planet On Symbology settings USPS Postnet Off Default USPS Postnet On ...

Page 55: ...yboard Before you read a code start or activate the application to which the read result is to be transferred 1 Hold the handheld reader so that the contrast between the code and surface is as high as possible A reading angle between 45 and 90 is optimal The reading distance is approximately 10 cm depending on the code type and code size 2 Press the trigger button If the reading operation is succe...

Page 56: ...ation 5 3 Orientation The handheld reader transmits a blue bar when the trigger button is pressed to facilitate detect ing the code in its field of view Point the bar to the code for the best reading quality Figure 5 1 Field of view ...

Page 57: ...ecially suitable for picking applications This means that the worker can hold packages with codes for automatic reading and recording under the charging cradle and an extra hand is therefore not required In addition the handheld reader can be removed from the charging cradle for recording codes on pallets and can be used on the move When an object is in the field of view of the handheld reader the...

Page 58: ...ation scan mode with motion detection in the charging cradle Deactivates the presentation scan mode in the charging cradle default Sets the maximum brightness for motion detection to 100 default Sets the maximum brightness for motion detection to 25 Sets the maximum brightness for motion detection to 50 Sets the maximum brightness for motion detection to 75 ...

Page 59: ...ttery Status Indicator To check the battery charge status press the button on the back of the battery Charge sta tus LED 1 LED 2 LED 3 LED 4 Battery Status Indicator 75 100 On On On On 50 75 On On On 25 50 On On 25 On 10 Flashing Battery empty Off Off Off Off Note Charging the Handheld Reader To charge the battery installed in the handheld reader place the handheld reader in the charging cradle wi...

Page 60: ...d a code as soon as a movement is detected in the read range Idle mode The handheld reader is switched on codes are not read In this state the lighting and the blue bar are switched off Shutdown mode If the handheld reader is not charged and is in idle mode it will turn off by default after two hours The duration of the idle mode before entering the power off mode can be set between one and ten ho...

Page 61: ...tion and transfer data success ful Function indicator on the handheld reader briefly lights up green The wireless LED will flash until the data transfer is complete Beeps once Vibrates once Code recognition suc cessful data transfer failed Beeps three times Control code recogni tion and processing successfully Function indicator on the handheld reader briefly lights up green Beeps twice Vibrates t...

Page 62: ...le LEDs on the battery status indicator light up continuously Status Visual Switched off LED off Powered but not connected to a handheld reader LED lights up alternately for one second on and one second off Attempt to establish connection with a hand held reader LED flashes quickly seven times Connected to a handheld reader LED lights up continuously Data transfer LED lights up alternately for two...

Page 63: ...h the optical unit with your fingers Do not immerse the device in water Do not spray the device with water or other liquids Do not use abrasive agents to clean the surface of the device Use a cotton or paper cloth moistened with water or isopropyl alcohol The cloth must not be soaked Remove any residual alcohol using a cotton or paper cloth moistened with distilled water The cloth must not be soak...

Page 64: ... The reading distance is too large or too small Move the handheld reader closer to or farther from the code until the width of the blue bars is roughly the same width as the code see chapter 5 3 The code is on a reflective sur face Enable the option for enhanced display reading Change the reading angle by holding the handheld reader at an angle to the surface The read result is incorrect The handh...

Page 65: ... the charging cradle to couple and connect the hand held reader Use the device manager on the host to couple and connect with the hand held reader The wireless LED flashes once every ten seconds The handheld reader is in idle mode and is not in the charging cradle Place the handheld reader in the charging cradle or press a button to activate the hand held reader The handheld reader beeps until any...

Page 66: ...rection of the arrow and remove the battery 2 Press and hold both trigger buttons on the top of the handheld reader 3 Insert the battery into the handheld reader and hold down the trigger buttons After a few seconds a number of beeps will sound in sequence 4 Then release the trigger buttons The function indicator of the handheld reader flashes green and the device beeps The handheld reader has now...

Page 67: ...Pepperl Fuchs Quality Download our latest policy here www pepperl fuchs com quality www pepperl fuchs com Pepperl Fuchs Subject to modifications DOCT 8261A ...

Reviews: