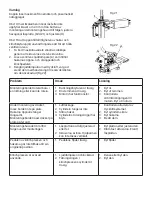
Note:
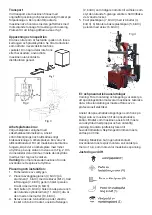
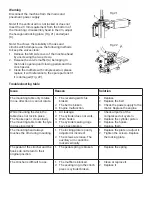
The operation below is referring to Fig. 4
Press the turn pedal of the mounting table (Z), the
mounting table (Y) rotates clockwise.
Lift up (Z), the mounting table (Y) rotates
counterclockwise.
Press the pedal of the clinch press (U) to make the
clinch press (R) press the tyre, release the pedal (U)
to return the press (R) to its original position.
Push the pedal off the hooks (V) to open the
mounting hooks on the mounting table (G), press
the pedal again to close them (G). When the pedal
is in the middle position, the chins should be in
place. Lift the compressed airlock button (K) to
lock the horizontal arm (N) and the arm of the
mounting head (M). Press the tilt pedal (H) to tilt
the column (C) backwards; lift the pedal to return
the pillar to the upper position.
The tyre change operation consists of three parts:
1) Disassembly of the clinch.
2) Disassembly of the tyre from the rim.
3) Mounting the tyre on the rim.
Warning:
Do not use the machine if you are
wearing loose clothing. Remember to wear
goggles, gloves and safety shoes. Make sure
the tyre is completely empty and loosen all tyre
weights from the rim.
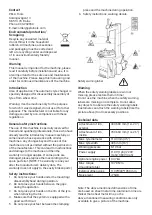
To loosen tyres from the clinch
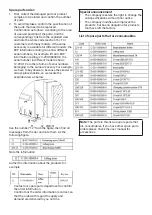
Fig 5
Check that there is no
air in the tire. Place the
tyre against the rubber
cushion (S). Press the
clincher (F) against the
clincher at approx. 10
mm from the rim edge
(Fig. 5). Press the pedal
of the clinch press (U)
to press the press onto the tire.
Repeat the same on several
points of the tyre on both sides to get the clinch off
the rim.
To loosen tyres from the rim
Make sure that all tyre weights have been removed
from the rim and that the tyre is completely
deflated before loosening the tire.
Add grease (or equivalent lubricant) on the tyre
clinch. If you don’t use grease, the machine can
damage the tyre or even cause it to break.
Attach the rim with the mounting hooks
depending on its dimensions:
a) To lock the rim from the outside:
Use the pedal (V) to move the four hooks (G) on
the mounting table (Y) to the appropriate point
depending on the size of the rim. Place the tyre on
the mounting table, hold the rim and press the
pedal of the hooks (V) until the rim is firmly
attached to the hooks.
b) To lock the rim from the inside:
Move the hooks (G) to the closed position in the
middle of the mounting table. Place the tyre on the
mounting table and press the pedal (V) that opens
the hooks, to open the position of the hooks and
lock the rim in place.
Warning: Make sure the tyre is securely fastened in
place in the hooks before the following operation.
Lower the vertical arm
(M) until the mounting /
disassembly head (I) is
next to the edge of the
rim, turn the
pneumatic locking
knob (K) to lock the
vertical and
horizontal arm (M) in position
and control the distance from
the mounting / disassembly head to the edge of
the wheel rim approx. 2-3 mm. Drive the tyre iron
(T) between the tyre clamp and the front end of the
mounting head (I) and lift the clamp on the
mounting head as shown in Fig. 6.
Warning: Chains, bracelets, loose clothing can
cause danger to the user near rotating parts.
Press the pedal of the mounting table (Z) while
holding the tyre iron in place, to turn the mounting
table (Y) clockwise until the clinch has completely
released from the tyre rim. To solve the second
clinch, use the tyre iron to lift the tyre and release
the tyre from the rim. Press the tilt lever (H) to turn
in the tilt position behind the column and remove
the tyre from the mounting table.
Fig 6
Tire fitting
Warning: Make sure that the tyres and rims are the
same sizes before fitting. To avoid damage to the
tire, lubricate the tyre clinch and rim with grease
recommended by the manufacturer. Put the tyre on
the rim.
Summary of Contents for 507083
Page 1: ...Tyre changer U 6656AT Däckmaskin U 6656AT en hastighet Item No 507083 ...
Page 10: ......
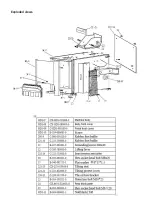
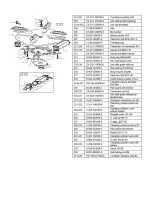
Page 19: ...Exploded views ...
Page 20: ......
Page 21: ......
Page 22: ......
Page 23: ......
Page 24: ......
Page 25: ......
Page 26: ......
Page 27: ......
Page 28: ......
Page 29: ......
Page 30: ......
Page 31: ...Wiring diagram ...
Page 32: ......


