background image

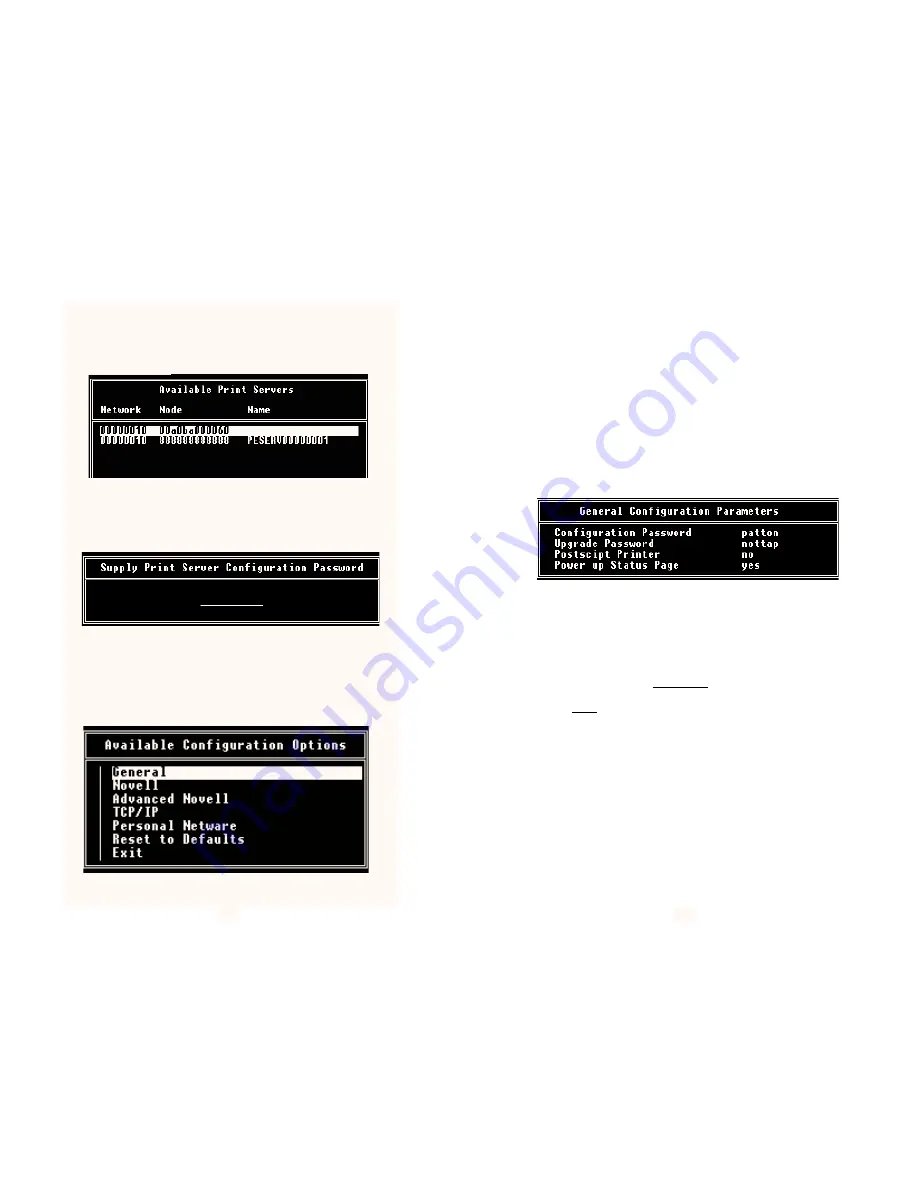
7) When the search is complete, you will see a list of the Print Servers
UCONNECT has located on the Available Print Servers screen (see
below).  Use the arrow keys to scroll between listed servers, and the
[ENTER] key to select a single print server to configure.

8) When you have selected a print server to configure, you will see the
Password screen.  Key in the password “PATTON” and press [ENTER]
to move to the Available Configuration Options screen.

9) The Available Configuration Options screen lets you select several
pathways of configuration depending upon the operating system your
network is using.  Section 4.3 will give you an overview of the
configuration options so that you can custom-tailor the Print Server to
your own requirements.

13

4.2  Configuration within Novell using UCONNECT

UCONNECT lets you configure the Print Server to work with several

types of Novell compatible network operating systems.  This section will
guide you through the various configuration options.  

4.2.1  General Configuration

The first option on the Available Configuration Options screen lets

you key in general information that will apply to any operating system.
In most cases you will need to enter information in the General
Configuration Parameters screen, as well as a second screen that
applies more specifically to the particular operating system you are
using.

Each of the options on the General Configuration Parameters screen
can be edited using the arrow and [esc] keys to scroll and select.

1) The Configuration Password may be altered to suit your needs.

2) The Upgrade Password 

may be altered, but we recommend that 

you leave this password unchanged.

3) You must change the Postscript Printer field to YES if your 
printer uses Postscript.  Otherwise, the printer will not output 
correctly.

4) The Power up Status Page field may be changed to NO if you do 
not want a status page to appear upon power up of the Print Server.

(continued)

14

Summary of Contents for MODEL 2126

Page 1: ...USER MANUAL MODEL 2126 PeNetTM Miniature 10Base2 to Parallel Print Server SALES OFFICE 301 975 1000 TECHNICAL SUPPORT 301 975 1007 07M2126 A Doc 081021UA Revised 3 07 96...

Page 2: ...warranties expressed or implied and the installation or use of this product shall be deemed an acceptance of these terms by the user 1 1 Radio and TV Interference The Model 2126 generates and uses ra...

Page 3: ...e of power loss the Model 2126 can restore connection to servers that are downed It also supports all the Novell printing and print server features The PeNetTM supports print speeds greater than 60 00...

Page 4: ...er status page b Is your printer set up for Postscript If so this will interfere with the default set up of the Print Server The status page may be garbled or may not print at all See Section 4 8 on G...

Page 5: ...assword are as allocated in PCONSOLE 3 Check that there is a connection available for the Print Server use Monitor on the Server Console 4 If Selective Login is enabled ensure correct File Server name...

Page 6: ...the menus use the arrow keys to scroll up and down between menu items The esc key is a toggle switch used to select and deselect menu items to be edited The ENTER key is used to update the file and m...

Page 7: ...the arrow keys to scroll between lines Use the esc key to select and deselect search methods Press ENTER to update the file with your selections and go to the next screen 11 6 The Start Scan for Prin...

Page 8: ...of Novell compatible network operating systems This section will guide you through the various configuration options 4 2 1 General Configuration The first option on the Available Configuration Options...

Page 9: ...nfigure Use the arrow and esc keys to scroll and select the print server you wish to configure Then press ENTER 15 2 Once you have selected a print server to configure you will receive the Advanced No...

Page 10: ...il the Print Server is rebooted 17 Warning If you select Yes you will lose all changes you have made in the configuration process 2 After you have sent your configuration changes to the print server a...

Page 11: ...understanding of the Novell printing system More information is available from Novell s Concepts and Print Server manuals The PeNetTM Print Server interface fully supports all common Novell print com...

Page 12: ...N This section tells how to use the Print Server with a TCP IP network Functions described include locating the Print Server on the network configuration initialization testing printing and FLASH EPRO...

Page 13: ...nd PESETUP Enter Setup Password PATTON Menu Displays Once connection to the Print Server has been achieved using the Telnet Protocol it is then simply necessary to enter the command PESETUP to enter t...

Page 14: ...use SMIT to add a host with the PeNetTM Print Server s Host Name Add a remote queue and specify Destination Host as above and Queue on Remote Printer Pport1 or other PeNetTM Print Server port Set the...

Page 15: ...based method of FLASH upgrade it is firstly necessary to establish an FTP connection to the Print Server in the same way as that used when printing to the unit via FTP Typically this will be achieved...

Page 16: ...l wall mount 120V AC domestic 220V AC international Temperature Range 2 60 C 37 140 F Altitude 0 10 100 feet Humidity Up to 95 non condensing Dimensions 4 0 x 2 1 x 0 8 Weight 3 oz max 29 APPENDIX B I...

Reviews: