1. The following functions are built in.
(1) Auto Light Control (ALC)/Electronic Light Control (ELC)
(2) The SUPER-D
2
function eliminates interference by strong background lighting
which makes the camera picture dark, such as a spotlight.
Dynamic range of 48 dB.
(3) Auto/Manual White Balance Function
(4) Electronic Shutter Function
2. Signal-to-noise ratio of 50 dB
3. Minimum illumination of 0.8 lx (0.08 footcandle) with F1.4 lenses.
4. Minimum illumination of 0.4 lx (0.04 footcandle) with Panasonic aspherical high speed
(F0.75) lenses.
5. 480 lines of horizontal resolution
FEATURES
1. Do not attempt to disassemble the camera.
To prevent electric shock, do not remove screws or covers.
There are no user serviceable parts inside. Ask a qualified service person for servicing.
2. Handle the camera with care.
Do not abuse the camera. Avoid striking, shaking, etc. The camera could be damaged
by improper handling or storage.
3. Do not expose the camera to rain or moisture, or try to operate it in wet areas.
Turn the power off immediately and ask a qualified service person for servicing.
Moisture can damage the camera and also create the danger of electric shock.
4. Do not use strong or abrasive detergents when cleaning the camera body.
Use a dry cloth to clean the camera when dirty.
In case the dirt is hard to remove, use a mild detergent and wipe gently.
PRECAUTIONS
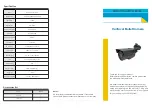
MAJOR OPERATING CONTROLS AND THEIR FUNCTIONS
q
Auto Iris Lens Connector
This connector is used to connect the auto iris lens. It supplies power and DC control
signal to the auto iris lens.
w
Flange-back Adjusting Ring
This ring is used to adjust the back focal length or picture focus by rotating it.
e
Lens (Option)
r
Camera Mounting Screw Hole
This hole is used to mount the camera onto a mounting bracket.
t
Focus Fixing Screw
y
Down Button (
)
This button is used to move the cursor downward. It is also used to select items in the
CAM SET UP menu.
u
Right Button (
)
This button is used to move the cursor to the right. It also selects the mode and can be
used to adjust some levels.
Open the panel to the upper left until it stops by rotating counterclockwise.
Super Dynamic
Super Dynamic
W
V
-
G
P1
60
GP160
q
t
y
!3
!0
o
u
i
w
r
e
!5
!8
!1
!2
MONITOR OUT
NC
MIC OFF-ON
SOFT-SHARP
LOCK
!6
!7
!4