


62
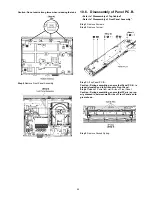
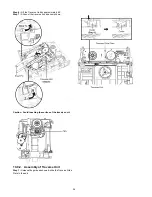
Step 3 Lift up Main P.C.B. as arrow shown.
Caution: Keep the Heatsink Spacer in safe place. Avoid
denting it, place it back during assembling.
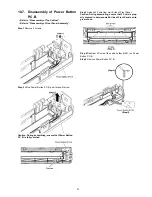
Step 4 Desolder the pins of Digital Amplifier IC (IC403).
Step 5 Remove Digital Amplifier IC (IC403).
Note 1: For disassembling of Digital Amplifier IC (IC404) &
(IC405), repeat the (Step 1) to (Step 5) of 10.11.1.
Note 2: Refer to diagram of Main P.C.B. (item 18.2) for location
of part.
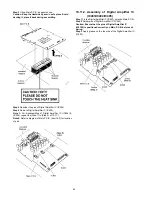
10.11.2. Assembly of Digital Amplifier IC
(IC403/IC404/IC405)
Step 1 Fix the Digital Amplifier IC (IC403) onto the Main P.C.B..
Step 2 Solder pins of Digital Amplifier IC (IC403).
Caution: Ensure that the pins of Digital Amplifier IC
(IC5100) is positioned correctly on Main P.C.B. before sol-
dering.
Step 3 Apply grease on the top side of the Digital Amplifier IC
(IC403).
Summary of Contents for SA-XH50P
Page 13: ...13 4 1 Others Licences ...
Page 16: ...16 5 4 Speaker Connection ...
Page 17: ...17 5 5 Linked Operations with the TV VIERA LINK HDAVI Control ...
Page 18: ...18 ...
Page 19: ...19 5 6 Connection with an ARC compatible TV ...
Page 21: ...21 5 7 2 File Extension Type Support MP3 JPEG ...
Page 23: ...23 3 Gently pull out the tray 4 Remove disc ...
Page 46: ...46 10 2 Main Components and P C B Locations ...
Page 82: ...82 ...
Page 92: ...92 ...
Page 94: ...94 ...