background image

- 74 -

Advanced (Recording pictures)

Press [

] to display the [REC] mode menu 

and select the item to set.

 (P71)

ISO is a measure of sensitivity to light. The 
higher the sensitivity is set, the less light is 
needed to take a picture so the camera 
becomes more suitable for recording in dark 
places.
• When setting to [AUTO], the ISO sensitivity 

is automatically adjusted to a maximum of 
[ISO200] according to the brightness. (It can 
be adjusted to a maximum of [ISO640] when 
using the flash.)

• To avoid picture noises, we recommend 

reducing the ISO sensitivity, setting 
[NOISE REDUCTION] in [PICT.ADJ.] to 
[HIGH] or setting the items except 
[NOISE REDUCTION] to [LOW] to take 
pictures.

 (P82)

• The ISO sensitivity is set to [ISO LIMIT] in 

intelligent ISO sensitivity mode [

].

• ISO sensitivity cannot be set in the following 

cases.
– Simple mode [

]

– Motion picture mode [

]

– Scene mode

Press [

] to display the [REC] mode menu 

and select the item to set.

 (P71)

By changing the aspect ratio, you can select 
an angle of view that matches the subject.

• In motion picture mode [

], you cannot 

select [

].

• The ends of the recorded pictures may be 

cut at printing.

 (P128)

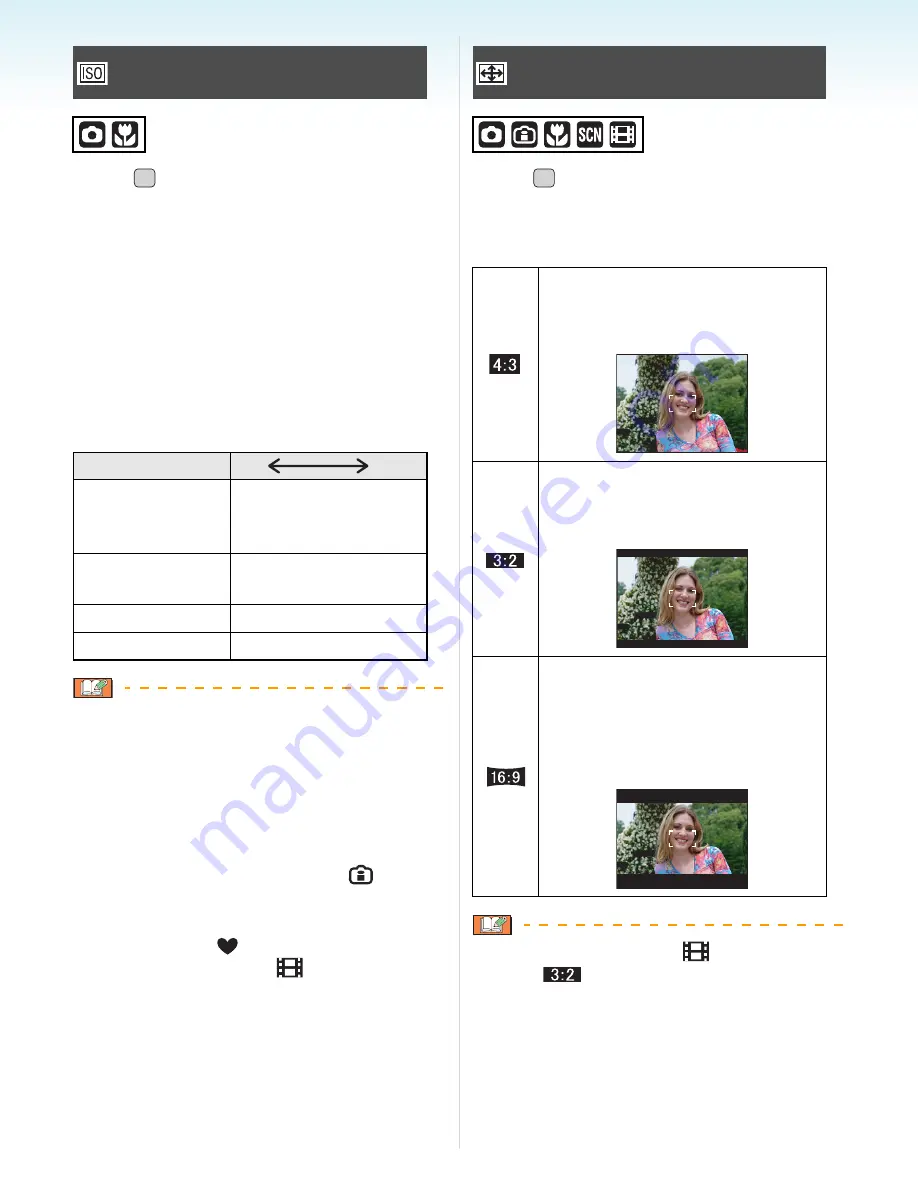
[SENSITIVITY]

Setting the light sensitivity

ISO sensitivity

80

1600

Use in bright 
places
(e.g. outdoors)

Suitable

Not suitable

Use in dark 
places

Not suitable

Suitable

Shutter speed

Slow

Fast

Noise

Less

Increased

MENU

/SET

[ASPECT RATIO]

Setting the aspect ratio of pictures

Select to take pictures with the 
same aspect ratio as a 4:3 TV or a 
PC monitor.

Select to take pictures with the 
same 3:2 aspect ratio as 35 mm 
film.

This is suitable for landscapes etc. 
where a wide view is preferable. 
This is also suitable for playing 
back pictures on a wide-screen 
TV, high-definition TV etc.

MENU

/SET

Summary of Contents for LUMIXDMC-FX100

Page 1: ...structions Digital Camera Model No DMC FX100 VQT1K32 Before use please read these instructions completely QuickTime and the QuickTime logo are trademarks or registered trademarks of Apple Inc used under license therefrom ...

Page 2: ...registered trademark of Leica Camera AG Other names company names and product names printed in these instructions are trademarks or registered trademarks of the companies concerned WARNING TO REDUCE THE RISK OF FIRE ELECTRIC SHOCK OR PRODUCT DAMAGE DO NOT EXPOSE THIS APPARATUS TO RAIN MOISTURE DRIPPING OR SPLASHING AND THAT NO OBJECTS FILLED WITH LIQUIDS SUCH AS VASES SHALL BE PLACED ON THE APPARA...

Page 3: ... If you wish to discard electrical and electronic equipment please contact your dealer or supplier for further information Information on Disposal in other Countries outside the European Union This symbol is only valid in the European Union If you wish to discard this product please contact your local authorities or dealer and ask for the correct method of disposal CAUTION DO NOT INSTALL OR PLACE ...

Page 4: ...cloth to wipe the camera body carefully About Condensation When the lens is fogged up Condensation occurs when the ambient temperature or humidity changes Be careful of condensation since it causes lens stains fungus and camera malfunction If condensation occurs turn the camera off and leave it for about 2 hours The fog will disappear naturally when the temperature of the camera becomes close to t...

Page 5: ...ced Recording pictures About the LCD Monitor 37 Changing the information displayed 37 Brightening the LCD Monitor Power LCD High angle mode 40 Taking Pictures using the Built in Flash 42 Taking Pictures with the Self timer 46 Compensating the Exposure 47 Taking Pictures using Auto Bracket 48 Changing the sensitivity according to the movement of the subject being recorded 49 Taking Close up Picture...

Page 6: ...n picture 87 Using the PLAY mode menu 90 SLIDE SHOW 91 FAVORITE 92 CATEGORY 93 ROTATE DISP ROTATE 95 DATE STAMP 96 DPOF PRINT 99 PROTECT 101 AUDIO DUB 102 RESIZE 102 TRIMMING 103 ASPECT CONV 104 COPY 105 FORMAT 106 Connecting to other equipment Connecting to a PC 108 Printing the Pictures 111 Playing Back Pictures on a TV Screen 115 Others Screen Display 116 Cautions for Use 119 Message Display 12...

Page 7: ...ptional You can record or play back pictures on the built in memory when you are not using a card Consult the dealer or your nearest Service Centre if you lose the supplied accessories You can purchase the accessories separately For the United Kingdom and Continental Europe Names of the Components 1 Flash P42 2 Lens P4 120 3 Self timer indicator P46 AF assist lamp P80 4 LCD monitor P22 37 116 5 Cu...

Page 8: ...rom dropping 18 Lens barrel 19 DIGITAL AV OUT socket P108 111 115 20 DC IN socket P108 111 Always use a genuine Panasonic AC adaptor optional This camera cannot charge the battery even though the AC adaptor optional is connected to it 21 Tripod receptacle When you use a tripod make sure the tripod is stable when the camera is attached to it 22 Card Battery door P12 23 Release lever P12 In these op...

Page 9: ... when the camera is shipped Charge the battery before use 2 Insert the battery and the card P12 When you do not use the card you can record or play back pictures on the built in memory P13 Refer to P13 when you use a card 3 Turn the camera on to take pictures Set the clock P14 1 Set the mode dial to 2 Press the shutter button to take pictures P24 4 Play back the pictures 1 Set the mode dial to 2 S...

Page 10: ... A turns off after about 130 minutes When the CHARGE indicator flashes read P11 3 Detach the battery after charging is completed After charging is completed be sure to disconnect the power supply device from the electrical outlet The battery becomes warm after using it and during and after charging The camera also becomes warm during use This is not a malfunction The battery will be exhausted if l...

Page 11: ...r lights when charging starts When the CHARGE indicator flashes The battery temperature is excessively high or low The charging time will be longer than normal Also charging may not be completed The terminals of the charger or the battery are dirty In this case wipe them with a dry cloth When the operating time of the camera becomes extremely short even after properly charging the battery the life...

Page 12: ...ard out upright B Do not touch the connection terminals of the card The card may be damaged if it is not fully inserted 3 1 Close the card battery door 2 Slide the release lever in the direction of the arrow If the card battery door cannot be completely closed remove the card check its direction and then insert it again Remove the battery after use Store the removed battery in the battery carrying...

Page 13: ...slid to the other side these functions become available This unit SDHC compatible equipment is compatible with SD Memory Cards based on SD Memory Card Specifications and formatted in FAT12 system and FAT16 system It is also compatible with SDHC Memory Cards based on SD Memory Card Specifications and formatted in FAT32 system You can use an SDHC Memory Card in equipment that is compatible with SDHC...

Page 14: ...2 Press 3 4 2 1 to select the date and time A Time at the home area B Time at the travel destination P69 2 1 Select the desired item 3 4 Set the display order for the date and time Cancel without setting the clock 3 Press MENU SET to set Turn the camera off after setting the clock Then set the mode dial to a recording mode to turn the camera on and check whether or not the clock setting is correct...

Page 15: ...ng will be stored in the camera for at least 3 months even if the battery is removed If you insert a battery that is not sufficiently charged the length of time that the clock setting is stored may become less However the clock setting is cancelled after this time In this case set the clock again You can set the year from 2000 to 2099 The 24 hour system is used If the clock is not set the correct ...

Page 16: ...mode currently selected appears on the LCD monitor when the camera is turned on Basic Advanced NORMAL PICTURE SCN S C N Normal picture mode P24 Use this mode for normal recording Simple mode P27 This mode is recommended for beginners Playback mode P34 This mode allows you to play back recorded pictures Intelligent ISO sensitivity mode P49 This mode automatically sets the optimal ISO sensitivity an...

Page 17: ...of the mode dial About the menu icons Setting menu items The following example shows how to set AUDIO REC when normal picture mode is selected 1 Press 3 4 to select the menu item Press 4 at A to switch to the next screen 2 Press 1 3 Press 3 4 to select the setting 4 Press MENU SET to set REC mode menu P71 This is displayed when the mode dial is set to PLAY mode menu P90 This is displayed when the ...

Page 18: ...lect the item to set P17 Change date and time AUTO REVIEW Displaying the recorded picture Press to display the SETUP menu and select the item to set P17 Set the length of time that the picture is displayed after taking it The auto review function is not activated in motion picture mode The auto review function is activated regardless of its setting when using auto bracket P48 HI SPEED BURST P61 in...

Page 19: ... is turned off while the flash is being charged The status indicator lights while the LCD monitor is turned off Press any button to turn on the LCD monitor again Power save mode is fixed to 2MIN However power save mode is not activated when using the AC adaptor optional The brightness of the LCD monitor is not reduced in Power LCD mode and high angle mode Economy mode is not activated in the follo...

Page 20: ...vel 6 to 0 When you connect the camera to a TV the volume of the TV speakers does not change NO RESET Press to display the SETUP menu and select the item to set P17 Reset the file number of the next recording to 0001 The folder number is updated and the file number starts from 0001 P109 A folder number between 100 and 999 can be assigned When the folder number reaches 999 the number cannot be rese...

Page 21: ...ss to display the SETUP menu and select the item to set P17 Set to match the type of TV SCENE MENU Press to display the SETUP menu and select the item to set P17 Set the screen that will appear when the mode dial is set to DIAL DISPLAY Press to display the SETUP menu and select the item to set P17 Set whether or not to show the mode dial display when the mode dial is rotated ON OFF LANGUAGE Press ...

Page 22: ... state 10 Built in memory Card The access indication lights red when pictures are being recorded on the built in memory or the card When using the built in memory When using the card Do not do the following when the access indication lamps lights The card or the data on the card may be damaged and this unit may no longer operate normally Turn this unit off Remove the battery or the card when using...

Page 23: ...ching the screen display You can change the screen display by pressing DISPLAY This allows you to display information while taking pictures such as the picture size or the number of recordable pictures or take pictures without displaying any information Refer to P37 for details ...

Page 24: ...ertically 2 Aim the AF area at the point you want to focus on 3 Press the shutter button halfway to focus The focus indication 2 lights green and the AF area 1 turns from white to green 3 Aperture value 4 Shutter speed The focus range is 50 cm to The subject is not focused in the following cases The focus indication blinks green The AF area turns white to red or there is no AF area The focus sound...

Page 25: ...you to take bright pictures Focusing P26 51 If you select normal picture mode the picture is automatically focused AF Auto Focus However one of the subjects in the picture may not be properly focused The focus range is 50 cm to When there are both near and distant subjects in a scene When there is dirt or dust on glass between the lens and the subject When there are illuminated or glittering objec...

Page 26: ...P P95 is set to ON Pictures may not be displayed vertically if they were taken with the camera aimed up or down Motion pictures taken with the camera held vertically are not displayed vertically Preventing jitter camera shake Be careful of jittering when pressing the shutter button If jitter could occur because of slow shutter speed the jitter alert A appears When the jitter alert appears we recom...

Page 27: ...m or E MAIL is set in PICT MODE the extra optical zoom is activated P29 The settings for BEEP and CLOCK SET in simple mode are also applied to other recording modes The settings for WORLD TIME MONITOR TRAVEL DATE BEEP SHUTTER NO RESET and LANGUAGE in the SETUP menu P18 are applied to simple mode ENLARGE Suitable for enlarging the pictures to be printed to 8qk10q size letter size etc 4qk6q 10k15cm ...

Page 28: ...mode White balance fine adjustment Exposure compensation Auto bracket AUDIO REC D ZOOM BURST SLOW SHUTTER COL EFFECT PICT ADJ GUIDE LINE The settings for WORLD TIME MONITOR TRAVEL DATE BEEP SHUTTER NO RESET and LANGUAGE in the SETUP menu P18 also affect simple mode The Backlight Compensation Backlight refers to when light comes from the back of a subject In this case the subject such as a person w...

Page 29: ... subjects appear further away use Wide Rotate the zoom lever towards Wide Picture size and maximum zoom magnification Available Not available Extra optical zoom mechanism When you set the picture size to 3M EZ 3 million pixels the 12M 12 2 million pixels CCD area is cropped to the centre 3M 3 million pixels area allowing a picture with a higher zoom effect Using the Optical Zoom Using the Extra Op...

Page 30: ... screen when you use the zoom function The zoom will stop moving for an instant near W 1k when the extra optical zoom is used This is not a malfunction The indicated zoom magnification is an approximation In motion picture mode and HIGH SENS or HI SPEED BURST in scene mode the extra optical zoom does not work You can zoom at high speed from Wide to Tele by pressing E ZOOM The zoom magnification di...

Page 31: ...size When the picture size is not set to the highest setting for each aspect ratio e g Setting to 3M EZ 1 Press E ZOOM once 2 Press E ZOOM twice 1 Extra optical zoom Press E ZOOM firmly until the zoom function is activated The easy zoom is also activated if E ZOOM is pressed when the zoom position is not Wide You can further extend the zoom to the digital zoom range when D ZOOM P32 is set to ON In...

Page 32: ...e the zoom lever to the extreme Tele position You can enter the digital zoom range by continuously rotating the zoom lever to Tele or releasing the zoom lever once and then rotating it to Tele again When using the digital zoom and the extra optical zoom 3M EZ at the same time 1 Optical zoom 2 Digital zoom 3 Extra optical zoom A big AF area P77 is displayed when using the digital zoom Also the stab...

Page 33: ...en rotate it even more for a 8k magnification When you rotate the zoom lever towards W after enlarging the picture the magnification becomes lower 2 Press 3 4 2 1 to move the position When you change the magnification or the position to be displayed the zoom position indication A appears for about 1 second Deleting the recorded picture during Review Quick deletion A single picture multiple picture...

Page 34: ...orwarded or rewound one by one This camera is based on the DCF standard Design rule for Camera File system which was established by the JEITA Japan Electronics and Information Technology Industries Association The LCD monitor may not be able to display the details of the recorded pictures You can use the playback zoom P85 to check the details of the pictures If you play back pictures that have bee...

Page 35: ...LETE step 3 ALL DELETE step 5 ALL DELETE EXCEPT When FAVORITE P92 is set only step 5 However this cannot be selected if none of the pictures have displayed 3 Press 2 1 to select the picture and then press 4 to set Only when selecting MULTI DELETE Repeat the above procedure appears on the selected pictures If 4 is pressed again the setting is cancelled The icon blinks red if the selected picture is...

Page 36: ...ing ALL DELETE EXCEPT If you press MENU SET while deleting pictures using ALL DELETE or ALL DELETE EXCEPT the deleting will stop halfway Do not turn off the camera while deleting When deleting pictures use a battery with sufficient battery power or the AC adaptor optional It is possible to delete up to 50 pictures at one time using MULTI DELETE The greater the number of pictures the longer it take...

Page 37: ...n only select Normal display H or No display J In simple mode B Normal display C No display In recording mode D Normal display E Display with histogram F No display Recording guide line 2 G No display 1 Histogram 2 Set the pattern of the guide lines displayed by setting GUIDE LINE in SETUP menu You can also set whether or not to have the recording information and histogram displayed when the guide...

Page 38: ...the horizontal axis black to white and the number of pixels at each brightness level on the vertical axis It allows you to easily check a picture s exposure It is very useful if manual adjustments of the lens aperture and shutter speed are available especially in those situations where automatic exposure may be difficult due to uneven lighting Using the histogram feature allows you to get the maxi...

Page 39: ...tion in recording mode The histogram of a picture may not match in recording mode and playback mode The histogram displayed in this camera does not match histograms displayed by picture editing software used in PCs etc The histogram does not appear in simple mode or motion picture mode and during multi playback or calendar playback and playback zoom ISO100 AWB 10 00 1 DEC 2007 1 3 F2 8 1 100 100_0...

Page 40: ...LCD High angle mode DISPLAY LCD MODE POWER LCD The LCD monitor becomes brighter and easier to see even when taking pictures outdoors HIGH ANGLE The LCD monitor is easier to see when taking pictures with the camera held high above your head This is useful when you cannot get close to the subject because there is a person in the way However it becomes more difficult to see when looked at straight on...

Page 41: ...h angle mode is activated Therefore some subjects may look different on the LCD monitor However this does not affect the recorded pictures The LCD monitor automatically returns to normal brightness after 30 seconds when recording in Power LCD mode Press any button to make the LCD monitor bright again If the screen is difficult to see because of light from the sun etc shining on it use your hand or...

Page 42: ...tomatically set AUTO The flash is automatically activated when the recording conditions make it necessary AUTO Red eye reduction 1 The flash is automatically activated when the recording conditions make it necessary It is activated once before the actual recording to reduce the red eye phenomenon eyes of the subject appearing red in the picture and then activated again for the actual recording Use...

Page 43: ...sation function is activated Slow sync Red eye reduction 1 If you take a picture with a dark background landscape this feature will slow the shutter speed when the flash is activated so that the dark background landscape will become bright Simultaneously it reduces the red eye phenomenon Use this when you take pictures of people in front of a dark background Forced OFF The flash is not activated i...

Page 44: ...P49 the ISO sensitivity is automatically increased to a maximum of ISO640 It is a maximum of ISO400 in BABY1 BABY2 and PET in scene mode If you take a picture with the flash at close range when the zoom is near W 1k the edges of the recorded picture may become dark Rotate the zoom lever slightly and then take the picture Available flash range in Intelligent ISO sensitivity mode ISO sensitivity Ava...

Page 45: ...while the flash is charging This does not happen when using the AC adaptor optional If the remaining battery power is low the length of time that the LCD monitor turns off to charge may become longer When you take a picture beyond the available flash range the exposure may not be adjusted properly and the picture may become bright or dark When the flash is being charged the flash icon blinks red a...

Page 46: ...elf timer setting is cancelled When using a tripod etc setting the self timer to 2 seconds is a convenient way to avoid the jitter caused by pressing the shutter button When you press the shutter button once fully the subject is automatically focused just before recording In dark places the self timer indicator will blink and then may turn on brightly operating as an AF assist lamp P80 to allow th...

Page 47: ...in steps of 1 3 EV Select 0 EV to return to the original exposure 2 Press MENU SET to finish You can also press the shutter button halfway to finish EV is an abbreviation of Exposure Value It refers to the amount of light given to the CCD by the aperture value and the shutter speed The exposure compensation value appears on the lower left of the screen The set exposure value is memorised even if t...

Page 48: ... setting the exposure compensation range the pictures taken are based on the selected exposure compensation range When the exposure is compensated the exposure compensation value appears on the lower left of the screen The auto bracket setting is cancelled if you turn the camera off or power save mode is activated When setting auto bracket and burst mode simultaneously auto bracket will be perform...

Page 49: ...ensitivity the more effectively the jitter will be reduced However picture noise will increase Jitter is avoided when taking pictures indoors of a moving subject by increasing the ISO sensitivity and making the shutter speed faster Noise is avoided when taking pictures indoors of a subject with no movement by decreasing the ISO sensitivity When you press the shutter button halfway A appears When y...

Page 50: ...d how fast the subject is moving jitter may not be avoided The camera may not be able to detect the movement of the subject in the following cases When the moving subject is small When the moving subject is at the edge of the screen When the subject starts moving the instant the shutter button is pressed fully To avoid picture noise we recommend decreasing the highest ISO sensitivity or setting NO...

Page 51: ...t may become difficult to focus on it again If the distance between the camera and the subject is beyond the focus range of the camera the picture may not be properly focused even if the focus indication lights Macro mode gives priority to a subject close to the camera Therefore if the distance between the camera and the subject is more than 50 cm it takes longer to focus on it in macro mode than ...

Page 52: ...out the information If you press DISPLAY when selecting a scene mode in step 2 explanations about each scene mode are displayed If you press DISPLAY again the screen returns to the SCENE MODE menu Refer to P45 for information about the shutter speed The flash setting is memorised even if the camera is turned off However the scene mode flash setting is reset to the initial setting when the scene mo...

Page 53: ...y is fixed to ISO80 Press to display the SCENE MODE menu and select a scene mode P52 This allows you to achieve a smoother appearance of the skin than in PORTRAIT Technique for Soft skin mode To make this mode more effective 1 Rotate the zoom lever as far as possible to Tele 2 Move close to the subject to make this mode more effective This mode is only suitable when taking pictures outdoors in the...

Page 54: ...or reviewing Refer to P33 for information about using the review function If the picture is blurry due to the slow shutter speed we recommend using the 2 second self timer The focus range is about 30 cm to 70 cm You can take a picture of yourself with audio P76 If you do this the self timer indicator will light up while recording the audio When you select SELF PORTRAIT the zoom magnification is au...

Page 55: ...ss to display the SCENE MODE menu and select a scene mode P52 Set here when you want to take pictures of sports scenes or other fast moving events This mode is suitable for taking pictures of subjects at distances of 5 m or more If you take pictures of a fast moving subject indoors the ISO sensitivity becomes the same as when intelligent ISO sensitivity mode is set to a highest ISO sensitivity of ...

Page 56: ...function Noise may become visible when you take pictures in dark places When using the flash Slow sync Red eye reduction is selected and the flash is activated every time The white balance cannot be set Press to display the SCENE MODE menu and select a scene mode P52 This allows you to take vivid pictures of the nightscape Technique for Night scenery mode Since the shutter speed becomes slower up ...

Page 57: ... select a scene mode P52 Select this when you want to take pictures at a wedding reception an indoor party etc This allows you to take pictures of people and the background with near real life brightness Technique for Party mode Use the flash We recommend using a tripod and the self timer for taking pictures We recommend rotating the zoom lever to Wide 1k and being about 1 5 m from the subject whe...

Page 58: ...This takes pictures of a baby with a healthy complexion When you use the flash the light from it is weaker than usual You can set two different birthdays by using BABY1 and BABY2 You can display the set age when playing back the pictures and stamp the age on the recorded pictures with DATE STAMP P96 The age can also be printed on each picture by using the software LUMIX Simple Viewer or PHOTOfunST...

Page 59: ... cannot be displayed even if camera is set to WITH AGE after taking the pictures The birthday setting can be reset with RESET You cannot use the following functions D ZOOM SLOW SHUTTER Press to display the SCENE MODE menu and select a scene mode P52 Select this when you want to take pictures of a pet such as a dog or a cat This allows you to set the birthday of your pet You can display the set age...

Page 60: ...ensitivity processing The sensitivity automatically switches to between ISO1600 and ISO6400 Picture size and aspect ratio Press 3 4 to select the picture size and aspect ratio and then press MENU SET to set The picture size becomes 3M 4 3 2 5M 3 2 or 2M 16 9 QUALITY is fixed to The resolution of the recorded picture decreases because of high sensitivity processing This is not a malfunction You can...

Page 61: ...M 4 3 16 9 or 2 5M 3 2 QUALITY is fixed to The recorded picture becomes slightly rougher This is not a malfunction You can take pictures suitable for 4qk6q 10k15 cm printing The shutter speed becomes 1 60th of a second to 1 2000th of a second The focus range becomes the same as macro mode 5 cm Wide 30 cm Tele to The flash setting is fixed to Forced OFF ISO sensitivity is fixed to AUTO You cannot u...

Page 62: ...ove the camera after this screen is displayed When countdown finishes PLEASE WAIT is displayed for the same length of time as the set shutter speed for signal processing Press MENU SET to stop taking the picture while the countdown screen is displayed Technique for Starry sky mode The shutter opens for 15 30 or 60 seconds Be sure to use a tripod We also recommend taking pictures with the self time...

Page 63: ... is little jitter such as when using a tripod etc You can change the shutter speed by compensating the exposure Histograms are always displayed in orange The flash setting is fixed to Forced OFF You cannot set the AF mode The AF area is not displayed The setting on the AF assist lamp is disabled ISO sensitivity is fixed to ISO80 You cannot set the slow shutter The white balance cannot be set Press...

Page 64: ...nd using this technique if it is difficult to focus when taking pictures of clouds etc Aim the camera at something with high contrast press the shutter button halfway to fix the focus and then aim the camera at the subject and press the shutter button fully to take the picture The focus range is 5 m to Turn the camera off when taking off or landing When using the camera follow all instructions fro...

Page 65: ...s unit Motion pictures cannot be recorded without audio When using the stabilizer function it is fixed to MODE1 2 Press the shutter button fully to stop recording If the built in memory or the card becomes full in the middle of recording the camera stops recording automatically Changing the settings for the aspect ratio and the picture quality 1 Press MENU SET 2 Press 3 4 to select ASPECT RATIO an...

Page 66: ...SD Memory Card with 10MB s or greater displayed on the package Depending on the type of the card recording may stop in the middle We recommend using Panasonic s SD Memory Cards SDHC Memory Cards Depending on the type of the card the card access indication may appear for a while after recording motion pictures This is not a malfunction Motion pictures can be recorded continuously up to 2 GB The max...

Page 67: ...assed since the departure date The number of days that have passed since the departure date can be printed on each picture by using the software LUMIX Simple Viewer or PHOTOfunSTUDIO viewer in the CD ROM supplied Setting the departure return date e g The following are examples of the screen in normal picture mode 1 Press MENU SET and then press 2 2 Press 4 to select the SETUP menu icon and then pr...

Page 68: ...e clock setting and the departure date you set If you set WORLD TIME P69 to the travel destination the travel date is calculated using the date in the clock setting and the travel destination setting The travel date setting is memorised even if the camera is turned off If you set a departure date and then take a picture on a date before this departure date minus is displayed in orange and the day ...

Page 69: ...the message PLEASE SET THE HOME AREA appears If this message appears press MENU SET and then set home area from the screen shown in step 2 in Setting the home area HOME Setting the home area HOME Perform steps 1 2 and 3 1 Press 4 to select HOME and then press MENU SET to set 2 Press 2 1 to select your home area and then press MENU SET to set The current time is displayed on the top left of the scr...

Page 70: ...e date and time are displayed as shown in the screen above 2 Press 2 1 to select the area the travel destination is in and then press MENU SET to set The current time at the selected travel destination area is displayed on the top right of the screen and the time difference from the home area is displayed at the bottom left of the screen If daylight saving time is used at the travel destination pr...

Page 71: ...ecording in normal picture mode STABILIZER BURST METERING MODE W BALANCE SENSITIVITY PICT SIZE QUALITY A Cursor buttons B MENU SET button C FUNC button 1 Press and hold FUNC when recording 2 Press 3 4 2 1 to select the menu item and the setting and then press MENU SET to close the menu You can also close the menu by pressing FUNC The White Set setting does not appear when using the quick setting M...

Page 72: ...KlKelvin Colour Temperature Auto white balance The available white balance range is shown in the illustration above When you take a picture beyond the available white balance range the picture may appear reddish or bluish Even within the confines of the range the auto white balance may not operate properly if there are many light sources or there is no colour close to white In these cases set the ...

Page 73: ...balance When you take a picture with the flash the white balance may not be properly adjusted if the flash level is insufficient for the subject The white balance setting is memorised even if the camera is turned off However the white balance setting for a scene mode returns to AWB when the scene mode is changed The white balance cannot be set in the following cases In simple mode In SCENERY NIGHT...

Page 74: ...nsitivity cannot be set in the following cases Simple mode Motion picture mode Scene mode Press to display the REC mode menu and select the item to set P71 By changing the aspect ratio you can select an angle of view that matches the subject In motion picture mode you cannot select The ends of the recorded pictures may be cut at printing P128 SENSITIVITY Setting the light sensitivity ISO sensitivi...

Page 75: ...cted you can record more pictures and attach them to an e mail or post them on a website because their file size is small When the aspect ratio is When the aspect ratio is When the aspect ratio is Quality PICT SIZE QUALITY Setting a picture size and quality that match your use of the pictures MENU SET 12M 4000k3000 pixels 8M EZ 3264k2448 pixels 5M EZ 2560k1920 pixels 3M EZ 2048k1536 pixels 2M EZ 1...

Page 76: ...Z E MAIL 0 3M EZ Press to display the REC mode menu and select the item to set P71 You can record audio with the still picture if this is set to ON This means you can record the conversation that took place when you were recording or an explanation of the picture appears on the screen when you set AUDIO REC to ON Focus on the subject and press the shutter button to start recording Recording will a...

Page 77: ...tre weighted This is the method used to focus on the subject on the centre of the screen and measure the whole screen evenly Spot This is the method to measure the subject in the spot metering target A MENU SET AF MODE Setting the focus method 9 area focusing The camera focuses on any of 9 focus areas This is effective when the subject is not in the centre of the screen 3 area focusing High speed ...

Page 78: ... the AF area is not displayed until the picture is brought into focus Switch the AF mode to or if it is difficult to focus using The AF mode cannot be set in simple mode SELF PORTRAIT or FIREWORKS in scene mode Press to display the REC mode menu and select the item to set P71 About the jitter movement detection demonstration screen Press 1 to display JITTER SUBJ MOVE DEMO when the STABILIZER scree...

Page 79: ...to MODE2 in simple mode and SELF PORTRAIT in scene mode and fixed to OFF in STARRY SKY in scene mode In motion picture mode MODE2 cannot be set Press to display the REC mode menu and select the item to set P71 Number of pictures recorded in burst mode The burst speed is constant regardless of the transfer speed of the card The number of pictures indicated is when the shutter speed is faster than 1...

Page 80: ... not cancelled when the camera is switched off When auto bracket and burst mode are set simultaneously auto bracket will be performed When burst mode is set the auto review function is activated regardless of the auto review setting The picture is not enlarged You cannot set the auto review function in the SETUP menu When burst mode is activated AUDIO REC cannot be used When the flash is activated...

Page 81: ...places with low light you can take pictures which are brighter than normal by selecting a setting even slower than the slowest setting of the shutter speed The slow shutter speeds you can select are 1 8 1 4 1 2 and 1 This is effective if you want to take bright pictures of both a night landscape and a subject using NIGHT PORTRAIT in scene mode This should usually be set to 1 8 to take pictures Whe...

Page 82: ...ures OFF This is the standard setting COOL The picture becomes bluish WARM The picture becomes reddish B W The picture becomes black and white SEPIA The picture becomes sepia MENU SET PICT ADJ Adjusting the picture quality for the recorded pictures CONTRAST HIGH Increases the difference between the brightness and the darkness in the picture LOW Decreases the difference between the brightness and t...

Page 83: ...icture and the setting the following icons will appear Favourites Motion picture BABY1 BABY2 PET in scene mode Travel date Travel destination Pictures stamped with DATE STAMP Example of 25 screens To return to normal playback Rotate towards T or press MENU SET The picture that was selected will appear To delete a picture during multi playback 1 Press 3 4 2 1 to select a picture and then press 2 Pr...

Page 84: ... to the calendar screen 4 Press 3 4 2 1 to select a picture and then press MENU SET The picture that was selected will appear To return to the 1 screen playback screen After the calendar screen is displayed rotate the zoom lever towards T to display 25 screens 9 screens and the 1 screen The pictures are displayed without being rotated even if you set ROTATE DISP to ON P95 You can display the calen...

Page 85: ...n 2 Press 3 4 2 1 to move the position When you move the position to be displayed the zoom position indication appears for about 1 second To stop using the playback zoom Rotate the zoom lever towards W or press MENU SET To delete a picture during the playback zoom 1 Press 2 Press 3 to select YES 3 Press MENU SET You can also delete the recording information etc on the screen during playback zoom b...

Page 86: ...during playback is the same as 3 4 2 1 Stopping motion picture playback Press 4 Fast forwarding Fast rewinding Press and hold 2 1 during motion picture playback The camera returns to normal motion picture playback when 2 1 is released To pause Press 3 during motion picture playback Press 3 again to cancel pause Frame by frame forwarding rewinding Press 2 1 while pausing Pictures with audio Press 2...

Page 87: ...ay be slower than usual You cannot use the following functions with motion pictures and pictures with audio Playback zoom While playing back or pausing motion pictures and while playing audio ROTATE DISP ROTATE AUDIO DUB Motion pictures only DATE STAMP RESIZE TRIMMING ASPECT CONV Creating still pictures from a motion picture You can create a single still picture with 1 screen or 9 screens from a r...

Page 88: ...shutter button The message SAVE THESE NINE PICTURES AS ONE SINGLE PICTURE appears Also the message SAVE AS A SINGLE PICTURE appears if you saved the picture in step 2 All the frames of the recorded motion picture are displayed as still pictures 1 30th second intervals 1 frame is skipped every second frame is displayed as a still picture 1 15th second intervals 2 frames are skipped every third fram...

Page 89: ...ate the zoom lever several times towards T or press MENU SET The screen returns to the paused motion picture playback screen Picture size QUALITY is fixed to You may not be able to save still pictures from a motion picture taken on other equipment MENU SET Item 1 picture 9 pictures 30fpsVGA 0 3 M 2 M 10fpsVGA 0 3 M 2 M 30fpsQVGA 0 3 M 1 M 10fpsQVGA 0 3 M 1 M 30fps16 9L 2 M 2 M 10fps16 9L 2 M 2 M 1...

Page 90: ...menu screen You can switch menu screens from any menu item by rotating the zoom lever After performing steps 1 and 2 refer to the description of the menu item in the operating instructions and then set it Items that can be set A Menu screen Item 1 3 SLIDE SHOW P91 FAVORITE P92 CATEGORY P93 ROTATE DISP P95 ROTATE P95 2 3 DATE STAMP P96 DPOF PRINT P99 PROTECT P101 AUDIO DUB P102 RESIZE P102 3 3 TRIM...

Page 91: ...annot select if a category slide show is not recorded 2 Press 3 to select START and then press MENU SET Screen when ALL is selected The cursor displayed during a slide show A or while a slide show is paused B or during MANUAL slide show C is the same as 3 4 2 1 Press 3 to pause the slide show Press 3 again to cancel pause Press 2 1 while paused to display the previous or next picture 3 Press 4 to ...

Page 92: ...he favourites icon will not appear when FAVORITE is set to OFF even if it was previously set to ON You cannot select CANCEL if none of the pictures have displayed 2 Press MENU SET to close the menu 3 Press 2 1 to select the picture then press 3 Repeat the above procedure If 3 is pressed while the favourites icon A is displayed is cleared and the favourites setting is cancelled You can set up to 99...

Page 93: ...ther equipment as favourites Press to display the PLAY mode menu and select the item to set P90 This mode allows you to search the recording information in scene modes etc PORTRAIT SCENERY NIGHT SCENERY etc and sort the pictures into different categories You can then play back the pictures in each category normally or as a slide show Press 1 to search the categories If a picture is found in a cate...

Page 94: ... to play back and then press DISPLAY 2 Press 3 to select START and then press MENU SET Press 3 during a slide show to pause it Press 3 again to cancel pause Press 2 1 while paused to display the previous or next picture Refer to P92 for information about setting DURATION EFFECT and AUDIO 3 Press 4 to finish the slide show 4 Press MENU SET twice to close the menu CATEGORY Recording information e g ...

Page 95: ...tion picture P87 cannot be played back from the motion pictures category in category playback Press to display the PLAY mode menu and select the item to set P90 This mode allows you to automatically display pictures vertically if they were recorded holding the camera vertically or rotate pictures manually in 90 steps Rotate display The picture is automatically rotated and displayed 1 Press 4 to se...

Page 96: ...back and playback zoom however are displayed without being rotated when they are played back in multi playback It may not be possible to rotate pictures that have been recorded with other equipment Press to display the PLAY mode menu and select the item to set P90 You can stamp the date and time of recording the age and the travel date on the recorded pictures It is suitable for regular size print...

Page 97: ...n below The picture becomes slightly rougher 4 Press 3 4 to select YES or NO and then press MENU SET The screen shown appears when you select a picture recorded with a picture size The message DELETE ORIGINAL PICTURE appears if the picture was recorded with a picture size or less The picture is overwritten when you select YES Pictures stamped with date stamp cannot be restored when they are overwr...

Page 98: ...g at the photo printing store or on the printer We recommend setting date stamp when there is plenty of space on the built in memory or the card You can set up to 50 pictures at one time in MULTI If you select YES in step 4 when the pictures selected in MULTI include protected pictures the message appears and only the protected pictures cannot be stamped with date stamp Depending on the printer be...

Page 99: ...SET You cannot select CANCEL if there are no prints that have been set in the DPOF print settings Single setting 1 Press 2 1 to select the picture to print and then press 3 4 to set the number of prints The number of prints icon A appears The number of prints can be set from 0 to 999 The DPOF print setting is cancelled when the number of prints is set to 0 2 Press MENU SET twice to close the menu ...

Page 100: ...sk at your photo printing store or refer to the operating instructions for the printer You cannot set date printing if the pictures have been stamped with the date stamp If you set DATE STAMP for pictures that have been set for date printing the date printing setting is cancelled DPOF is an abbreviation of Digital Print Order Format This feature allows you to write print information to media and t...

Page 101: ...ling protection the cancelling will stop halfway The protect setting may not be effective on other equipment If you want to delete protected pictures cancel their protection Even if you protect pictures in the built in memory or a card they will be deleted if the built in memory or the card is formatted Even if you do not protect pictures on an SD Memory Card or an SDHC Memory Card they cannot be ...

Page 102: ...stop recording The audio recording stops automatically if 4 is not pressed after about 10 seconds 3 Press MENU SET twice to close the menu Audio dubbing may not work properly on pictures recorded by other equipment Press to display the PLAY mode menu and select the item to set P90 We recommend resizing to if you want to attach a picture to an e mail or use it on a website 1 Press 2 1 to select the...

Page 103: ...ith DATE STAMP It may not be possible to resize pictures recorded with other equipment Press to display the PLAY mode menu and select the item to set P90 You can enlarge and then clip the important part of the recorded picture 1 Press 2 1 to select the picture and then press 4 The following pictures cannot be trimmed Motion pictures Pictures with audio Pictures stamped with DATE STAMP 2 Enlarge or...

Page 104: ...l picture The picture quality of the trimmed picture will deteriorate It may not be possible to trim pictures recorded with other equipment Press to display the PLAY mode menu and select the item to set P90 You can convert pictures taken with a aspect ratio to a or a aspect ratio 1 Press 3 4 to select or and then press MENU SET The following pictures cannot be converted Motion pictures Pictures wi...

Page 105: ...hat of the original picture Files that do not conform to the DCF standard cannot be converted You may not be able to convert pictures taken on other equipment Press to display the PLAY mode menu and select the item to set P90 You can copy recorded picture data from the built in memory to a card or vice versa 1 Press 3 4 to select the copy destination and then press MENU SET All the picture data in...

Page 106: ...folder number file number as the picture to be copied in the copy destination when is selected that picture is not copied It may take time to copy the picture data Only pictures recorded with a Panasonic digital camera LUMIX will be copied Even if the pictures were recorded with a Panasonic digital camera you may not be able to copy them if they were edited with a PC DPOF settings on the original ...

Page 107: ...a again Use a battery with sufficient battery power or the AC adaptor optional when formatting Do not turn the camera off during formatting It may take longer to format the built in memory than the card Max about 15 sec You cannot format an SD Memory Card or an SDHC Memory Card when the card s Write Protect switch A is set to LOCK If the built in memory or the card cannot be formatted consult your...

Page 108: ...the AC adaptor optional Turn the camera off before inserting or removing the cable for the AC adaptor optional Set the camera to a mode other than mode 1 Turn on the camera and the PC 2 Connect the camera to a PC via the USB connection cable A supplied Connect the USB connection cable with the mark facing the 2 mark on the DIGITAL socket Hold the USB connection cable at 1 and insert straight in or...

Page 109: ...ns under which a different folder number is used In the following cases the picture is not recorded in the same folder as the previously recorded picture It is recorded in a folder with a new number 1 When the folder just recorded to contains a picture file with the number 999 in it example P1000999 JPG 2 When the card just recorded to contains for example a folder with the number 100 100_PANA in ...

Page 110: ...ndicator blinks and the alarm beeps In this case stop the communication at once on the PC When connecting the camera to a Windows 2000 OS PC with the USB connection cable do not replace the card while the camera and the PC are connected The information on the card may be damaged Use Safely Remove Hardware in the task tray on your PC when replacing the card Pictures edited or rotated with a PC may ...

Page 111: ...f the mode dial is not set to when the camera is connected to the printer disconnect the USB connection cable set the mode dial to and then connect the USB connection cable again Depending on the printer it may be necessary to turn it off and then on again Do not use any other USB connection cables except the supplied one If a card is not inserted when the camera is connected to the printer you ca...

Page 112: ... it even if FAVORITE is set to ON PictBridge 1 3 MENU 100_0001 PLEASE SELECT THE PICTURE TO PRINT PRINT SELECT MULTI PRINT MENU SET SINGLE SELECT NUM OF PRINTS PRINT WITH DATE PAPER SIZE PAGE LAYOUT SELECT CANCEL SET MENU PRINT START 1 OFF MENU SET MULTI SELECT Multiple pictures are printed at one time After selecting MULTI SELECT press 2 1 to select the pictures to print and then press 4 The icon...

Page 113: ... a layout which is not supported by the camera set PAPER SIZE or PAGE LAYOUT to and then set the paper size or the layout on the printer For details refer to the operating instructions of the printer PRINT WITH DATE If the printer does not support date printing the date cannot be printed on the picture NUM OF PRINTS Set the number of prints You can set up to 999 prints PAPER SIZE Paper sizes that ...

Page 114: ...r becomes low while the camera and the printer are connected the status indicator blinks and the alarm beeps If this happens during printing press MENU SET and stop printing at once If not printing disconnect the USB connection cable The camera is receiving an error message from the printer when the indication lights orange during printing After finishing printing make sure there are no problems w...

Page 115: ...t setting black bands may be displayed on the top and bottom or the left and right of the pictures Do not use any other AV cables except the supplied one Audio playback is monaural Read the operating instructions for the TV When you play back a picture vertically it may be blurry You can view pictures on TVs in other countries regions which use the NTSC or PAL system when you set VIDEO OUT in the ...

Page 116: ...settings 15 Burst P79 Audio recording P65 76 16 White balance P72 17 ISO sensitivity P74 ISO limit P49 18 Colour effect mode P82 19 Picture mode P65 4 3 16 9 20 Available recording time P65 21 Spot AF area P77 22 Spot metering target P77 23 Histogram P38 24 Age P58 This is displayed for about 5 seconds when this unit is turned on in BABY1 BABY2 or PET in scene mode Number of days that have passed ...

Page 117: ...e mode 1 Flash mode P42 2 Focus P24 3 Picture mode P27 Jitter alert P26 4 Battery indication P22 5 Number of recordable pictures 6 Built in memory P13 Card P13 7 Recording state 8 AF area P24 9 Travel date P67 10 Operation for backlight compensation P28 11 Current date and time This is displayed for about 5 seconds when the camera is turned on after setting the clock and after switching from playb...

Page 118: ...able disconnection warning icon P114 Motion picture recording time P86 11 Histogram P38 12 Recording information 13 Favourites settings P92 Elapsed playback time P86 14 Recorded date and time Travel destination setting P69 15 Age P58 16 Power LCD P40 17 Number of days that have passed since the travel date P67 18 Audio playback P86 Motion picture mode P86 19 Stamped with date stamp indication P96 ...

Page 119: ...ave radiation generated by microprocessors may adversely affect the camera disturbing the pictures and sound If the camera is adversely affected by electromagnetic equipment and stops functioning properly turn the camera off and remove the battery or disconnect AC adaptor optional Then reinsert the battery or reconnect AC adaptor and turn the camera on Do not use the camera near radio transmitters...

Page 120: ...rying case supplied If you drop the battery accidentally check to see if the body of the battery and the terminals are damaged Inserting a damaged battery in the camera will damage the camera Bring charged spare batteries when going out Be aware that the operating time of the battery becomes shorter in low temperature conditions such as at a ski resort When you travel do not forget to bring the ba...

Page 121: ...nded humidity 40 to 60 Always remove the battery and the card from the camera If the battery is left inserted in the camera it will discharge even if the camera is turned off If the battery continues to be left in the camera it will discharge excessively and may become unusable even if charged When storing the battery for a long period of time we recommend charging it once a year Remove the batter...

Page 122: ... DPOF print cannot be set for pictures not based on the DCF standard NOT ENOUGH SPACE ON BUILT IN MEMORY NOT ENOUGH MEMORY ON THE CARD There is no space left on the built in memory or the card When you copy pictures from the built in memory to the card batch copy the pictures are copied until the capacity of the card becomes full SOME PICTURES CANNOT BE COPIED COPY COULD NOT BE COMPLETED The follo...

Page 123: ...n be used P109 Format the card after saving necessary data on a PC etc P106 If you execute NO RESET in the SETUP menu after formatting the folder number is reset to 100 P20 PICTURE IS DISPLAYED FOR 4 3 TV PICTURE IS DISPLAYED FOR 16 9 TV The AV cable is connected to the camera Press MENU SET if you want to delete this message at once Select TV ASPECT in the SETUP menu if you want to change the TV ...

Page 124: ...y charged If you leave the camera on the battery will be exhausted Turn the camera off frequently by using power save mode P19 etc Recording 1 The picture cannot be recorded Is the mode dial correctly set Is there any memory remaining on the built in memory or the card Before recording delete some pictures P34 2 The recorded picture is whitish The lens is dirty The picture can become whitish if th...

Page 125: ...gh sensitivity processing This is not a malfunction 8 The brightness or the hue of the recorded picture is different from the actual scene If recording under fluorescent light the brightness or the hue may change slightly when the shutter speed becomes fast This occurs due to the characteristics of fluorescent light It is not a malfunction 9 A reddish vertical line appears on the LCD monitor when ...

Page 126: ...ear to maintain the brightness of the LCD monitor This does not affect the pictures you are recording Flash 1 The flash is not activated Is the flash setting set to Forced OFF Change the flash setting P42 The flash is not activated when motion picture mode P65 SCENERY NIGHT SCENERY SUNSET HI SPEED BURST STARRY SKY FIREWORKS or AERIAL PHOTO in scene mode is selected P52 2 The flash is activated 2 t...

Page 127: ...ar playback P84 Is the clock in the camera set properly P14 For example if the clock setting on the camera is different from the date and time set on the PC and you acquire pictures recorded with the camera to the PC and then write them back to the card the pictures may be displayed with dates different from the actual recording dates in calendar playback etc 5 White round spots like soap bubbles ...

Page 128: ...function before printing For details refer to the operating instructions for the printer When you order photo studios to print pictures ask the photo studio if the pictures can be printed with both ends Others 1 An unreadable language was selected by mistake Press MENU SET select the SETUP menu icon and then select the icon to set the desired language P21 2 The setting for the auto review function...

Page 129: ...f in wide angle the more distorted the picture you take is However this is not a malfunction 9 Colours appear on the picture which were not found in the actual scene Depending on the zoom magnification the picture may have some coloured fringes around the subject This is called chromatic aberration and may be more visible when recording distant subjects However this is not a malfunction 10 The fil...

Page 130: ...1920 pixels Quality Built in Memory Approx 27 MB 3 8 6 13 10 21 Card 16 MB 1 4 2 6 5 10 32 MB 4 9 6 14 11 23 64 MB 9 20 14 30 24 48 128 MB 20 41 30 61 50 99 256 MB 40 81 61 120 98 190 512 MB 81 160 120 240 195 380 1 GB 160 320 240 480 390 770 2 GB 330 650 490 970 790 1530 4 GB 650 1280 970 1910 1560 3010 Aspect ratio Picture size 3M EZ 2048k1536 pixels 2M EZ 1600k1200 pixels 0 3M EZ 640k480 pixels...

Page 131: ...260 210 430 1 GB 180 360 270 530 440 860 2 GB 370 730 550 1070 890 1700 4 GB 730 1430 1080 2110 1740 3350 Aspect ratio Picture size 2 5M EZ 2048k1360 pixels 9M 4000k2248 pixels 6M EZ 3264k1840 pixels Quality Built in Memory Approx 27 MB 18 36 5 11 8 17 Card 16 MB 9 18 2 5 4 8 32 MB 20 40 6 12 9 19 64 MB 43 83 13 26 20 40 128 MB 88 165 27 55 41 81 256 MB 170 330 54 105 81 155 512 MB 340 650 105 210...

Page 132: ...1800 3410 4 GB 2040 4020 3540 6700 Aspect ratio Picture quality setting 30fps VGA 10fps VGA 30fps QVGA 10fps QVGA Built in Memory Approx 27 MB j j 53 s 2 min 40 s Card 16 MB 6 s 26 s 26 s 1 min 23 s 32 MB 17 s 58 s 59 s 2 min 55 s 64 MB 39 s 2 min 2 min 6 min 128 MB 1 min 23 s 4 min 10 s 4 min 10 s 12 min 20 s 256 MB 2 min 45 s 8 min 10 s 8 min 10 s 24 min 512 MB 5 min 30 s 16 min 20 s 16 min 20 s...

Page 133: ...n the screen may not decrease in order This unit does not support recording motion pictures on MultiMediaCards The extra optical zoom does not work in HIGH SENS P60 or HI SPEED BURST P61 in scene mode so the picture size for EZ is not displayed Aspect ratio Picture quality setting 30fps 16 9L 10fps 16 9L 15fps 16 9H Built in Memory Approx 27 MB j j j Card 16 MB 5 s 22 s 4 s 32 MB 14 s 50 s 12 s 64...

Page 134: ...cm Wide 30 cm Tele to Scene mode There may be differences in the above settings Shutter system Electronic shutteriMechanical shutter Motion picture recording When the aspect ratio setting is 640k480 pixels 30 frames second 10 frames second only when using a Card 320k240 pixels 30 frames second 10 frame second When the aspect ratio setting is 1280k720 pixels 15 frames second only when using a Card ...

Page 135: ...ine TFT LCD Approx 207 000 pixels field of view ratio about 100 Flash Flash range ISO AUTO Approx 60 cm to 5 m Wide AUTO AUTO Red eye reduction Forced ON Forced ON Red eye reduction Slow sync Red eye reduction Forced OFF Microphone Monaural Speaker Monaural Recording media Built in Memory Approx 27 MB SD Memory Card SDHC Memory Card MultiMediaCard Still pictures only Picture size Still picture Whe...

Page 136: ... 2 0 Full Speed Analogue video audio NTSC PAL Composite Switched by menu Audio line output monaural Terminal DIGITAL AV OUT Dedicated jack 8 pin DC IN Dedicated jack Dimensions Approx 96 7 mm W k54 0 mm H k24 5 mm D excluding the projecting parts Mass Approx 148 g excluding card and battery Approx 176 g with card and battery Operating temperature 0 oC to 40 oC Operating humidity 10 to 80 Battery C...

Reviews: