background image

310

SQW0547

Wi-Fi

Operating the camera by connecting it to a smartphone


Using an Android device

 •When reading a QR Code to connect

Start “Image App” 

(→

305)

Select [   ]
Read the QR Code displayed on this unit with “Image App”

(When you press [MENU/SET] on the camera, the QR code is displayed in an 

enlarged size.)

 •When the smartphone is connected to a wireless access point, it may take time to display QR 

code.

 •When connecting with SSID and password

Start “Image App” 

(→

305)

 •If a message appears stating that a camera search is in progress, close the message.

 Select  [   ]
Select the SSID displayed on this unit

Enter the password displayed on this unit (First time connecting only)

 •If you check the item to display the password, you can confirm the password as you enter it.

Changing the connection method

To change the connection method, follow the steps below:

(When the connection is made using [Wi-Fi] in the [Setup] menu)

Press [DISP.] button

(When the connection is made by pressing [Wi-Fi] button)

 → [

DISP.

] button → [

New Connection

] → [

Remote Shooting & View

] → 

[DISP.] button


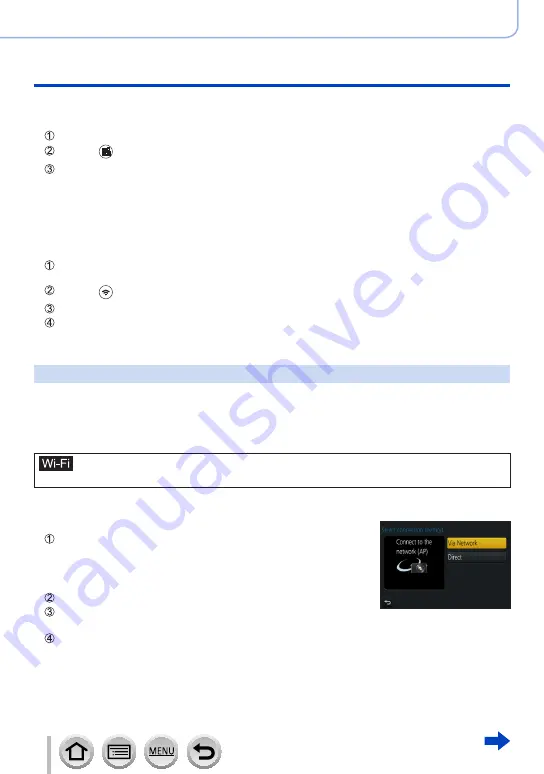
When connecting with [Via Network]

(On the camera)

Select [Via Network] and press [MENU/SET]

 •Connect the camera to a wireless access point by following the 

connection method 

(→

338)

.

(On your smartphone)

Set Wi-Fi function to “ON”

Select the wireless access point you connected to the 

camera, and set

Start “Image App” 

(→

305)

Summary of Contents for LUMIX DMC-ZS100

Page 1: ...M0116KZ0 Message Display 375 Please read these instructions carefully before using this product and save this manual for future use Q A Troubleshooting 383 Finding the information you need 2 Contents 5 Contents by Function 13 Menu list 379 Register online at http shop panasonic com support U S customers only ...

Page 2: ...Search from Contents 5 Search from the list of function names Contents by Function 13 Search from Names and Functions of Main Parts 19 Search from List of monitor viewfinder displays 363 Search from the list of on screen messages Message displays 375 Search from the menu list Menu list 379 Rec 379 Motion Picture 380 Custom 381 Setup 382 Playback 382 Search from Q A Troubleshooting 383 For details ...

Page 3: ...s in black you can select and execute indicated menus and functions Click a cross reference in the text to jump to the corresponding page About the models This manual provides instructions for DMC ZS100 and DMC ZS60 Screens shown in this manual are from the DMC ZS100 unless otherwise indicated Functions vary by model When reviewing the manual be aware that model numbers corresponding to each funct...

Page 4: ...he Custom menu Tips for skillful use and points for recording 00 Indicates the reference page Click to go to the corresponding page Click to view the description on the next page In this Owner s Manual steps for setting a menu item are described as follows Rec Quality In this manual ring dial and lever operations are illustrated as below Turn the control ring ZS100 Rotate the rear dial ZS60 Rotate...

Page 5: ...hing the Shoulder Strap adaptor 23 Charging battery 25 ZS100 Inserting the battery 26 ZS60 Inserting the battery 27 ZS100 Charging the battery 28 ZS60 Charging the battery 29 ZS100 Inserting and removing the card optional 35 ZS60 Inserting and removing the card optional 36 About the Card 37 Formatting the card initialization 38 Estimated recording capacity number of pictures recording time 39 Sett...

Page 6: ...ing frequently used menus instantly Quick Menu 68 ZS100 Change the Quick Menu to your preferred item 69 Assigning frequently used functions to the buttons Function buttons 70 Using the function buttons during recording 71 Using the function buttons during playback 73 Contents Basics ZS100 Changing the settings assigned to the control ring rear dial 74 ZS60 Changing the settings assigned to the con...

Page 7: ...e 101 Taking pictures by setting the shutter speed Shutter Priority AE Mode 102 Taking pictures by setting the aperture value and shutter speed Manual Exposure Mode 103 Checking the effects of the aperture value and shutter speed Preview Mode 106 Easily set aperture shutter speed for suitable exposure One Push AE 108 Recording panorama pictures Panorama Shot Mode 109 Taking pictures according to t...

Page 8: ...etting the upper limit of ISO Sensitivity 181 Setting the incremental value of ISO Sensitivity 181 Extending the ISO Sensitivity setting 182 Setting the metering mode 183 Picture Quality and coloring Settings Adjusting the picture quality with effects Photo Style 129 Taking pictures using picture effects Filter Settings 131 ZS100 Adjusting highlights and shadows Highlight Shadow 133 Adjusting the ...

Page 9: ... the flash output 250 Recording while exposure is changed automatically Auto Bracket 206 Taking pictures with self timer 208 Functions for specific subjects and purposes Saving a picture by selecting a focus point after recording Post Focus 210 Recording using Post Focus 210 Select the focus point and save the picture 214 Taking pictures automatically at set intervals Time Lapse Shot 216 Creating ...

Page 10: ...vel Shot 266 Flkr Decrease 266 Silent Operation 266 Wind Noise Canceller 267 Zoom Mic 267 Playing Back and Editing Pictures Viewing your pictures 268 Viewing motion pictures 270 Capturing still pictures from motion pictures 271 Switching the Playback Method 272 Zooming in and viewing Playback Zoom 272 Viewing a list of pictures Multi Playback 273 Viewing pictures by their recording date Calendar P...

Page 11: ...ing pictures to a PC 325 Using WEB services 327 When sending images to WEB service 327 When sending images to Cloud Sync Service 331 Using LUMIX CLUB 332 About the LUMIX CLUB 332 About connections 337 Connecting via a wireless access point Via Network 338 Connecting directly Direct 341 Connecting quickly with the same settings as used previously Select a destination from History Select a destinati...

Page 12: ... adaptor optional and DC coupler optional instead of the battery 362 ZS100 List of monitor viewfinder displays 363 ZS60 List of monitor viewfinder displays 369 Message displays 375 Menu list 379 Q A Troubleshooting 383 Usage cautions and notes 398 Contents ...

Page 13: ...re Quality and Color Tone Photo Style 129 Filter Settings 131 ZS100 Highlight Shadow 133 White Balance 134 Picture Size 139 Quality 140 i Dynamic 142 i Resolution 142 HDR 143 ZS100 Long Shtr NR 144 Diffraction Compensation 144 ZS100 Color Space 145 Flash Flash Mode 243 ZS100 2nd curtain synchro 249 Flash Adjust 250 Monitoring ZS100 Recording while monitoring camera images 232 Motion Picture Creati...

Page 14: ...sition 287 Clear Retouch 289 Resize 294 Cropping 295 Playback Adding information Location Logging 283 Title Edit 290 Text Stamp 291 Image settings Favorite 297 Print Set 298 Protect 299 Basic settings Format 38 Clock Set 42 Display switching 53 57 Diopter adjustment 60 How to set menu items 65 Q MENU 68 Beep 78 Economy 81 Reset initialization 86 Setup Custom Customization ZS100 CUSTOM in the Quick...

Page 15: ... App 305 WPS Push Button 338 341 Direct connection 341 Image App Remote recording 312 Saving images 313 Sending images 314 322 Sending and adding location information 314 Combining motion pictures recorded with Snap Movie 316 Wi Fi In combination with other devices Playing back pictures on a TV 318 Printing images 323 Sending images to an AV device 324 Sending images to a PC 325 Sending images to ...

Page 16: ...come into contact with the camera Avoid using the camera under the following conditions which present a risk that sand water or foreign material may enter the camera through the lens or openings around buttons Be especially careful because these conditions may damage the camera and such damage may not be repairable In extremely dusty or sandy places In the rain or by the shore where the camera may...

Page 17: ...al problems with the camera or card prevent recording Carefully observe copyright laws Unauthorized use of recordings that contain works with copyright for purposes other than personal use is prohibited under copyright law Recording of certain material may be restricted even for the purpose of personal use Also refer to Usage cautions and notes 398 Before using the camera make sure all accessories...

Page 18: ...here the camera was purchased For details on the accessories refer to Basic Owner s Manual Battery Pack is indicated as battery pack or battery in the text SD Memory Card SDHC Memory Card and SDXC Memory Card are indicated as card in the text Please dispose of all packaging appropriately Keep small parts in a safe place out of the reach of children Optional accessories Cards are optional ...

Page 19: ...ng mode 5 Camera ON OFF switch 42 6 Rear dial 50 7 Flash 241 8 Viewfinder 58 9 Diopter adjustment dial 60 10 Eye sensor 58 60 11 Stereo microphone 44 Be careful not to cover the microphone with your finger Doing so may make sound difficult to record 12 Strap eyelet 23 13 Control ring 50 Allows you to zoom and adjust settings when recording 14 Lens barrel 15 Lens 16 Self timer indicator 208 AF Assi...

Page 20: ... Mode 146 165 167 26 MENU SET button 52 27 DISP button 53 Use this to change display 28 HDMI socket 348 29 CHARGE socket 28 30 Touch screen 61 monitor 363 31 Speaker 44 Be careful not to cover the speaker with your finger Doing so may make sound difficult to hear 32 Tripod mount 401 Do not attach this unit to tripods that have screws with a length of 5 5 mm 0 22 inch or more Doing so may damage th...

Page 21: ...ophone 44 Be careful not to cover the microphone with your finger Doing so may make sound difficult to record 7 Viewfinder 58 8 Diopter adjustment dial 60 9 Eye sensor 58 60 10 Strap eyelet 23 11 Speaker 44 Be careful not to cover the speaker with your finger Doing so may make sound difficult to hear 12 Control ring 51 Allows you to zoom and adjust settings when recording 13 Lens barrel 14 Lens 15...

Page 22: ...Mode 146 165 167 25 MENU SET button 52 26 DISP button 53 Use this to change display 27 HDMI socket 348 28 CHARGE socket 29 29 Touch screen 61 monitor 369 30 Tripod mount 401 Do not attach this unit to tripods that have screws with a length of 5 5 mm 0 22 inch or more Doing so may damage this unit or the unit may not be secured properly on the tripod 31 DC coupler cover 362 When using an AC adaptor...

Page 23: ...he Shoulder Strap adaptor You can use a shoulder strap commercially available by attaching a shoulder strap adaptor supplied to the camera 1 Attach a shoulder strap adaptor to the strap eyelet on the camera Strap eyelet 2 Pass your shoulder strap through the shoulder strap opening of the strap adaptor Check the operating instructions that came with the shoulder strap Shoulder Strap opening ...

Page 24: ...daptor a little shorter Pass the shoulder strap adaptor through the strap eyelet Pass your shoulder strap through both the shoulder strap adaptor string and shoulder strap opening Check the operating instructions that came with the shoulder strap String Pull the shoulder strap and then check that it will not come out Also attach the other side of the shoulder strap so it is not twisted Keep the sh...

Page 25: ... counterfeit battery packs which look very similar to the genuine products are made available to purchase in some markets Some of these battery packs are not adequately protected with internal protection to meet the requirements of appropriate safety standards There is a possibility that these battery packs may lead to fire or explosion Please be advised that we are not liable for any accident or ...

Page 26: ...ry Move the lever in the card battery compartment in the direction of the arrow Always use genuine Panasonic batteries If you use other batteries we cannot guarantee the quality of this product To remove the battery turn the camera off and wait until the LUMIX indicator on the screen goes off Failure to wait may cause the camera to malfunction and may damage the card or recorded data Remove batter...

Page 27: ...y Move the lever in the card battery compartment in the direction of the arrow Always use genuine Panasonic batteries If you use other batteries we cannot guarantee the quality of this product To remove the battery turn the camera off and wait until the LUMIX indicator on the screen goes off Failure to wait may cause the camera to malfunction and may damage the card or recorded data Remove battery...

Page 28: ...pplied AC adaptor supplied Computer Getting ready Turn on the computer When charging the camera connect the USB connection cable supplied to the CHARGE socket CHARGE socket This terminal is located at the bottom when the camera is in an upright position Always check the direction of the pins and hold the plug straight to insert or remove it If the cable is inserted in the wrong direction the pins ...

Page 29: ...plied AC adaptor supplied Computer Getting ready Turn on the computer When charging the camera connect the USB connection cable supplied to the CHARGE socket CHARGE socket This terminal is located at the bottom when the camera is in an upright position Always check the direction of the pins and hold the plug straight to insert or remove it If the cable is inserted in the wrong direction the pins c...

Page 30: ...Charging lamp On Charging in progress Off Charging complete After charging stops disconnect the camera from the electrical outlet or your computer Flashing Charging error For instructions on correcting the problem refer to 383 Notes on charging time When using the AC adaptor supplied Charging time Approx 190 min The charging time indicated above is the time required for charging in case when the b...

Page 31: ...accessories of this camera Do not use them for other devices Remove the battery after use The battery will be exhausted if left for a long period of time after being charged If there is any trouble related to the electrical outlet i e power failure charging may not complete properly Disconnect the USB connection cable supplied and reconnect it to the camera If the charging lamp does not light even...

Page 32: ...tures By CIPA standard Recording time Approx 130 min Approx 140 min Recording conditions by CIPA standard CIPA is an abbreviation of Camera Imaging Products Association Program AE Mode Temperature 23 C 73 4 F Humidity 50 RH when monitor viewfinder is on Using a Panasonic SDHC Memory Card Using the supplied battery Starting recording 30 seconds after the camera is turned on when Stabilizer is set t...

Page 33: ...3 4 F humidity 50 RH Motion pictures with Rec Quality setting of FHD 28M 60p FHD 17M 60i in AVCHD Recording stops when the continuous recording time exceeds 29 minutes and 59 seconds Motion pictures with their file size set to FHD HD or VGA in MP4 Recording stops when the continuous recording time exceeds 29 minutes and 59 seconds or the file size exceeds 4 GB Since the file size becomes larger wi...

Page 34: ...e environment and the operating conditions For example in the following cases the operating times shorten and the number of recordable pictures is reduced In low temperature environments such as on ski slopes When operations such as the flash and zoom are used repeatedly If available battery power is significantly reduced battery is reaching end of lifespan Please purchase a new battery ...

Page 35: ...ert the card all the way firmly until it clicks 3 Close the card battery door and slide the release lever to the LOCK position To remove card Press the center of the card OPEN LOCK Release lever Do not touch the terminal Keep the Memory Card out of reach of children to prevent swallowing To remove the card turn the camera off and wait until the LUMIX indicator on the screen goes off Failure to wai...

Page 36: ...ert the card all the way firmly until it clicks 3 Close the card battery door and slide the release lever to the LOCK position To remove card Press the center of the card OPEN LOCK Release lever Do not touch the terminal Keep the Memory Card out of reach of children to prevent swallowing To remove the card turn the camera off and wait until the LUMIX indicator on the screen goes off Failure to wai...

Page 37: ...o recording Use a card that meets the following ratings of the SD Speed Class or UHS Speed Class SD Speed Class and UHS Speed Class are the speed standards regarding continuous writing Confirm the SD speed by checking the card label or other card related materials Rec Format Rec Quality Speed class Label example AVCHD All Class 4 or higher MP4 FHD HD VGA MP4 4K High Speed Video UHS Speed Class 3 W...

Page 38: ... card before recording a picture with this unit Since data cannot be recovered after formatting make sure to back up necessary data in advance 1 Set the menu Setup Format This requires a sufficiently charged battery or an AC adaptor optional and DC coupler optional Do not turn off the camera or perform other operations during formatting Always format cards with this camera Please reformat the card...

Page 39: ...10M 1310 2650 5310 10510 S 5M 2270 4600 9220 17640 When Aspect Ratio is set to 3 2 and Quality is set to Picture Size 8 GB 16 GB 32 GB 64 GB L 20M 220 450 920 1840 M 10M 260 530 1070 2140 S 5M 290 580 1170 2340 ZS60 When Aspect Ratio is set to 4 3 and Quality is set to Picture Size 8 GB 16 GB 32 GB 64 GB L 18M 800 1610 3240 6500 M 9M 1470 2970 5950 11760 S 4 5M 2590 5240 10500 20590 When Aspect Ra...

Page 40: ...5m00s 2h30m00s 5h00m00s FHD 17M 60i 1h00m00s 2h00m00s 4h05m00s 8h15m00s FHD 24M 30p 42m00s 1h25m00s 2h55m00s 5h50m00s When Rec Format is MP4 ZS100 Rec Quality 8 GB 16 GB 32 GB 64 GB 4K 100M 30p 4K 100M 24p 9m00s 20m00s 42m00s 1h20m00s FHD 28M 60p 36m00s 1h15m00s 2h30m00s 5h00m00s FHD 20M 30p 49m00s 1h40m00s 3h20m00s 6h40m00s HD 10M 30p 1h30m00s 3h10m00s 6h25m00s 12h50m00s VGA 4M 30p 3h25m00s 7h00m...

Page 41: ...9 seconds MP4 motion pictures with a Rec Quality size of 4K Recording stops when the continuous recording time exceeds 15 minutes When you are using an SDHC memory card you can continue recording without interruption even if the file exceeds 4 GB but the motion picture file will be recorded and played back in separate files If using an SDXC Memory Card you can record a motion picture in a single f...

Page 42: ...ss MENU SET while the message is displayed 3 Press to select the language and press MENU SET The Please set the clock message appears 4 Press MENU SET 5 Press to select the items year month day hour minute and press to set To set the display order or time display format Select Style and press MENU SET to display the setting screen for display order and time display format Home time Destination tim...

Page 43: ...ich Mean Time If the clock is not set the correct date cannot be printed when you order a photo studio to print the picture or when you stamp the date on the pictures with Text Stamp Changing time settings 1 Select Clock Set from the Setup menu For details about how to set the menu 65 2 Set the date and time Perform steps 5 6 42 Clock settings will be saved for approx 3 months even after the batte...

Page 44: ...there is no danger of colliding with another person or object in the vicinity while taking pictures ZS100 ZS60 AF Assist Lamp Microphone Speaker Hand strap Flash Flash AF Assist Lamp Microphone Speaker Hand strap About the direction detect function Still pictures recorded with the camera held vertically can be automatically displayed in portrait orientation during playback Only when Rotate Disp is...

Page 45: ...ever ZS100 1 Turn the control ring ZS100 ZS60 ZS60 You can perform zoom operation by assigning the Zoom setting to the control ring 74 75 T side Telephoto Enlarge the subject W side Wide angle Capture a wider area Clockwise Telephoto Enlarge the subject Counterclockwise Wide angle Capture a wider area Do not touch the lens barrel during zooming Adjust the focus after adjusting the zoom The camera ...

Page 46: ...ed When focus is not aligned flashing Aperture value Shutter speed 2 Press the shutter button fully push the button all the way and take the picture Pictures can be taken only when the image is correctly focused as long as the Focus Release Priority 164 is set to FOCUS Even during menu operation or picture playback if you press the shutter button halfway you can instantly set the camera ready for ...

Page 47: ...g still pictures immediately after taking them Custom Auto Review Set the time to display the pictures you have taken after taking still pictures Settings HOLD 5SEC 4SEC 3SEC 2SEC 1SEC OFF When HOLD is selected pictures are displayed until you press the shutter button halfway During 4K Photo recording 184 and Post Focus recording 210 the Auto Review settings items change to ON and OFF ...

Page 48: ...for Recording Motion picture button Recording motion pictures 1 Press the motion picture button to start recording Immediately release the motion picture button after pressing it ZS100 ZS60 2 Press the motion picture button again to end recording ...

Page 49: ...ture value settings Aperture Priority AE Mode 101 Determine aperture then record pictures Shutter Priority AE Mode 102 Determine shutter speed then record pictures Manual Exposure Mode 103 Determine aperture and shutter speed then record pictures Creative Video Mode 124 Determine aperture and shutter speed then record motion pictures You cannot take still pictures Custom Mode 127 Record pictures u...

Page 50: ...ogram Shift 97 101 Aperture adjustment 101 102 Shutter speed adjustment 102 103 Aperture adjustment 2 103 Shutter speed adjustment 2 103 109 Picture effects change 117 112 Aperture adjustment 3 103 Shutter speed adjustment 4 103 117 Picture effects change 117 1 When Manual Focus is set the control ring is assigned to focus adjustment 167 2 Press to switch between shutter speed adjustment and apert...

Page 51: ... 97 Program Shift 97 101 Aperture adjustment 101 102 Shutter speed adjustment 102 103 Aperture adjustment 2 103 Shutter speed adjustment 2 103 109 Picture effects change 117 112 Aperture adjustment 3 103 Shutter speed adjustment 4 103 117 Picture effects change 117 1 When Manual Focus is set the control ring is assigned to focus adjustment 167 2 Press to switch between shutter speed adjustment and...

Page 52: ... SET Confirmation of setting contents etc is performed In this manual the button that is to be used is indicated by ZS100 ZS60 Even when the camera is operated using the touch screen it is possible to operate with the cursor button and MENU SET button if a guide like the one shown on the right is displayed Even on menu screens etc on which the guide is not displayed you can make settings and selec...

Page 53: ...utton or touch the screen to display the information again ZS100 ZS60 During recording You can use Monitor Disp Style and LVF Disp Style in the Custom menu to select either Monitor style display layout or Live View Finder style display layout for the display screen of the monitor and viewfinder Monitor style display layout Example of monitor style display With information Without information With ...

Page 54: ...tion With information With information Detailed information level gauge With information level gauge 60p 60p Switching the monitor display method Custom Monitor Disp Style Live View Finder style display layout Monitor style display layout Switching the viewfinder display method Custom LVF Disp Style Live View Finder style display layout Monitor style display layout ...

Page 55: ...ogram is not the same as that of the recorded picture under the following conditions histogram will be displayed in orange When manual exposure assist indicates settings other than in Manual Exposure Mode or during Exposure Compensation When the flash fires When the correct exposure is not achieved or when the brightness of the screen cannot be displayed accurately in a dark location The histogram...

Page 56: ... line Tilting up or down In this case it is facing upward Tilting left or right In this case the right side has dropped When the camera is tilted very little or not at all the level gauge will turn green Even when angle is more or less corrected there may be an error of about 1 degree When Level Gauge is assigned to a function button you can turn the level gauge on and off every time you press the...

Page 57: ...seconds and other touch icons will disappear A histogram of each color including R red G green B blue and Y luminance is separately displayed during playback Enabling disabling the overexposed area display Custom Highlight ON OFF You can set overexposed areas areas that are too bright and where there are no shades of gray to flash on the screen when the Auto Review function is activated or during ...

Page 58: ... between the monitor and viewfinder You can operate the LVF button Fn4 button in two ways using it either as the LVF button or as a function button Fn4 You can use this button as the LVF button at the time of purchase For details on the function button refer to 70 ZS100 Eye Sensor LVF button ZS60 Eye Sensor LVF button ...

Page 59: ...splay to viewfinder when your eye or an object moves close to the viewfinder When the eye or object moves away from the viewfinder the camera returns to monitor display Viewfinder display Viewfinder display only Monitor display Monitor display only About the eye sensor The eye sensor may react depending on the shape of your eyeglasses the way you hold the camera or whether the eye sensor is expose...

Page 60: ...ity of the eye sensor HIGH LOW LVF Monitor Switch Use this setting to switch the display between the viewfinder and monitor LVF MON AUTO Automatic switching between viewfinder and monitor LVF Viewfinder display MON Monitor display After the display is switched using the LVF button the setting of LVF Monitor Switch will also change Adjusting not adjusting the focus automatically when the eye sensor...

Page 61: ...spread pinch out your 2 fingers to zoom in and pinch pinch in your 2 fingers to zoom out Enabling disabling the touch operation Custom Touch Settings Touch Screen All touch operations When set to OFF only button and dial operations can be used ON OFF Touch Tab Operation to display the touch icons by touching tabs such as displayed on the right of the screen ON OFF Touch AF Operation to optimize th...

Page 62: ... or operability Do not press on the monitor with hard pointed tips such as ballpoint pens Do not press the touch screen with your fingernails Clean the monitor with a soft dry cloth if there are fingerprints or other kinds of dirt on it Do not scratch or press the monitor too hard The touch screen may not function normally in the following cases When touched by a gloved hand When the touch screen ...

Page 63: ...ouch 2 Touch The icon changes to and you can now proceed with touch shutter recording 3 Touch the subject you want to record To release the touch shutter function Touch If shooting with the touch shutter fails the AF area turns red and disappears Measurement of brightness is performed on the spot touched when the Metering Mode 183 is set to At the edge of the screen the metering may be affected by...

Page 64: ...tering Mode is set to which is used exclusively for the Touch AE 3 Touch the subject you want to optimize the brightness for Touching Reset will bring the brightness optimization position back to the center Set Set Reset Reset 4 Touch Set Canceling the Touch AE function Touch Metering Mode returns to the original setting and the brightness optimization position is canceled This function is not ava...

Page 65: ...can perform settings for the aspect ratio number of pixels 4K Photo etc Motion Picture 380 You can select the recording format and picture quality and other settings Custom 381 Operation of the unit such as displaying of the screen and button operations can be set up according to your preferences Also it is possible to register the modified settings Setup 382 You can perform settings that make usa...

Page 66: ...g the rear dial ZS60 The menu item can also be selected by rotating the control dial You can also switch to the next page by pressing DISP button or rotating the zoom lever With touch screen operations Touch the menu item You can switch to the next page by touching Page Item 3 Press to select the setting and press MENU SET ZS100 The setting can also be selected by rotating the rear dial ZS60 The s...

Page 67: ...y pressing the shutter button halfway With touch screen operations Touch When Menu Resume 84 in the Setup menu is set to ON the screen displayed last after you selected the menu item will reappear It is set to ON at the time of purchase When the Menu Information 84 in the Setup menu is set to ON descriptions of the menu items and settings will appear on the menu screen ...

Page 68: ...the camera is in 1 Press Q MENU button ZS100 ZS60 2 ZS100 Rotate the rear dial to select a menu item and press or ZS60 Rotate the control dial to select a menu item and press or The menu item can also be selected by pressing 60p 60p 3 ZS100 Rotate the rear dial to select the setting ZS60 Rotate the control dial to select the setting The setting can also be selected with 60p 60p 4 Press Q MENU butt...

Page 69: ...SET 2 Press to select the menu item in the top row and press MENU SET Items that are displayed in gray in the top row have already been set Top row Items that can be set Bottom row Set items 3 Press to select the empty space in the bottom row and press MENU SET You can also set the menu item by dragging it from the top row to the bottom row If there is no empty space in the bottom row you can repl...

Page 70: ...ect the function you want to assign and press MENU SET For details on the functions that can be assigned in Setting in REC mode refer to 71 For details on the functions that can be assigned in Setting in PLAY mode refer to 73 Rapidly assigning functions The assignment screen displayed in Step 4 above can be displayed by holding a function button Fn1 to Fn4 for 2 seconds Recording mode The function...

Page 71: ...73 175 AF ON 173 175 Preview 106 One Push AE 108 Touch AE 64 Level Gauge 56 Fn6 Focus Area Set ZS100 Cursor Button Lock Photo Style 129 Filter Select 131 Aspect Ratio 139 Picture Size 139 Quality 140 Sensitivity 179 ZS60 White Balance 134 AF Mode 149 AFS AFF AFC 148 Metering Mode 183 Burst Rate 202 Auto Bracket 206 Self Timer 208 ZS100 Highlight Shadow 133 i Dynamic 142 i Resolution 142 Post Focus...

Page 72: ...function button operation of the cursor button and MENU SET is disabled To enable operation press the function button again Setting Restore to Default returns the function buttons to their original settings at the time of purchase The function assigned to the Fn1 button will not work in the following cases When using Time Lapse Shot ZS100 When Multi Exp is set When recording with 4K Burst S S of t...

Page 73: ...g playback Example When Fn2 is set to Favorite 1 Press to select the picture 2 Press Fn2 button and then set the picture as Favorite Functions that can be assigned in Setting in PLAY mode The following functions can be assigned to the button Fn1 Fn2 or Fn4 Playback menu Playback functions Favorite 297 Fn2 Print Set 298 Protect 299 Delete Single 277 Off Fn1 Fn4 Restore to Default Function button se...

Page 74: ...vity 179 i Dynamic 142 White Balance 134 i Resolution 142 AF Mode 149 Flash 243 Focus Mode 146 165 167 Flash Adjust 250 Drive Mode 201 OFF Not Set Items that can only be set to the control ring To return to the default setting select Normal If you do not use the control ring select Not Set Under Highlight Shadow use the control ring and rear dial If Highlight Shadow is assigned to the control ring...

Page 75: ... 201 Zoom 236 Photo Style 129 Step Zoom 239 Filter Effect 131 Exposure Comp 177 Aspect Ratio 139 Sensitivity 179 i Dynamic 142 White Balance 134 i Resolution 142 AF Mode 149 Flash Mode 244 Focus Mode 146 165 167 Flash Adjust 250 OFF Not Set Items that can only be set to the control ring To return to the default setting select Normal If you do not use the control ring select Not Set The assigned fu...

Page 76: ...1 Use to select Destination or Home and press MENU SET 2 Use to select area and press MENU SET City area name Difference with home time Current time at selected destination When Destination has been selected When Home has been selected To set daylight savings Press in step 2 Press again to release the setting When daylight savings is set the current time is advanced by 1 hour If the setting is can...

Page 77: ... Entering text 87 To print Location or the number of days that have passed either use Text Stamp 291 or print using the PHOTOfunSTUDIO software 353 The travel date is calculated from the set departure date and the date set in the camera s clock When destination is set in World Time days elapsed are calculated based on local destination time When Travel Setup is set to OFF the number of days elapse...

Page 78: ...es are displayed at 30 fps For example use when you want to record a comparatively slow moving subject while confirming the focusing Minimizes power consumption and the operating time is extended 60fps Display speed has higher priority over picture quality and pictures are displayed at 60 fps For example use when you want to record a fast moving subject The Live View Mode setting does not affect t...

Page 79: ...the vividness of colors Red Tint Adjusts red hues Blue Tint Adjusts blue hues 1 Press to select the setting item and press to make adjustments ZS100 You can also make adjustments with the rear dial ZS60 You can also make adjustments with the control dial 2 Press MENU SET It will adjust the monitor when the monitor is in use and the viewfinder when the viewfinder is in use Some subjects may look di...

Page 80: ...ghtness is increased The brightness is standard The brightness is decreased Some subjects may look different from their actual appearance but the recorded picture will not be affected returns to ordinary brightness if there is no operation for 30 seconds when recording Press any button or touch the screen to make the screen brighter again Setting or reduces the operating time Cannot select during ...

Page 81: ... OFF To restore Press the Camera ON OFF button Auto LVF Monitor Off The monitor is automatically turned off if the camera has not been used for the time selected on the setting Settings 5 MIN 2 MIN 1 MIN To restore Press any button or touch the monitor This function is not available in the following cases During motion picture recording playback When recording with 4K Pre Burst of the 4K Photo fun...

Page 82: ...his unit using the HDMI micro cable Settings AUTO Automatically sets the output resolution based on information from a connected TV 4K Outputs pictures with a resolution of 3840 2160 pixels using a progressive scan method for the number of effective scanning lines 2 160 lines 1080p Outputs pictures using a progressive scan method for the number of effective scanning lines 1 080 lines 1080i Outputs...

Page 83: ... micro cable Settings ON The camera display is output as is OFF Only images are output VIERA Link Enable automatic linking with other VIERA Link compatible devices and operability with a VIERA remote control when connecting via an HDMI micro cable 350 Settings ON Operations may be performed via the remote control of the VIERA Link compatible device Not all operations will be available Operability ...

Page 84: ...ast operated menu position Settings ON OFF Menu Background Set the background color for the menu screen Menu Information Explanations of the menu items and settings are displayed on the menu screen Settings ON OFF Language Change display language Set the language displayed on the screen If you set a different language by mistake select from the menu icons to set the desired language ...

Page 85: ...ompensation brightness setting is reset Settings ON OFF Self Timer Auto Off The self timer is canceled if the unit is turned off Settings ON OFF No Reset Reset picture file numbers The folder number is updated and the file number starts from 0001 To reset folder number to 100 First format the card and reset the file numbers using No Reset Then select Yes on the folder number reset screen A folder ...

Page 86: ...p custom settings When the setup custom settings are reset the following settings are also reset The World Time setting The Travel Date setting Departure date Return date Location The settings of Rotate Disp and Picture Sort in the Playback menu Folder numbers and clock settings will not be reset Reset Wi Fi Settings Returns Wi Fi settings to default settings Excluding LUMIX CLUB Demo Mode You can...

Page 87: ...side ZS100 Rotate the rear dial counterclockwise ZS60 Rotate the control dial clockwise To edit text Use to select and press MENU SET Then move the cursor to the text to edit ZS100 You can also use the zoom lever or rear dial to reposition the cursor ZS60 You can also use the zoom lever or control dial to reposition the cursor Use to select Delete and press MENU SET Use to select the correct text ...

Page 88: ... Setting the brightness exposure Setting the color tone Menus that can be set 96 1 Set mode dial to The camera will switch to either the most recently used of Intelligent Auto Mode or Intelligent Auto Plus Mode 95 Following are the settings in effect at time of purchase ZS100 Intelligent Auto Plus Mode ZS60 Intelligent Auto Mode ZS100 ZS60 2 Point the camera at the subject When the camera identifi...

Page 89: ... the subject and press the shutter button halfway to operate the AF tracking function For details about AF tracking refer to 151 In and the camera adjusts the focus on the eye that is closest to this unit and matches the exposure with the face In Intelligent Auto Plus Mode or Intelligent Auto Mode the eye to be focused on cannot be changed Face Eye Detection Automatic Scene Detection does not func...

Page 90: ...ght Shot 2 i Food i Baby 3 i Sunset When scene does not correspond to any of the above 1 Displayed only when using flash 2 When iHandheld Night Shot is ON 91 3 When children that are registered in the camera with Face Recognition under 3 years old are recognized When the camera identifies as the optimal scene and if the camera determines that jitter is reduced by the use of a tripod or by other me...

Page 91: ...eld iHandheld Night Shot can record a still picture with less jitter and less noise without using a tripod by combining a burst of pictures Rec iHandheld Night Shot ON OFF The angle of view becomes narrow slightly After the shutter button has been pressed do not move the camera during the burst operation When the camera is fixed in place on a tripod or by other means will not be identified The fla...

Page 92: ...row slightly After the shutter button has been pressed do not move the camera during the burst operation Since a burst of still pictures are combined after they have been recorded it will be a few moments before you can record another picture In the case of composition from a burst afterimages may appear if the subject was moving This function will not work for still pictures while motion pictures...

Page 93: ...trol operation and operation finish 2 ZS100 Rotate the rear dial to adjust the background defocusing condition ZS60 Rotate the control dial to adjust the background defocusing condition 250 125 60 30 15 8 0 5 6 2 8 4 0 Strong defocusing Slight defocusing Press MENU SET to return to the recording screen With touch screen operations Touch Touch to display the setting screen Drag the exposure meter t...

Page 94: ... 2 ZS100 Rotate the rear dial to adjust brightness exposure ZS60 Rotate the control dial to adjust brightness exposure Setting coloring 1 ZS100 Press to display the setting screen ZS60 Press to display the setting screen 2 ZS100 Rotate the rear dial to adjust color ZS60 Rotate the control dial to adjust color Press MENU SET to return to the recording screen With touch screen operations Touch Touch...

Page 95: ...it is turned off or the camera is switched to another Recording mode About Intelligent Auto Plus Mode and Intelligent Auto Mode Switching between Intelligent Auto Plus Mode and Intelligent Auto Mode 1 Press MENU SET ZS100 ZS60 2 Press 3 Press to select the or tab ZS100 Items can also be selected by rotating the rear dial ZS60 Items can also be selected by rotating the control dial 4 Use to select ...

Page 96: ... Press Release Pinpoint AF Time Pinpoint AF Display Focus Release Priority AF MF MF Assist MF Assist Display MF Guide Peaking Histogram Guide Line Highlight Zebra Pattern Monochrome Live View Constant Preview Dial Guide LVF Disp Style Monitor Disp Style Rec Area Remaining Disp Auto Review Fn Button Set Zoom lever Zoom Resume Q MENU Ring Dial Set Eye Sensor Touch Settings Touch Scroll Menu Guide Se...

Page 97: ...lues using Program Shift The operation can also be performed by rotating the control ring 50 To cancel Program Shift either turn off the camera or rotate the rear dial until the Program Shift indication turns off ZS60 While the numeric values are displayed approximately 10 seconds rotate the control dial to change the values using Program Shift The operation can also be performed by rotating the c...

Page 98: ...low Therefore Long shutter noise reduction ongoing may be displayed Although noise reduction requires the same time as the shutter speed for signal processing you can take sharp pictures Enabling disabling the exposure meter display Custom Expo Meter ON OFF When you set this function to ON an exposure meter is displayed during Program Shift aperture setting and shutter speed operation Proper expos...

Page 99: ...9 10 11 12 14 13 1 1 2 1 4 1 8 1 15 1 30 1 60 1 125 1 250 1 500 1 1000 1 2000 1 4000 15 16 17 18 19 20 Aperture value EV Shutter speed Program Shift amount Represents the aperture and shutter speed set automatically by the camera at each exposure value Program Shift diagram Represents the range of the aperture and shutter speed combination you can change with Program Shift at each exposure value P...

Page 100: ...es noise when Long Shtr NR is set to ON and the shutter speed is slow Therefore Long shutter noise reduction ongoing may be displayed 144 Although noise reduction requires the same time as the shutter speed for signal processing you can take sharp pictures ZS60 The camera automatically removes noise when the shutter speed is slow Therefore Long shutter noise reduction ongoing may be displayed Alth...

Page 101: ...conds F2 8 F8 0 60 1 2000 When the mechanical shutter is used 1 1 16000 When the electronic shutter is used 1 You may not be able to select some values depending on zoom position ZS60 Rotate the control dial to set the aperture value The operation can also be performed by rotating the control ring 51 When you rotate the control ring or control dial an exposure meter is displayed If the correct exp...

Page 102: ...ic shutter is used F2 8 F8 0 ZS60 Rotate the control dial to set the shutter speed The operation can also be performed by rotating the control ring 51 When you rotate the control ring or control dial an exposure meter is displayed If the correct exposure is not achieved the numeric values of the aperture are shown in red Shutter speeds that can be set seconds Aperture value set 4 1 2000 When the m...

Page 103: ...e 60 1 2000 When the mechanical shutter is used 1 1 16000 When the electronic shutter is used 1 You may not be able to select some values depending on zoom position ZS60 Rotate the control dial to set the shutter speed and the aperture value You can switch between the shutter speed setting operation and the aperture value setting operation each time is pressed You can also set the aperture value w...

Page 104: ... We recommend using a tripod or self timer when the shutter speed is slow Optimizing the ISO sensitivity for the shutter speed and aperture value When the ISO sensitivity is set to AUTO the camera sets the ISO sensitivity automatically so that the exposure will be appropriate for the shutter speed and aperture value Depending on recording conditions an appropriate exposure may not be set or the IS...

Page 105: ...vity is set to AUTO ISO sensitivity will change to 125 You cannot use this function when the electronic shutter is used When you take pictures with the shutter speed set to T time we recommend using remote recording 312 with a tripod or smartphone as a remote shutter release in order to prevent jitter When you take still pictures with the shutter speed set to T time the pictures may have higher no...

Page 106: ... displaying the screen at the shutter speed used for the actual recording When the shutter speed is increased the screen is displayed like a frame dropping Use this function to check the effect when you want to capture an image in a scene by stopping the motion for example when you take a picture of water flowing 1 Assign Preview to the function button 70 The following step is an example of assign...

Page 107: ...e Far Depth of field Focus range Shallow narrow Example To take a picture by deliberately blurring the background Deep wide Example To take a picture by adjusting the focus while including the background You can take a picture even when Preview Mode is activated The range in which you can check the effect of a selected shutter speed is between 8 seconds and 1 16000 seconds This mode cannot be used...

Page 108: ...he Manual Exposure Assistance is anything other than when in Manual Exposure Mode For details about the Manual Exposure Assistance refer to 104 1 Assign One Push AE to the function button 70 2 When exposure is not adequate Press the function button Blinks red Exposure meter 60 5 6 4 0 2 8 15 30 125 250 Change to appropriate exposure The exposure meter is not displayed in Creative Control Mode In t...

Page 109: ...s from left to right Horizontal vertical guide line Recording direction and progress status approximate Image size STANDARD Image size WIDE Pan the camera at a constant speed You may not be able to take pictures successfully if you move the camera too quickly or too slowly 4 Press the shutter button fully again to end recording You can also end recording if you stop panning the camera while taking...

Page 110: ...l line of a panorama picture varies depending on the picture size recording direction and number of stitched pictures The maximum number of recording pixels is as follows Image size Recording direction Horizontal Resolution Vertical Resolution STANDARD Horizontal 8176 pixels 1920 pixels Vertical 2560 pixels 7680 pixels WIDE Horizontal 8176 pixels 960 pixels Vertical 1280 pixels 7680 pixels Tips Pa...

Page 111: ...nificantly different from those of the first picture the panorama picture as a whole when all pictures are stitched together may not have consistent focus and brightness Since several pictures are stitched together to create a panorama picture some subjects may be distorted or the joining portions of successively taken pictures that are stitched may be noticeable Shutter Type is fixed to Electroni...

Page 112: ...lide bar 3 Press MENU SET It is also possible to display the selection screen by touching the Recording mode icon in recording screen Depending on the Menu Guide setting in the Custom menu either the selection screen or the recording screen is displayed when the Mode Dial is switched 116 60 8 Switching the scene selection screen display Press the DISP button to switch the display When it is set to...

Page 113: ...cketing by pressing the cursor button on the recording screen 137 138 ZS60 Although White Balance is fixed to AWB for certain types of scenes you can fine tune the White Balance or use White Balance bracketing by pressing MENU SET going to the Rec menu and selecting White Balance 137 138 For the setting procedures for the Scene Guide Mode refer to 112 1 Clear Portrait The more the zoom is drawn to...

Page 114: ...nery 8 Bright Blue Sky 9 Romantic Sunset Glow 10 Vivid Sunset Glow 11 Glistening Water Star filter used in this mode may cause glistening effects on the objects other than water surface 12 Clear Nightscape Tripod self timer recommended The shutter may remain closed after taking the picture This is due to signal processing and is not a malfunction Noise may become visible when you take pictures in ...

Page 115: ...ures in dark places 17 Handheld Night Shot After the shutter button has been pressed do not move the camera during the burst operation The angle of view becomes narrow slightly 18 Clear Night Portrait ZS100 Open the flash Tripod self timer recommended When Clear Night Portrait is selected keep the subject still for about 1 second after taking the picture The shutter may remain closed after taking ...

Page 116: ...t you avoid using the flash 21 Cute Dessert The more the zoom is drawn towards T side and the closer the camera is brought to the subject the greater the effect will be Tripod self timer recommended For close up recording we recommend that you avoid using the flash 22 Freeze Animal Motion Default AF Assist Lamp setting is OFF 164 23 Clear Sports Shot 24 Monochrome Displaying not displaying the sel...

Page 117: ...e picture effects filters by touching the example images 3 Press MENU SET It is also possible to display the selection screen by touching the Recording mode icon in recording screen Depending on the Menu Guide setting in the Custom menu either the selection screen or the recording screen is displayed when the Mode Dial is switched 116 60 Switching the display of a selection screen for applying pic...

Page 118: ... setting conditions such as degree and coloring of an effect of the picture effects according to your preferences 1 Press to display the setting screen 2 ZS100 Rotate the rear dial to adjust the setting conditions of the picture effects ZS60 Rotate the control dial to adjust the setting conditions of the picture effects The settings that can be adjusted vary depending on the selected picture effec...

Page 119: ...loring High Dynamic Vividness Black white Gaudy coloring Cross Process Coloring Greenish coloring Bluish coloring Yellowish coloring Reddish coloring ZS100 Select the desired color tone by rotating the rear dial and press MENU SET ZS60 Select the desired color tone by rotating the control dial and press MENU SET Toy Effect Coloring Orangish coloring Bluish coloring Toy Pop Range in which periphera...

Page 120: ...er Angle of the rays of light Rotate to the left Rotate to the right One Point Color Amount of color retained Leaves a small amount of color Leaves a large amount of color For details about One Point Color 123 Sunshine Coloring Yellowish coloring Reddish coloring Bluish coloring Whitish coloring ZS100 Rotate the rear dial to select coloring and press MENU SET ZS60 Rotate the control dial to select...

Page 121: ...ecording screen Pressing Q MENU button on the blurriness setting screen will cancel the setting 250 125 60 30 15 8 0 5 6 2 8 4 0 This function is not available in the following case Miniature Effect Creative Control Mode Setting brightness exposure 1 Press to display the setting screen Each press of switches between brightness exposure setting operation blur control operation above and operation f...

Page 122: ... area frame On the touch screen spread pinch out your 2 fingers to zoom in and pinch pinch in your 2 fingers to zoom out 61 When you press DISP button the initial setting condition is restored Press MENU SET No audio is recorded for motion pictures When a motion picture is recorded the finished recording will be approximately 1 10th of the actual recorded time period If you record a motion picture...

Page 123: ...hing touch Press to move the center of the light source to a different position The position of the light source can also be moved by touching the screen Tips on positioning the center of the light source You can move the center of the light source to a point outside the image to obtain a more natural finish ZS100 Rotate the rear dial to adjust the size of the light source ZS60 Rotate the control ...

Page 124: ... subject and background set the aperture value to a higher number To record motion pictures with a defocused background set a lower number About the shutter speed To record a sharp motion picture of a fast moving subject set a faster shutter speed To record a motion picture with a trailing effect for a subject s movements set a slower shutter speed When you manually set a faster shutter speed the ...

Page 125: ...icture quality and press MENU SET 240fps VGA Recording is done at 240 frames second with VGA in MP4 The angle of view becomes narrower 120fps HD Recording is done at 120 frames second with HD in MP4 4 Press the motion picture button or shutter button to start recording 5 Press the motion picture button or shutter button to stop recording No sound is recorded Recording stops when the continuous rec...

Page 126: ... of a motion picture Using touch icons allows silent operation while recording motion pictures 1 Set the menu Motion Picture Silent Operation 2 Use to select ON 3 Start recording 4 Touch 5 Touch icon Zoom Aperture value Shutter speed Exposure Compensation ISO sensitivity 6 Drag the slide bar to set The speed of the operation varies depending on the position you touch Changes the setting slowly Cha...

Page 127: ...m To allow recording using the same settings up to 3 sets of current camera settings can be registered using Cust Set Mem Preparations Select the recording mode you wish to register and set the Rec menu Motion Picture menu Setup menu etc 1 Set the menu Custom Cust Set Mem 2 Use to select custom set for registration and press MENU SET The following menu items are not registered as custom settings R...

Page 128: ...ant to use and press MENU SET It is also possible to display the selection screen by touching the Recording mode icon in recording screen 60p The settings are switched to those settings you selected for the custom set 60p Changing the registered content Even if the menu settings are changed temporarily when the mode dial has been set to the currently registered settings will remain unchanged To ch...

Page 129: ...t creates a picture using monochrome shades of gray only such as black and white Scenery Setting that creates a picture using vivid colors for the blue sky and green Portrait Setting that produces the look of a healthy complexion Custom Setting for using colors and picture quality that were registered in advance This setting is not available in Intelligent Auto Plus Mode In Intelligent Auto Plus M...

Page 130: ...oring Subdued coloring Color Tone 1 Bluish coloring Yellowish coloring Filter Effect 2 Yellow Enhances the contrast of a subject Effect Low Records a blue sky clearly Orange Enhances the contrast of a subject Effect Medium Records a blue sky with vibrant colors Red Enhances the contrast of a subject Effect High Records a blue sky with even more vibrant colors Green Applies subdued coloring for the...

Page 131: ...the following cases Creative Video Mode During motion picture recording Toy Effect and Toy Pop also cannot be used when 4K Live Cropping is set When recording 4K photos When recording using Post Focus In Creative Video Mode or when recording motion pictures this item is not available only if the motion picture size is 4K in Rec Quality The following functions are not available in Panorama Shot Mod...

Page 132: ...e camera will take a still picture with the effects applied and then a still picture without the effects After taking the picture Auto Review will display only the still picture with the effects applied This function is not available in the following cases When Filter Effect of Filter Settings is set to OFF Panorama Shot Mode When using Burst When recording 4K photos When using Auto Bracket When r...

Page 133: ...wed areas brighter Custom You can set a custom registration shape 3 Rotate the control ring to adjust the brightness of the highlighted areas and rotate the rear dial to adjust the brightness of the shadowed areas To register your preferred settings press to select the registration target icon Custom 1 Custom 2 and Custom 3 Adjustments can also be made by dragging the graph Highlighted area Shadow...

Page 134: ...the control dial to select the White Balance AWB Automatic adjustment in accordance with the light source Adjust to the color under a clear sky Adjust to the color under a cloudy sky Adjust to the color in the shade Adjust to the color under incandescent lights 1 Adjust to the color that is optimal for taking pictures using the flash 2 2 Use the White Balance value that was set manually 136 Use th...

Page 135: ... to AWB In the Scene Guide Mode settings suitable for each scene are made Auto White Balance When AWB Automatic White Balance is set the coloring is adjusted in accordance with the light source However if the scene is too bright or too dark or if other extreme conditions apply the pictures may appear reddish or bluish The White Balance may not operate correctly if there is a multiple number of lig...

Page 136: ...not be possible to set the correct White Balance if subjects are too bright or too dark In this case adjust the brightness and try to set the White Balance again Setting the White Balance using color temperature You can set the White Balance using color temperature Color temperature is a numeric value that expresses the color of light unit K 2 A picture becomes bluish when the color temperature va...

Page 137: ...osition back to the center 3 Press MENU SET 4 Press MENU SET to finalize the setting You can also press the shutter button halfway to set the White Balance When you perform fine adjustments of the White Balance toward the A amber or B blue side the color of the White Balance icon displayed on the screen will change to the fine tuned color When you perform fine adjustments of the White Balance towa...

Page 138: ... M You can also set the bracket by touching BKT BKT 2 Press MENU SET 3 Press MENU SET to finalize the setting You can also press the shutter button halfway to set the White Balance When the White Balance Bracket is set BKT appears on the White Balance icon ZS100 When the camera is turned off Including Sleep Mode the White Balance Bracket setting is canceled ZS60 When the camera is turned off Inclu...

Page 139: ...he detail of the pictures will appear even when they are printed onto large sheets Rec Picture Size ZS100 Aspect Ratio 4 3 3 2 16 9 1 1 Picture Size L 17 5M 4864 3648 L 20M 5472 3648 L 17M 5472 3080 L 13 5M 3648 3648 M 9M 3456 2592 M 10M 3888 2592 M 8M 3840 2160 M 6 5M 2592 2592 S 4 5M 2432 1824 S 5M 2736 1824 S 2M 1920 1080 S 3 5M 1824 1824 ZS60 Aspect Ratio 4 3 3 2 16 9 1 1 Picture Size L 18M 48...

Page 140: ...ile is also deleted 2 Regardless of the aspect ratio of the picture during recording a RAW still picture is always recorded at the following aspect ratio ZS100 3 2 5472 3648 ZS60 4 3 4896 3672 About RAW file In RAW file format the data is saved without any picture processing by the camera To play back and edit RAW file pictures you must use this unit or dedicated software You can perform advanced ...

Page 141: ...e Photo Style 1 Aspect Ratio Highlight Shadow 1 2 i Dynamic 1 Red Eye Removal 3 i Resolution 1 Diffraction Compensation 3 Color Space 1 2 Rec menu You cannot set to or in the following cases Panorama Shot Mode Handheld Night Shot Scene Guide Mode 1 ZS100 When you use RAW Processing in the Playback menu adjustments are made from the settings at the time of recording Therefore you can output a JPEG ...

Page 142: ...he following case When HDR is set to ON ZS100 When Sensitivity is set to H 16000 H 20000 or H 25600 ZS60 When Sensitivity is set to H 4000 H 5000 or H 6400 Enhancing the impression of high resolution i Resolution Recording mode You can use the camera s Intelligent Resolution technology to record still pictures with sharper outlines and clearer resolution Rec i Resolution Settings HIGH STANDARD LOW...

Page 143: ... adjusts the displacement of pictures caused by jitter etc We recommend using this setting to take pictures with a handheld camera OFF Does not adjust the displacement of pictures We recommend using this setting when you use a tripod ZS100 After the shutter button has been pressed do not move the camera during the burst operation Since a burst of still pictures are combined after they have been re...

Page 144: ...ction ongoing is displayed for the same period as the shutter speed for the signal processing time This function is not available in the following cases During motion picture recording When Burst Rate is set to SH When recording 4K photos When recording using Post Focus When using the electronic shutter Raising the resolution when the aperture is closed Diffraction Compensation Recording mode The ...

Page 145: ...pace sRGB Sets the sRGB color space This setting is widely used for devices such as PCs AdobeRGB Sets the AdobeRGB color space AdobeRGB color space has a wider color reproduction range than sRGB color space Therefore AdobeRGB color space is mainly used for business applications such as commercial printing Select sRGB if you do not have expert knowledge about AdobeRGB color space The setting is fix...

Page 146: ...3 Press the shutter button halfway Two beep sounds are heard and Auto Focus is activated Four beep sounds when focus is not aligned When you take a picture in a dark location is displayed for the focus display and it may take longer to adjust focus than usual ZS100 If the camera detects stars in the night sky after displaying Starlight AF will be activated When focus is achieved the focus indicati...

Page 147: ...the picture is focused while the button is pressed halfway ZS60 If Auto Focus Mode is set to the AF area will be displayed momentarily only the first time the picture is focused while the button is pressed halfway Subjects environments which may make focusing difficult Fast moving or extremely bright objects or objects with no color contrast Taking pictures through glass or near objects emitting l...

Page 148: ...ontinuous In this mode while the shutter button is pressed halfway focusing is constantly performed to match the movement of the subject When the subject is moving the focusing is performed by predicting the subject position at the time of recording Movement prediction When recording using AFF AFC Focusing may take time if the zoom is suddenly changed from max Wide to max Tele or if you suddenly m...

Page 149: ...MENU SET ZS100 If you press when or is selected or touch the screen the AF area setting screen appears 157 159 ZS60 If you press when or is selected or touch the screen the AF area setting screen appears 157 In Intelligent Auto Mode and Intelligent Auto Plus Mode or can be set Auto Focus is fixed to 1 area focusing in the following cases When using the Digital Zoom Miniature Effect Creative Contro...

Page 150: ...nce away as faces within the yellow AF area are also focused Eye used for focusing Changing the eye to be in focus Touch the eye to be used for focusing If you touch a location outside the yellow frame the AF area setting screen will be displayed 157 If you touch or press MENU SET the eye focus setting will be canceled If the yellow frame moves to another face or the frame disappears after you cha...

Page 151: ...turns yellow while the subject is locked To release AF Tracking Touch If AF Lock fails a red frame flashes for a while and then turns off Retry the locking operation When you set Metering Mode to Multi Metering the camera adjusts the exposure using a locked subject 183 Under certain recording conditions such as when the subject is small or dark may not operate correctly When does not work focus wi...

Page 152: ...and brightness exposure Taking pictures with Auto Focus Subject not centered in picture 49 area focusing Focuses on the subject in the wide range area up to 49 area focusing on the recording screen You can select the focusing area 158 ...

Page 153: ...2 Select a Custom Multi icon etc and press When you press the AF area setting screen appears Current AF area shape 3 Use to select the setting item Horizontal Pattern Horizontal line shape Ideal shape for panning etc Vertical Pattern Vertical line shape Ideal shape for recording structures etc Central Pattern Shape distributed over the center Ideal shape for focusing around the center Custom You c...

Page 154: ...SET to set repeat If you press MENU SET again the setting will be canceled To cancel all the settings press the DISP button With touch screen operations Touch the parts you want to set as AF areas If you touch one of the selected AF areas the selection of the area will be canceled 6 Press Fn2 button Registering the set AF area in and Custom Press on the screen of step 4 on 153 Use to select the re...

Page 155: ...ocus is not aligned flashing AF area When focus is aligned green 1 Adjust focus according to subject Align the AF area with the subject Hold down halfway 2 Return to desired composition Press fully ZS100 Pinpoint focusing Enables more precise focusing on a smaller point than 1 area focusing You can set the focus position using the enlarged screen 159 When you press the shutter button halfway an en...

Page 156: ...rea Custom Direct Focus Area ON OFF ZS100 When or is selected you can move the AF area and when is selected you can move the enlarged position ZS60 When or is selected you can move the AF area Use the Quick menu 68 to set functions to be assigned to the cursor button such as Drive mode and Exposure Compensation When you set Metering Mode 183 to spot focusing the metering target will move along wit...

Page 157: ...ove the position of the AF area Pinch out Pinch in Enlarges reduces the AF area in small steps ZS100 Enlarges reduces the AF area in large steps ZS60 DISP Reset Resets the AF area back to the center If you press the button again the frame size will be reset to the initial setting If you set the AF area to an eye in the yellow frame when is selected the eye to be used for focusing will be changed P...

Page 158: ...isting of 9 points each 6 points or 4 points for the groups located at the edges of the screen Examples of group Set the menu Rec AF Mode Select and press The AF area setting screen appears Press to select an AF area group You can also select a group by touching the screen Press MENU SET Only the indications center points of the selected group remain on the screen Setting of the AF area is cleared...

Page 159: ...splayed by touching the subject Move to the focus position with Operation Touch operation Description Touch Moves Pinch in Pinch out Enlarges reduces the AF area in small steps Enlarges reduces the AF area in large steps Switches the enlarged display windowed full screen DISP Reset Resets back to the center The image of a part of the screen can be enlarged or reduced approximately 3 to 6 times The...

Page 160: ...m Pinpoint AF Display FULL Enlarges the assist screen using the entire screen PIP Enlarges the assist screen on part of the screen The display of the assist screen can also be switched by touching ZS100 Setting the timeout for the enlarged display Custom Pinpoint AF Time LONG approx 1 5 seconds MID approx 1 0 second SHORT approx 0 5 seconds ...

Page 161: ...hing a desired position on the touch pad OFFSET Moves the AF area of the viewfinder according to the distance you drag the touch pad 61 OFF Press the shutter button halfway to determine the focus position If you press the DISP button before determining the focus position the focus position returns to the center To cancel the settings for the AF area when the Auto Focus Mode 149 is set to Face Eye ...

Page 162: ...set 3 Touch Set The AF area with the same function as is displayed on the touched position If you touch the Metering Mode returns to the original setting and the brightness optimization position is canceled The AF area setting is also canceled If you touch the Metering Mode returns to the original setting and the brightness optimization position is canceled When the background has become too brigh...

Page 163: ...use the AF AE LOCK button instead of the shutter button to focus on a subject 1 Set the menu Custom Shutter AF OFF Custom AF AE Lock AF ON 2 Press the AF AE LOCK button The camera focuses on a subject 3 2 3 Press the shutter button to take a picture The camera takes a picture by adjusting the exposure Enabling disabling pre adjustment of focus Custom Quick AF ON OFF The focus is automatically adju...

Page 164: ...ses Distinct Scenery Bright Blue Sky Romantic Sunset Glow Vivid Sunset Glow Glistening Water Clear Nightscape Cool Night Sky Warm Glowing Nightscape Artistic Nightscape Handheld Night Shot Scene Guide Mode When Silent Mode is set to ON Enabling disabling recording when a subject is out of focus Custom Focus Release Priority FOCUS Recording is disabled unless the focusing is performed properly RELE...

Page 165: ...s of a subject as close as ZS100 5 cm 0 16 feet ZS60 3 cm 0 098 feet from the lens by rotating the zoom lever upmost to Wide 1x Macro Zoom Use this setting to get close to the subject and then further enlarge when taking the picture You can take a picture with the Digital Zoom up to 3x while maintaining the distance to the subject for the extreme Wide position ZS100 5 cm 0 16 feet ZS60 3 cm 0 098 ...

Page 166: ...us range depth of field is significantly narrowed Therefore if the distance between the camera and the subject is changed after focusing on the subject it may become difficult to focus on it again Resolution may be slightly reduced around the edges of the picture This is not a malfunction Cannot set to Macro Zoom in the following cases Handheld Night Shot Scene Guide Mode Panorama Shot Mode During...

Page 167: ... and press MENU SET 3 Touch the screen twice set the focus position with and press MENU SET The screen changes to the assist screen and an enlarged display appears MF Assist You can also enlarge the area by pinching out 61 the screen You can also adjust the focus position by dragging 61 the screen If you press DISP button the area to be enlarged will be reset to the center If you turn the control ...

Page 168: ...ol ring to adjust focus Turning the control ring to the right Focusing on a nearby subject Turning the control ring to the left Focusing on a distant subject ZS100 ZS60 Color is added to the portions of the image that are in focus Peaking 172 About the MF Guide 171 MF Assist Enlarged screen Peaking MF Guide ...

Page 169: ... use the HDMI output during recording the screen cannot be enlarged in windowed mode Changing the MF Assist display Custom MF Assist Display FULL Enlarges the assist screen using the entire screen PIP Enlarges the assist screen on part of the screen The display of the assist screen can also be switched by touching 5 Press the shutter button halfway The assist screen will close The recording screen...

Page 170: ...center of the frame When Auto Focus is activated on the MF Assist screen the camera will adjust the focus at the center of the MF Assist screen Auto Focus also works with the following operations ZS100 Pressing the AF AE LOCK button to which AF ON is assigned 173 Pressing the function button to which AF ON is assigned Dragging the monitor and releasing your finger at the position you want to focus...

Page 171: ...y subject is to be recorded 166 Setting the display method of MF Assist Custom MF Assist ON OFF When MF Assist is set to ON in the Custom menu and you perform the Manual Focus operation an enlarged display of the MF area the position to be focused on appears Shortly after you stop operating Manual Focus the display switches to normal Enabling disabling MF Guide display Custom MF Guide ON OFF When ...

Page 172: ...Peaking Settings Changing the Detect Level setting also changes the Display Color setting as follows Detect Level HIGH LOW Display Color Light blue Blue Yellow Orange Yellow Green Green Pink Red White Gray When Peaking is set to ON Detect Level HIGH or Detect Level LOW will be displayed Each time in is touched the setting is switched in order of ON Detect Level LOW ON Detect Level HIGH OFF When Fn...

Page 173: ...e you press and hold the AF AE LOCK button move the camera to compose the picture you want to take and fully press the shutter button When AE LOCK is set press the shutter button halfway to focus then press it fully Exposure is locked AE Lock 60p Setting the function of the AF AE LOCK button Custom AF AE Lock AE LOCK Locks exposure only AEL aperture value and shutter speed are displayed when the c...

Page 174: ...us and or exposure AF AE Lock AF Lock only is effective in the following case Manual Exposure Mode During Manual Focus only AE Lock can be used The subject can be focused again by pressing the shutter button halfway even when AE is locked Program Shift can be set even when AE is locked ZS100 ...

Page 175: ...nceled 3 While you press and hold the function button move the camera to compose the picture you want to take and fully press the shutter button When AE LOCK is set press the shutter button halfway to focus then press it fully Setting the function of the function button where AF AE LOCK is registered Custom AF AE Lock AE LOCK Locks exposure only AEL aperture value and shutter speed are displayed w...

Page 176: ...us and or exposure AF AE Lock AF Lock only is effective in the following case Manual Exposure Mode During Manual Focus only AE Lock can be used The subject can be focused again by pressing the shutter button halfway even when AE is locked Program Shift can be set even when AE is locked ZS60 ...

Page 177: ...o dark or too bright 1 Press button ZS100 ZS60 Exposure compensation value 2 ZS100 Rotate the rear dial to compensate the exposure ZS60 Rotate the control dial to compensate the exposure Under exposed Optimum exposure Over exposed Adjust the exposure to the direction Adjust the exposure to the direction ZS100 ZS60 Adjust the exposure to the direction Adjust the exposure to the direction ...

Page 178: ...t the exposure compensation value in the range between 5 EV and 5 EV Settings can be made within a range of 3 EV to 3 EV while recording motion pictures recording 4K photos or recording in Post Focus Depending on the brightness this may not be possible in some cases The set Exposure Compensation value is stored even if the camera is turned off When Exposure Comp Reset 85 is set to OFF ...

Page 179: ... brightness of a subject Intelligent ISO ISO sensitivity is automatically set in a range up to 3200 ZS60 with the flash on 1600 1 depending on the movement and brightness of a subject The shutter speed is not fixed when the shutter button is pressed halfway It is continuously changing to match the movement of the subject until the shutter button is pressed fully ZS100 80 2 100 2 125 200 400 800 16...

Page 180: ...ed Bright outdoors Dark Shutter speed Slow Fast Interference Low High Subject blur High Low For details on the available flash range used when the ISO sensitivity is set to AUTO refer to 242 Cannot select in the following cases Shutter Priority AE Mode Manual Exposure Mode When recording using Post Focus ZS100 When Multi Exp is set the maximum setting is 3200 You can use the following settings in ...

Page 181: ...ape Handheld Night Shot Scene Guide Mode During motion picture recording Setting the incremental value of ISO Sensitivity Recording mode You can change the setting to increase ISO sensitivity by 1 EV or 1 3 EV Rec ISO Increments 1 3EV ZS100 L 80 L 100 125 160 200 250 320 400 500 640 800 1000 1250 1600 2000 2500 3200 4000 5000 6400 8000 10000 12800 H 16000 H 20000 H 25600 ZS60 80 100 125 160 200 25...

Page 182: ...ting the ISO Sensitivity Extending the ISO Sensitivity setting Recording mode You can extend the numeric values that can be set for ISO Sensitivity Rec Extended ISO Settings ON OFF The setting cannot be made during 4K photo recording or recording in Post Focus ...

Page 183: ...brightness Rec Metering Mode Metering Mode Brightness measurement position Conditions Multiple Whole screen Normal usage produces balanced pictures Center weighted Center and surrounding area Subject in center Spot Center of spot metering target Great difference between brightness of subject and background e g person in spotlight on stage backlighting ...

Page 184: ...e pictures The picture is complete To record pictures use a UHS Speed Class 3 card 37 When recording 4K photos the angle of view becomes narrower 1 Press button The same operation can be performed by pressing the button using to select a 4K photo icon etc and pressing 201 ZS100 ZS60 2 Press to select the recording method and press MENU SET The recording method can also be set from 4K PHOTO in the ...

Page 185: ...dren Burst recording starts when the shutter button is pressed and stops when pressed again Start and stop tones will be heard Start First Stop Second Recording is performed Continuous recording length Up to 15 minutes Audio recording Available 4K Pre Burst 189 For recording as needed whenever a photo opportunity arises e g the moment when a ball is thrown Burst recording is performed for approxim...

Page 186: ...7 it is recommended to use a tripod or use a smartphone instead of the shutter and do remote recording 312 to control camera shaking To cancel the 4K Photo functions In step 2 select The operation can be canceled by pressing the button and then selecting Single or Battery drainage and camera temperature If the surrounding temperature is high or 4K photos are recorded continuously or the temperatur...

Page 187: ...le recording Focus will be adjusted continuously For information on how to select and save pictures from recorded 4K burst files refer to 190 Recording stops when the continuous recording time exceeds 15 minutes When you are using an SDHC memory card you can continue recording without interruption even if the file exceeds 4 GB but the motion picture file will be recorded and played back in separat...

Page 188: ...cording you can add a marker Up to 40 markers for each recording When selecting and saving pictures from a 4K burst file you can skip to the positions where you added markers For information on how to select and save pictures from recorded 4K burst files refer to 190 Recording stops when the continuous recording time exceeds 15 minutes When you are using an SDHC memory card you can continue record...

Page 189: ...essed Recording tips Focus and exposure Auto Focus adjusts focus continuously and except in Manual Exposure Mode it also adjusts exposure continuously Focus cannot be adjusted at the desired timing by pressing the shutter button halfway or operating other controls In situations where you want to lock focus and exposure such as when the subject is not at the center use AF AE LOCK 173 175 For inform...

Page 190: ...t or 4K Burst S S 1 Select a 4K burst file on the playback screen and press is displayed on a 4K burst file The same operation can be performed by touching The slide view screen for selecting pictures will be displayed It takes a few seconds until the screen is displayed 2 Touch and drag the frames to select the frame you want to save as a picture You can also perform the same operation by pressin...

Page 191: ... the frames that are currently displayed in slide view Pressing the same button again will display the frames following the next ones or the ones preceding the previous ones Touch Drag Selects the frames to be displayed Frames preceding and following the selected frame will be displayed in slide view Pinch out Pinch in Enlarges reduces the display Drag Moves the enlarged area during enlarged displ...

Page 192: ...the 4K burst file Press Fn1 button again to return to the original operation Operation Touch operation Description Moves to the next marker Moves to the previous marker When you have selected frames that are not currently displayed in slide view such as when you have selected or it may take a few seconds until the slide view frames are displayed ...

Page 193: ...Fast forward playback Single frame forward while paused ZS60 Fast rewind playback Single frame rewind while paused Touch Drag Selects the frames to be displayed while paused Pinch out Pinch in Enlarges reduces the display while paused Drag Moves the enlarged area during enlarged display Fn2 Displays the slide view screen while paused Fn1 Switches to marker operation 4K Burst S S only MENU SET Save...

Page 194: ...selecting pictures will be displayed It takes a few seconds until the screen is displayed 2 Touch and drag the frames to select the frame you want to save as a picture You can also perform the same operation by pressing Operation Touch operation Description ZS100 Touch Drag Selects a frame ZS60 Pinch out Pinch in Enlarges reduces the display Drag Moves the enlarged area during enlarged display MEN...

Page 195: ... the SD card to a 4K compatible TV with an SD card slot you cannot play back 4K burst files recorded with Aspect Ratio set to an option other than 16 9 To play them back connect the camera and a 4K compatible TV with an HDMI micro cable As of January 2016 If you display the playback screen when the camera contains many picture files the acquiring information icon or may be displayed for a long tim...

Page 196: ...which may increase the noise on the screen Shutter sound for 4K photo recording When using 4K Burst or 4K Pre Burst recording is performed with the electronic shutter You can change the electronic shutter sound settings in Shutter Vol and Shutter Tone 78 When recording with 4K Burst S S you can set the start stop tone volume in Beep Volume You can perform high speed burst recording quietly using t...

Page 197: ...3840 2160 1 1 2880 2880 Quality Shutter Type ESHTR Rec Format MP4 Rec Quality 4K 100M 30p Continuous AF ON Settings in the Motion Picture menu are not applied to 4K burst files recorded with the 4K Photo function The following limitations apply to the recording functions indicated below 4K Burst 4K Burst S S 4K Pre Burst Program Shift Exposure compensation 3 EV to 3 EV Shutter speed 1 30 to 1 1600...

Page 198: ...cord w o filter is not available It is not possible to use the HDMI output When recording using the 4K Pre Burst function Step Zoom does not operate Scene Detection in Intelligent Auto Mode works the same way as when recording motion pictures The 4K Photo function is disabled when using the following settings Clear in Backlight Glistening Water Artistic Nightscape Glittering Illuminations Handheld...

Page 199: ... Electronic shutter sound 4 1 This setting is available only in Manual Exposure Mode 103 2 Varies depending on the setting of ISO sensitivity 179 3 You cannot turn off the mechanical shutter sound 4 You can use Shutter Vol and Shutter Tone to adjust the volume of the electronic shutter sound 78 1 Set the menu Rec Shutter Type AUTO The shutter mode automatically switches based on the recording cond...

Page 200: ...otos When recording using Post Focus When Silent Mode is set to ON If you take a picture of a moving subject using the electronic shutter the subject in the picture may be skewed in some cases When you take a picture under a fluorescent or LED lighting fixture using the electronic shutter the recorded picture may have horizontal stripes If you use a slower shutter speed the horizontal stripes may ...

Page 201: ...while the shutter button is pressed 4K PHOTO 184 When the shutter button is pressed a 4K photo is recorded Auto Bracket 206 When the shutter button is pressed the pictures are recorded with different exposure settings based on the Exposure Compensation range Self Timer 208 When the shutter button is pressed recording takes place after the set time has elapsed Cannot be set when using Intelligent A...

Page 202: ...r as a single burst group 275 1 Press button 2 Press to select an item etc and press 3 Press to select the burst speed and press MENU SET ZS100 SH Super high speed 1 H High speed M Middle speed L Low speed Speed pictures sec AFS 50 10 6 2 AFF AFC 6 6 2 Live View during burst recording None None Available Available Number of recordable pictures 2 With RAW files 12 3 Without RAW files 60 Depends on ...

Page 203: ...tions and the type and or status of the card used 3 Pictures can be taken until the card becomes full However the burst speed will become slower halfway through the recording The exact time when the slower burst speed will start depends on the settings of the aspect ratio picture size and quality as well as the type of card used The burst speed may become slower depending on the following settings...

Page 204: ...ly AFS AFF AFC Focus Release Priority Focus AFS FOCUS At the first picture RELEASE AFF AFC 1 FOCUS Normal focusing 2 RELEASE Predicted focusing 3 1 Focus is fixed in the first picture when dark subjects are recorded or the burst speed is set to SH 2 Since the camera records a burst of pictures while it adjusts the focus the burst speed may be slower 3 The camera predicts the focus within a possibl...

Page 205: ...nding on the usage conditions It may take a while to store still pictures that were taken using the burst function If you continue to record while storing the number of burst pictures that can be taken will be reduced A high speed card is recommended when recording using the burst function This function is not available in the following cases Glistening Water Glittering Illuminations Handheld Nigh...

Page 206: ...lect an item etc and press 3 Press to select the compensation range and press MENU SET ZS60 You can also set the amount of compensation by going to the Rec menu and choosing Auto Bracket 4 Focus on the subject and take a picture If you press and hold the shutter button a burst of pictures can be recorded The display of Auto Bracket flashes until all of the burst pictures you have set are recorded ...

Page 207: ...s 7 2 3 7 pictures 7 1 7 pictures Sequence 0 0 When you take pictures using Auto Bracket after performing Exposure Compensation the camera will take pictures using the corrected exposure value as a reference This function is not available in the following cases Glistening Water Glittering Illuminations Handheld Night Shot Soft Image of a Flower Scene Guide Mode Rough Monochrome Silky Monochrome Mi...

Page 208: ...imer to 2 seconds 1 Press button 2 Press to select an item etc and press 3 Press to select the self timer operation setting and press MENU SET The shutter is activated after 10 seconds The shutter is activated after 10 seconds and three pictures are taken at intervals of approximately 2 seconds The shutter is activated after 2 seconds You can also set the time for the self timer using Self Timer i...

Page 209: ...timer by turning off the camera When Self Timer Auto Off 85 is set to ON If you take a picture with a flash when is set the flash output may not be stable in some cases It cannot be set to in the following cases When White Balance Bracket is set When recording using Post Focus ZS100 During T Time recording ZS100 When Multi Exp is set When Simultaneous record w o filter of Filter Settings is set to...

Page 210: ...d focus point Finished picture has the desired focus point To record pictures use a UHS Speed Class 3 card 37 During recording the angle of view will be narrower Recording using Post Focus 1 Press button Post Focus icon 2 Press to select ON and press MENU SET It can also be set by going to the Rec menu and selecting ON for Post Focus 3 Determine the composition and press the shutter button halfway...

Page 211: ...ost focus To learn how to save pictures from images recorded using Post Focus refer to 214 Canceling Post Focus Select OFF in step 2 You can also cancel the Post Focus by selecting OFF of Post Focus in Rec menu About camera temperature If the surrounding temperature is high or Post Focus recording is performed continuously or the temperature of the camera rises may be displayed and recording may b...

Page 212: ...eration White Balance White Balance Bracket ISO sensitivity ZS100 AUTO 125 to 6400 ZS60 AUTO 80 to 3200 Flash Motion picture recording Drive Mode Single Self Timer or The following menu items are disabled Rec Picture Size Quality AF Mode AFS AFF AFC iHandheld Night Shot iHDR HDR Panorama Settings Shutter Type Flash 1 Flash Adjust 2 Extended ISO Long Shtr NR 1 Digital Zoom Color Space 1 Face Recog ...

Page 213: ...ible to use the HDMI output Scene Detection in Intelligent Auto Mode works the same way as when recording motion pictures The Post Focus function is disabled when using the following settings Clear in Backlight Glistening Water Artistic Nightscape Glittering Illuminations Handheld Night Shot Clear Night Portrait Soft Image of a Flower Scene Guide Mode Rough Monochrome Silky Monochrome Miniature Ef...

Page 214: ...elected point a red frame will be displayed and pictures cannot be saved The edge of the screen cannot be selected To make slight adjustments to focus refer to 215 Operation Touch operation Description ZS100 Touch Select focus point No selection can be made while display is enlarged ZS60 Enlarge display Shrink display when in enlarged display Fn2 Highlight in focus portion with color peaking 215 M...

Page 215: ...icture can be enlarged 2 Drag the slide bar to make fine adjustments to focus The same operation can be performed using 3 Touch to save the picture The screen returns to step 1 Highlight in focus portion with color peaking You can check the degree of focus by setting the detection level for the in focus portion and highlighting it with color 1 Touch Each time the icon is touched the setting is swi...

Page 216: ...n Start Time Set Set the time to start recording Any time up to 23 hours 59 minutes ahead can be set Press to select the item hour and or minute and to set the start time and press MENU SET Shooting Interval Image Count The recording interval and the number of pictures can be set Select the item minute second number of pictures Setting MENU SET Set You can set the interval from 1 second to 99 minu...

Page 217: ...pause or stop the recording Displays a selection screen that lets you resume or stop the recording during pause 5 Select the motion picture creation method Rec Format MP4 Rec Quality Sets the picture quality of the motion picture 4K 30p 4K 24p 1 FHD 60p FHD 30p HD 30p VGA 30p 1 ZS100 Frame Rate Set the number of frames per second When you set a higher number you can create a more seamless animatio...

Page 218: ...ro cable or USB connection cable during Time Lapse Shot recording When you select the picture quality for an aspect ratio that is different from the original picture the picture will be displayed with a black band on the upper lower side or the left right side of a stop motion animation If the power supply is cut off due to a power outage or AC adaptor disconnection while a motion picture is being...

Page 219: ...ject is moving To create stop motion animation using this camera it is necessary to record 1 to 60 frames of still pictures for every 1 second of motion picture To produce smooth movement of the subject record the motion using as many frames as possible and set a higher number of frames per second frame rate when you create a stop motion animation 1 Set the menu Rec Stop Motion Animation 2 Press t...

Page 220: ...ure select Yes How to create stop motion animation effectively Up to two previously recorded pictures are displayed on the recording screen Check this screen as a guideline for determining the amount of required motion You can press the Playback button to check the recorded pictures Press the Q MENU button to delete unnecessary pictures To return to the recording screen press the Playback button a...

Page 221: ...ith FHD 60p setting ZS100 You can set the number of frames to 24fps 12fps 8fps 6fps 4 8fps 2 4fps or 1fps when Rec Quality is set to 4K 24p Sequence NORMAL Stitches the still pictures in the recording sequence REVERSE Stitches the still pictures in the reverse order of recording 9 Press to select OK and press MENU SET You can also create a stop motion animation using Stop Motion Video in the Playb...

Page 222: ...picture quality setting of 4K 30p or 4K 24p recording times are limited to 29 minutes and 59 seconds ZS60 When creating motion pictures at a picture quality setting of 4K 30p recording times are limited to 29 minutes and 59 seconds If using an SDHC Memory Card you will not be able to create motion pictures with a file size greater than 4 GB With an SDXC Memory Card you can create motion pictures w...

Page 223: ... the shutter button halfway to proceed to the next recording Press to select the item and press MENU SET You can perform the following operations Next Proceed to the next recording Retake Delete the result of the last shot and take another picture Exit Exit Multi Exposure and save the picture that was taken Next Retake Exit 4 Record the second third and fourth pictures When you press Fn1 button wh...

Page 224: ...To overlay the pictures on the RAW file picture in a card Set Overlay to ON on the screen in step 2 of Performing multiple exposures for a single picture 223 After selecting Start the pictures on a card will be displayed Select the RAW file pictures and press MENU SET to continue recording You can perform Overlay on RAW file pictures recorded using this camera only Pictures are not saved in memory...

Page 225: ...ons are fixed Shutter Type ESHTR Flash Forced Flash Off AF Assist Lamp OFF Beep Volume Off Shutter Vol Off Even when this mode is set to ON the following lamps indicators will light or flash Self timer indicator Wi Fi connection lamp The operation sounds of this camera such as the lens aperture sound are not muted If you take a picture of a moving subject using the electronic shutter the subject i...

Page 226: ...nly pictures of the selected registered people are played back Category Play Face Recog functions only when Auto Focus mode is set to Only the first picture of the burst recording will contain Face Recognition information The name of the person recognized in the first picture is displayed in the case of group pictures Face Recognition may take more time to select and recognize distinctive facial f...

Page 227: ...e eyes and eyebrows are not hidden by hair Make sure there are no heavy shadows on the face During registration the flash is not used Good example for registering a face If the camera seems to have difficulty recognizing faces when recording Register additional pictures of the same person s face indoors and outdoors or with different expressions or angles Register additional pictures at the place ...

Page 228: ... cursor button operation Just press MENU SET to register an additional face picture When a registered face picture is selected with cursor button a screen to confirm deletion is displayed Select Yes to delete the face picture Record the picture step 3 227 Editing or deleting information about registered persons 1 Use to select MEMORY and press MENU SET 2 Use to select the picture of the person to ...

Page 229: ...e to select SET and press MENU SET Age Use to select year month and day set with and press MENU SET Name See Entering Text 87 Use to select Exit and press MENU SET to finish Canceling the display of the name and age in months years Select OFF in step Name and Age print settings can be made on your computer using PHOTOfunSTUDIO software which you download from a website 353 Text may also be stamped...

Page 230: ...ness to be displayed for each zebra pattern Zebra 1 Zebra 2 1 Use to select the brightness and press MENU SET The range of brightness you can select from is 50 to 105 The OFF setting is available for Zebra 2 When 100 or 105 is selected only the overexposed areas are displayed with the zebra pattern When a smaller numeric value is set the range of brightness to be displayed by each zebra pattern wi...

Page 231: ...rome Live View Recording mode You can display the recording screen in black and white This function is useful when a black and white screen will make it easier to adjust focus in Manual Focus mode Custom Monochrome Live View Settings ON OFF ZS100 Even if you use the HDMI output during recording this function will not work for the connected device This does not affect recorded pictures ...

Page 232: ...ed and cause faulty operation Also do not insert into the wrong socket Doing so may cause damage to this unit HDMI socket To HDMI video audio input socket HDMI micro cable Use a High Speed HDMI micro cable with the HDMI logo Cables that do not comply with the HDMI standards will not work High Speed HDMI micro cable Type D Type A plug up to 2 m 6 6 feet long Switching the information displayed You ...

Page 233: ...9 An electronic sound or shutter sound will not sound If you set up a Wi Fi connection while using the HDMI output no image will be displayed on the camera monitor The scene selection screen in Scene Guide Mode is not output through the HDMI connection This function is not available in the following cases During motion picture recording During panorama picture recording When recording 4K photos Wh...

Page 234: ...ct going in a specific direction We recommend using the Viewfinder OFF Stabilizer does not work To prevent jitter If a warning is displayed about jitter use Stabilizer a tripod or Self Timer Shutter speed will be slower particularly in the following cases Keep the camera still from the moment the shutter button is pressed until the picture appears on the screen We recommend using a tripod 60p Slow...

Page 235: ...may be weaker compared to other picture quality settings ZS100 The 5 axis Hybrid Image Stabilizer function is not available when recording motion pictures for which Rec Quality is set to either 4K 100M 30p or 4K 100M 24p ZS60 The 5 axis Hybrid Image Stabilizer function is not available when recording motion pictures for which Rec Quality is set to 4K 100M 30p Cases where the stabilizer function ma...

Page 236: ...n Picture Size 139 Extended optical zoom allows you to zoom in using a higher zoom ratio than Optical Zoom without degrading the picture quality The maximum zoom ratio varies depending on the picture size Maximum magnification ZS100 20x ZS60 61 2x This function is not available in the following cases Toy Effect Toy Pop Creative Control Mode Handheld Night Shot Scene Guide Mode When recording 4K ph...

Page 237: ...er than the original zoom ratio with limited deterioration of picture quality Rec Motion Picture i Zoom ON OFF This function is not available in the following cases Impressive Art Toy Effect Toy Pop Creative Control Mode Handheld Night Shot Scene Guide Mode During Macro Zoom recording When Burst Rate is set to SH When HDR is set to ON ZS100 When Multi Exp is set When iHandheld Night Shot is set to...

Page 238: ...a is largely displayed at the center in the Digital Zoom range This function is not available in the following cases Impressive Art Toy Effect Toy Pop Miniature Effect Creative Control Mode Handheld Night Shot Scene Guide Mode When recording using Post Focus When recording with High Speed Video When Burst Rate is set to SH When HDR is set to ON ZS100 When Multi Exp is set When Quality is set to or...

Page 239: ...is operated the zoom stops at the position for one of the preset focal lengths This setting does not work when recording motion pictures or 4K photos with 4K Pre Burst Focus range Current zoom position The zoom or step zoom setting can be assigned to the control ring 74 75 Retaining not retaining the zoom position when the camera is turned off Custom Zoom Resume ON OFF ...

Page 240: ...gging the slide bar The zoom speed varies depending on the touched position Slow zooming Fast zooming Touch again to end touch zoom operations When the zoom operation of the Zoom lever is set to Step Zoom 239 a slide bar for step zoom appears This function is not available in the following cases When High Speed Video is set When recording 4K photos When recording using Post Focus ...

Page 241: ...object when you close the flash Forcibly closing the flash can damage the camera Be sure to close the built in flash when not in use The flash setting is fixed to while the flash is closed ZS60 Use Do not use flash You can record with flash as appropriate to the recording mode Setting the way the flash works 244 If you do not wish to use flash press the button and select Forced Flash Off The flash...

Page 242: ...cture may become slightly dark if using flash at short distances without using zoom close to max Wide This may be remedied by using a little zoom Max Wide Max Tele ZS100 Approx 0 6 m 8 0 m 2 0 feet 26 feet Approx 0 7 m 3 8 m 2 3 feet 12 feet ZS60 Approx 0 6 m 5 6 m 2 0 feet 18 feet Approx 2 0 m 2 9 m 6 6 feet 9 5 feet These ranges are obtained the ISO sensitivity is set to AUTO and ISO Limit Set i...

Page 243: ...ainst a dark background landscape this feature will slow the shutter speed when the flash is activated Ideal for taking pictures of people against a nightscape Using a slower speed can cause motion blur We recommend using a tripod Two flashes will be emitted Do not move until after the second flash Interval between flashes varies according to brightness of subject The red eye reduction effect vari...

Page 244: ...ubjects against a nightscape by decreasing the shutter speed when firing a flash Ideal for taking pictures of people against a nightscape Using a slower speed can cause motion blur We recommend using a tripod Forced Flash Off The flash is not activated in any recording conditions Use this when you take pictures in places where the use of the flash is not permitted 1 This can be set only in Intelli...

Page 245: ...ng with flash red eye reduction ZS60 Automatically detects red eye and corrects still picture data when recording with flash red eye reduction or Rec Red Eye Removal Settings ON OFF ZS100 When this function is set to ON the flash icon changes to ZS60 When this function is set to ON the flash icon changes to Depending on the circumstance it may not be possible to correct red eye ...

Page 246: ...lear in Backlight Relaxing Tone Sweet Child s Face Distinct Scenery Bright Blue Sky Romantic Sunset Glow Vivid Sunset Glow Glistening Water Clear Nightscape Cool Night Sky Warm Glowing Nightscape Artistic Nightscape Glittering Illuminations Handheld Night Shot Clear Night Portrait Soft Image of a Flower Appetizing Food Cute Dessert Freeze Animal Motion Clear Sports Shot Monochrome The display will...

Page 247: ...it Softness Clear in Backlight 2 Relaxing Tone Sweet Child s Face 4 Distinct Scenery Bright Blue Sky Romantic Sunset Glow Vivid Sunset Glow Glistening Water Clear Nightscape Cool Night Sky Warm Glowing Nightscape Artistic Nightscape Glittering Illuminations Handheld Night Shot Clear Night Portrait Soft Image of a Flower 3 Appetizing Food 3 Cute Dessert 3 Freeze Animal Motion 3 Clear Sports Shot 3 ...

Page 248: ...d seconds 1 1 16000 60 3 1 16000 1 ZS60 2 ZS100 The shutter speed is set to 60 seconds in Shutter Priority AE Mode and to T Time in Manual Exposure Mode ZS60 The shutter speed is set to 4 seconds in Shutter Priority AE Mode 3 ZS100 The shutter speed is set to T Time in Manual Exposure Mode In Intelligent Auto Mode or the shutter speed changes depending on the detected scene ...

Page 249: ...er speed 1 Set the menu Rec Flash Flash Synchro 2 Press to select the setting item and press MENU SET 1ST 1st curtain sync is the normal recording method when using the flash 2ND The light source is captured in back of the subject and this produces a picture that is vibrant and lively If you set to 2ND 2nd will be displayed in the flash icon on the screen When a fast shutter speed is set the Flash...

Page 250: ...taken using the flash is too bright or too dark 1 Set the menu ZS100 Rec Flash Flash Adjust ZS60 Rec Flash Adjust 2 Press to set the flash output and press MENU SET Settings 2 EV to 2 EV unit 1 3 EV When you do not want to adjust the intensity of the flash select 0 EV When the intensity of the flash is adjusted or is displayed on the flash icon ...

Page 251: ...re button after pressing it While you are recording motion pictures the recording status indicator red will flash With recording in a quiet environment the sound of aperture focus and other actions may be recorded in motion pictures This is not a malfunction The focus operation during recording of motion pictures can be set to OFF in Continuous AF 257 If some information is no longer displayed on ...

Page 252: ...rting to record a motion picture When you set Rec Area to the angle of view setting used for recording motion pictures is displayed Rec Area is not available for 4K photo recording or recording in Post Focus About operation sound when recording ends If the operation sound of the motion picture button pressed to end recording bothers you try the following Record the motion picture about three secon...

Page 253: ...abled It is recommended to use a fully charged battery or an AC adaptor optional and DC coupler optional when recording motion pictures If while recording motion pictures using the AC adaptor optional and the power supply is cut off due to a power outage or if the AC adaptor is disconnected etc the motion picture being recorded will not be recorded The below mentioned motion picture recording mode...

Page 254: ...ding 41 To record motion pictures in 4K Select the recording mode 49 Set the Rec Format in the Motion Picture menu to MP4 255 ZS100 Set Rec Quality in the Motion Picture menu to 4K 100M 30p or 4K 100M 24p 255 ZS60 Set Rec Quality in the Motion Picture menu to 4K 100M 30p 255 Start recording by pressing the motion picture button Stop the recording by pressing the motion picture button again Recordi...

Page 255: ...en AVCHD is selected Rec Quality Picture size Recording frame rate Sensor output Bit rate FHD 28M 60p 1 1920 1080 60p 60 fps Approx 28 Mbps FHD 17M 60i 1920 1080 60i 60 fps Approx 17 Mbps FHD 24M 30p 1920 1080 60i 30 fps Approx 24 Mbps FHD 24M 24p 2 1920 1080 24p 24 fps Approx 24 Mbps When MP4 is selected Rec Quality Picture size Recording frame rate Sensor output Bit rate 4K 100M 30p 3840 2160 30...

Page 256: ...rding information may not be displayed properly ZS100 When you play back and import motion pictures recorded with FHD 28M 60p FHD 24M 30p or FHD 24M 24p in AVCHD using a device other than this unit a compatible Blu ray disc recorder or PC installed with PHOTOfunSTUDIO software downloaded from our website 353 is required ZS100 For details on motion pictures recorded with 4K 100M 30p or 4K 100M 24p ...

Page 257: ...e recording motion pictures 148 OFF Fix focus position at the start of motion picture recording When AFS AFF AFC is set to AFS AFF or AFC the camera will refocus if the shutter button is pressed halfway while recording motion pictures When Auto Focus is activated while you are recording motion pictures the focusing operation sound may be recorded under some conditions If you want to suppress this ...

Page 258: ...le of view 3840 2160 to Full High Definition 1920 1080 by capturing the subject at a wide angle of view and setting a crop start frame and crop end frame Hold the camera firmly in place while recording A motion picture will be recorded at FHD 20M 30p under MP4 Example of panning while recording Setting crop frames at 4K angle of view Screen moves from left to right without moving the camera 1 Set ...

Page 259: ...return to the size of 1920 1080 with the position of the frame as its center MENU SET Set Decides the position and size of the frame 5 Set the crop end frame Do the same as in step 4 to set the end frame position and size 1 making it coincide with the movement in the image you wish to record see below 1 Press DISP or touch Reset to return to the start frame position and size Movement of the image ...

Page 260: ...during recording To cancel 4K Live Cropping recording Set OFF in step 3 4K Live Cropping recording cannot be performed when High Speed Video is set Brightness is measured and focus is done in the crop start frame During motion picture recording they are done in the crop frame The metering mode will be Multi Metering If you assign 4K Live Cropping in Fn Button Set 70 under the Custom menu you can d...

Page 261: ... still picture using Picture Size S 2M The picture quality may be different to S 2M of standard pictures Only pictures in JPEG file format are recorded when Quality is set to or Quality is used with the setting when is set When the Creative Control Mode is set to Miniature Effect a still picture may be taken with a slight delay from the time you fully press the shutter button This function is not ...

Page 262: ... SET and press MENU SET 3 Use to select the item and press MENU SET Record time Sets the recording time of motion pictures 8SEC 6SEC 4SEC 2SEC Pull Focus Allows dramatic imaging expression by shifting focus gradually at the start of recording ON OFF For details 264 Fade Adds a fade in gradual appearance effect to an image and audio as recording starts or adds a fade out gradual disappearance effec...

Page 263: ...ecorded with WHITE IN or BLACK IN are displayed as all white or all black thumbnails in Playback Mode If you assign Snap Movie to Fn Button Set 70 you can display a screen that lets you switch Snap Movie between ON OFF by pressing the assigned function button If you press DISP button while the screen is displayed you can change the settings for Snap Movie Snap Movie will be set to OFF when you con...

Page 264: ...rn to the center Repeat step Second position Auto Focus will work to set the start and end focus of Pull Focus When the setup has failed the frame returns to the first position Perform the setup again To cancel the frame settings press MENU SET A greater effect can be achieved by creating a striking contrast of focus between the start and end positions for example by shifting focus from the backgr...

Page 265: ... Picture menu refer to 65 The Motion Picture menu is not displayed in the recording mode in which motion pictures cannot be recorded 4K Live Cropping For details 258 Snap Movie For details 262 Rec Format For details 255 Rec Quality For details 255 Exposure Mode For details 124 High Speed Video For details 125 ...

Page 266: ...n pictures When Level Shot is set to ON The angle of view becomes slightly narrow when motion picture recording starts Still pictures taken while recording motion pictures will not be horizontally corrected This function is not available in the following cases When recording with High Speed Video When Stabilizer is set to OFF ZS100 When Rec Format is set to MP4 and Rec Quality is set to 4K 100M 30...

Page 267: ...d is detected STANDARD extracts and reduces only the wind noise without deteriorating the sound quality You may not see the full effect depending on the recording conditions Zoom Mic Recording mode Coupled to the zoom operation it will more clearly record far sounds during enlarging image and surrounding sounds with wide angle Settings ON OFF When set to ON and performing zoom the operation sound ...

Page 268: ...tating the control dial or dragging the screen horizontally 61 If you keep your finger touching the left or right edge of the screen after scrolling the pictures the pictures will continue to be scrolled The pictures are displayed in a reduced size The playback speed of pictures varies depending on the playback conditions Switching the speed for forwarding or rewinding pictures continuously Custom...

Page 269: ...a on in playback mode When the camera is switched to the playback screen from the recording screen the lens barrel is retracted after approx 15 seconds This camera is compliant with the unified DCF Design rule for Camera File system standard formulated by the Japan Electronics and Information Technology Industries Association JEITA and with Exif Exchangeable image file format Files that are not DC...

Page 270: ...otion pictures recorded with Snap Movie are played back automatically Some information will not be displayed for motion pictures recorded in AVCHD Motion picture recording time Operations during motion picture playback Operation Touch operation Description Play pause Fast rewind 1 Single frame rewind 2 while paused Stop Fast forward 1 Single frame forward while paused ZS100 Volume down Volume up Z...

Page 271: ... pause a motion picture being played back on the camera If you press while paused you can make finer adjustments to the positions in a motion picture 2 Press MENU SET The same operation can be performed by touching The still picture is saved with aspect ratio of 16 9 and Quality of The picture size varies depending on the motion picture being played back Rec Quality Picture Size 4K M 8M FHD HD S 2...

Page 272: ...enlarge reduce When you change the magnification the zoom position indication appears for about 1 second You can move the enlarged part by pressing of the cursor button or dragging the screen 61 You can also zoom in by quickly touching the touch screen twice If the display was enlarged it returns to the same magnification ratio ZS100 You can forward or rewind a picture while maintaining the same z...

Page 273: ...screen Calendar screen Move the lever to the T side to return It is possible to switch the playback screen by touching the following icons 1 picture screen 12 picture screen 30 picture screen Calendar screen The screen can be switched gradually by dragging the screen up or down When you select a picture using the cursor button and press MENU SET on the 12 picture or 30 picture screen the selected ...

Page 274: ...ard the W side to return to the Calendar screen display Selected date MON SUN TUEWEDTHU FRI SAT The recording date of the picture selected in the playback screen becomes the date selected when the Calendar screen is first displayed You can display the calendar between January 2000 to December 2099 Pictures taken without clock settings are displayed with the date January 1st 2016 Pictures taken wit...

Page 275: ...ll be deleted 15pic 15pic Pictures will not be grouped if they are recorded without setting Clock Set Playing back group pictures consecutively 1 Press The same operation can be performed by touching the group picture icon When you play back group pictures one by one the option settings are displayed From the first picture Play back the group pictures consecutively from the first picture in a grou...

Page 276: ...y touching 2 Use to select Display In Group and press MENU SET 3 Use to scroll through the pictures Pressing again or touching and selecting Exit Display In Group will return you to the normal playback screen You can use the same operations for pictures stored in a group as in normal still picture playback Multi Playback Playback Zoom deletion of pictures etc ...

Page 277: ...ard switch is in LOCK position Pictures that are not based on the DCF standard 269 Do not turn off the camera while deleting Use a sufficiently charged battery or an AC adaptor optional and DC coupler optional Delete Single 1 Press button to delete displayed picture The same operation can be performed by touching ZS100 ZS60 2 Use to select Delete Single and press MENU SET ...

Page 278: ...g a picture ZS100 ZS60 2 Use to select Delete Multi Delete All and press MENU SET You can select All Delete Except Favorite in Delete All if there are pictures that have been set as Favorite 297 3 When Delete Multi is selected Use to select picture and press MENU SET repeat To cancel Press MENU SET again Picture selected OK 4 When Delete Multi is selected Use to select OK and press MENU SET May ta...

Page 279: ...sible to set or edit pictures taken with other cameras How to select an image s after selecting Single or Multi Some menu items allow you to specify how to select an image s Single Use to select a still picture and press MENU SET If Set Cancel is displayed at the right bottom of the screen the setting is canceled when MENU SET is pressed again Set Set Multi When a screen similar to the one on the ...

Page 280: ...ess MENU SET If you select Video Only 4K burst files recorded with the 4K Photo function and pictures recorded using Post Focus will also be played back Only an in focus representative image will be played back from pictures recorded using Post Focus When you select Category Selection use to select category and press MENU SET For details about category refer to 282 3 Use to select Start and press ...

Page 281: ...to OFF when in Video Only or during the slide show for or in Category Selection During slide shows of 4K photo burst files pictures recorded in Post Focus or group pictures effects will stay turned off even if Effect is set When you play back the following pictures in a slide show the Duration setting is disabled Motion pictures 4K burst files Pictures recorded using Post Focus Panorama pictures G...

Page 282: ... Night Scenery i Handheld Night Shot in Automatic Scene Detection Clear Nightscape Cool Night Sky Warm Glowing Nightscape Artistic Nightscape Glittering Illuminations Handheld Night Shot Clear Night Portrait Scene Guide Mode Clear Sports Shot Scene Guide Mode i Food in Automatic Scene Detection Appetizing Food Cute Dessert Scene Guide Mode Travel Date A burst of pictures recorded by setting the bu...

Page 283: ...s displayed for the period of the abort operation If selected again while is displayed writing location information will resume where it left off Delete received location information Use to select Delete Location Data and press MENU SET Use to select a period for deleting location information and press MENU SET The location information cannot be written in the following cases Pictures that were re...

Page 284: ...can select the i Dynamic settings HIGH STANDARD LOW or OFF Contrast You can adjust the contrast Highlight You can adjust the brightness of a highlighted area Shadow You can adjust the brightness of a shadowed area Saturation Color Tone You can adjust the saturation You can adjust the coloring when Monochrome is selected for Photo Style Filter Effect You can select a Filter effect Only when Monochr...

Page 285: ...an adjustment you just made and to return to the item selection screen Set Set Set Set If you have selected Noise Reduction i Resolution or Sharpness the comparison screen is not displayed Pictures can be enlarged by operating the zoom lever You can also zoom in by quickly touching the touch screen twice If the display was enlarged it returns to the same magnification ratio The following operating...

Page 286: ...ss of the aspect ratio of the picture during recording a RAW image recorded on this camera is always recorded with the aspect ratio set to 3 2 5472 3648 but if you perform RAW Processing from the Playback menu the picture will be processed with the aspect ratio fixed as that at the time of recording The range that can be set using Exposure Compensation varies from the range used during recording T...

Page 287: ...sh to combine and then camera superimposes brighter parts of the image Select the frames For button and touch operation refer to 193 Images displayed cannot be enlarged or shrunk or shown as in slide view in touch operation becomes Press MENU SET The selected frames are remembered and the display goes to the preview screen Use to select items and press MENU SET to perform the following operations ...

Page 288: ... is the same as in step when selecting Composite Merging Press MENU SET The position of the first picture will be remembered Select the frame of the last picture Press MENU SET The position of the last picture will be remembered 4 Select Yes at the confirmation screen and press MENU SET The combined picture is displayed Pictures are saved in JPEG format Recording information Exif information such ...

Page 289: ...m in and pinch in your two fingers to zoom out 61 You can also zoom in out with the zoom lever Dragging the screen allows you to move the enlarged part Touch REMOVE This will bring you back to the operation of dragging your finger over the part you want to erase The part you want to erase can be dragged even while the picture is enlarged 4 Touch Set 5 Touch Save or press MENU SET Pictures may appe...

Page 290: ...elect a still picture 279 is displayed for pictures with texts already stamped 3 Enter characters Entering text 87 To delete texts delete all the characters in the character input screen You can print out texts using the PHOTOfunSTUDIO software 353 You can set up to 100 pictures at one time with Multi This function is not available in the following cases Motion pictures 4K burst files Pictures rec...

Page 291: ...tion registered in Setup menu s Travel Date Travel Date Stamp number of days that have elapsed since the travel date set in Setup menu s Travel Date Title Stamp text registered in Title Edit 6 Press Q MENU button 7 Use to select OK and press MENU SET Do not request date printing in store or make date printing on printer for still pictures with date stamps Date printing may be overlapped You can se...

Page 292: ... split a motion picture to pause it If you press while paused you can make finer adjustments to the splitting positions in a motion picture 4 Press The original motion picture that was split does not remain There will only be the 2 motion pictures that were created after the split During dividing do not turn off the camera or remove the card or battery If you do so the motion picture may be delete...

Page 293: ...production method For details refer to step 5 and the subsequent steps 217 For details on the motion picture you created refer to 218 Stop Motion Video You can create a motion picture from the pictures in a group that was recorded using Stop Motion Animation The motion picture you created is saved in the MP4 recording format 1 Set the menu Playback Stop Motion Video 2 Use to select a stop motion a...

Page 294: ...e and press MENU SET Set Set Multi up to 100 pictures Use to select size and press MENU SET Use to select a still picture and press MENU SET repeat To cancel Press MENU SET again Use to select OK and press MENU SET OK Picture quality is reduced after resizing This function is not available in the following cases Motion pictures 4K burst files Pictures recorded using Post Focus Still pictures recor...

Page 295: ...sition ZS60 Enlarge Change position Perform cropping for each picture in the group You cannot edit pictures in group units If you crop a picture in the group it is saved as a new picture Original Face Recognition information will not be copied when still pictures are cropped Picture quality is reduced after cropping This function is not available in the following cases Motion pictures 4K burst fil...

Page 296: ...on direction and press MENU SET Rotate a picture 90 degrees clockwise Rotate a picture 90 degrees counterclockwise Rotate Disp Rotating a picture automatically to display 1 Set the menu Playback Rotate Disp ON When you play back pictures on a PC they cannot be displayed in the rotated direction unless the OS or software is compatible with Exif Exif is a file format for still pictures which allows ...

Page 297: ...Favorite Single or Multi 2 Select picture 279 To clear all In step 1 select Favorite Cancel Yes and then press MENU SET Up to 999 pictures can be set When you set Favorite for a picture in a group the number of pictures set is displayed with the Favorite icon of the first picture Only when Playback Mode is set to Normal Play you can select Cancel This function is not available in the following cas...

Page 298: ...When you have performed Print Set for pictures in a group the setting for how many prints to make applies to all pictures in the group and the number of prints set and total number of prints are shown on the print settings icon of the first picture If the total number of pictures is 1 000 or higher 999 is displayed Date print setting cannot be made for pictures with a Text Stamp applied Depending ...

Page 299: ... Protect icon of the first picture Face Rec Edit Edit or delete the recognition information for pictures with incorrect information 1 Set the menu Playback Face Rec Edit REPLACE or DELETE 2 Use to select picture and press MENU SET 3 Use to select a person and press MENU SET If DELETE go to step 5 4 Use to select the person to replace for another and press MENU SET 5 Use to select Yes and press MEN...

Page 300: ...ows you to find the storage location of a picture on a card more easily DATE TIME Displays pictures according to the date and time that the pictures were taken in chronological order When the pictures are taken using several cameras and stored on the same card this display format allows you to find a specific picture more easily Pictures may not be displayed according to the DATE TIME sequence imm...

Page 301: ...hone Connect easily You can easily set up a direct connection to your smartphone without entering a password Displaying still pictures on a TV 318 Wireless printing 323 Sending pictures to AV device 324 Still pictures and motion pictures can be sent to AV device in the home home AV device Sending pictures to a PC 325 Using WEB services 327 Through LUMIX CLUB you can send still pictures and motion ...

Page 302: ...ing of the Wi Fi connection lamp when the Wi Fi function is in use ZS100 ZS60 Lit When the Wi Fi function is ON or connected by Wi Fi Blinking When sending picture data About the Wi Fi button In this Owner s Manual a function button to which Wi Fi is assigned is referred to as the Wi Fi button At the time of purchase Wi Fi is assigned to Fn5 button For details on the function button refer to 70 To...

Page 303: ...tton during a Wi Fi connection enables the following operation Terminate the Connection Terminates the Wi Fi connection Change the Destination 1 Terminates the Wi Fi connection and allows you to select a different Wi Fi connection Change Settings for Sending Images 2 For details 321 Register the Current Destination to Favorite 1 Registering the current connection destination or the connection meth...

Page 304: ...ot be used to connect to a public wireless LAN connection Use a IEEE802 11b IEEE802 11g or IEEE802 11n compatible device when using a wireless access point We recommend that you use a fully charged battery when you send pictures When sending images on a mobile network high packet communication fees may be incurred depending on the details of your contract Pictures may not be completely sent depend...

Page 305: ... January 2016 Supported OS versions may be changed without prior notice The service may not be able to be used properly depending on the type of smartphone being used For the latest information on the Image App refer to the support site below http panasonic jp support global cs dsc This site is available in English only When downloading the app on a mobile network high packet communication fees ma...

Page 306: ...rty can tap into the Wi Fi transmission and steal transmitted data To set Wi Fi Password to ON refer to 308 It may take some time for the operation to end after operating a smartphone 1 Select the menu on the camera Setup Wi Fi Wi Fi Function New Connection Remote Shooting View The information required for directly connecting your smartphone to this unit SSID is displayed You can also display the ...

Page 307: ... 305 When the connection confirmation screen appears on this unit select Yes and press MENU SET Only when making a connection for the first time Using an Android device Start Image App 305 If a message appears stating that a camera search is in progress close the message Select Select the SSID displayed on this unit When the connection confirmation screen appears on this unit select Yes and press ...

Page 308: ...4 On your smartphone Install Image App in advance 305 1 Select the menu on the camera Setup Wi Fi Wi Fi Function New Connection Remote Shooting View The information QR Code SSID and Password required for directly connecting your smartphone to this unit is displayed You can also display the information by pressing Wi Fi button on the camera Switching the connection method 310 SSID and Password QR C...

Page 309: ...stall the profile The message is displayed in the Web browser If a passcode is required to unlock the smartphone you will have to input the passcode Press the home button to close the Web browser Turn on the Wi Fi function in the setting menu of the smartphone Select the SSID displayed on the screen of this unit Return to the home screen and start Image App 305 When connecting with SSID and passwo...

Page 310: ...isplayed on this unit Enter the password displayed on this unit First time connecting only If you check the item to display the password you can confirm the password as you enter it Changing the connection method To change the connection method follow the steps below When the connection is made using Wi Fi in the Setup menu Press DISP button When the connection is made by pressing Wi Fi button DIS...

Page 311: ...the smartphone On your smartphone Start Image App 305 Closing the connection On the camera 1 On the recording standby screen terminate the connection from the menu of the camera Setup Wi Fi Wi Fi Function Yes You can also terminate the connection by pressing Wi Fi button on the camera 303 On your smartphone 2 Close Image App Using an iOS device From the Image App screen press the home button on th...

Page 312: ...ure the camera in place with a tripod or by other means This function is not available in the following cases Panorama Shot Mode When using Time Lapse Shot When Snap Movie is set to ON Taking a picture while jumping When you hold your smartphone and jump the camera s shutter can be released automatically as the smartphone detects the peak of the jump 1 Select the sensitivity will be displayed on t...

Page 313: ...erent from the actual motion picture that you have recorded Depending on your smartphone and its usage environment you may notice degradation in the picture quality or skipping of sound when playing back motion pictures and still pictures Saving pictures in the camera to a smartphone 1 Connect to a smartphone 306 2 Operate the smartphone Select You can switch a device of pictures to be displayed u...

Page 314: ...ion to pictures in the camera from a smartphone You can send the location information acquired from a smartphone to the camera After the information is sent you can write it on the pictures in the camera GPS Starts location information recording Start the recording Ends location information recording Sends and writes the location information You can also use Location Logging in the Playback menu t...

Page 315: ...operation is displayed for pictures that have location information written to it The smartphone battery drains faster while location information is being recorded When recording of location information is not necessary stop it For details about the operating procedure etc refer to Help in the Image App menu On the smartphone you can set the acquisition interval of location information and check th...

Page 316: ...ed with the camera s Snap Movie function 262 Music can be added to motion pictures to be combined In addition you can save the combined motion picture or upload it on a web service Record motion pictures with Snap Movie Send the recorded motion pictures Edit WEB services Combine the motion pictures save the combined motion picture and send it to a web service Combine the motion pictures and save t...

Page 317: ...ecording dates are not available a screen that lets you select motion pictures will be displayed Select motion pictures and send them Operate the smartphone to edit the motion pictures Read the Help in the Image App menu for further details on how to operate Snap Movie of Image App Snap Movie of the Image App requires a smartphone that supports Android OS 4 3 or higher The iPhone 4 does not suppor...

Page 318: ...also close the connection by pressing the Wi Fi button 303 When you display the pictures on a TV using the Wi Fi function they are not output using 4K resolution To output pictures using 4K resolution connect this unit to the TV using an HDMI micro cable 348 When a TV is connected to this unit the TV screen may temporarily return to the status before the connection Pictures are displayed again whe...

Page 319: ...ith Rec Quality of 4K Some images may not be played back or sent depending on the device For more information about picture playback see the operating instructions of the destination device or check the WEB service to which you will send the pictures Send Images While Recording A picture can be automatically sent to a specified device every time you take it is displayed on the recording screen whi...

Page 320: ...is function Send Images Stored in the Camera You can select and send recorded images How to select an image s after selecting Single Select or Multi Select Single Select Select the picture Set Set Select Set Multi Select Select the picture repeat If selected again the setting will be canceled 2 3 4 5 6 1 OK Select OK The number of pictures that can be sent by Multi Select is limited To change the ...

Page 321: ...images before sending them ON Delete the location information then send OFF Keep the location information and send This operation only deletes the location information from the images that are set to be sent The location information will not be deleted from the original images stored in this unit Cloud Limit 4 You can select whether to send images when the Cloud Folder runs out of free space ON Do...

Page 322: ...access point and set Start Image App 305 When connecting with Wi Fi Direct or WPS Connection in Direct Start Image App 305 When connecting with Manual Connection in Direct Set Wi Fi function to ON Select the SSID displayed on this unit Start Image App 305 3 Select the device you wish to connect to 4 Check the send settings and select Set To change the send setting press the DISP button 321 Send Im...

Page 323: ...i Fi Wi Fi Function New Connection Send Images Stored in the Camera Printer 2 Select Via Network or Direct to connect 338 341 3 Select a printer you want to connect 4 Select the still picture and print Pictures are selected the same way as when connecting by USB connection cable For details 358 To terminate the connection press Q MENU button You can also close the connection by pressing the Wi Fi ...

Page 324: ...Mode Read the operating instructions of your device for details 1 Set the menu Setup Wi Fi Wi Fi Function New Connection Send Images While Recording Send Images Stored in the Camera AV device 2 Select Via Network or Direct to connect 338 341 3 Select the device you wish to connect to 4 Check the send settings and select Set To change the send setting press the DISP button 321 Send Images While Rec...

Page 325: ...phanumeric characters When using PHOTOfunSTUDIO Install PHOTOfunSTUDIO on the PC 353 Create a folder that receives images with PHOTOfunSTUDIO For details refer to the operating instructions of PHOTOfunSTUDIO PDF When not using PHOTOfunSTUDIO For Windows Supported OS Windows 10 Windows 8 1 Windows 8 Windows 7 Example Windows 7 Select a folder you intend to use for receiving then right click Select ...

Page 326: ...ck the send settings and select Set To change the send setting press the DISP button 321 Send Images While Recording 6 Take a still picture 319 Send Images Stored in the Camera 6 Select the picture 320 Folders sorted by the sent date are created in the specified folder and pictures are saved in those folders If the screen for a user account and password entry appears enter the one you set on your ...

Page 327: ... service you need to register the WEB service 328 Panasonic assumes no responsibility for the damages resulting from the leakage loss etc of images uploaded on WEB services When uploading images to the WEB service do not delete images from this camera even after they have finished sending until you have checked that they have been properly uploaded to the WEB service Panasonic assumes no responsib...

Page 328: ...ervice you want to use and have the login information available 1 Connect to the LUMIX CLUB site using a smartphone or computer http lumixclub panasonic net eng c 2 Enter your LUMIX CLUB login ID and password and log in to the service 3 If you have not registered your email address with LUMIX CLUB register the email address 4 Select the WEB service to be used for WEB service link settings and regi...

Page 329: ...ding Send Images Stored in the Camera Web service 2 Select Via Network and connect 338 3 Select a WEB service you want to connect 4 Check the send settings and select Set To change the send setting press the DISP button 321 Send Images While Recording 5 Take a still picture 319 Send Images Stored in the Camera 5 Select the picture 320 ...

Page 330: ...ttings and select Set The camera is connected to the previously used wireless access point and the pictures are sent to the WEB service Step are not necessary when you continue to send another image To change the transmission setting for the picture press the DISP button 321 To terminate the connection press MENU SET or operate other controls to exit the playback screen You can also terminate the ...

Page 331: ... up to 1 000 pictures Transferred images are deleted automatically 30 days after the transfer Furthermore when the number of stored images exceeds 1 000 some images may be deleted depending on the Cloud Limit 321 setting even within 30 days after the transfer When the download of images from a Cloud Folder to all specified devices is complete images may be deleted from the Cloud Folder even within...

Page 332: ...B when uploading pictures to WEB services You can set the same LUMIX CLUB login ID for this unit and a smartphone 335 Refer to the LUMIX CLUB site for details http lumixclub panasonic net eng c Please note The service may be suspended due to regular maintenance or unexpected problems and service contents may be changed or added to without prior notice to the users The service may be stopped in who...

Page 333: ...ange the connecting destination Proceed to the next page by selecting Next 5 Read through the LUMIX CLUB terms of use and select Agree You can press to switch pages Turn the zoom lever to the T side to enlarge the page display x2 magnification If you turn the zoom lever to the W side after enlarging the page the page returns to its original size no magnification You can use to move the position of...

Page 334: ...artphone or PC and change the LUMIX CLUB password in advance 1 Set the menu Setup Wi Fi Wi Fi Setup LUMIX CLUB 2 Select Set Add Account 3 Select Set Login ID The login ID and password are displayed The password is displayed as Close the menu if only checking the login ID 4 Select the item you wish to change 5 Enter your login ID or password For details on how to enter characters refer to Entering ...

Page 335: ...n you display the playback screen You can also set a common login ID by following the on screen instructions This operation is not available for Wi Fi Direct connection When this unit and the smartphone have acquired different login IDs When you want to use the smartphone s login ID for this unit Change the login ID and password for this unit to those acquired by the smartphone When you want to us...

Page 336: ...a 1 Set the menu Setup Wi Fi Wi Fi Setup LUMIX CLUB 2 Select Delete account The message is displayed Select Next 3 Select Yes in the login ID delete confirmation screen The message is displayed Select Next 4 Select Yes on the confirmation screen for deleting the LUMIX CLUB account If you want to continue using the service selecting No will only delete the login ID Exit the menu after it is execute...

Page 337: ...g with the same settings as used previously refer to 342 When a screen similar to the one below is displayed select a connection method Example of operation for displaying a screen Setup Wi Fi Wi Fi Function New Connection Send Images While Recording Smartphone Wireless access point Connection method Description Via Network Connects through a wireless access point 338 Direct Your device connects d...

Page 338: ...patible with Wi Fi Protected Setup with a WPS mark 1 Press the wireless access point WPS button until it switches to WPS Mode Refer to the wireless access point instruction manual for details WPS PIN code Save PIN code type wireless access point that is compatible with Wi Fi Protected Setup with a WPS mark 1 On the camera screen select the wireless access point you are connecting to 2 Enter the PI...

Page 339: ...g by Manual Input confirm SSID network authentication type encryption type encryption key of the wireless access point you are using 1 Select the wireless access point you are connecting to Pressing DISP button will search for a wireless access point again If no wireless access point is found refer to When connecting with Manual Input 340 2 If network authentication is encrypted Enter the encrypti...

Page 340: ...e encryption type The type of settings that can be changed may vary depending on the details of network authentication settings Network authentication type Encryption types that can be set WPA2 PSK WPA PSK TKIP AES Common Key WEP Open No Encryption WEP When an option other than No Encryption is selected Enter the encryption key Check the wireless access points instruction manual and settings when ...

Page 341: ...ect the device to connect to WPS Connection WPS Push Button 1 Select WPS Push Button 2 Set the device to WPS mode You can wait longer for a connection by pressing the DISP button on this unit WPS PIN code 1 Select WPS PIN code 2 Enter the PIN code of the device into the camera Manual Connection 1 Enter the SSID and password into the device The SSID and password are displayed on the connection wait...

Page 342: ...onnects using the same settings as used previously Select a destination from Favorite Connects using settings registered in Favorite 3 Select the desired connection setting If the device you want to connect to smartphone etc is connected to a wireless access point other than the camera you cannot connect the device to the camera using Direct Change the Wi Fi settings of the device you want to conn...

Page 343: ...ring and saving frequently used Wi Fi connection settings to Favorites 342 The number of settings that can be saved in the history is limited Checking connection details of History or Favorite When selecting History or Favorite items you can view connection details by pressing the DISP button Performing Reset Wi Fi Settings deletes content registered in History and Favorite When using Select a des...

Page 344: ...10 LUMIX CLUB Acquires or changes the LUMIX CLUB login ID For details 332 PC Connection You can set the workgroup You must connect to the same workgroup as the destination computer when sending pictures to the computer The default is set to WORKGROUP Change Workgroup Name Enter the workgroup of the connecting computer Restore to Default Returns settings to default settings For details on how to en...

Page 345: ...characters refer to Entering Text 87 Make a copy of password If you forget the password you can reset it with Reset Wi Fi Settings in the Setup menu however other settings will also be reset excluding LUMIX CLUB Network Address Displays the MAC address and IP address of this unit A MAC Address is a unique address that is used to identify network equipment IP address refers to a number that identif...

Page 346: ...display the playback screen 348 When the VIERA Link setting on the camera is set to ON and the camera is connected to a VIERA Link HDMI compatible Panasonic television VIERA the television automatically switches its input and the playback screen is displayed For details 350 When you have motion pictures recorded with Rec Format set to MP4 and their size set to 4K in Rec Quality you can also play t...

Page 347: ... pictures on a DVD You cannot transfer or copy motion pictures recorded in Rec Quality with 4K to a Blu ray disc or DVD using a Panasonic recorder Current as of January 2016 You can use the software PHOTOfunSTUDIO 353 to convert the file size of a motion picture to a smaller size or copy it to a DVD For details refer to the operating instructions of PHOTOfunSTUDIO PDF ...

Page 348: ...eo audio input socket HDMI micro cable Use a High Speed HDMI micro cable with the HDMI logo Cables that do not comply with the HDMI standards will not work High Speed HDMI micro cable Type D Type A plug up to 2 m 6 6 feet long ZS60 HDMI socket To HDMI video audio input socket HDMI micro cable Use a High Speed HDMI micro cable with the HDMI logo Cables that do not comply with the HDMI standards wil...

Page 349: ... not output at 24 frames per second When an HDMI micro cable is connected pictures are not displayed on the screen HDMI output will be canceled if a USB connection cable supplied is connected simultaneously Audio output is stereo Read the operating instructions for the TV The recorded pictures can be played back on a TV with an SD Memory Card slot Proper playback aspect ratio will be dependent on ...

Page 350: ...r product manual to verify compatibility with VIERA Link HDMI This camera supports VIERA Link HDMI Version 5 This is the Panasonic standard that also supports previous Panasonic VIERA Link devices Preparation Set VIERA Link to ON 83 1 Connect the camera to a VIERA Link HDMI compatible Panasonic television VIERA with an HDMI micro cable 348 2 Turn on the camera and press the Playback button 3 Opera...

Page 351: ... switches to the camera s screen The television can also be switched on via the camera from Standby Mode if Power on link on the television is set to on If VIERA Link HDMI does not function correctly 395 If you do not know if your TV is VIERA Link HDMI compatible see the TV s operating instructions Use a High Speed HDMI micro cable with the HDMI logo Cables that do not comply with the HDMI standar...

Page 352: ... to the following support website http panasonic net avc sdcard information SDXC html Computer specifications You can connect the camera to a computer that can detect a mass storage device device that stores a large volume of data Windows Windows 10 Windows 8 1 Windows 8 Windows 7 Mac OS X v10 5 v10 11 Some motion pictures recorded in AVCHD may not be scanned correctly by copying a file or folder ...

Page 353: ...The software is available for download until the end of March 2021 http panasonic jp support global cs soft download d_pfs98pe html Operating environment Supported OS Windows 10 32 bit 64 bit Windows 8 1 32 bit 64 bit Windows 8 32 bit 64 bit Windows 7 32 bit 64 bit SP1 CPU Windows 10 Pentium 4 2 8 GHz or higher Windows 8 1 Windows 8 Windows 7 Display 1024 768 pixels or more 1920 1080 pixels or mor...

Page 354: ...8 Windows 7 Mac OS X v10 6 v10 11 For details on the operating environment and how to use the SILKYPIX Developer Studio SE refer to the Help or the Ichikawa Soft Laboratory s support website LoiLoScope 30 day full trial version Windows 10 8 1 8 7 Motion pictures can be edited easily Check the website below to download install the software http loilo tv product 20 For more information on how to use...

Page 355: ...onnection cable supplied while Access is displayed USB connection cable supplied ZS60 CHARGE socket Access sending data Do not disconnect the USB connection cable supplied while Access is displayed USB connection cable supplied 2 Use to select PC and press MENU SET If you set the USB Mode 82 to PC in the Setup menu in advance the camera will be automatically connected to the PC without displaying ...

Page 356: ... folder Folder number P1000001 JPG 1 File number P1000999 JPG 101_PANA 999_PANA MISC DPOF files Favorite PRIVATE AVCHD Motion pictures in AVCHD ZS100 Color Space P sRGB _ AdobeRGB Card 1 JPG Still pictures RW2 Still pictures recorded in RAW file MP4 MP4 Motion Pictures 2 New folders are created in the following cases When there is a picture with file number 999 inside the folder When using cards a...

Page 357: ...format The method of importing still pictures and motion pictures recorded in this unit to other devices will vary depending on the file format JPEG RAW AVCHD or MP4 You cannot copy 4K burst files MP4 format with Aspect Ratio set to an option other than 16 9 to hard disk drives including those of Panasonic recorders compatible with import of 4K motion pictures As of January 2016 See the instructio...

Page 358: ... damage to this unit Do not use any other USB connection cables except the supplied one Using cables other than the above may cause a malfunction ZS100 CHARGE socket Do not disconnect the USB connection cable supplied when the cable disconnection icon is displayed may not be displayed with some printers USB connection cable supplied ZS60 CHARGE socket Do not disconnect the USB connection cable sup...

Page 359: ...ery with sufficient battery power or the AC adaptor optional and DC coupler optional When the battery begins to run out during communication a warning beep sounds Cancel printing and disconnect USB connection cable supplied Before connecting or disconnecting the AC adaptor optional turn the camera off Before inserting or removing a card turn the camera off and disconnect the USB connection cable S...

Page 360: ...on the camera in advance allows settings for numbers of copies and date printing to be designated before giving the card to the store You cannot request a store to print the characters entered for Age or Name of Profile Setup or Face Recog Travel Date Location and Title Edit Using computer Print settings for recording date and text information can be made using PHOTOfunSTUDIO software 353 Using pr...

Page 361: ...ate and Num of prints items are not displayed If the printer does not support date printing the date cannot be printed on the picture When setting Print with Date to ON check the date printing settings on the printer printer settings may be prioritized To print a picture on which text or a date has been stamped set Print with Date to OFF The still picture is printed with the date superimposed on i...

Page 362: ... AC adaptor optional and DC coupler optional you can record and play back without worrying about the remaining battery charge The optional DC coupler can only be used with the designated Panasonic AC adaptor optional Always use a genuine Panasonic AC adaptor optional Also read the AC adaptor and DC coupler operating instructions ...

Page 363: ... Photo Style 129 Flash Mode 243 60p Rec Format Rec Quality 255 Snap Movie 262 Aspect Ratio Picture Size 139 Image size Panorama Shot Mode 109 Picture effect Filter adjustment display 118 131 EXPS Types of picture effects Filter 131 Card displayed only during recording 37 XXhXXmXXs Elapsed recording time 1 251 Simultaneous recording indicator 261 Automatic switching between viewfinder and monitor 5...

Page 364: ...ashes red 251 Focus Lights green 46 Focus Under low illumination 146 Focus Starlight AF 146 Wi Fi connection status Histogram 55 Name 2 229 Travel elapsed days 3 77 Age in years months 2 229 Location 3 77 Current date time 3 Travel destination setting 3 76 Exposure meter 98 Zoom 238 AF area 146 156 161 Spot metering target 183 Self Timer 4 208 Silent Mode 225 AEL AE Lock 173 Metering Mode 64 183 P...

Page 365: ...tures and available recording time with the Remaining Disp setting in the Custom menu Touch tab 61 Touch zoom 240 Touch Shutter 63 Touch AE 64 Peaking 172 Function buttons 71 126 Coloring 94 Defocus control function 93 121 Brightness exposure 94 121 Type of defocus Miniature Effect 122 One Point Color 123 Sunshine 123 Picture effect Filter adjustment display 118 131 Picture effects ON or OFF 131 P...

Page 366: ...s recorded using Post Focus 214 Continuous playback of Time Lapse Shot picture group 275 Continuous playback of stop motion animation group 275 Text stamped display 291 XXhXXmXXs Elapsed playback time 1 4K Photo 4K burst file 184 Post Focus 210 Aspect Ratio Picture Size 139 60p Rec Format Rec Quality 255 Snap Movie 262 Quality 140 120fps High Speed Video 125 Remaining battery 32 1 98 Picture numbe...

Page 367: ... 229 Multi Playback 273 Delete 277 Name 2 228 229 Location 2 77 Title 2 290 Recording information 3 Recording information Stabilizer 234 i Dynamic 3 142 HDR 4 143 iHDR 4 92 i Resolution 142 Recording date time World time 76 Aspect Ratio Picture Size 139 60p Rec Format Rec Quality 255 120fps High Speed Video 125 Quality 140 Color Space 4 145 4K Photo 4K burst file 184 Post Focus 210 100 0001 Folder...

Page 368: ...pictures 100 0001 Folder File number 3 356 1 h m and s indicate hour minute and second 2 It is displayed in order of Title Location Name Baby1 Baby2 Pet Name Face Recog 3 This is not displayed for motion pictures recorded in AVCHD 4 This is not displayed for motion pictures Histogram display 100 0001 1 98 R G B Y ZS100 ...

Page 369: ...49 Custom Set 127 Photo Style 129 Flash Mode 244 60p Rec Format Rec Quality 255 Snap Movie 262 Aspect Ratio Picture Size 139 Image size Panorama Shot Mode 109 Picture effect Filter adjustment display 118 131 EXPS Types of picture effects Filter 131 Card displayed only during recording 37 XXhXXmXXs Elapsed recording time 1 251 Simultaneous recording indicator 261 Automatic switching between viewfin...

Page 370: ...ording state Flashes red 251 Focus Lights green 46 Focus Under low illumination 146 Wi Fi connection status Histogram 55 Name 2 229 Travel elapsed days 3 77 Age in years months 2 229 Location 3 77 Current date time 3 Travel destination setting 3 76 Exposure meter 98 Zoom 238 AF area 146 156 161 Spot metering target 183 Self Timer 4 208 Silent Mode 225 AEL AE Lock 175 Metering Mode 64 183 Program S...

Page 371: ...tures and available recording time with the Remaining Disp setting in the Custom menu Touch tab 61 Touch zoom 240 Touch Shutter 63 Touch AE 64 Peaking 172 Function buttons 71 126 Coloring 94 Defocus control function 93 121 Brightness exposure 94 121 Type of defocus Miniature Effect 122 One Point Color 123 Sunshine 123 Picture effect Filter adjustment display 118 131 Picture effects ON or OFF 131 P...

Page 372: ...ecorded using Post Focus 214 Continuous playback of Time Lapse Shot picture group 275 Continuous playback of stop motion animation group 275 Text stamped display 291 XXhXXmXXs Elapsed playback time 1 4K Photo 4K burst file 184 Post Focus 210 Aspect Ratio Picture Size 139 60p Rec Format Rec Quality 255 Snap Movie 262 Quality 140 240fps 120fps High Speed Video 125 Remaining battery 32 1 98 Picture n...

Page 373: ...hs 228 229 Multi Playback 273 Delete 277 Name 2 228 229 Location 2 77 Title 2 290 Recording information 3 Recording information Stabilizer 234 i Dynamic 3 142 HDR 4 143 iHDR 4 92 i Resolution 142 Recording date time World time 76 Aspect Ratio Picture Size 139 60p Rec Format Rec Quality 255 240fps 120fps High Speed Video 125 Quality 140 4K Photo 4K burst file 184 Post Focus 210 100 0001 Folder File...

Page 374: ...pictures 100 0001 Folder File number 3 356 1 h m and s indicate hour minute and second 2 It is displayed in order of Title Location Name Baby1 Baby2 Pet Name Face Recog 3 This is not displayed for motion pictures recorded in AVCHD 4 This is not displayed for motion pictures Histogram display 100 0001 1 98 R G B Y ZS60 ...

Page 375: ...f a required card varies depending on Rec Format and Rec Quality of a motion picture 4K photo recording requires a card that meets a particular speed class rating Use a card that meets the rating Be sure to use a card of the recommended speed class For details refer to About motion picture 4K photo recording and speed class ratings 37 If recording stops even when using a card of the recommended sp...

Page 376: ...devices that use the 2 4 GHz band No picture to send This is displayed when there is no image to transmit due to the restriction of the destination Check the file type of the image to transmit 319 Connection failed Please retry in a few minutes Network disconnected Transfer stopped Radio waves from the wireless access point are getting weak Perform the connection closer to the wireless access poin...

Page 377: ...tion limit Check the file format of the image to send 319 Sending motion pictures may fail if the file size is too large Split the motion picture using Video Divide 292 Unavailable Please set Login settings on LUMIX CLUB web site Login to the LUMIX CLUB from your smartphone or PC and set the login details of the destination WEB service Both picture and video sharing service cannot be selected toge...

Page 378: ...er or other device and then use Format on the camera 38 Folder number is reset to 100 when performing No Reset 85 Editing operation cannot proceed as another operation is taking place If you display the playback screen when the camera contains many picture files the acquiring information icon or may be displayed for a long time While either one of these icons is displayed some of the Playback menu...

Page 379: ...Size 139 Quality 140 Sensitivity 179 ZS60 White Balance 134 AF Mode 149 AFS AFF AFC 148 Metering Mode 183 Burst Rate 202 4K PHOTO 184 Auto Bracket 206 Self Timer 208 ZS100 Highlight Shadow 133 i Dynamic 142 i Resolution 142 Post Focus 210 iHandheld Night Shot 91 iHDR 92 HDR 143 ZS100 Multi Exp 223 Time Lapse Shot 216 Stop Motion Animation 219 Panorama Settings 110 Shutter Type 199 ZS100 Flash 243 ...

Page 380: ...ommon for both Rec and Motion Picture menus If a setting in one menu is changed the setting with the same name in other menu will also be changed automatically For details refer to the corresponding item of the Rec menu 4K Live Cropping 258 Snap Movie 262 Rec Format 255 Rec Quality 255 Exposure Mode 124 High Speed Video 125 Continuous AF 257 Level Shot 266 Flkr Decrease 266 Silent Operation 126 Wi...

Page 381: ...169 Focus Release Priority 164 AF MF 164 MF Assist 171 MF Assist Display 169 MF Guide 171 Peaking 172 Histogram 55 Guide Line 55 Highlight 57 Zebra Pattern 230 Monochrome Live View 231 ZS100 Constant Preview 105 Expo Meter 98 Dial Guide 52 LVF Disp Style 53 54 Monitor Disp Style 53 54 Rec Area 252 Remaining Disp 41 Auto Review 47 Fn Button Set 70 Zoom lever 239 Zoom Resume 239 ZS100 Q MENU 69 Ring...

Page 382: ...Language 84 Version Disp 85 Exposure Comp Reset 85 Self Timer Auto Off 85 No Reset 85 Reset 86 Reset Wi Fi Settings 86 Demo Mode 86 Format 38 Playback Slide Show 280 Playback Mode 281 Location Logging 283 ZS100 RAW Processing 284 Light Composition 287 Clear Retouch 289 Title Edit 290 Text Stamp 291 Video Divide 292 Time Lapse Video 293 Stop Motion Video 293 Resize 294 Cropping 295 Rotate 296 Rotat...

Page 383: ...lso apply to the battery itself Charging is not possible if the power supply capacity of the computer is low Camera does not work even if the camera is turned on Camera switches off as soon as the camera is turned on Battery needs recharging Turn the camera off frequently by using the Economy etc 81 This unit is turned off automatically Economy is activated 81 The linked operation of VIERA Link HD...

Page 384: ...llowing settings Simultaneous record w o filter 132 White Balance Bracket 138 Burst Auto Bracket of the self timer 201 Focus not aligned correctly Subject outside of focus range 46 Caused by jitter or subject movement 234 Focus Release Priority is set to RELEASE 164 Shutter AF is set to OFF 163 AF Lock 173 175 is set inappropriately If there are fingerprints or dirt on the lens the focus may be se...

Page 385: ...l pictures using the electronic shutter the striping may be reduced by setting a slower shutter speed 102 When noticeable flicker or striping is seen under lighting such as a fluorescent or LED lighting fixture in the motion picture recording mode you can reduce the flicker or striping by setting up Flkr Decrease 266 and fixing the shutter speed It is possible to select a shutter speed from 1 50 1...

Page 386: ... required card varies depending on Rec Format and Rec Quality of a motion picture Be sure to use a card of the recommended speed class For details refer to About motion picture 4K photo recording and speed class ratings 37 If recording stops even when using a card of the recommended speed class the data writing speed has dropped If this happens we recommend backing up the data on the memory card a...

Page 387: ...ecorded at all In this case the camera may pick up the lens operating sounds more easily Operating sounds are recorded at the end of the motion picture recording If the operation sound of the motion picture button pressed to end recording bothers you try the following Record the motion picture about three seconds longer and then divide the last part of the motion picture using Video Divide 292 in ...

Page 388: ...e significantly for an instant This occurs due to the aperture of the lens changing when the shutter button is pressed halfway or when the brightness of the subject changes This is not a malfunction The screen flickers indoors The screen may flicker for a few seconds after turning on This is an operation to correct flicker caused by lighting such as fluorescent lights LED lights etc and is not a m...

Page 389: ... using a PC or a picture which was taken by another device Battery removed immediately after picture taken or picture taken with low battery Save needed data on a computer or other device and then use Format on the camera 38 Playback and operation sounds are too low The speaker is blocked 20 21 Incorrect date displayed in Calendar Search Is the clock in the camera set properly 42 Pictures edited o...

Page 390: ...ecording 245 ZS60 When the digital red eye correction is operating red areas may be blackened We recommend setting the flash mode to or Red Eye Removal to OFF before recording 245 Motion pictures taken with this camera cannot be played in other cameras Even if a motion picture is played back on a compatible device it may have bad picture quality or sound quality upon playback or it may not be play...

Page 391: ...or connect to a wireless access point depending on the radio wave condition Perform the connection closer to the wireless access point Remove the obstacles between this unit and the wireless access point Change the direction of this unit Move the location or change the angle of the wireless access point Perform the Manual Input 340 It may not display even if the radio waves exist depending on the ...

Page 392: ...e LUMIX CLUB is not possible in the environment without a wireless access point The camera cannot be connected to Mac computer Windows PC via Wi Fi connection Please confirm login name and password are correctly typed When the system time of Mac computer or Windows PC connected to a camera differs severely from that of the camera the camera cannot be connected to the computer or PC in some OSs Ple...

Page 393: ... are sending the image to It takes time to transmit an image to the WEB service Is the size of the image too large Transmit after dividing the motion picture with Video Divide 292 Reduce the image size at Size 321 and then send It may take longer time to transmit when distance to the wireless access point is far Transmit closer to the wireless access point The image that was supposed to have uploa...

Page 394: ...ted Image cannot be transmitted when the battery indicator is flashing red Is the size of the image too large Divide the motion picture using Video Divide 292 Reduce the image size at Size 321 and then send File format of the picture that can be sent differs depending on the destination 319 Capacity or number of images in the WEB service is full Login to LUMIX CLUB and check the status of the dest...

Page 395: ...k HDMI is not working Check that the HDMI micro cable is fully inserted 348 Is the camera s VIERA Link setting set to ON 83 The input setting may not be able to be changed automatically with certain television HDMI sockets In this case please change the input setting with your television s remote control consult your television s operating instructions for details Check the VIERA Link HDMI setting...

Page 396: ...off turn the camera off before disconnecting the USB connection cable Cannot print when connecting to printer Printer not compatible with PictBridge Set USB Mode to PictBridge PTP 82 358 The edges of pictures are cut off when printing Release any trimming or edgeless printing settings on printer before printing The aspect ratio of pictures is different from that of paper used for printing If print...

Page 397: ...set to ON 57 Camera is hot Camera may become a little warm during use but this does not affect performance or quality Clock is incorrect If you do not use the camera for a long time the clock may be reset Reset the clock 43 When using zoom picture becomes slightly warped and the edges of the subject become colored Pictures may be slightly warped or colored around the edges depending on the zoom ra...

Page 398: ...ic equipment and stops functioning properly turn this unit off and remove the battery or disconnect AC adaptor supplied AC adaptor optional Then reinsert the battery or reconnect AC adaptor and turn this unit on Do not use this unit near radio transmitters or high voltage lines If you record near radio transmitters or high voltage lines the recorded pictures and or sound may be adversely affected ...

Page 399: ...rawer etc Store batteries in cool 15 C to 25 C 59 F to 77 F places with low humidity 40 RH to 60 RH and no major temperature changes Charge battery once per year and use completely before storing again Check all the parts before taking pictures when you have not used the camera for a long period of time Monitor viewfinder Do not press hard on the monitor This may cause uneven display and damage th...

Page 400: ...s depending on conditions of battery usage Charging takes longer at high or low temperatures and when the battery has not been used in some time Battery will be warm during charging and for some time thereafter Battery will run out if not used for long periods of time even after being charged Do not leave any metal items such as clips near the contact areas of the power plug Otherwise a fire and o...

Page 401: ...corded data may be damaged or lost if the camera breaks down due to inappropriate handling Panasonic will not be liable for any damage caused due to loss of recorded data When disposing of transferring memory cards If using the format or delete functions on your camera or computer this only changes the file management information and does not completely delete the data from within the memory card ...

Page 402: ...taining personal information When ordering repairs or transferring disposing of the camera After you make a note of the personal information perform Reset Wi Fi Settings Delete account to delete data containing personal information such as wireless LAN connection settings that you registered or set in this unit 86 336 To protect your personal information please reset the settings 86 Remove the mem...

Page 403: ... radio waves may be intercepted by a third party We strongly recommend that you enable encryption in the settings of your wireless access point to ensure information security Do not use the camera in areas with magnetic fields static electricity or interference Do not use the camera in areas with magnetic fields static electricity or interference such as near microwave ovens Radio waves may not re...

Page 404: ...r countries iMovie Mac and Mac OS are trademarks of Apple Inc registered in the U S and other countries iPad iPhone iPod and iPod touch are trademarks of Apple Inc registered in the U S and other countries App Store is a service mark of Apple Inc Android and Google Play are trademarks or registered trademarks of Google Inc The Wi Fi CERTIFIED Logo is a certification mark of Wi Fi Alliance The Wi F...

Page 405: ...ive remuneration to i encode video in compliance with the AVC Standard AVC Video and or ii decode AVC Video that was encoded by a consumer engaged in a personal activity and or was obtained from a video provider licensed to provide AVC Video No license is granted or shall be implied for any other use Additional information may be obtained from MPEG LA L L C See http www mpegla com ...

Page 406: ...rd party and licensed to Panasonic Corporation and or 3 open source software The software categorized as 3 is distributed in the hope that it will be useful but WITHOUT ANY WARRANTY without even the implied warranty of MERCHANTABILITY or FITNESS FOR A PARTICULAR PURPOSE Please refer to the detailed terms and conditions thereof displayed by selecting MENU SET Setup Version Disp Software info ...

Reviews: