173
DVQP1242
Using Menu Functions
Menu list
■
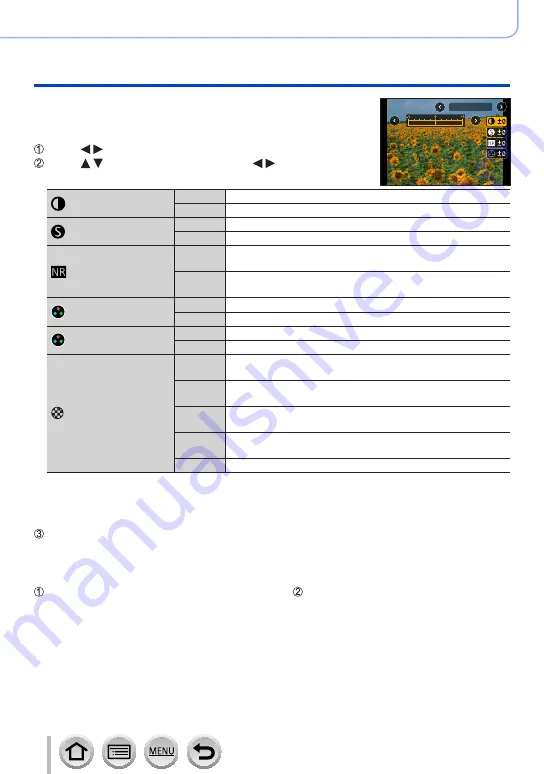
Adjusting the picture quality
•Picture quality cannot be adjusted in the Intelligent Auto
Plus Mode.
Standard
Press to select the type of Photo Style
Press to select an item and press to adjust
[Contrast]
[+]
Increases the contrast in a picture.
[–]
Decreases the contrast in a picture.
[Sharpness]
[+]
Enhances the outlines in a picture.
[–]
Softens the outlines in a picture.
[Noise Reduction]
[+]
Increases the noise reduction effect to reduce noise. This
setting may slightly lower the resolution.
[–]
Lowers the noise reduction effect to achieve a picture
quality with clearer resolution.
[Saturation]
*
1
[+]
Gaudy colouring
[–]
Subdued colouring
[Color Tone]
*
1
[+]
Bluish colouring
[–]
Yellowish colouring
[Filter Effect]
*
2
[Yellow]
Enhances the contrast of a subject. (Effect: Low)
Records a blue sky clearly.
[Orange]
Enhances the contrast of a subject. (Effect: Medium)
Records a blue sky with vibrant colours.
[Red]
Enhances the contrast of a subject. (Effect: High)
Records a blue sky with even more vibrant colours.
[Green] Applies subdued colouring for the skin and lips of a person.
Emphasises green leaves and makes them brighter.
[Off]
—
*
1
[Color Tone] is displayed only when [Monochrome] is selected. Otherwise, [Saturation] is
displayed.
*
2
Displayed only when [Monochrome] is selected.
•When the picture quality is adjusted, [+] will be displayed in the [Photo Style] icon.
Press [MENU/SET]
■
Registering the setting for the adjusted picture quality to [Custom]
Perform the picture quality adjustment in Step of “Adjusting the picture quality” and
press the [DISP.] button


