background image

3

For assistance, please call: 1-800-211-PANA(7262)

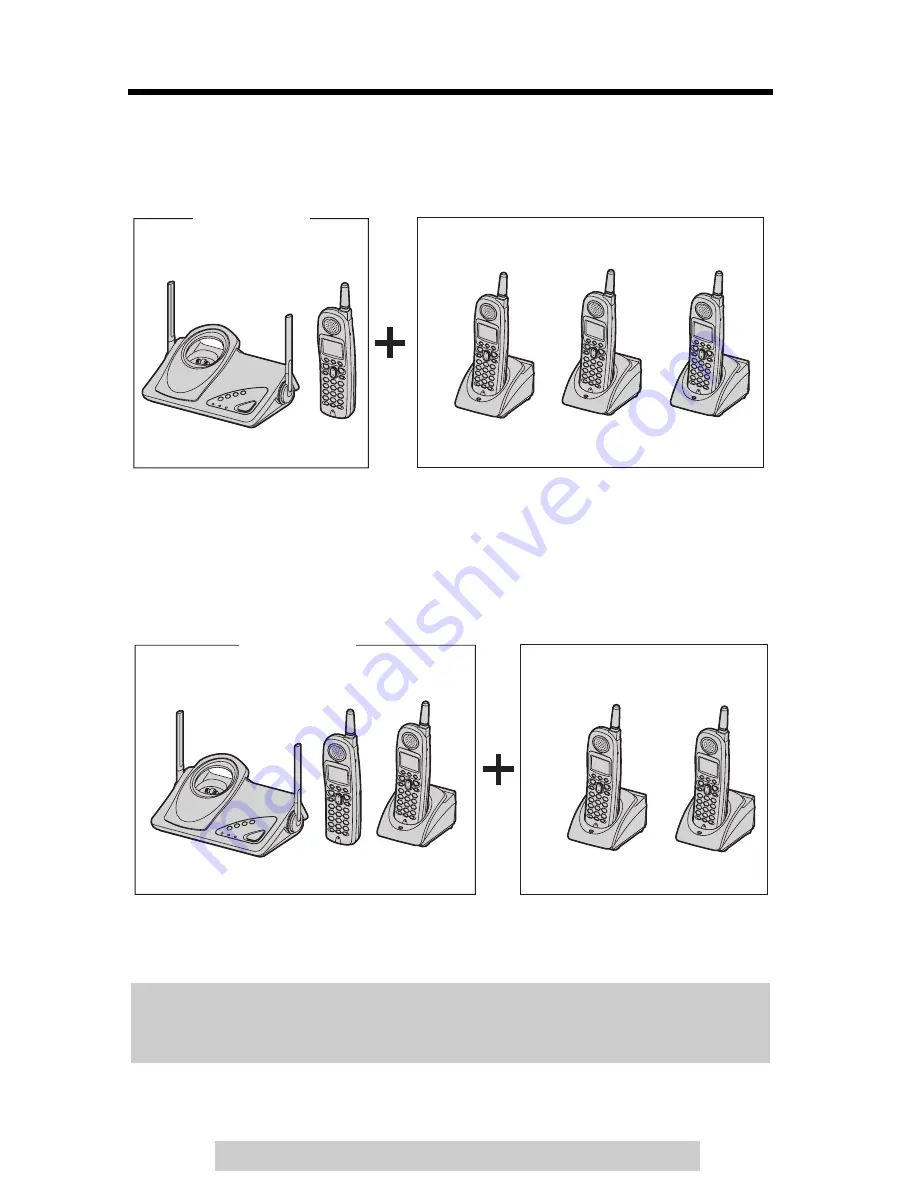
Expanding Your Phone

For KX-TG5200 users

KX-TG5200 includes one handset and one base unit. You can expand the system 
by adding up to 3 accessory handsets, sold separately. 
A maximum of 4 handsets can be registered to the base unit. 

The included handset is pre-registered at the factory and assigned the extension 
number 1. 

For KX-TG5202 users

KX-TG5202 includes two handsets, one charger unit and one base unit. You can 
expand the system by adding up to 2 accessory handsets, sold separately. 
A maximum of 4 handsets can be registered to the base unit. 

The included handset is pre-registered at the factory and assigned the extension 
numbers 1 and 2. 

After purchasing accessory handsets, you must register each to the base unit. 
(Please read the accessory handset’s Installation Manual.) 

The model numbers of the accessory handsets are KX-TGA520 and 
KX-TGA523. A charger is included with each accessory handset. 
To order, contact your dealer or call 1-800-211-PANA(7262) to locate a dealer.

Up to 3 accessory handsets can be added.

KX-TG5200

The illustration is KX-TGA520.

Up to 2 accessory handsets 
can be added.

KX-TG5202

The illustration is KX-TGA520.

Summary of Contents for KX-TG5200

Page 1: ...ty The unit is Caller ID compatible To display the Caller s name and phone number you must subscribe to Caller ID service PLEASE READ BEFORE USE AND SAVE Panasonic World Wide Web address http www panasonic com for customers in the USA or Puerto Rico Charge the battery for 6 hours before initial use Model shown is KX TG5200 ...

Page 2: ...which displays a second caller s name and phone number while the user is on another call requires a subscription to both Caller ID and Call Waiting with Caller ID Services CWID After subscribing to Voice Mail Service this unit will give you visual indication to let you know when there are messages in the mailbox AAC Adaptor p 10 Order No PQLV1Z PQLV1 one ATelephone Line Cord p 10 Order No PQJA1007...

Page 3: ...g up to 2 accessory handsets sold separately A maximum of 4 handsets can be registered to the base unit The included handset is pre registered at the factory and assigned the extension numbers 1 and 2 After purchasing accessory handsets you must register each to the base unit Please read the accessory handset s Installation Manual The model numbers of the accessory handsets are KX TGA520 and KX TG...

Page 4: ...hone Book 29 Erasing Caller Information 29 Phone Book 30 Storing Names and Numbers 30 Dialing from the Phone Book 32 Chain Dial 33 Editing an Item in the Phone Book 34 Erasing an Item in the Phone Book 34 Copying Items in the Phone Book 35 Intercom 37 Intercom between Handsets 37 Transferring a Call 38 Conference Calls 39 Call Share 39 Voice Mail Service 40 Storing a Voice Mail Access Number 40 Se...

Page 5: ...r on Your Display 55 openLCR Service for Caller IQ 61 Turning on or off Caller IQ Feature 61 Downloading Data 62 Important Safety Instructions 65 FCC and Other Information 67 Specifications 70 Index 71 Warranty 73 Useful Information Troubleshooting 57 Important Throughout these Operating Instructions and are used to indicate with which unit an operation can be performed Perform with the handset Pe...

Page 6: ...location is Note If you use the handset near a microwave oven which is being used noise may be heard from the receiver or the speaker Move away from the microwave oven and closer to the base unit If you use the handset near another cordless phone s base unit noise may be heard Move away from the other cordless phone s base unit and closer to your base unit AND KX TG5202 only Away from electrical a...

Page 7: ... 23 VM Indicator p 42 Charge Contacts p 12 LOCATOR and Buttons p 43 Headset Jack p 47 TALK Button p 20 Speakerphone Button p 20 MENU Button p 13 Microphone p 20 Charge Contacts p 12 Antenna Display p 9 OFF Button p 13 20 HOLD INTERCOM Button p 21 37 REDIAL Button p 21 Soft Keys p 8 Receiver FLASH CALL WAIT Button p 44 45 Navigator Key d B p 8 Ringer Message Alert Indicator p 19 23 TONE Button p 44...

Page 8: ...y the arrows d or B Charge Contacts p 12 CHARGE Indicator p 11 How to use the soft keys navigator key Handset soft keys Three soft keys are used to select functions displayed directly above each key Functions displayed above each key will change depending on the state of use On this sample display and C are displayed above the soft keys Pressing the right soft key selects the Phone Book C Pressing...

Page 9: ... 3 53 54 7 The display shows the dialed number call status programming options phone book items Caller ID information etc 8 The icons on the bottom line indicate the functions of the corresponding soft keys which are located directly below the display p 8 Ex The soft key below C phone book icon is used when storing or viewing phone book items p 30 32 9 D extension icon and extension numbers are di...

Page 10: ...g a power failure We recommend connecting a standard telephone to the same telephone line or to the same telephone jack using the Panasonic KX J66 T adaptor Charger unit KX TG5202 only Charger unit USE ONLY WITH Panasonic AC ADAPTOR KX TCA1 Order No KX TCA1 G The AC adaptor must remain connected at all times It is normal for the adaptor to feel warm during use Telephone Line Cord Single Line Telep...

Page 11: ...er and charge the handset for 6 hours Battery Charge Place the handsets on the base unit and charger for 6 hours before initial use The unit beeps once the CHARGE indicator lights and Charging is displayed When the battery is fully charged Charge completed is displayed if there are no new calls in the Caller List Battery strength You can confirm the battery strength on the handset display Battery ...

Page 12: ...ly talk on the handset will be shortened Actual battery performance depends on a combination of how often the handset is in TALK mode and how often it is in Standby mode Clean the charge contacts of the handset the base unit and charger with a soft dry cloth once a month Clean more often if the unit is subject to grease dust or high humidity Otherwise the battery may not charge properly If the bat...

Page 13: ...ode If the unit detects a problem an error message will be displayed p 55 56 and or error beeps will sound Make sure the handset and base unit are not being used The handset must be operated near the base unit and while off the base unit or charger 1 Press MENU The main menu is displayed p 14 2 Scroll to the desired item by pressing d or B 3 Press the soft key to select the desired item 4 If the i...

Page 14: ...andset Ringer volume Ringer tone Incoming call View Info Get new Info Voice Mail LCD contrast Key tone Auto talk Set flash time Set line mode Registration HS registration Deregistration Message alert Turn CIQ off Set dial mode Change language Display Main menu Sub menu I Caller IQ Initial setting Sub menu II Voice enhancer Copy 1 item Copy all items Copy phone book Ringer setting Store VM access V...

Page 15: ... B then press the soft key 4 To change from English to Spanish press the soft key To change from Spanish to English press the soft key The display changes to the selected language You can also select the display language by pressing d or B 5 When Spanish is selected press the soft key then press OFF When English is selected press the soft key then press OFF 1 Press MENU 2 Scroll to Initial setting...

Page 16: ...he Auto Talk feature turned off 1 Press MENU 2 Scroll to Initial setting by pressing d or B then press the soft key 3 Scroll to Set tel line by pressing d or B then press the soft key 4 Scroll to Set line mode by pressing d or B then press the soft key 5 Select A or B by pressing d or B 6 Press the soft key then press OFF 1 Press MENU 2 Scroll to Initial setting by pressing d or B then press the s...

Page 17: ...u can also adjust the ringer volume while an outside call is ringing Press d or B while the handset is ringing Temporary ringer off While the handset is ringing for an outside call you can turn the ringer off temporarily by pressing OFF The handset will ring again as normal the next time a call is received 1 Press MENU 2 Press the soft key at Ringer setting 3 Press the soft key at Ringer volume 4 ...

Page 18: ...sh lines by their ringers If you select one of the melody ringer patterns the ringer will continue to sound for several seconds if the caller hangs up before you answer the call or another person answers the call using another phone connected on the same line 1 Press MENU 2 Press the soft key at Ringer setting 3 Scroll to Ringer tone by pressing d or B then press the soft key 4 Select the desired ...

Page 19: ...apidly when a call is received whether this feature is on or off Battery operating time may be shortened when using this feature p 12 1 Press MENU 2 Scroll to Initial setting by pressing d or B then press the soft key 3 Scroll to LCD contrast by pressing d or B then press the soft key 4 Select the desired contrast by pressing d or B The contrast will change The number of steps indicates the contra...

Page 20: ...ion 1 Press s SP phone is displayed 2 Dial a phone number The dialed number is displayed After a few seconds the display will show the length of the call 3 When the other party answers talk into the microphone 4 To hang up press OFF or place the handset on the base unit or charger Hands free Digital Duplex Speakerphone For best performance please note the following Talk alternately with the other ...

Page 21: ...ry Redial The last 5 phone numbers dialed are stored in the redial list 1 Press REDIAL The last number dialed is displayed 2 Scroll to the desired number by pressing d or B You can also scroll down through the list by pressing REDIAL To exit the list press OFF 3 Press C or s To erase an item scroll to the item then press the soft key If No items stored is displayed the list is empty To put a call ...

Page 22: ...re there may be interference During an outside call this feature will be turned on automatically when necessary This feature will turn off when you hang up put a call on hold or make a conference call It will not turn off automatically during a call You can also turn this feature on or off manually 1 Press MENU during an outside call 2 Press 2 to select 2 Booster on or 2 Booster off You can also s...

Page 23: ...fting the handset off the base unit or charger for KX TG5202 or accessory handset users p 3 Temporary ringer off While the handset is ringing for an outside call you can turn the ringer off temporarily by pressing OFF The handset will ring again as normal the next time a call is received 1 Press C or s You can also answer a call by pressing any button except d B or OFF 2 To hang up press OFF or pl...

Page 24: ...ng on radio communications with the base unit the handset may not display Caller ID information immediately after the first ring If your unit is connected to a PBX which does not support Caller ID you cannot access Caller ID service Name display service may not be available in some areas For further information please contact your telephone company If you subscribe to both Caller ID and Call Waiti...

Page 25: ...viewed the Caller List or answered a call on one handset the same information in the other handsets will be displayed as missed If you do not press any buttons for 60 seconds the unit will exit the Caller List 1 The display will show the number of calls you missed 2 Press the soft key d or B to review other calls logged in the Caller List If there are no items in the Caller List will not be displa...

Page 26: ...wing a caller s information 2 to 9 will be replaced with Calling Back from the Caller List In some cases you may have to edit the number before dialing p 27 Ex You may have to delete 1 and the area code If a phone number is not displayed in the caller information you cannot call that caller back from the Caller List 1 Press the soft key d or B to enter the Caller List 2 Scroll to the desired calle...

Page 27: ... press the soft key the number is rearranged into one of 3 patterns F G H 1 The order in which patterns F H are displayed depends on how the telephone number is displayed in step 2 4 To call the edited number press C or s If Caller ID Number Auto Edit feature is turned on factory preset is on phone numbers with the same area code as the number you edited will now be edited in the Caller List and e...

Page 28: ...ecently edited area codes will be automatically edited You can turn this feature on or off using the handset The factory preset is ON To turn on or off Caller ID Number Auto Edit feature If you fail to reach your destination when making a call the phone number you dialed might have an incorrect pattern Edit the phone number with another pattern p 27 When this feature is turned off the unit will st...

Page 29: ...me will be displayed You can enter a name by performing the following steps 1 enter the name p 31 2 press d and 3 press the soft key If a name is not required press d then press the soft key To continue storing other items repeat from step 2 To exit programming mode press OFF Handset C I D SAVE SAVE SAVE Handset 1 Press the soft key d or B to enter the Caller List 2 Scroll to the desired caller by...

Page 30: ...splay will show the number of stored items 2 Press the soft key 3 Enter a name of up to 16 characters with the dialing buttons 0 to 9 p 31 then press d To move the cursor press the soft key or If a name is not required press d then go to step 4 4 Enter a phone number of up to 32 digits To delete a digit press the soft key To erase all of the digits press and hold the soft key 5 Press d If you want...

Page 31: ...ake a mistake while entering a name or number 1 Press the soft key or to move the cursor to the incorrect character 2 Press the soft key to delete the character Each time you press the soft key a character is erased To erase all characters press and hold the soft key 3 Enter the correct character Keys Characters Keys Characters 1 1 6 m n o M N O 6 2 a b c A B C 2 7 p q r s P Q R S 7 3 d e f D E F ...

Page 32: ...betical index will be displayed 3 Press d repeatedly until the desired name is displayed Index table 1 Press the soft key C The display shows the number of stored items You can press the soft key to view the first item 2 Scroll to the desired item To scroll down press d To scroll up press B 3 Press C s or the soft key The phone number is dialed Keys Index Keys Index 1 Symbols 1 6 M N O 6 2 A B C 2...

Page 33: ...er and your PIN when storing in the phone book p 30 1 Search and dial from the phone book 1 800 012 3456 Calling card access number The voice guidance will be announced 2 Search and dial from the phone book 1234 Calling card PIN 3 Search and dial from the phone book 1 555 012 3456 Destination Number If you have rotary or pulse service you need to press before pressing MENU in step 1 to change the ...

Page 34: ...e number press d then go to step 6 To delete a digit press the soft key To delete all of the digits press and hold the soft key 6 Press the soft key To continue editing other items repeat from step 2 7 Press OFF 1 Press the soft key C 2 Scroll to the desired item by pressing d or B To search for the item by initial see page 32 3 Press the soft key To cancel erasing press the soft key 4 Press the s...

Page 35: ...2 or accessory handset users p 3 until copying finishes otherwise copying will stop To copy one phone book item to another handset Make sure the destination handset is not in use 1 Press MENU 2 Scroll to Copy phone book by pressing d or B then press the soft key 3 Press the soft key at Copy 1 item 4 Select the destination extension number 1 to 4 by pressing d or B You can also select the extension...

Page 36: ...press the soft key 4 Select the destination extension number 1 to 4 by pressing d or B You can also select the extension number by pressing 1 to 4 5 Press the soft key When all items have been copied Complete is displayed The destination handset displays Phone book Receiving then Phone book Received To continue copying items to another extension repeat from step 3 6 Press OFF SELECT Copy phone boo...

Page 37: ...COM 2 Handset 1 To page another handset press its extension number 1 to 4 The paged handset will ring for 1 minute and the Ringer Message Alert indicator flashes rapidly To stop paging press OFF 3 Handset 2 Press C s or HOLD INTERCOM to answer the page Any button except d B or OFF can be pressed to answer the page 4 Handset 1 When the paged party answers start talking 5 Handset 1 or Handset 2 To d...

Page 38: ...r 1 to 4 3 Press OFF to hang up The call will be transferred directly The paged party can answer the transferred call by pressing C or s After the paged party answers the transfer is complete If the paged party does not answer press C or s to return to the outside call If the paged party does not answer within 60 seconds after you hang up your phone will ring and the call will be returned to your ...

Page 39: ...he call on hold can resume the full conference by pressing the soft key A maximum of three parties including the outside party can take part in a conference call Call Share This feature allows the handset to join an existing outside call To prevent other users from joining your conversation turn the Call Privacy feature on p 43 To join a conversation Call Share Press C or s Conference is displayed...

Page 40: ...ial setting by pressing d or B then press the soft key 3 Press the soft key at Voice Mail 4 Press the soft key at Store VM access 5 Enter your access number up to 32 digits If a pause is required for dialing press the soft key Each time you press the soft key a digit is erased To erase all of the digits press and hold the soft key 6 Press the soft key then press OFF is displayed To prevent misdial...

Page 41: ...ephone company Voice Mail will be displayed on the handset the Ringer Message Alert indicator on the handset will flash slowly if Message Alert is turned on p 19 and the VM indicator will flash on the base unit Turn off this programming when you do not subscribe to a voice mail service your telephone company does not send a series of tones followed by a continuous tone to indicate you have new voi...

Page 42: ... handset beeps Voice Mail will disappear and stops flashing but remains on the handset and the Ringer Message Alert indicator on the handset and the VM indicator on the base unit will go out If your voice mail service uses a voice mail tone and the recorded message is over 3 minutes long the handset and base unit may not indicate you have new messages If your voice mail service uses a voice mail t...

Page 43: ... an outside caller To allow other users to join your conversation leave this feature off This feature is only available for the handset To turn on the Call Privacy feature Press the soft key during a conversation PRIVACY will be displayed To turn this feature off press the soft key again during a conversation While the Call Privacy feature is turned on other users cannot join the conversation Call...

Page 44: ...e cannot be used when the first call is put on hold If this function does not operate properly consult your telephone company for details Call Waiting Caller ID display If you subscribe to both Caller ID and Call Waiting with Caller ID services CWID when a second call is received while talking the second caller s information will be displayed After you hear a call waiting tone while talking the di...

Page 45: ...se special features of your host PBX such as transferring an extension call or accessing optional telephone services such as call waiting Pressing FLASH CALL WAIT cancels the mute or the Temporary Tone Dialing mode p 43 44 Selecting the flash time The flash time depends on your telephone exchange or host PBX You can select the following flash times 700 600 400 300 250 110 100 or 90 ms milliseconds...

Page 46: ...ound tones key tone confirmation tone error tone The factory preset is ON 1 Press MENU 2 Press the soft key at Ringer setting 3 Scroll to Incoming call by pressing d or B then press the soft key 4 Select On Off or 2 by pressing d or B 5 Press the soft key then press OFF 1 Press MENU 2 Scroll to Initial setting by pressing d or B then press the soft key 3 Scroll to Key tone by pressing d or B then ...

Page 47: ...sation Please use only a Panasonic KX TCA60 KX TCA86 KX TCA88 KX TCA88HA KX TCA91 KX TCA92 or KX TCA98 headset To order call the accessories telephone number on page 2 Connecting an optional headset Open the headset jack cover and insert the headset plug into the headset jack as shown below Headset sold separately Model shown here is KX TCA88 To switch to the speakerphone while using the headset P...

Page 48: ... wall phone plate 1 Connect the AC adaptor 2 Tuck the telephone line cord inside the wall mounting adaptor A Connect the telephone line cord B 3 Insert the hooks on the wall mounting adaptor into the holes A and B on the base unit To Power Outlet 1 2 A B A B ...

Page 49: ...ystem 4 Adjust the adaptor to hold the base unit then push it in the direction of the arrow until it clicks into place 5 Connect the telephone line cord Mount the unit then slide it down Raise the antennas 6 To charge the handset battery Place the handset on the base unit The unit beeps once and the CHARGE indicator lights ...

Page 50: ...unit KX TG5202 only The charger can be wall mounted Connect the AC adaptor Install screws using the wall template see below Mount the charger A Slide it down B then slide down to the right C until it is secured 2 1 1 RELEASE LEVERS A B C Screws To Power Outlet 2 45 cm 31 32 Wall Template for the Charger unit 2 45 cm 31 32 ...

Page 51: ...r IQ 2 7 1 View information 4 7 2 5 Go to Step 4 on page 64 Get new information 3 7 3 5 Go to Step 4 on page 63 Turn Caller IQ off 3 7 4 5 p 61 Turn Caller IQ on 3 7 5 5 p 61 Copy phone book Copy 1 item 1 Go to Step 4 on page 35 Copy phone book Copy all items 2 Go to Step 4 on page 36 LCD contrast 0 1 1 6 Level 1 6 p 19 Key tone 0 2 1 On 0 Off p 46 Auto talk 0 3 1 On 0 Off p 16 Caller ID Number Au...

Page 52: ...aller IQ is turned off Turn CIQ on is displayed after pressing 7 Canceling Registration Re registration Canceling the Handset Registration If you no longer need to use the handset or if you want to use the handset with a different base unit of the same model it is necessary to cancel the handset s registration from the current base unit Only one handset can be canceled at a time Make sure the hand...

Page 53: ...the handset and base unit nearby during registration 5 Press 3 3 5 to delete the registration memory If you enter a wrong code re enter 3 3 5 6 Press the soft key The registration memory will be erased on both the handset and the base unit If the handset beeps 3 times you entered a wrong code Enter 335 then press the soft key To register the handset to another base unit of the same model start fro...

Page 54: ...1 Press the soft key 2 Wait until a long beep sounds and the display shows the new extension number ex extension number 2 Registration is complete If you have not canceled the handset s registration at the previous base unit p 52 the handset number remains in that base unit s memory To erase the handset number from the previous base unit see the base unit s Operating Instructions For the KX TG5200...

Page 55: ...nd press the button again Busy The called handset is in use Privacy mode is on for the call you tried to join p 43 The handset you tried to send phone book items to is in use The handset you are calling is too far from the base unit Invalid The called handset has not been registered to the base unit You selected your own extension number Error When you tried to register or deregister the handset t...

Page 56: ... C or s Phone book No items stored Your phone book is empty No items were copied to the destination unit Invalid Please register to the base unit The handset you tried to call has not been registered to the base unit Register the handset p 54 steps 5 and 6 Store VM access A voice mail access number is not stored Store the number p 40 Error 4 handsets have already been registered 4 handsets have al...

Page 57: ... the dialing mode setting is correct p 15 Fully charge the battery p 11 Clean the charge contacts and charge again p 12 Check battery installation p 11 Unplug the base unit s AC adaptor to reset it Plug in and try again The handset has not been registered to the base unit Register the handset p 54 steps 5 and 6 Re install the battery p 11 and fully charge it Static sound cuts in out fades Interfer...

Page 58: ...you have long distance service Check if Caller IQ feature is turned on Turn Caller IQ feature off p 61 The handset does not display the caller s name and or phone number You need to subscribe to Caller ID Other telephone equipment may be interfering with your phone Disconnect it and try again Other electrical appliances connected to the same outlet may be interfering with Caller ID Telephone line ...

Page 59: ... charge again p 12 The battery may need to be replaced If you install a new battery fully charge it p 11 12 The CHARGE indicator does not go out after the battery has been charged This is normal The Ringer Message Alert indicator flashes slowly when the handset is not ringing and in use The Message Alert is turned on and new messages in your voice mailbox have been recorded Turn the Message Alert ...

Page 60: ... the handset while Listen follow phone guidance is being displayed Check the settings p 10 12 Dialing to openLCR may have been disconnected Try again p 63 If you cannot solve a problem consult openLCR see below For more information about Caller IQ Call openLCR s customer service department at 1 866 openLCR 1 866 673 6527 openLCR s web site www openLCR com ...

Page 61: ...ECT TO ANY OF THE SERVICES PROVIDED BY OPENLCR NOR ASSUME NOR CREATE ANY OTHER OBLIGATION OF ANY KIND ON BEHALF OF OPENLCR Turning on or off Caller IQ Feature After the first download to your phone Caller IQ features are automatically turned on If you wish you can turn off Caller IQ When Caller IQ is on CIQ is displayed while talking To turn off Caller IQ feature when it is already on To turn on C...

Page 62: ...otice 1 Access the openLCR s web site at www openLCR com and click on the Manage Account Login tab 2 Enter your Telephone Number and Password then click 3 Follow the on screen instructions Phone book data To create the phone book data enter a name of up to 16 characters and a phone number of up to 32 digits If you have already stored items into the phone book of the unit you need to enter all of t...

Page 63: ...tart again from step 1 To download data from openLCR 1 Press MENU 2 Scroll to Caller IQ by pressing d or B then press the soft key 3 Scroll to Get new Info by pressing d or B then press the soft key The unit will dial openLCR automatically A voice prompt will be heard 4 Follow the voice prompt to start downloading If you have rotary or pulse service you need to press to change the dialing mode tem...

Page 64: ...openLCR are stored in the handset and will be heard when you receive an outside call The names of each melody up to 14 characters are also downloaded To select the desired melody go to the Ringer tone menu in the Ringer setting menu p 18 Downloaded melody 1 and 2 can also be selected by pressing d B 8 or 9 To view information 1 Press MENU 2 Scroll to Caller IQ by pressing d or B then press the sof...

Page 65: ...overload wall outlets and extension cords This can result in the risk of fire or electric shock 10 Never push any objects through slots in this unit This may result in the risk of fire or electric shock Never spill any liquid on the unit 11 To reduce the risk of electric shock do not disassemble this unit Take the unit to an authorized servicenter when service is required Opening or removing cover...

Page 66: ...he electrolyte may be toxic if swallowed 4 Exercise care in handling batteries in order not to short the battery to conductive materials such as rings bracelets and keys The battery and or conductor may overheat and cause burns 5 Charge the battery ies provided with or identified for use with this product only in accordance with the instructions and limitations specified in this manual WARNING TO ...

Page 67: ...if advance notice isn t practical the telephone company will notify the customer as soon as possible Also you will be advised of your right to file a complaint with the FCC if you believe it is necessary The telephone company may make changes in its facilities equipment operations or procedures that could affect the operation of the equipment If this happens the telephone company will provide adva...

Page 68: ...f interference is experienced move the cordless telephone further away from the TV or VCR This will often reduce or eliminate interference Operating near 5 8GHz electrical appliances may cause interference Move away from the electrical appliances FCC RF Exposure Warning This product complies with FCC radiation exposure limits set forth for an uncontrolled environment To comply with FCC RF exposure...

Page 69: ...ult the manufacturer of any personal medical devices such as pacemakers or hearing aids to determine if they are adequately shielded from external RF radio frequency energy The unit operates in the frequency range of 5760MHz to 5840MHz and the power output level can range 0 25 to 0 5 watts Do not use the unit in health care facilities if any regulations posted in the area instruct you not to do so...

Page 70: ...4 mm x 135 mm 4 7 32 x 8 15 32 x 5 5 16 Mass Weight Approx 340 g 0 75 lb N Charger KX TG5202 only Power Supply AC adaptor 120 V AC 60 Hz Power Consumption Standby Approx 0 8 W Maximum Approx 4 0 W Dimensions H x W x D Approx 69 mm x 74 mm x 100 mm 2 23 32 x 2 29 32 x 3 15 16 Mass Weight Approx 120 g 0 28 lb N Dialing Mode Tone DTMF Pulse N Operating Environment 5 C 40 C 41 F 104 F Specifications a...

Page 71: ...r List 26 Chain dial 33 CID Caller ID 24 Clarity booster 22 CONF Conference 39 Conference calls 39 Copy phone book 35 D Deregistration 52 Dialing mode 15 Direct commands 51 52 Display 9 Display language 15 E Error messages 55 Extension number 37 53 54 F FCC and other information 67 FLASH button 45 Flash time 45 Function menu Direct commands 51 52 Function menu selection 13 Function menu table 14 H...

Page 72: ...gistration 53 54 Registration canceling 52 Ringer off 17 23 Ringer tone 18 Ringer volume 17 Rotary service tone dialing 44 S Safety instructions 65 Shipping product for service Back cover Soft keys 8 Specifications 70 SP phone 20 T Transferring a call 38 Troubleshooting 57 TTY 2 74 Back Cover V VE Voice Enhancer 22 VM Voice Mail 40 Voice enhancer technology 22 Volume control handset 21 W Wall moun...

Page 73: ...73 ...

Page 74: ...74 ...

Page 75: ......

Page 76: ... regional sales offices These locations do not repair consumer products For your future reference Serial No Date of purchase found on the bottom of the unit Name and address of dealer Panasonic Consumer Electronics Company Division of Matsushita Electric Corporation of America One Panasonic Way Secaucus New Jersey 07094 Panasonic Sales Company Division of Matsushita Electric of Puerto Rico Inc Ave...

Reviews: