background image

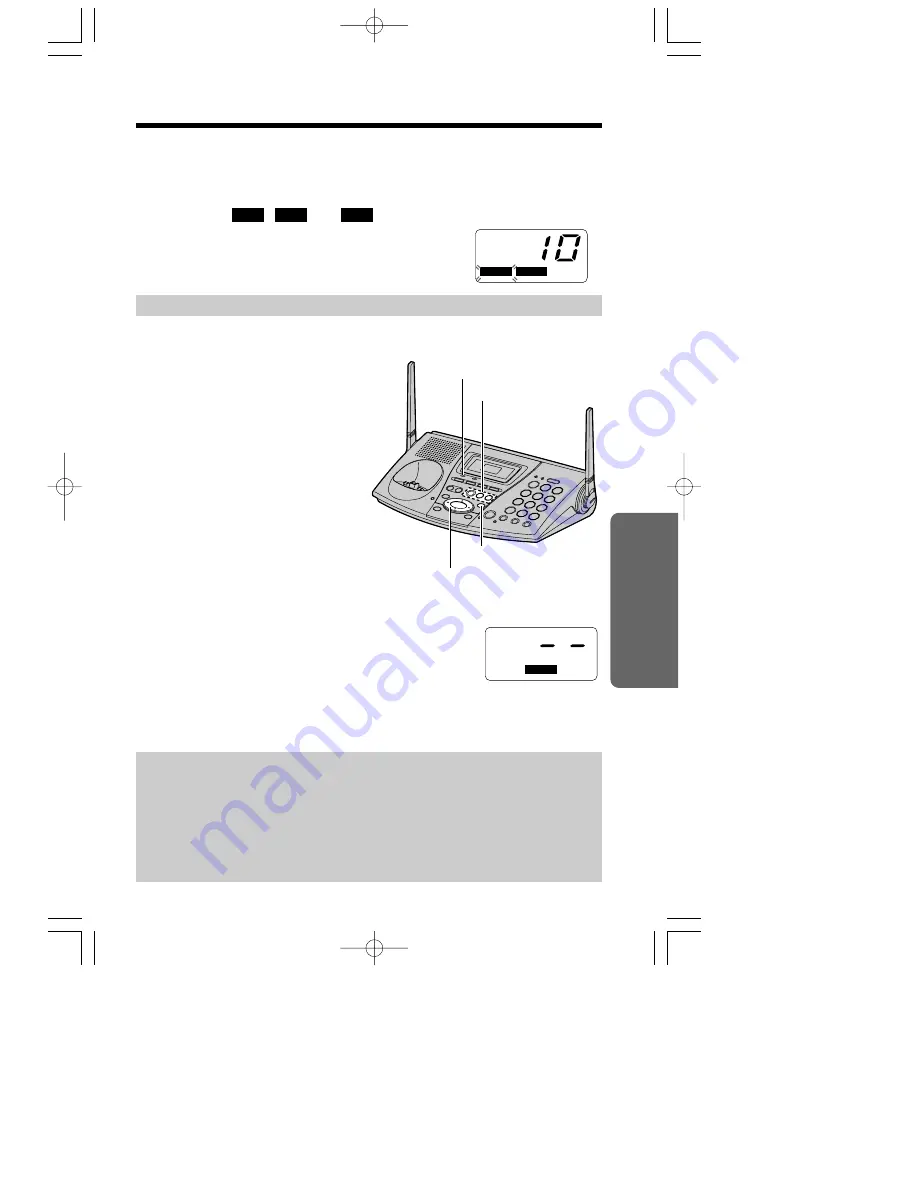
You can see the total number of recorded
messages on the base unit display. If the
ANSWER ON indicator flashes, new
messages have been recorded. The
mailbox icons (

and

)

which have new messages also flash on
the base unit display. 

If only old messages exist in a mailbox, the
mailbox icon will be displayed but will not flash.

BOX 3

BOX 2

BOX 1

To play back messages

Press the MAILBOX button (

(MAILBOX–1)

(MAILBOX–2)

or 

(MAILBOX–3)

).

The unit announces “

Mailbox (No.)

and the number of new messages in
the mailbox, and plays back the new
messages.

If old messages exist with new
messages in the mailbox, only new
messages will be played back.

When the mailbox has no new
messages,

the unit announces

Mailbox (No.)

” and “

No new messages.

All message playback

”, and plays back

all messages in the mailbox.

When Mailbox 2 or 3 has the password:

1. Press 

(MAILBOX–2)

or 

(MAILBOX–3)

.

Enter Mailbox password

” will be heard, and “

--

will be displayed.

2. Enter the Mailbox password (p. 71).

The unit announces “

Mailbox (No.)

” and the number 

of new messages in the mailbox, and plays back the new messages. If there
are no new messages, all messages in the mailbox will be played back.

BOX 

BOX 

3

RINGER

FULL

OFF

OFF

BOX 

1 BOX 

BOX 

2

BOX 

1

BOX 

3

RINGER

FULL

OFF

OFF

BOX 

2

e.g. Mailbox 2

73

Answering System

Listening to Messages

During playback, the display shows the message number of the mailbox. 
(e.g. While the first message of the mailbox is being played back, “1” is
displayed.)

At the end of the last message of the mailbox, “

End of final message

” is heard.

The unit will announce the remaining recording time if it is less than
5 minutes.

When the mailbox has no messages, the unit announces “

Mailbox (No.)

” and

No messages

”.

(STOP)

ANSWER ON Indicator

MAILBOX Buttons

(‹)

(›)

(fi)

(fl)

e.g. 10 messages exist; 

Mailbox 1 has new
messages;
Mailbox 2 has old
messages; 
Mailbox 3 has no messages.

To listen to messages with the handset, see page 77.

PQQX13405ZA-BM-5E  02.6.4 3:43 PM  ページ 73

Summary of Contents for KX-TG2730CS

Page 1: ...tem Operating Instructions Model No KX TG2730CS Pulse or tone dialing capability PLEASE READ BEFORE USE AND SAVE For assistance please call 1 800 561 5505 or visit us at www panasonic ca Charge the battery for about 15 hours before initial use Call Display Compatible PQQX13405ZA BM 1E 02 6 4 3 42 PM ページ 1 ...

Page 2: ...second caller s name and phone number while the user is on the phone line with the first caller requires a subscription to both Call Display with Name and Call Waiting Service Accessories included AC Adaptor p 11 one Telephone Line Cord p 11 one Battery p 12 89 one Wall Mounting Adaptor p 86 one Belt Clip p 85 one Handset Cover p 12 89 one To use more than one handset please purchase the optional ...

Page 3: ...e unit If you use the handset near another cordless phone s base unit noise may be heard Move away from the other cordless phone s base unit and closer to your base unit Away from electrical appliances such as a TV personal computer or another cordless phone In a HIGH and CENTRAL location with no obstructions such as walls Raise the antennas Base Unit Location Noise Calls are transmitted between t...

Page 4: ...plex Speakerphone 33 Answering Calls 35 Handset 35 Base Unit 35 Call Display Service 36 Using the Caller List 37 Viewing the Caller List 38 Calling Back from the Caller List 39 Editing the Caller s Phone Number 40 Storing Caller List Information in the Directory 41 Erasing Caller List Information 42 Speed Dialer 43 Storing Phone Numbers 43 Dialing a Stored Number 43 Directory 44 Storing Names and ...

Page 5: ...72 Setting the Unit to Answer Calls 72 Listening to Messages 73 Erasing Messages 74 Recording a Memo Message 75 Transferring a Call to a Mailbox 76 Remote Operation with the Handset 77 Remote Operation from a Touch Tone Phone 80 Remote Code 81 Voice Menu 82 Direct Remote Operation 83 Useful Information Belt Clip 85 Optional Headset 85 Wall Mounting 86 Adding Another Phone 88 Battery Replacement 89...

Page 6: ...M DIGITAL SP PHONE CONF Display p 9 MIC Microphone p 24 33 35 52 75 CHARGE Indicator p 12 PROGRAM Button p 43 RINGER AUTO Button p 21 43 DIGITAL SP PHONE Speakerphone Button and Indicator p 33 35 52 MUTE Button and Indicator p 28 59 62 FLASH CALL WAIT Button p 63 67 REDIAL PAUSE Button p 34 62 LOCATOR INTERCOM TRANSFER Button and Indicator p 52 55 59 76 PRIVACY Button and Indicator p 57 HOLD Butto...

Page 7: ...8 74 Speaker p 25 34 TONE Button p 62 Antenna p 3 11 Charge Contacts p 13 MAILBOX Buttons p 73 74 75 1 2 3 IN USE Indicator p 33 34 35 How to use the Navigator key This key has four active areas that are indicated by arrows Pressing the up and down arrows allows you to adjust the speaker volume and the ringer volume Pressing the right arrow allows you to skip a message Pressing the left arrow allo...

Page 8: ... menu choices Throughout these Operating Instructions the Navigator key is indicated by the arrows fi or fl INTERCOM TRANSFER CLEAR SP PHONE FUNCTION REDIAL CALLWAIT 2 1 3 4 5 6 7 8 TONE 0 9 TALK OFF HOLD FLASH CONF PAUSE Headset Jack p 85 TONE Button p 62 Microphone p 30 35 Charge Contacts p 13 Antenna Display p 10 OFF Button p 14 29 38 46 77 HOLD CLEAR INTERCOM TRANSFER Button p 32 42 48 51 54 PAU...

Page 9: ...s which can still be recorded is 0 Erase unnecessary messages p 74 79 3 When flashes you have not set the clock yet or a power failure may have occurred The clock needs adjusting p 23 4 Message counter shows the total number of recorded messages in all mailboxes If the recording time is set to Greeting only will be displayed p 26 While adjusting the speaker volume the level is displayed p 25 34 is...

Page 10: ...mber of the handset is displayed if the handset has been registered to the base unit p 28 91 7 The display shows the dialed number call status programming options and directory items etc If you subscribe to a Call Display service caller information will be displayed Received calls will be displayed when new calls have been received 8 The prompts on the bottom line will show corresponding functions...

Page 11: ...onnect a standard telephone on the same line see page 88 If your unit is connected to a PBX which does not support Call Display services you cannot access those services Hook Telephone Line Cord AC Adaptor Power Outlet AC 120 V 60 Hz Single Line Telephone Jack CA11A Fasten the AC adaptor cord to prevent it from being disconnected Raise the antennas PQQX13405ZA BM 2E 02 6 4 3 42 PM ページ 11 ...

Page 12: ...ttery Charge Place the handset on the base unit and charge for about 15 hours before initial use The CHARGE indicator lights a beep sounds and Charging will be displayed Installing the Battery in the Handset Insert the battery into the handset as shown matching the correct polarity 1 Press the battery down until it settles into the compartment 2 When finished close the cover CHARGE Indicator 1 2 P...

Page 13: ... recharge the handset battery for more than 15 minutes the display will continually indicate Recharge battery and or will flash when the handset is lifted off the base unit If the battery has been discharged the handset will display Charge for 15HRS and when you place the handset on the base unit The handset will not work Keep charging Battery information After your Panasonic battery is fully char...

Page 14: ...mming is complete a confirmation tone sounds The display will return to the main menu or the sub menu I or the sub menu II if the function item is in the sub menu I or in the sub menu II You can continue programming other items To exit the menu press OFF Useful information indicates the beginning or end of the function menu You can go back to the previous display by pressing fi except when entering...

Page 15: ...ub menu I item See the corresponding pages for function details Save directory p 44 p 23 Ringer setting Date and time Copy directory Initial setting p 20 p 68 p 69 Ringer volume Ringer tone Incoming call p 49 Copy 1 item p 50 Copy all items p 21 LCD contrast p 19 Auto talk p 58 Room monitor Set tel line Registration p 17 Set dial mode p 67 Set flash time p 18 Set line mode Set answering p 27 Numbe...

Page 16: ...s fl 3 Scroll to Change language by pressing or 4 Press fl 5 Press fl at Display The current setting is displayed 6 Select French or English by pressing or 7 Press the right soft key A beep sounds To exit the programming mode press OFF You can exit the programming mode at any time by pressing OFF SAVE Display English 4 3 1Save directory Ringer setting Copy directory 1Initial setting 2Way radio mode R...

Page 17: ...Press fl 6 Press fl at Set dial mode The current setting is displayed 7 Select Pulse or Tone by pressing or 8 Press the right soft key A beep sounds To exit the programming mode press OFF You can exit the programming mode at any time by pressing OFF SAVE Set dial mode Tone 4 3 Room monitor 1Set tel line Set answering 1Save directory Ringer setting Copy directory 1Initial setting 2Way radio mode 1LCD...

Page 18: ... Set line mode by pressing or 6 Press fl The current setting is displayed 7 Select B or A by pressing or 8 Press the right soft key A beep sounds To exit the programming mode press OFF You can exit the programming mode at any time by pressing OFF SAVE 1Set dial mode Set flash time 1Save directory Ringer setting Copy directory 1Initial setting 2Way radio mode Room monitor 1Set tel line Set answering...

Page 19: ...by pressing or 3 Press fl 4 Scroll to Auto talk by pressing or 5 Press fl The current setting is displayed 6 Select On or Off by pressing or 7 Press the right soft key A beep sounds To exit the programming mode press OFF You can exit the programming mode at any time by pressing OFF In order to view Call Display information after you lift up the handset to answer a call leave the Auto Talk feature OF...

Page 20: ...d 5 Press the right soft key A beep sounds To turn the ringer ON Press in step 4 and press the right soft key The ringer will sound at the LOW level You can exit the programming mode at any time by pressing OFF If set to OFF Ringer off will be displayed while the handset is not in use You can also select the ringer volume while an external call is being received Press or while the handset is just ...

Page 21: ...it ringer volume to HIGH MEDIUM LOW or OFF If set to OFF the base unit will not ring for external calls and for internal calls it will ring at the LOW level Your phone comes from the factory set to HIGH Make sure the base unit is not being used To select HIGH preset MEDIUM or LOW press RINGER AUTO Each time you press the button the ringer volume will change and ring To turn the ringer OFF press an...

Page 22: ... press fl 3 Scroll to Change language by pressing or and press fl 4 Scroll to Voice prompt by pressing or 5 Press fl The current setting is displayed 6 Select French or English by pressing or 7 Press the right soft key A beep sounds To exit the programming mode press OFF You can exit the programming mode at any time by pressing OFF SAVE Voice prompt English 4 3 Copy directory 1Initial setting 2Way ra...

Page 23: ... sounds and the clock starts working If 3 beeps sound the setting is not correct Start again from step 4 To exit the programming mode press OFF You can exit the programming mode at any time by pressing OFF When entering the time in step 4 you cannot enter numbers greater than 12 Do not use military time To set 13 00 hours enter 0100 and select PM by pressing SAVE If a power failure occurs the time...

Page 24: ... Jack press and 3 Or just stay on the line and leave a message after the beep Thank you Greeting Message You can record a personal greeting message of up to 2 minutes If a greeting message is not recorded one of two pre recorded greetings will be played when a call is received p 25 All messages greeting incoming memo etc are stored in digital memory p 25 The total recording time is about 11 minute...

Page 25: ...our name and phone number after the beep We will return your call When the recording time is set to Greeting only Hello we are not available now Please call again Thank you for your call Flash Memory Message Backup Messages are stored on a flash memory IC chip and will not be affected by power failures All messages are saved until you erase them 3 When finished press GREETING The unit will automat...

Page 26: ...setting by pressing or and press fl 3 Scroll to Set answering by pressing or and press fl 4 Scroll to Recording time by pressing or 5 Press fl The current setting is displayed 6 Select the recording time by pressing or You can also select the recording time by pressing 1 1 minute 2 2 minutes 3 3 minutes or 0 Greeting only 7 Press the right soft key A beep sounds To exit the programming mode press OFF...

Page 27: ...so select the number of rings by pressing 0 Toll saver or 2 to 7 7 Press the right soft key A beep sounds To exit the programming mode press OFF You can exit the programming mode at any time by pressing OFF SAVE Toll saver When you call the unit from outside If the unit answers on the 2nd ring there is at least one new message If the unit answers on the 4th ring there are no new messages Hang up w...

Page 28: ...ill then be complete The registered number 1 to 8 is shown on the top right of the display OK e g Extension number 2 KX TG2730CS Up to 7 optional handsets can be added The illustration is KX TGA270CS KX TG2730CS includes a handset with the base unit You can expand the system by adding up to 7 optional handsets to the system A maximum of 8 handsets can be registered at the base unit Generally a max...

Page 29: ...he Reception Booster feature see page 31 MUTE PRIVACY OFF PAUSE REDIAL HOLD CLEAR fi fl Display Receiver Microphone Back side Speaker Handset To re register a handset to a different base unit of the same model see pages 90 and 91 You can stop registration by pressing OFF on the handset and pressing MUTE on the base unit SP PRIVACY 1 Talk 002 Booster IN USE PRIVACY MUTE SP PRIVACY 1 Talk 1112222 IN U...

Page 30: ...peakerphone 1 Press SP phone is displayed 2 Dial a phone number The dialed number is displayed After a few seconds the display will show the length of the call 3 When the other party answers talk into the microphone 4 To hang up press OFF or place the handset on the base unit To adjust the receiver volume HIGH MEDIUM or LOW or speaker volume 6 levels while talking To increase press To decrease pre...

Page 31: ...ter on 31 Cordless Telephone To dial after confirming the entered number 1 Enter a phone number If you misdial press HOLD CLEAR One digit will be erased Dial the correct phone number To cancel press OFF 2 Press OR To have a hands free phone conversation press and when the other party answers talk into the microphone After a few seconds the display will show the length of the call 3 To hang up pres...

Page 32: ... release the hold by pressing or IN USE To redial using the redial list Memory Redial The last 5 phone numbers dialed with the handset are stored in the redial list 1 Press PAUSE REDIAL The last number dialed is displayed with number 1 2 Scroll to the desired number by pressing or You can also scroll down through the list by pressing PAUSE REDIAL To exit the list press OFF 3 Press or To erase an i...

Page 33: ...TAL SP PHONE on the base unit If on the base unit just lift up To use PRIVACY and MUTE features see pages 57 and 62 Base Unit Digital Duplex Speakerphone MIC DIGITAL SP PHONE and Indicator REDIAL PAUSE HOLD IN USE Indicator Hands free Digital Duplex Speakerphone For best performance please note the following Talk alternately with the caller in a quiet room If the other party has difficulty hearing...

Page 34: ...ights start to flash If a call is kept holding for 6 minutes an alarm tone will start to sound After 4 additional minutes on hold the call will be disconnected To release the hold From the base unit press DIGITAL SP PHONE From the handset press or If another phone is connected on the same line p 88 you can also release the hold by lifting its handset The DIGITAL SP PHONE indicator and IN USE indic...

Page 35: ...ther party answers talk into the microphone 2 To hang up press OFF Auto Talk If you set the Auto Talk feature to ON p 19 you can answer a call by lifting the handset off the base unit without pressing or If you purchase an additional handset p 28 you can answer a call by lifting it off the charger Microphone OFF Base Unit 1 Press DIGITAL SP PHONE 2 Talk into the MIC 3 To hang up press DIGITAL SP P...

Page 36: ...en the 51st call is received the first call is deleted Using the list you can automatically call back a caller You can store the callers names and numbers from the Caller List into the directory If you subscribe to a Visual Call Waiting Call Waiting ID Service when a second call is received while talking the new caller s name and phone number will be displayed p 63 How caller information is displa...

Page 37: ...t support Call Display services you cannot access those services The name display service may not be available in some areas For further information please contact your telephone company If the handset has lost communication with the base unit when a call is received the caller information will not be recorded in the Caller List Using the Caller List If you have received new calls Received calls w...

Page 38: ... added to caller information If the system has one or more additional handset p 28 each handset has the Caller List individually If you checked the Caller List on your handset Caller List information in the other handsets will remain still NEW and will not be added In step 1 you can go to the directory list by pressing fl p 46 If you do not press any buttons for 60 seconds the handset will exit the...

Page 39: ...nter the Caller List 2 Scroll to the desired caller by pressing or 3 Press or the left soft key The displayed phone number is dialed automatically In some cases you may have to edit the number before dialing p 40 e g You may have to add 1 for long distance calls If a phone number is not displayed in the caller information you cannot call back that caller DIAL e g The caller called 3 times e g Talk...

Page 40: ...toring procedures To call back press or the left soft key p 39 To store the number in the directory press fl Follow the instructions on the display see page 41 from step 4 If a 7 digit number comes without editing will not be displayed with the item and you cannot edit that 7 digit number The number edited in step 3 will not be maintained in the Caller List EDIT DIAL Phone no Area code Phone no Pho...

Page 41: ...f a name is required enter the name p 45 When finished press 2 Press the right soft key A beep sounds To continue storing other items repeat from step 2 To exit the programming mode press OFF You can exit the programming mode at any time by pressing OFF If the display shows Directory Full in step 4 press OFF to exit the list To erase other stored items from the directory see page 48 You cannot sto...

Page 42: ...the information is erased To erase other items repeat from step 2 To exit the Caller List press OFF To erase all entries in the Caller List Before erasing all entries make sure that 0 new caller is displayed 1 Press or to enter the Caller List 2 Press HOLD CLEAR To stop erasing press fi 3 Press HOLD CLEAR again A beep sounds and all entries are erased Caller s list 10 new callers 4 3 1 Directory li...

Page 43: ...unds To store other numbers repeat steps 1 to 4 If a pause is required for dialing press REDIAL PAUSE where needed Pressing REDIAL PAUSE counts as one digit p 62 When entering is displayed When entering is displayed To erase a stored number Press PROGRAM press RINGER AUTO and press the memory station number 0 to 9 for the phone number to be erased Dialing a Stored Number 1 Press DIGITAL SP PHONE 2...

Page 44: ... dialing buttons 0 to 9 p 45 To move the cursor press fi or fl If a name is not required press and go to step 5 4 Press 5 Enter a phone number up to 22 digits Each time you press HOLD CLEAR a digit is erased To erase all of the digits press and hold HOLD CLEAR To move the cursor press fi or fl 6 Press If you want to change the name or number press to reach the desired display and change it 7 Press the...

Page 45: ...rase other stored items from the directory see page 48 Selecting characters to enter names The handset dialing buttons 0 to 9 can be used to enter letters and symbols The letters are printed on the dialing buttons Pressing each button selects a character as shown below To Tom Tom Jo Tom Jones T 1 a b c A B C 2 d e f D E F 3 g h i G H I 4 j k l J K L 5 m n o M N O 6 p q r s P Q R S 7 t u v T U V 8 ...

Page 46: ...tter of the desired name until any name with the same initial is displayed see the Index table below e g To find Frank press 3 repeatedly until the first item under F is displayed 2 Press repeatedly until the name is displayed 3 Press or The number is dialed automatically If No items stored is displayed in step 1 the directory list is empty You can leave the directory list at any time by pressing ...

Page 47: ...AR a digit is erased To erase all digits press and hold HOLD CLEAR To move the cursor press fi or fl 7 Press If you want to change the name or number press to reach the desired display and change it 8 When finished press the right soft key A beep sounds To continue editing other items repeat from step 2 To exit the directory list press OFF You can exit the edit mode at any time by pressing OFF SAVE ...

Page 48: ...l see page 46 3 Press HOLD CLEAR To stop erasing press fi 4 Press HOLD CLEAR A beep sounds and the item is erased To erase other items repeat from step 2 To exit the directory list press OFF You can exit the programming mode at any time by pressing OFF Clear Clear 2 No CLEAR Yes SP PRIVACY 1 Helen 234 567 8901 SP PRIVACY 1 Directory list 10 items 4 3 1 Caller s list PQQX13405ZA BM 3E 02 6 4 3 43 PM...

Page 49: ...end one directory item to another handset 1 Press CONF FUNCTION 2 Scroll to Copy directory by pressing or and press fl 3 Press fl at Copy 1 item 4 Select the destination extension number by pressing or You can also select the extension number by pressing the dialing button 1 to 8 5 Press fl 6 Scroll to the directory item you want to send by pressing or To search for the item by initial see page 46 7 ...

Page 50: ...directory memory is full That item and items after it have not been transferred to the destination handset To exit the directory sending mode press OFF To erase other stored items from the destination handset directory see page 48 You can re send all of the items or re send the items which have not been transferred one by one p 49 You can exit the directory sending mode by pressing OFF SEND If Inc...

Page 51: ...page the base unit press 0 The base unit will ring for 1 minute To stop paging press OFF 3 When the paged party answers talk into the handset You can switch to the speaker by pressing To switch back to the receiver press 4 To end the intercom press OFF To page another handset when the system has additional handsets p 28 Press HOLD INTERCOM and enter the extension number using the dialing button 1 ...

Page 52: ...r LOCATOR INTERCOM TRANSFER 3 When the paged party answers talk into the MIC 4 To end the intercom press DIGITAL SP PHONE or LOCATOR INTERCOM TRANSFER The LOCATOR INTERCOM TRANSFER indicator and DIGITAL SP PHONE indicator lights go out To page all handsets when the system has additional handsets p 28 Press LOCATOR INTERCOM TRANSFER and enter 0 All handsets will ring for 1 minute You can only talk ...

Page 53: ...ndset on the base unit or the charger Auto Talk If you set the Auto Talk feature to ON p 19 you can answer a call by lifting the handset off the base unit without pressing or HOLD INTERCOM If you purchase an additional handset p 28 you can answer a call by lifting it off the charger Base unit When an intercom call is being received the base unit rings and the LOCATOR INTERCOM TRANSFER indicator li...

Page 54: ...the transfer the LOCATOR INTERCOM TRANSFER indicator light flashes Press DIGITAL SP PHONE or LOCATOR INTERCOM TRANSFER to answer the page After the paging party hangs up the call you can talk to the outside caller If the paging party hangs up before you answer the page press DIGITAL SP PHONE to take the transferred call To answer a transferred call on another handset when the system has additional...

Page 55: ...ging party hangs up the call you can talk to the outside caller If the paging party hangs up before you answer the page Incoming call is displayed Press or to take the transferred call Any user can take a transferred call by pressing or DIGITAL SP PHONE If you do not announce the transfer and if the paged party does not answer within 60 seconds after you hang up the transferred call will be return...

Page 56: ...ator flashes 2 To page the handset enter the extension number using the dialing button 1 to 8 3 When the paged party answers press CONF on the base unit to make a conference call To leave the conference press DIGITAL SP PHONE The two other parties can continue the conversation During a conference the outside call can be placed on hold by pressing HOLD TRANSFER on the handset or HOLD on the base un...

Page 57: ... can turn the feature on during a call If you allow other users to join your conversation leave the feature off Handset Press the left soft key during a conversation PRIVACY will be displayed on the first line To turn the feature off press the left soft key again PRIVACY will disappear Base unit Press PRIVACY during a conversation The PRIVACY indicator lights To turn the feature off press PRIVACY ...

Page 58: ...ng by pressing or and press fl 2 Scroll to Room monitor by pressing or and press fl 3 Select On by pressing or and press the right soft key A beep sounds To exit the programming mode press OFF To prevent your handset from being monitored select Off in step 3 and press the right soft key To turn the base unit Room Monitor feature on to allow the handset to monitor through the base unit Use the handse...

Page 59: ... by pressing LOCATOR INTERCOM TRANSFER or DIGITAL SP PHONE The monitored handset user can stop being monitored by pressing OFF If the Room Monitor feature of the destination unit is off or the destination handset is on the base unit Denied will be displayed and busy tones will sound MONITOR 59 Cordless Telephone To monitor with the base unit 1 Press LOCATOR INTERCOM TRANSFER and press MUTE The LOC...

Page 60: ...essages Receiving Call Display information After you finish using this mode remember to turn the mode OFF or the battery operating time will be shortened p 13 Initial setting 12Way radio mode 2Way radio mode Off 4 3 SAVE 2Way radio mode On 4 3 SAVE 2Way radio mode To turn the 2 Way Radio mode ON Make sure the handset is not being used 1 Press CONF FUNCTION 2 Scroll to 2Way radio mode by pressing o...

Page 61: ...me 6 levels while talking press or To adjust the ringer volume for 2 Way Radio mode HIGH MEDIUM LOW or OFF To increase press while the handset is not in use To decrease press To turn the ringer off press until Off is displayed Ringer off will be displayed and the handset will not ring in the 2 Way Radio mode To answer a call 1 After the rings press or HOLD INTERCOM You can also answer a call by pr...

Page 62: ... Calls We recommend that you press PAUSE REDIAL on the handset or REDIAL PAUSE on the base unit if a pause is required for dialing with a PBX or to make a long distance call e g Line access number 9 PBX 9 PAUSE REDIAL or REDIAL PAUSE Pressing PAUSE REDIAL or REDIAL PAUSE once creates a 3 5 second pause This prevents misdialing when you redial or dial a stored number Pressing PAUSE REDIAL or REDIAL...

Page 63: ...e If this function does not operate properly consult your telephone company for details Visual Call Waiting Call Waiting ID Service Visual Call Waiting Call Waiting ID Service allows your unit to display the second caller s information After you hear a call waiting tone while talking the unit will display the caller s name with the phone number and Waiting The second caller s information will not ...

Page 64: ...n Make sure the base unit and the handset are not being used 1 Press CONF FUNCTION 2 Scroll to Initial setting by pressing or and press fl 3 Scroll to Set tel line by pressing or and press fl 4 Scroll to C WTG options by pressing or 5 Press fl The current setting is displayed 6 Select On by pressing or 7 Press the right soft key A beep sounds To exit the programming mode press OFF To turn the C WTG C...

Page 65: ...by your telephone company if applicable Consult your telephone company about voice mail services Hangs up the current call and answers the waiting call Answers the second call and combines it with the first call to make a conference call During a conference call you can choose either Drop caller1 or Drop caller2 to hang up the first or second call Returns to the waiting caller while keeping the cu...

Page 66: ...ons Drop caller1 to hang up the first call Drop caller2 to hang up the second call Press FLASH CALL WAIT to display the option menu Enter a displayed option number 1 or 2 to select the desired option In step 2 you can also select the desired option by pressing or until the option flashes then pressing FLASH CALL WAIT To cancel the option menu wait for 20 seconds The handset display will return to ...

Page 67: ...base unit and the handset are not being used 1 Press CONF FUNCTION 2 Scroll to Initial setting by pressing or and press fl 3 Scroll to Set tel line by pressing or and press fl 4 Scroll to Set flash time by pressing or and press fl The current setting is displayed 5 Select the desired time by pressing or 6 Press the right soft key A beep sounds To exit the programming mode press OFF If the unit is con...

Page 68: ...ger volume is OFF the handset will not ring p 20 You can also select the ringer tone by pressing dialing buttons 1 to 6 5 Press the right soft key A beep sounds To exit the programming mode press OFF You can exit the programming mode at any time by pressing OFF Base unit Make sure the base unit is not being used 1 Press RINGER AUTO The base unit rings at the current setting 2 Within 5 seconds sele...

Page 69: ...ting will be displayed 4 Select the desired setting On Off or 2 by pressing or 5 Press the right soft key A beep sounds To exit the programming mode press OFF Base unit incoming call tone Use the handset Make sure the base unit and the handset are not being used 1 Press CONF FUNCTION and scroll to Initial setting by pressing or and press fl 2 Scroll to Set base unit by pressing or and press fl 3 Pre...

Page 70: ...ur call If you have a message for John press and 1 for Jane press and 2 for Jack press and 3 Or just stay on the line and leave a message after the beep Thank you Callers wait until the greeting ends then they can leave a message The message will be automatically recorded into Mailbox 1 Useful information You can leave a memo message for other users in a mailbox with the base unit p 75 You can tra...

Page 71: ...word has already been assigned to the mailbox it is displayed 6 Enter a password using a 2 digit number 00 99 If you entered a wrong number press HOLD CLEAR and enter the password again 7 Press the right soft key A beep sounds If 3 beeps sound you entered the same password as the other mailbox or the remote code p 81 or the entered password was one digit Start again from step 6 and select another ...

Page 72: ... is being recorded you can monitor it through the base unit speaker To increase the speaker volume press To decrease press To answer the call with the base unit speakerphone press DIGITAL SP PHONE For the handset press or The unit stops recording Automatic Answering Operation The Answering System allows the unit to answer calls with a greeting message Callers can then leave a message in a mailbox ...

Page 73: ...Enter Mailbox password will be heard and will be displayed 2 Enter the Mailbox password p 71 The unit announces Mailbox No and the number of new messages in the mailbox and plays back the new messages If there are no new messages all messages in the mailbox will be played back BOX BOX 3 RINGER FULL OFF OFF BOX 1 BOX BOX 2 BOX 1 BOX 3 RINGER FULL OFF OFF BOX 2 e g Mailbox 2 73 Answering System List...

Page 74: ...k speed will slow down by 30 To return to the normal speed press the MAILBOX button again during playback Each time you press the MAILBOX button during playback the playback speed will change to slow normal The playback speed will return to normal after you finish listening to messages Erasing Messages The unit will announce the remaining recording time after playback if it is less than 5 minutes ...

Page 75: ...in from step 1 When the memo message is played back with the handset the handset display will show the message number of the mailbox and caller information will not be displayed p 78 75 Answering System Erasing a specific message Press ERASE while the message you want to erase is being played p 73 A short beep will sound and the message will be erased The unit will continue to play the next messag...

Page 76: ...ler will hear Please leave your message The caller can leave a message in the mailbox OR If the caller does not specify the mailbox the caller can leave a message in Mailbox 1 after the greeting message Even if you subscribe to a Call Display service p 36 caller information will not be displayed while the message that the caller left is being played on the handset The caller information will be re...

Page 77: ... displayed Mailbox 2 or 3 has the password Enter the password p 71 Mailbox No and the number of new messages will be announced and new messages will be played To play all messages in the mailbox press 5 You can enter the desired direct commands for other functions p 79 If you do not enter a command the voice menu will start p 78 3 To end remote operation press OFF PLAY Remote operation 1 Mailbox1 ...

Page 78: ...ailbox by pressing and the mailbox number 1 to 3 during the remote operation The unit will announce the remaining recording time after playback if it is less than 5 minutes If a call is being received during the remote operation you will hear incoming call tones p 69 To answer the call press or If you hear Memory full after playback erase some or all of the messages p 79 Voice menu If no commands ...

Page 79: ... a message Each time you press the button the playback speed will change to slow normal slow will be displayed for the slow speed Operation is stopped temporarily To resume operation enter a direct command within 15 seconds or the voice menu will start p 78 The current message is erased A short beep will sound and the next message will be played All recorded messages in the mailbox are erased A lo...

Page 80: ...the menu or enter the direct commands p 83 To end remote operation hang up OR To listen to messages in another mailbox press 1 Mailbox 1 2 Mailbox 2 or 3 Mailbox 3 If you hear Enter Mailbox password Mailbox 2 or 3 has a password p 71 Enter the password The unit will announce the remaining recording time after playback if it is less than 5 minutes The messages are saved If No new messages is heard ...

Page 81: ... or 5 Press fl The current setting is displayed 6 Enter a remote code using a 2 digit number 00 99 7 Press the right soft key A beep sounds If 3 beeps sound the entered remote code is the same as the password p 71 Start again from step 6 and select another code To exit the programming mode press OFF You can exit the programming mode at any time by pressing OFF To check the remote code Repeat steps ...

Page 82: ...r other functions Press 2 Press 1 to erase all messages Press 2 for other functions Press 1 Press 1 Press 1 Press 2 All message playback All recorded messages in the mailbox are played back At the end of the last message End of final message is heard The unit will announce the remaining recording time if it is less than 5 minutes New message playback Only new messages in the mailbox are played bac...

Page 83: ... messages are played back The current message is repeated If you press within 5 seconds of playback the previous message will be played The current message is skipped The next message is played Each time you press the button the playback speed will change to slow normal Operation is stopped temporarily To resume operation enter a direct command within 15 seconds or the voice menu will start p 82 T...

Page 84: ...te code for other options Skipping the greeting message After calling your unit press during the greeting message The unit skips the rest of the greeting message and you can start recording your message after the long beep SELECTING ANOTHER MAILBOX Mailbox 1 is selected and the number of new messages is heard If Mailbox 2 has a password p 71 enter it Mailbox 2 is selected and the number of new mes...

Page 85: ... and connect an optional headset to the headset jack as shown below To switch to the speakerphone while using the headset Press To return to the headset press A B Belt Clip You can hang the handset on your belt or pocket using the belt clip To attach the belt clip To remove the belt clip Headset Jack While pressing the top of the clip A pull the right edge in the direction of the arrow B The illus...

Page 86: ...inside the wall mounting adaptor 1 Connect the telephone line cord 2 Fasten the telephone line cord to prevent it from being disconnected 3 To Power Outlet 3 Insert A and B hooks on the wall mounting adaptor into the holes on the base unit Hooks Bottom of the unit 2 1 3 C A B A B C PQQX13405ZA BM 7E 02 6 4 3 44 PM ページ 86 ...

Page 87: ...base unit The CHARGE indicator lights 5 While keeping the adaptor held to the base unit slide the wall mounting adaptor to the left until it clicks into place Bottom of the unit with the adaptor locked into position 4 Adjust the adaptor to hold the base unit aligning the arrow C on the base unit with the adaptor z C Arrow C PQQX13405ZA BM 7E 02 6 4 3 44 PM ページ 87 ...

Page 88: ...ease the lock Remove the adaptor RELEASE LEVER 2 1 RELEASE LEVER Bottom of the unit with the adaptor released Adding Another Phone This unit will not function during a power failure To connect a standard telephone on the same line use a T adaptor Standard Telephone Single Line Telephone Jack T Adaptor Telephone Line Cord PQQX13405ZA BM 7E 02 6 4 3 44 PM ページ 88 ...

Page 89: ...ery fully but after a few telephone calls Recharge battery is displayed and or continues to flash or Charge for 15HRS and are displayed Please replace with a new Panasonic PQPP511SVC P P511 battery 1 2 1 Press the notch on the handset cover firmly and slide it as indicated by the arrow 2 Remove the old battery Insert the new battery into the handset as shown matching the correct polarity 1 Press t...

Page 90: ...LD CLEAR and enter 335 7 Press the right soft key A beep sounds and the registration memory will be erased on both the handset and the base unit If 3 beeps sound you entered a wrong code The display will return to step 6 Enter 335 To register the handset to another base unit of the same model start from step 5 on page 91 or see page 28 is shown on the top right of the display You can exit the prog...

Page 91: ...ber still remains on that base unit memory To erase the handset number from the previous base unit see the base unit Operating Instructions For KX TG2730CS base unit 1 press PROGRAM 2 press MUTE 3 enter 335 and 4 enter that handset number 1 to 8 e g Extension number 2 1HS registration Deregistration Copy directory 1Initial setting 2Way radio mode Set base unit 1Registration Change language SP PRIV...

Page 92: ... far from the base unit The Privacy mode is on for the call you tried to join p 57 The called handset has not been registered to the base unit or you selected your extension number You pressed 9 instead of entering an extension number Enter the extension number 0 to 8 to call When you tried to register or deregister the handset the handset and the base unit could not link for some reason such as i...

Page 93: ...is full The transfer is stopped If you tried to send all of the items the item displayed with Incomplete and items after it have not been transferred to the destination handset You can press OFF to exit the mode p 49 50 To erase other stored items from the destination handset directory see page 48 You can send all of the items again or send the items which have not been transferred one by one p 49...

Page 94: ... base unit Register it p 28 91 8 handsets have already been registered to the base unit To cancel another handset registration see page 90 This base unit has the memory of the handset currently registered to another base unit Erase the handset memory from the base unit For KX TG2730CS base unit 1 Press PROGRAM 2 Press MUTE 3 Enter 335 and 4 Enter that handset number 1 to 8 Invalid Please register ...

Page 95: ...al appliances p 3 Walk closer to the base unit Raise the base unit antennas Press fi on the handset to turn on the Reception Booster feature p 31 The ringer volume is OFF Set to HIGH MEDIUM or LOW p 20 21 61 If more than one other user is using the handsets and base unit the handset base unit may not ring Those users will hear incoming call tones p 69 and the IN USE indicator flashes quickly on the...

Page 96: ...on Telephone line noise may be affecting the Call Display information The caller requested not to send his her information See page 37 If a call is being transferred to you the caller information will not be displayed Do not pause for over 60 seconds while searching The called handset is too far from the base unit The called unit is in use Try again later If more than one other user is using the h...

Page 97: ...boxes Try again later If 2 other users are listening to messages in the mailboxes you cannot access a mailbox Try again later If the Answering System is responding to a call and another user is listening to messages in a mailbox you cannot access a mailbox Try again later Your handset is too far from the base unit Walk closer to the base unit Make sure you enter the correct remote code p 81 If Ent...

Page 98: ...se messages in the mailbox When you play back messages or you turn the Answering System on the unit announces the wrong day Call Display information is not displayed during message playback p 78 Cause Remedy While another user is accessing the mailbox or a caller is leaving a message in the mailbox you cannot erase messages in the same mailbox The date may be set wrong Adjust the date p 23 The cal...

Page 99: ... fi or fl may have been pressed when you picked up the handset Press OFF and try again If more than three other users are using the handsets you may not be able to program Try again later If the 2 Way Radio mode is on turn it off p 60 Charge the battery fully p 12 The maximum of 8 handsets have already been registered to the base unit This base unit has the memory of the handset currently registered...

Page 100: ...but should contact the appropriate electric inspection authority or electrician as appropriate NOTICE The Ringer Equivalence Number REN assigned to each terminal device provides an indication of the maximum number of terminals allowed to be connected to a telephone interface The termination on an interface may consist of any combination of devices subject only to the requirement that the sum of th...

Page 101: ...ock 3 Place the unit on a flat surface For best performance 1 If noise prevents the conversation from being understood at the handset approach the base unit to lessen the noise 2 The handset should be used at the HIGH volume setting when the reception tone is difficult to hear 3 The handset should be fully recharged on the base unit when Recharge battery is displayed and or flashes on the display ...

Page 102: ...4q k 5 1 2q Mass Weight Approx 500 g 1 10 lb Handset Power Supply Ni Cd battery 3 6 V 850 mAh Frequency 2 40 GHz 2 48 GHz Dimensions H k k W k k D Approx 242 mm k 53 mm k 40 mm 9 17 32q k 2 3 32q k 1 9 16q Mass Weight Approx 220 g 0 48 lb Security Codes 1 000 000 Dialing Mode Tone DTMF Pulse Operating Environment 5 C 40 C 41 F 104 F Specifications are subject to change without notice PQQX13405ZA B...

Page 103: ... MERCHANTABILITY OR FITNESS FOR A PARTICULAR PURPOSE IN NO EVENT WILL PANASONIC CANADA INC BE LIABLE FOR ANY SPECIAL INDIRECT OR CONSEQUENTIAL DAMAGES In certain instances some jurisdictions do not allow the exclusion or limitation of incidental or consequential damages or the exclusion of implied warranties so the above limitations and exclusions may not be applicable WARRANTY SERVICE For product...

Page 104: ...YPE OF MOISTURE If there is any trouble disconnect the unit from the telephone line and connect a known working phone If the known working phone operates properly have your unit repaired by one of the specified authorized Panasonic Factory Servicentres If the known working phone does not operate properly consult your telephone company PQQX13405ZA BM 7E 02 6 4 3 44 PM ページ 104 ...

Reviews: