background image

9

Quick Start

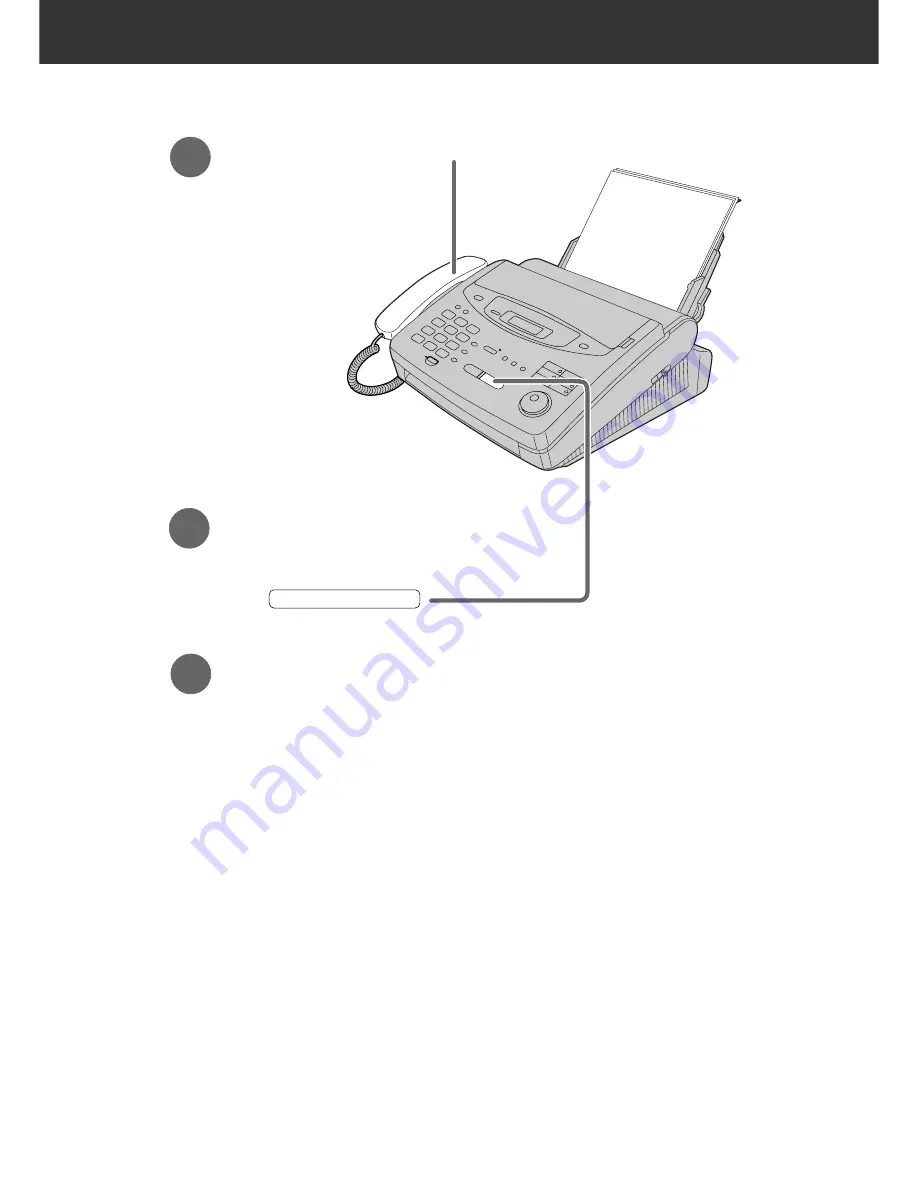
Faxes - receiving

1

When the unit rings, lift the handset.

3

Replace the handset.

2

When:
— document reception is required,
— a fax calling tone (slow beep) is heard, or
— no sound is heard,
press                                   .

START/SET/COPY

For further details, see page 70.

You can select the way to receive calls according to your needs.
See pages 66 and 67 for KX-FP300.
See pages 68 and 69 for KX-FP320/KX-FM330.

If you are having trouble, see page 116.

Summary of Contents for KX-FM330E

Page 1: ...Machine Model No KX FP300E Model No KX FP320E Multi Function Plain Paper Facsimile Model No KX FM330E OPERATING INSTRUCTIONS Please read these Operating Instructions before using the unit and save for future reference The pictured model is KX FP300 This unit is not designed for making emergency telephone calls when the power fails Alternative arrangements should be made for access to emergency ser...

Page 2: ...ing of the used film Do not rub or use an eraser on the printed side as the print may smear Model difference Copyright This manual is copyrighted by Kyushu Matsushita Electric Co Ltd KME and its licensee Under the copyright laws this manual may not be reproduced in any form in whole or part without the prior written consent of KME and its licensee Kyushu Matsushita Electric Co Ltd 1999 Features Mo...

Page 3: ...NTHS WARRANTY Thank you for purchasing your Panasonic facsimile By filling in the section below this will ensure the following We will register your unit on our warranty database Should you ever require a service call under warranty your call will be dealt with quickly and efficiently We will send you a reply fax to confirm your registration and the correct operation of your unit If you have any p...

Page 4: ...y correct the problem b If the fault cannot be resolved and you require a trained operator please contact our customer helpline on 08701 580560 7 In the event the helpline cannot resolve the problem a like for like exchange fax will be dispatched overnight if the call is received before 4pm or by a mutually convenient arrangement The helpline operator will give you specific instructions on how the...

Page 5: ...t to a qualified engineer when maintenance or repair work is required Opening or removing covers may expose you to dangerous voltages or other risks Incorrect re assembly could cause electric shock when the unit is subsequently used 13 Unplug this unit from the mains outlet and refer servicing to qualified service personnel when the following conditions occur A When the power supply cord or plug i...

Page 6: ...ge and remove the leaflet from the unit D If the film in the film cartridge is slack tighten it by winding the bottom side gears E Install the film cartridge into the unit F Make sure that the blue label on the cartridge matches the one on the unit G Close the cover securely by pushing down on both ends Remove the shipping tape from the unit and paper stacker and install as follows Shipping tape I...

Page 7: ...paper to prevent a paper jam and insert the paper into the paper tray C Move the recording paper set lever back Paper stacker p 27 2 A Lift the front of the unit insert the paper stacker into the slots and slide it until it stops Paper tray p 28 3 A Open the paper tray B Insert the two tabs on the paper tray into the slots on the back of the unit ...

Page 8: ... Connect to B T socket To B T socket To Household Mains Supply 220 240 V 50 Hz Mains lead 3 A Connect to the unit B Connect to Household Mains Supply Answering machine not included For further details see page 71 KX FP300 only EXT jack is only for KX FP300 Peel off the tape on the EXT jack and connect the cord For further details see page 30 ...

Page 9: ...king replace the handset For further details see page 37 If you are having trouble see page 115 Voice calls making answering Voice calls making 1 Lift the handset 3 When finished talking replace the handset 2 Dial the number For further details see page 36 If you are having trouble see page 115 ...

Page 10: ...nt feeder tray 1 Press START SET COPY Dial the fax number 4 5 Adjust the width of the document guides to the size of the document 2 Insert the document until the unit grabs the document and a single beep is heard 3 For further details see page 54 If you are having trouble see pages 115 and 116 ...

Page 11: ...eception is required a fax calling tone slow beep is heard or no sound is heard press START SET COPY For further details see page 70 You can select the way to receive calls according to your needs See pages 66 and 67 for KX FP300 See pages 68 and 69 for KX FP320 KX FM330 If you are having trouble see page 116 ...

Page 12: ... START SET COPY 4 Open the document feeder tray Insert the document until the unit grabs the document and a single beep is heard Make sure the handset is on the unit Adjust the width of the document guides to the size of the document 1 2 3 For further details see page 91 If you are having trouble see page 117 ...

Page 13: ...nd fax messages automatically For further details see page 93 TAD FAX ON AUTO ANSWER ON 1 2 Make sure the display shows the following message Press The AUTO ANSWER light will come on AUTO ANSWER TAD FAX MODE If the display does not show this message the setting needs to be changed to the TAD FAX mode p 76 ...

Page 14: ...For further details see page 98 Press The new recorded messages will be played When the PLAY MESSAGES indicator flashes PLAY MESSAGES PLAY MESSAGES Press All messages will be played When the PLAY MESSAGES indicator lights FLASH LIGHT PLAY MESSAGES ...

Page 15: ...ls see page 98 Press while listening to the message you want to erase ERASE Erasing a specific message 1 Press after listening to all of the messages ERASE 2 Press Erasing all the messages 3 Press again START SET COPY START SET COPY STOP To stop erasing press ...

Page 16: ...lephone numbers in the EASY DIAL directory 43 Making a voice call using the EASY DIAL directory 45 Caller ID service from your phone company 46 Viewing the Caller ID list on the display 47 Calling back from the Caller ID list 48 Storing telephone numbers in the One Touch Dial and EASY DIAL directory from the Caller ID list 49 Erasing a number name from the Caller ID list 50 Automatic Caller ID lis...

Page 17: ...es Recording Remote Operation Options TAD FAX mode using the built in answering device and receiving voice and fax calls automatically 93 Pre recorded greeting messages 94 Recording your own greeting messages 95 Checking your own recorded greeting messages 96 Erasing your own recorded greeting messages 96 Recording time for the TAD FAX greeting message 97 Listening to recorded messages 98 Erasing ...

Page 18: ...mal head and black bar 127 General Information Print Reports Fax Voice Guidance Display Contrast Recall Mode Reset Important Information Guarantee Features Summary Specifications Printing the feature settings telephone numbers journal printer test list and Caller ID list 128 Fax voice guidance KX FP320 KX FM330 only 129 Changing the display contrast 130 Setting the recall mode 131 Resetting the ad...

Page 19: ...ridge 1 with free starter film The film cartridge is pre installed Panasonic PC Software for KX FM330 CD ROM 1 PANA LINK Software Guide 1 Accessory order information Note The film is not reusable Do not rewind and use the film again The free starter film cartridge is only 20 meters long We recommend that you buy a regular film cartridge 100 m for continuous use of your unit For best results use a ...

Page 20: ... 1 How to program your unit 2 How to store names in the EASY DIAL directory and how to dial them 3 Help with problems receiving faxes 4 How to use the copier function 5 List of available reports 6 How to use the Caller ID service 3 Press PRINTING START SET COPY 6 CALLER ID 5 REPORTS 4 COPIER 3 FAX RECEIVING 2 EASY DIAL 1 HOW TO SET UP PRESS SET HELP START SET COPY HELP For KX FP300 ...

Page 21: ... to store names in the EASY DIAL directory and how to dial them 3 Help with problems operating answering device 4 Help with problems receiving faxes 5 How to use the copier function 6 List of available reports 7 How to use the Caller ID service 3 Press PRINTING START SET COPY 7 CALLER ID 6 REPORTS 5 COPIER 4 FAX RECEIVING 3 TAD OPERATION 2 EASY DIAL 1 HOW TO SET UP PRESS SET HELP START SET COPY HE...

Page 22: ...ng p 38 Dial keypad Display panel To adjust volumes p 35 To select feature settings during programming To select a resolution p 54 To initiate or exit programming Recall button p 38 To stop an operation or cancel programming To change from pulse to tone during dialling p 38 To dial without lifting the handset To initiate fax transmission reception or copying To store a setting during programming F...

Page 23: ...ogramming p 33 41 To select the basic features during programming p 137 To select an enlargement reduction rate in the copy mode p 91 92 To confirm a stored telephone number p 45 46 To select stations 6 10 for the One Touch Dial p 40 42 55 To keep the telephone number secret p 40 41 43 To insert one character or one space p 32 33 41 For transmission to multiple stations p 63 64 To insert a hyphen ...

Page 24: ...anel To adjust volumes p 35 To select feature settings during programming To select a resolution p 54 To initiate or exit programming Recall button p 38 To stop an operation or cancel programming To change from pulse to tone during dialling p 38 For slow playback p 99 For quick playback p 99 For speakerphone operation To initiate fax transmission reception or copying To store a setting during prog...

Page 25: ...99 To select an enlargement reduction rate in the copy mode p 91 92 To confirm a stored telephone number p 45 46 To select stations 6 10 for the One Touch Dial p 40 42 55 To keep the telephone number secret p 40 41 43 To insert one character or one space p 32 33 41 To talk with the other party when using the speakerphone For transmission to multiple stations p 63 64 To insert a hyphen p 33 41 To c...

Page 26: ...ing paper exit Paper stacker Document exit Document feeder tray Cover Serial interface connector KX FM330 only To connect your PC with a RS232C cable For system requirements see the PANA LINK Software Guide Document guides To match the width of the document p 54 Cover open lever To open the cover The pictured model is KX FP300 ...

Page 27: ...dge If the film is rewound the print quality will be greatly reduced and the unit may jam Full size replacement film kits KX FA135X Film cartridge Complete kit includes Film roll gears and cartridge Prints about 310 A4 size pages KX FA136X Replacement film Two replacement film rolls only Use these film rolls to refill the cartridge Both rolls print a total of about 620 A4 size pages Shipping tape ...

Page 28: ...m 5 If the film in the film cartridge is slack tighten it by winding the bottom side gears Film cartridge Installation label 6 Install the film cartridge into the unit Blue gear Blue labels 7 Make sure that the blue label on the cartridge matches the one on the unit 8 Close the cover securely by pushing down on the dotted area on each side ...

Page 29: ...the paper stacker 2 Lift the front of the unit and insert the paper stacker into the slots Paper stacker Slots Bottom Shipping tape 3 Check that the paper stacker is locked into the centre slots Centre slots Paper stacker 4 Slide the paper stacker until it stops Paper stacker ...

Page 30: ... use 60 g m2 to 90 g m2 paper 1 Pull the recording paper set lever forward Recording paper set lever Paper tray 2 Insert the two tabs on the paper tray into the slots on the back of the unit Do not place the unit in areas where the paper tray may be obstructed by a wall etc Paper tray Tabs Slots 1 Open the paper tray Paper tray ...

Page 31: ...shiny paper that is highly textured Also avoid paper that is coated damaged or wrinkled Avoid double sided printing Do not use paper printed from this unit for double sided printing with other copiers or printers or the paper may jam Do not reinsert the ejected paper into the recording paper exit Some paper only accepts print on one side Try using the other side of the paper if you are not happy w...

Page 32: ...XT on this unit p 71 83 A voltage drop of 1 15 V at 40 mA will be introduced between the EXT jack and the B T socket If you have difficulty in making a call or experience problems during a telephone conversation consult your dealer or our service personnel CHECK LEVER Helpful hints when using an extension telephone KX FP300 only If you connect an extension telephone or answering machine to the fac...

Page 33: ... 5 Press 6 Enter the correct hour minute by selecting each 2 digits using the dial keypad Press to select AM or PM Example 3 15PM 1 Press 2 Press until PM is displayed TIME 03 15PM TIME 03 15AM 1 5 0 3 TIME 12 00AM START SET COPY D 10 M 08 Y 99 8 1 0 9 0 9 D 01 M 01 Y 99 START SET COPY SET DATE TIME 0 1 1 SYSTEM SET UP MENU 7 Press 8 Press MENU SETUP ITEM START SET COPY STOP START SET COPY MENU EA...

Page 34: ...OUR LOGO 0 2 1 SYSTEM SET UP MENU STOP INSERT HYPHEN Delete MENU START SET COPY EASY DIAL To correct a mistake Press or to move the cursor to the incorrect character then make the correction To delete a character Move the cursor to the character you want to delete and press STOP To insert a character 1 Press or to move the cursor to the position to the right of where you want to insert the charact...

Page 35: ... 1 to enter the next character Display order of characters EASY DIAL Capital alphabet Lower case alphabet Number Symbol Rotating to the right Rotating to the left EASY DIAL Keys Characters 1 2 3 4 5 6 7 8 9 0 1 2 STOP HYPHEN key To insert a hyphen INSERT key To insert one character or one space Delete key To delete a character key To move the cursor to the left key To move the cursor to the right ...

Page 36: ...SET UP MENU STOP START SET COPY MENU EASY DIAL To correct a mistake Press or to move the cursor to the incorrect number then make the correction To delete a number Move the cursor to the number you want to delete and press STOP Note You can enter your facsimile telephone number by rotating If using press to move the cursor The button replaces the digit with a and the button replaces it with a spac...

Page 37: ...ng message When a call is received the unit will not ring and will display the following Monitor Speaker volume 8 levels high to low are available While using the monitor speakerphone press or Fax voice guidance volume KX FP320 KX FM330 only 9 levels high to off are available While listening to the fax voice guidance press or Answering device volume KX FP320 KX FM330 only 9 levels high to off are ...

Page 38: ...a telephone conversation using the handset Display The other party cannot hear you but you can hear them 2 To resume the conversation press again For KX FP320 KX FM330 You can also mute your voice to the other party when using DIGITAL SP PHONE MUTE HANDSET MUTE MUTE MUTE HANDSET MUTE WAITING REDIAL DIGITAL SP PHONE MONITOR REDIAL PAUSE Hints for the speakerphone operation KX FP320 KX FM330 only Us...

Page 39: ...the conversation press again For KX FP320 KX FM330 You can also mute your voice to the other party when using DIGITAL SP PHONE MUTE HANDSET MUTE MUTE MUTE HANDSET MUTE Helpful hint You can press instead of using the handset KX FP320 KX FM330 only DIGITAL SP PHONE Hints for the speakerphone operation KX FP320 KX FM330 only Use the speakerphone in a quiet room If you have difficulty hearing the othe...

Page 40: ...REDIAL PAUSE TONE RECALL Example British Telecom call waiting 1 Ensure that you have set the RECALL MODE to T_BR Time Break Recall See page 131 2 If the call waiting tone is heard during a conversation press 3 When the dial tone is heard dial The first call is put on hold and you can talk to the second party 2 RECALL If your unit is connected to a PBX pressing allows you to access some features of...

Page 41: ...ange the dialling mode setting to PULSE by following the instructions below 1 Press Display 2 Press then 3 Press 4 Press or to select the desired setting 5 Press 6 Press MENU SETUP ITEM START SET COPY MODE TONE START SET COPY DIALING MODE 1 3 1 SYSTEM SET UP MENU START SET COPY MENU Dialling mode touch tone or pulse ...

Page 42: ...most frequently dialled numbers 10 stations are available The One Touch Dial key 1 can be used as One Touch Dial key 1 DIAL MODE or as a broadcast key BROADCAST Both functions cannot be used at the same time For the broadcast function see pages 63 and 64 1 Press Display 2 For stations 1 5 Press one of the One Touch Dial keys If you select One Touch Dial 1 select DIAL MODE by pressing and press to ...

Page 43: ...s EASY DIAL Capital alphabet Lower case alphabet Number Symbol Rotating to the right Rotating to the left EASY DIAL Note A hyphen entered in a telephone number counts as two digits Keys Characters 1 2 3 4 5 6 7 8 9 0 1 3 STOP 2 HYPHEN key To insert a hyphen INSERT key To insert one character or one space SECRET key To keep the telephone number secret Delete key To delete a character key To move th...

Page 44: ...stead of using the handset DIGITAL SP PHONE MONITOR EASY DIAL Making a voice call using the One Touch Dial Before using this feature program the desired names and telephone numbers into the One Touch Dial p 40 1 Lift the handset Display Check that there are no documents in the document feeder tray 2 For stations 1 5 Press the desired One Touch Dial key For stations 6 10 Press then press the desire...

Page 45: ... hyphen press 6 Press To program other items repeat steps 3 to 6 7 Press to exit the program DIRECTORY PROGRAM NAME REGISTERED START SET COPY HYPHEN NO 5552233 NO START SET COPY NAME Alice NAME EASY DIAL USE EASY DIAL PRESS STATION DIRECTORY PROGRAM HYPHEN SECRET STOP START SET COPY DIRECTORY PROGRAM EASY DIAL To correct a mistake Press or to move the cursor to the incorrect character then make th...

Page 46: ...etails see page 43 7 Press REGISTERED START SET COPY Erasing a stored name and number 1 Rotate until the desired name is displayed Example 2 Press 3 Press to select DELETE If you do not want to erase the item press 4 Press The stored name and number are deleted DELETED START SET COPY STOP YES PRESS SET DELETE OK EDIT DELETE DIRECTORY PROGRAM Smith EASY DIAL DIRECTORY PROGRAM STOP ERASE START SET C...

Page 47: ... when the other party answers For KX FP320 KX FM330 You can press instead of using the handset DIGITAL SP PHONE MONITOR Note If the desired name has not been stored press and dial the number manually STOP To search for a name by initial Example If you want to search for the name Lisa 1 Rotate until any name is displayed Example 2 Press repeatedly until any name with the initial L is displayed see ...

Page 48: ... you subscribe to a Caller ID service set the following ring count settings to 2 or more rings FAX ONLY mode ring count p 75 77 TEL FAX delayed ring count p 82 and TAD FAX mode ring count p 109 KX FP320 KX FM330 only Note If the unit is connected to a PBX system you may not receive the caller s information Consult your PBX supplier The Caller ID service is currently provided in calling areas by ca...

Page 49: ...ween calls rotate The display will show END OF NEW CALL after the last new call in the list The display will show END after the last call in the list If the display shows NO CALLER DATA and a beep sounds the Caller ID list is empty EASY DIAL EASY DIAL STOP NAME TEL NO CALLER ID SEARCH 1 Press Example Display 2 Rotate to search the Caller ID list see below 3 If you want to know the date time of the...

Page 50: ...00 MONITOR DIGITAL SP PHONE MIC KX FP320 KX FM330 EASY DIAL 1 Press Example Display 2 Rotate until the desired telephone number or name is displayed Example 3 Lift the handset The unit will automatically dial the number 4 When finished talking replace the handset Helpful hints For KX FP300 You can press instead of lifting up the handset in step 3 Use the handset when the other party answers For KX...

Page 51: ...ory 1 For station 1 press One Touch Dial key 1 select DIAL MODE by pressing and press For stations 2 5 press one of the One Touch Dial keys For stations 6 10 press then press one of the One Touch Dial keys Example 2 Enter the name up to 10 characters by following the instructions on page 41 3 Press A new entry will overwrite any previous information If you are using One Touch Dial key 1 as BROADCA...

Page 52: ... 5 Press to exit the program STOP ERASE COMPLETED START SET COPY STOP ALL ERASE OK START SET COPY CALL LIST ERASE START SET COPY 3 CALLER SET UP MENU START SET COPY STOP MENU Erasing a number name from the Caller ID list You can erase all or some of the entries in the Caller ID list Erasing all callers information ...

Page 53: ...ASY DIAL 1 Press Example Display 2 Rotate until the desired number is displayed Example 3 Press The caller s information will be erased Example To erase other callers information repeat steps 2 to 3 4 Press to exit the program STOP 4561032238 DELETED ERASE 3453809 EASY DIAL USE EASY DIAL 2 NEW CALLS CALLER ID SEARCH ...

Page 54: ...ress or to select the desired setting If this feature is not required select OFF 5 Press 6 Press MENU SETUP ITEM START SET COPY MODE ON START SET COPY AUTO CALL LIST 2 6 1 SYSTEM SET UP MENU MENU START SET COPY Note The NAME TELEPHONE NUMBER TIME OF CALL information is received through a Caller ID service ANSWER How the call was received by the unit TEL Telephone FAX Facsimile TAD Telephone answer...

Page 55: ...ote If you initiate voice contact during transmission the unit will call you with a distinctive ring after all of the documents have been transmitted If you initiate voice contact during reception the unit will call you with a distinctive ring after the current page of the document is received DIGITAL SP PHONE Receiving a request for voice contact 1 If the other party initiates voice contact your ...

Page 56: ...th normal sized characters For originals with small printing For originals with minute printing For originals containing photographs shaded drawings etc Sending a fax manually 1 Open the document feeder tray 2 Adjust the width of the document guides to the size of the document 3 Insert the document up to 15 pages FACE DOWN until the unit grabs the document and a single beep is heard Display 4 If n...

Page 57: ...0 Helpful hints You can confirm the stored items on the display p 45 or on the telephone number list p 128 You can use the EASY DIAL directory to select the station name instead of using the One Touch Dial keys Rotate until the desired name is displayed then press The connecting tone will be heard during dialling to tell you the status of the other party s machine p 65 START SET COPY EASY DIAL Fax...

Page 58: ... The unit will start transmission CONNECTING FAX Alice START SET COPY NAME TEL NO Alice EASY DIAL RESOLUTION STANDARD Before using this feature program the desired names and fax numbers into the directory p 43 Helpful hints You can confirm the stored items on the display p 45 or on the telephone number list p 128 The connecting tone will be heard during dialling to tell you the status of the other...

Page 59: ...s 3 Insert the document FACE DOWN until the unit grabs the document and a single beep is heard 4 Press 5 Dial the fax number 6 When a fax tone is heard press START SET COPY DIGITAL SP PHONE HELP 5 SEND GUIDE MENU To transmit insert the document face down until you hear the beep Voice guide Press the speaker phone button then dial the phone number When the fax tone is heard press the start button S...

Page 60: ...lips staples or other similar fastening objects Check that ink paste or correction fluid has dried Do not send the following types of documents Use copies for fax transmission Chemically treated paper such as carbon or carbonless duplicating paper Electrostatically charged paper Heavily curled creased or torn paper Paper with a coated surface Paper with a faint image Paper with printing on the opp...

Page 61: ...fax transmission is successful or not OFF The sending report will not print 1 Press Display 2 Press then 3 Press 4 Press or to select the desired setting 5 Press 6 Press MENU SETUP ITEM START SET COPY MODE ERROR START SET COPY SENDING REPORT 0 4 1 SYSTEM SET UP MENU MENU START SET COPY Sample of a sending report 01 2345678 00 51 SND 00 COMMUNICATION ERROR 43 20 Jan 1999 01 19PM 20 Jan 01 18PM SEND...

Page 62: ...ed setting If this feature is not required select OFF 5 Press 6 Press MENU SETUP ITEM START SET COPY MODE ON START SET COPY AUTO JOURNAL 2 2 1 SYSTEM SET UP MENU MENU START SET COPY Sample of a journal report NO 01 02 03 04 05 3332222 9998765 John 555556677 USAGE TIME 00 45 00 58 00 48 02 45 03 50 MODE SND RCV RCV SND SND RCV PAGES 01 02 01 03 05 03 OK OK OK COMMUNICATION ERROR 43 OK OK START TIME...

Page 63: ... in advance 1 Insert the document FACE DOWN until a single beep is heard Display 2 Press 3 Press then 4 Press 5 Press or to select ON 6 Press 7 Enter the fax number using the dial keypad One Touch Dial or 8 Press 9 Enter the transmission start time Press to select AM or PM Example 11 30PM Press then press until PM is displayed Press Press At the programmed time the unit will automatically start tr...

Page 64: ...lay Display Amount of memory used PAGES 01 05 START SET COPY EASY DIAL EASY DIAL FACE DOWN STOP START SET COPY EASY DIAL One Touch Dial keys Transmitting documents from memory 1 Press Display 2 Press then 3 Press 4 Press or to select ON If this feature is not required select OFF 5 Press 6 Press MENU SETUP ITEM START SET COPY MODE ON MODE OFF START SET COPY SEND BY MEMORY 1 5 1 SYSTEM SET UP MENU M...

Page 65: ...reset One Touch Dial key For stations 6 10 press then press the preset One Touch Dial key Example b Using the EASY DIAL directory Rotate until the desired name is displayed up to 100 stations Example Press Example To enter other stations repeat this step up to 109 stations DIR John 002 START SET COPY John 001 EASY DIAL DIR Luke 001 LOWER DIR 000 START SET COPY BROADCAST DIAL MODE BROADCAST USE EAS...

Page 66: ... or half tone resolution the number of pages that the unit can transmit will decrease If one of the stations is busy or does not answer the station will be skipped All skipped stations will be redialled up to 3 times after all of the other stations have been called To cancel the broadcast setting 1 Press while the unit displays BROADCASTING Display 2 Press START SET COPY YES PRESS SET SEND CANCELE...

Page 67: ...ume cannot be adjusted Connecting tone This feature allows you to hear connecting tones such as a fax tone ring back tone or busy tone for several seconds when you send a fax using the One Touch Dial or EASY DIAL directory This will tell you the status of the other party s machine Fax tone The other party s machine is ready for reception Ring back tone If this tone continues the other party s mach...

Page 68: ...ate TEL mode p 70 When the unit rings you must answer all calls If you hear a fax calling tone slow beep or no sound is heard press An answering machine can also answer the incoming calls p 71 START SET COPY FAX ONLY mode p 74 75 The AUTO ANSWER light should be OFF If the AUTO ANSWER light is on press to turn it off AUTO ANSWER The AUTO ANSWER light should be ON If the AUTO ANSWER light is off pre...

Page 69: ...hine to the EXT jack 2 Set the number of rings on the answering machine to less than 4 3 Record a greeting message on the answering machine 4 Turn on the answering machine 5 Program the remote activation ID into your fax machine For further details see pages 71 to 73 Use with TEL mode or FAX ONLY mode If you use with FAX ONLY mode set the FAX ONLY mode ring count to 5 EXT TAM p 75 When receiving v...

Page 70: ...et this This is how the unit will operate TAD FAX mode Telephone Answering Device Facsimile mode p 93 The AUTO ANSWER light should be ON If the AUTO ANSWER light is off press to turn it on AUTO ANSWER When receiving voice calls The unit will activate the answering device and record voice messages When receiving fax calls The unit will activate the fax function to receive documents FAX ONLY mode p ...

Page 71: ...NSWER light should be OFF If the AUTO ANSWER light is on press to turn it off AUTO ANSWER Remote activation If you answer a telephone in another room and hear a fax tone you can activate the unit remotely by pressing 9 p 83 TEL FAX mode If you are near the unit and want to use it to receive your voice calls yourself and fax calls automatically see pages 78 79 81 and 82 Other options With PC If you...

Page 72: ...e the handset The unit will start reception CONNECTING START SET COPY Handset START SET COPY DIGITAL SP PHONE STOP FAX ON AUTO ANSWER OFF KX FP320 KX FM330 MIC KX FP320 KX FM330 To stop receiving the document Press Friendly reception feature When you answer a call and hear a fax calling tone slow beep the unit will automatically start receiving If this feature is not required set to OFF p 86 STOP ...

Page 73: ...e to the TEL mode p 70 or FAX ONLY mode p 74 When you set the FAX ONLY mode set the ring count in the FAX ONLY mode feature setting 07 to 5 EXT TAM p 75 The number of rings on the answering machine should be less than the FAX ONLY mode ring count so that the answering machine will answer a call first Using the FAX ONLY mode will allow you to receive faxes if the answering machine is full 6 Check t...

Page 74: ...er details see next page How the fax machine and answering machine work To use with an answering machine and computer we recommend the following setup Wall jack Computer Fax machine Wall jack Answering machine not included We recommend you use separate wall jacks for the unit and the computer Note Set the TEL mode on the fax machine The device which has the shortest ring count will answer a call f...

Page 75: ...ODE ON MODE OFF START SET COPY REMOTE TAM ACT 1 2 1 SYSTEM SET UP MENU MENU START SET COPY Remote operation of your answering machine remote activation ID The caller can leave a voice message and send a fax document during the same call Inform the caller of the following procedures beforehand 1 The caller calls your fax machine The answering machine will answer the call 2 The caller can leave thei...

Page 76: ... is used for both voice and fax calls When the unit answers the call fax communication is attempted with the other fax machine even if someone is trying to call you FAX ONLY MODE AUTO ANSWER Activating the FAX ONLY mode If you have a telephone line just for receiving faxes we recommend the following setup Line 1 Voice calls Line 2 Fax calls Only a fax machine is connected Example One telephone lin...

Page 77: ...ngs If you have difficulty receiving faxes the other parties may have tried to send faxes before confirming if your unit answered or not Decrease the number of rings 1 Press Display 2 Press then 3 Press 4 Press or to select the desired number or enter the number using the dial keypad 5 Press 6 Press MENU SETUP ITEM START SET COPY RING 2 START SET COPY FAX RING COUNT 0 7 1 SYSTEM SET UP MENU MENU S...

Page 78: ...ou The number of rings before a call is answered can be changed see next page To change to the TAD FAX or TEL FAX mode select TAD FAX or TEL FAX in step 4 MENU START SET COPY TAD FAX ON AUTO ANSWER ON 1 Press Display 2 Press then 3 Press 4 Press or to select FAX ONLY 5 Press 6 Press 7 If the AUTO ANSWER light is off turn it on by pressing FAX ONLY MODE AUTO ANSWER MENU SETUP ITEM START SET COPY MO...

Page 79: ...s Display 3 Press then 4 Press 5 Press or to select the desired number or enter the number using the dial keypad 6 Press 7 Press MENU SETUP ITEM START SET COPY RING 2 START SET COPY FAX RING COUNT 0 6 1 SYSTEM SET UP MENU MENU START SET COPY FAX ONLY mode ring count Note If you subscribe to a Caller ID service set this ring count setting to 2 or more rings If you have a telephone line just for rec...

Page 80: ...ll ring up to 3 times Answer the call The unit will automatically receive documents without ringing Ring Ring Ring The following message will be played after the TEL FAX delayed rings KX FP320 KX FM330 only Hello To send a fax start transmission To speak with someone please wait If the call is not answered the following message will be played KX FP320 KX FM330 only No one is available to take your...

Page 81: ...d rings KX FP320 KX FM330 only Hello To send a fax start transmission To speak with someone please wait If the call is not answered the following message will be played KX FP320 KX FM330 only No one is available to take your call right now Please try again later Thank you TEL FAX delayed ring count Up to 4 ring signals will be generated before the unit answers depending on feature setting 78 on pa...

Page 82: ...P ITEM START SET COPY MODE TEL FAX MODE FAX ONLY START SET COPY AUTO ANSWER 7 7 1 SYSTEM SET UP MENU MENU START SET COPY FAX ON AUTO ANSWER ON Changing the AUTO ANSWER setting to the TEL FAX mode Answering machine Wall jack Note To return to the FAX ONLY mode select FAX ONLY in step 4 Do not connect an answering machine when using the TEL FAX mode If you use the unit with an answering machine see ...

Page 83: ...eature setting 77 p 76 2 If the AUTO ANSWER light is off turn it on by pressing Display The unit will play the TEL FAX greeting message TEL FAX MODE AUTO ANSWER TAD FAX ON AUTO ANSWER ON Changing the AUTO ANSWER setting to the TEL FAX mode For KX FP320 KX FM330 ...

Page 84: ...not be able to receive documents from some older model fax machines which do not send a fax calling tone If you subscribe to a Caller ID service set this ring count setting to 2 or more rings When the unit detects a voice call in the TEL FAX mode it will ring up to 3 times The number of rings can be changed up to 6 1 Press Display 2 Press then 3 Press 4 Press or to select the desired number or ent...

Page 85: ...ee above to receive a voice message and fax document in the same call p 73 KX FP300 only Important This code should be different from the remote activation ID p 73 the auto disconnection code p 87 and remote operation ID p 102 1 Press Display 2 Press then 3 Press 4 Press or to select ON If this feature is not required select OFF 5 Press The display will show the pre selected code 6 Enter the new c...

Page 86: ...7 mm Legal 216 mm x 356 mm Letter 216 mm x 279 mm 1 Press Display 2 Press then 3 Press 4 Press or to select the desired setting If this feature is not required press to select 100 5 Press 6 Press MENU SETUP ITEM START SET COPY MODE 92 START SET COPY RCV REDUCTION 3 6 1 SYSTEM SET UP MENU MENU START SET COPY Note Documents usually have a heading on the top of each page which contains the sender s n...

Page 87: ...tte tape deactivate this feature 1 Press Display 2 Press then 3 Press 4 Press or to select the desired setting If this feature is not required select OFF 5 Press 6 Press MENU SETUP ITEM START SET COPY MODE ON START SET COPY SILENT DETECT 4 0 1 SYSTEM SET UP MENU MENU START SET COPY Using the unit and a computer on the same line KX FP320 KX FM330 only Wall jack Computer Fax machine Wall jack We rec...

Page 88: ...Press MENU SETUP ITEM START SET COPY MODE ON START SET COPY FRIENDLY RCV 4 6 1 SYSTEM SET UP MENU MENU START SET COPY Memory reception alert When a received document is stored into memory due to a problem the unit will alert you with beep tones If you hear slow beeps clear the printing problem or supply paper to print the stored document The beep tones will stop 1 Press Display 2 Press then 3 Pres...

Page 89: ...d and you can talk with the other party Important This code should be different from the remote activation ID p 73 and the fax activation code p 83 0 MENU START SET COPY 1 Press Display 2 Press then 3 Press 4 Press or to select ON If this feature is not required select OFF 5 Press The display will show the pre selected code 6 Enter the new code This code can be from 2 to 4 digits in length using 0...

Page 90: ...The unit functions with ECM communication pre selected setting OFF The unit does not function with ECM communication MENU START SET COPY 1 Press Display 2 Press then 3 Press 4 Press or to select the desired setting 5 Press 6 Press MENU SETUP ITEM START SET COPY MODE ON START SET COPY ECM COMMUNI 6 8 1 SYSTEM SET UP MENU Note You cannot change the setting of this feature if there are stored documen...

Page 91: ... fax NO START SET COPY MODE ON MODE OFF START SET COPY FAX PAGER CALL 7 0 1 SYSTEM SET UP MENU How your unit and pager work When your unit receives a fax document it will call your pager company Your pager company will call your pager Pager company Pager 5 5 5 5 A few minutes later your pager will display the same message you entered in step 6 above For example 5555 7 Press The unit will dial the ...

Page 92: ...T SET COPY FILM DETECTION 7 9 1 SYSTEM SET UP MENU MENU START SET COPY Polling retrieving fax documents Receiving polling The polling feature allows you to receive a document from another compatible machine where you pay for the call This saves the sending party the call charges To place a call and recover a document from another machine follow the steps below Make sure that no documents have been...

Page 93: ... COPYING START SET COPY COLLATE ON COLLATE EASY DIAL NUMBER 1 100 START SET COPY RESOLUTION STANDARD Note If a resolution is not selected FINE resolution will be selected automatically You can make or receive a voice call while making copies After copying the enlargement reduction rate setting will return to 100 FACE DOWN COLLATE Document feeder tray Recording paper set lever Document guides zoom ...

Page 94: ... top half of the document See the example below Sample of an enlarged copy EASY DIAL To reduce a document When you copy a document that is longer than the recording paper the unit can reduce the original document by programming a suitable reduction rate The reduction rate is determined by the size of the recording paper and the original document Select from 92 86 and 72 by rotating zoom to the lef...

Page 95: ... or your own greeting message p 95 Note The recording time for incoming messages can be set p 110 For the total recording time see Memory Capacity on page 143 When the remaining time is low erase unnecessary messages from memory p 98 104 While an incoming call is being recorded the other party s voice will be heard through the speaker If this feature is not required set the incoming message monito...

Page 96: ...Hello We are unable to answer right now To send a fax please start transmission To leave a voice message please speak after the beep Thank you When you record your own greeting message see next page Your own TAD FAX greeting message MESSAGE FULL FAX MEMORY FULL and FAX MEMORY FULL MESSAGE FULL Hello We are unable to answer right now To send a fax please start transmission To leave a voice message ...

Page 97: ...the TAD FAX greeting Display For the TEL FAX greeting 3 Press A long beep will sound The display will show one of the following according to your selection in step 1 For the TAD FAX greeting For the TEL FAX greeting T F REC 16s TAD REC 16s START SET COPY PRESS START 2 T F GREETING PRESS START 2 TAD GREETING RECORD 4 Speak clearly about 20 cm away from the microphone The display will show the remai...

Page 98: ...PY PRESS START 2 T F GREETING PRESS START 2 TAD GREETING ERASE STOP START SET COPY ERASE Erasing your own recorded greeting messages Checking your own recorded greeting messages To check your TAD FAX greeting message 1 Select TAD FAX in step 4 of feature setting 77 p 76 2 If the AUTO ANSWER light is off turn it on by pressing If the AUTO ANSWER light is on turn it off once then on again Display Th...

Page 99: ...eting message to press 9 before starting fax transmission If you change the greeting message time to 16 seconds from 60 seconds your own recorded TAD FAX greeting message will be deleted and return to the pre recorded message If necessary re record your own greeting message p 95 1 Press Display 2 Press then 3 Press 4 Press or to select the desired setting 5 Press 6 Press MENU SETUP ITEM START SET ...

Page 100: ...olume using or The number of calls in the call counter will not decrease until you erase the recorded messages PLAY MESSAGES PLAY MESSAGES CALLS call counter PLAY MESSAGES FLASH LIGHT Voice time day stamp During playback a synthesised voice will announce the time and day of the week when each message was recorded Erasing a specific message Press while listening to the message you want to erase Era...

Page 101: ... rotate to the left until you hear the message you want to repeat Skipping a message Rotate one click to the right to play the next message Changing the playback speed Press to play messages at one and a half times the original speed Press 0 to play messages at half the original speed To return to the original speed press or again during quick or slow playback Stopping playback Press To resume pla...

Page 102: ... COPY PRESS START 1 MEMO MESSAGE RECORD STOP START SET COPY MIC RECORD Telephone conversation You can record a telephone conversation 1 During the telephone conversation press Display 2 To stop recording press or replace the handset STOP 2WAY RECORDING RECORD STOP RECORD Note This feature is not available when using the DIGITAL SP PHONE button There may be legal restrictions in your area on record...

Page 103: ...emote Operation Notice of Remote Operation Fold here 1 Call your unit 2 Enter the remote operation ID during the greeting message The new recorded messages will be played automatically 3 Press the remote command key s see the reverse side within 10 seconds If there are no new messages in step 2 press the remote command key s within 4 seconds or wait for 4 seconds and all the recorded messages will...

Page 104: ...ess the answering device Choose any 3 digit number except a number using digits 0 or 7 1 Press Display 2 Press then 3 Press 4 Enter the desired number 5 Press 6 Press MENU SETUP ITEM START SET COPY ID 111 START SET COPY REMOTE TAD ID 1 1 1 SYSTEM SET UP MENU MENU START SET COPY Stops re recording of a greeting message Erases a specific message Erases all messages Changes to the TEL mode Turns ON m...

Page 105: ...ew recorded messages press To listen to all of the recorded messages press 5 4 During playback Repeating a message Press to play the current message If you press within 5 seconds of the beginning of a message the previous message will be played Skipping a message Press 2 1 1 3 new messages Voice guide example No new messages When there are no new recorded messages The voice guide will be heard Pre...

Page 106: ...ll you that the remote operation has ended 2 Wait about 10 seconds for the voice guide to prompt you to leave a message 3 Leave a message after the beep Please leave your name and message after the beep Other remote operations Recording a marker message After playing back the recorded messages you can leave an additional message Re recording a greeting message You can change the contents of the gr...

Page 107: ...e transfer pager call on or off You must pre program a transfer telephone number or a pager number p 107 before using this feature Press to turn OFF the message transfer pager call 6 2 If a transfer telephone number or a pager number is not programmed you cannot turn this feature ON The voice guide will prompt you Skipping the greeting message Press during the greeting message playback The unit wi...

Page 108: ...ng the remote operation Pager call Program the pager number first When an incoming call is recorded your pager will be called Call your unit and retrieve the message using the remote operation This feature operates in the TAD FAX mode For details on the remote operation see page 101 Use a touch tone telephone to access your unit An incoming voice message is recorded in memory Your unit calls the t...

Page 109: ... 202 555 1234PPP12345678PPP5555 Your pager number Pauses Your pager access code if required Message you want displayed on your pager when your unit receive a fax NO START SET COPY MODE OFF START SET COPY MESSAGE TRANS 6 0 1 SYSTEM SET UP MENU REDIAL PAUSE MENU START SET COPY PAUSE Note This feature can be turned on off remotely from a touch tone telephone p 105 7 Press 8 Press MENU SETUP ITEM STAR...

Page 110: ...will show the remaining recording time Example TRNS REC 15s TRNS REC 16s START SET COPY RECORD CHECK START SET COPY TRNS GREETING 6 1 1 SYSTEM SET UP MENU STOP MENU START SET COPY MIC To erase your message 1 Press then 2 Press or to select ERASE in the display 3 Press Your own message will be erased 4 To exit the program press The pre recorded greeting message will be played when transferring a ca...

Page 111: ... rings If you have difficulty in receiving faxes from machines that have an automatic transmission feature decrease the number of rings Note If you subscribe to a Caller ID service set this ring count setting to 2 or more rings Two rings may be referred to as NORMAL as it enables the unit to answer incoming calls in a reasonably short time This position should be selected unless you specially wish...

Page 112: ...ss MENU SETUP ITEM START SET COPY MODE LONG START SET COPY RECORDING TIME 1 0 1 SYSTEM SET UP MENU MENU START SET COPY When this feature is on the unit will let you know with slow beeps that a caller s message has been recorded MENU START SET COPY Message alert 1 Press Display 2 Press then 3 Press 4 Press or to select ON If this feature is not required select OFF 5 Press 6 Press MENU SETUP ITEM ST...

Page 113: ...RT SET COPY REC TIME ALERT 4 3 1 SYSTEM SET UP MENU beeps when memory is almost full When calls are received with the answering device the incoming messages ICM will be heard from the speaker during the call If you do not want the messages to be heard by other persons who share your unit set this feature to OFF 1 Press Display 2 Press then 3 Press 4 Press or to select the desired setting If this f...

Page 114: ...or occurred because of a problem with the other party s fax machine Check with the other party The document was not received due to memory being full The document was not fed into the unit properly Reinsert the document and try again The other party s fax machine is busy or has run out of recording paper Try again The document was not fed properly Reinsert the document and try again The other part...

Page 115: ...trance Clear the jammed paper and press to clear the message see When paper has jammed near the recording paper entrance on page 121 Do not install folded or heavily curled paper in the paper tray There is no space to store new stations in the EASY DIAL directory Edit or erase unnecessary stations p 44 The unit has a document in memory See the other displayed message instructions to print out the ...

Page 116: ...T POLLING ERROR PLEASE WAIT The unit is checking that there is no slack on the film Wait a while The other party s fax machine does not provide the polling function Check with the other party The other party s fax machine is busy or has run out of recording paper Try again The document is jammed Remove the jammed document p 122 Attempted to transmit a document longer than 600 mm Press to remove th...

Page 117: ... volume is off Adjust it to a suitable level p 35 The FAX ONLY mode is set Tell them the number is only used for faxes or change to another receive mode on your unit p 66 68 Use the speakerphone in a quiet room If you have difficulty hearing the other party adjust the volume using or If parts of your conversation are cut off you and the other party are speaking at the same time Speak alternately I...

Page 118: ...e Remedy I cannot receive documents automatically The display shows CONNECTING but faxes are not received The recording image is faint The printing quality is poor A blank sheet is ejected after the received documents are printed out The receive mode is set to the TEL mode Set to one of the other modes The time taken to answer a call is too long Decrease the number of rings p 75 77 82 109 The tele...

Page 119: ... not copied properly The copied image is blank The printing quality is poor The printing is faint A paper jam occurs when copying Pull the recording paper set lever forward make sure the paper is inserted correctly and push the recording paper set lever back You cannot make a copy during programming Make the copy after programming or stop the programming The glass or rollers are dirty Clean them p...

Page 120: ...nswering machine is too long Shorten the message up to 10 seconds The answering machine rings too many times Set to 1 or 2 rings The silent detection feature is deactivated Activate this feature p 85 Check that the answering machine is turned on and connected to the unit properly p 71 Set the number of rings on the answering machine to 1 or 2 The remote access code on your answering machine is the...

Page 121: ...emory have been erased If an extension telephone answering machine is connected to the unit you can use it during a power failure KX FP300 only Power down report The power down report will be automatically printed out after power is restored The report will not be printed out if there are no documents stored in memory Sample of a power down report NO 01 FAX NOT AVAIL MODE RCV PAGES 01 MEMORY RECEI...

Page 122: ...rea on each side 4 Remove the jammed recording paper 5 If the film is slack tighten it by winding the bottom side gears Cover open lever Film cartridge Bottom side gears Film cartridge Blue labels Incorrect Correct Tight Recording paper jams If the unit does not eject any recording paper during reception or copying the recording paper has jammed Remove the jammed paper The display will show the fo...

Page 123: ... up and push the jammed recording paper out through the triangular window on the bottom of the unit Triangular window 3 Remove the jammed recording paper from the recording paper exit If you cannot remove the jammed paper remove it by following the instructions on page 120 1 Pull the recording paper set lever forward then pull out the jammed recording paper from the recording paper entrance Push t...

Page 124: ... the cover open lever forward 2 The cover is under tension to improve print quality Pull up hard enough to open 3 Remove the jammed document carefully 4 Close the cover securely by pushing down on the dotted area on each side Cover open lever Note Do not forcibly pull out the jammed paper before opening the cover ...

Page 125: ...l up hard enough to open 3 Shift the position of the lever using an instrument with a pointed end such as a paper clip Position A When documents do not feed Position B Standard position pre selected Position C When documents multiple feed 4 Close the cover securely by pushing down on the dotted area on each side A C B Lever Cover open lever Sending document does not feed or multi feeds ...

Page 126: ... for replacement KX FA135X Film cartridge 1 cartridge and 1 film KX FA136X Replacement film 2 films To order see page 17 FILM EMPTY FILM NEAR EMPTY 1 Slide the cover open lever forward 2 The cover is under tension to improve print quality Pull up hard enough to open 3 Remove the film cartridge If you have purchased a film cartridge Model no KX FA135X for replacement go to step 10 To replace only t...

Page 127: ...ack the top side gears and pulling the bottom side gears forward until they lock into place If the film is slack tighten it by winding the bottom side gears B A Top side gear Bottom side gear Bottom side gears Top side gears A B Insert the film cartridge by matching the blue label on the cartridge with the one on the unit Close the cover securely by pushing down on the dotted area on each side The...

Page 128: ... Clean the document feeder rollers sub roller and rubber flap with a cloth moistened with isopropyl rubbing alcohol and let all parts dry thoroughly 5 Clean the white plate and glass with a soft dry cloth 6 Close the cover securely by pushing down on the dotted area on each side 7 Connect the power cord and the telephone line cord Rubber flap Sub roller Document feeder rollers Glass White plate Po...

Page 129: ...ve print quality Pull up hard enough to open 4 Clean the thermal head and black bar with a cloth moistened with isopropyl rubbing alcohol and let it dry thoroughly 5 Close the cover securely by pushing down on the dotted area on each side 6 Connect the power cord and the telephone line cord Black bar Caution Do not push on the black cover Thermal head Caution To prevent a malfunction due to static...

Page 130: ...x communications p 60 Printer test list allows you to check the print quality of your unit If the test print has a dirty pattern or blurred points or lines clean the thermal head p 127 Caller ID list keeps record of the last 35 callers after subscribing to a Caller ID service Also this list will be printed automatically after every 35 callers p 52 1 Press two times Display 2 For the feature list p...

Page 131: ...ction pre recorded setting OFF The fax voice guidance will not be heard ERROR The fax voice guidance will only be heard when fax transmission reception and friendly reception fail Start transmission Fax transmission start If friendly reception p 86 is activated one of the following messages will also be heard Transmission is complete Transmission has failed Transmission has been interrupted Fax tr...

Page 132: ...tting 5 Press 6 Press MENU SETUP ITEM START SET COPY MODE NORMAL START SET COPY LCD CONTRAST 3 9 1 SYSTEM SET UP MENU MENU START SET COPY Changing the display contrast Use this feature to adjust the display contrast NORMAL Pre selected setting DARKER Used when the display contrast is too light ...

Page 133: ...etting the recall mode When this unit is used as an extension of a PABX Private Automatic Branch Exchange the RECALL button will allow access to PABX functions such as call transfer and hold Depending on your PABX select one of the following choices T_BR Time Break Recall pre selected setting E_RE Earth Recall For British Telecom Star Services set to Time Break Recall If you are unsure of which se...

Page 134: ...ETUP ITEM RESET COMPLETED START SET COPY STOP RESET OK START SET COPY RESET YES RESET NO START SET COPY SET DEFAULT 8 0 1 SYSTEM SET UP MENU MENU START SET COPY STOP Resetting the advanced features Use this feature to return the advanced features p 138 139 for KX FP300 p 141 142 for KX FP320 KX FM330 to their pre selected settings except the ECM communication 68 ...

Page 135: ...s will operate under all possible conditions of connection to compatible PBX s This apparatus is suitable for connection to a PBX with or without initial proceed indication This apparatus is suitable for connection to a PBX with or without secondary proceed indication Any cases of difficulty should be referred in the first instance to the supplier of the apparatus d The apparatus must not be conne...

Page 136: ... any modification in any material way not authorised by BABT or it is used with or connected to internal software that has not been formally accepted by BABT All apparatus connected to the facsimile machine and thereby connected directly or indirectly to telecommunication systems must be approved apparatus as defined in Section 22 of the British Telecommunication Act 1984 NOTES If you experience a...

Page 137: ...HOCK IF THE CUT OFF PLUG IS INSERTED INTO ANY 13 AMP SOCKET If a new plug is to be fitted please observe the wiring code as shown below If in any doubt please consult a qualified electrician WARNING THIS APPLIANCE MUST BE EARTHED IMPORTANT The wires in this mains lead are coloured in accordance with the following code Green and Yellow Earth Blue Neutral Brown Live As the colours of the wire in the...

Page 138: ...ment or repair to damage caused through installation adaption modification or use in an improper manner or inconsistent with the technical and or safety standards required in the country where this appliance is used or to damage occurred during transit to or from the purchaser 5 If at any time during the guarantee period any part or parts of the appliance are replaced with a part or parts not supp...

Page 139: ...YOUR FAX NO Up to 20 digits 34 07 Setting the ring count in the FAX ONLY mode FAX RING COUNT 1 2 3 4 5 EXT TAM 1 to 5 rings 5 rings for use with an answering machine 75 12 Securing the remote operation for the answering machine REMOTE TAM ACT ON ID 11 OFF Activate Deactivate 73 04 Printing the sending report SENDING REPORT ERROR ON OFF If transmission fails Activate Deactivate 59 ON OFF Activate D...

Page 140: ...AX RING 3 4 5 6 3 to 6 rings 82 36 Receiving documents of other sizes RCV REDUCTION 100 92 86 72 Deactivate reduction 92 reduction 86 reduction 72 reduction 84 NORMAL DARKER Normal contrast Darker contrast 39 Changing the display contrast LCD CONTRAST 130 ON OFF Activate Deactivate 40 Setting the silent detection SILENT DETECT 85 ON CODE 9 OFF Activate Deactivate 41 Changing the fax activation cod...

Page 141: ...anging the AUTO ANSWER setting AUTO ANSWER FAX ONLY TEL FAX Facsimile only mode Telephone Facsimile mode 82 79 Setting the film detection FILM DETECTION ON OFF Activate Deactivate 132 80 Resetting the advanced features SET DEFAULT YES NO Reset Will not reset 78 Setting the TEL FAX delayed ring count TEL FAX RING 1 2 3 4 1 to 4 rings 90 Advanced features 87 49 Setting the auto disconnection AUTO DI...

Page 142: ...instead of entering the code number 01 02 etc EASY DIAL The pre selected setting is in bold LONG SHORT 2 minutes 30 seconds 1 minute 11 Setting the remote operation ID REMOTE TAD ID ID 111 Any 3 digit number except a number using digits 0 or 7 06 Setting the ring count in the TAD FAX mode TAD RING COUNT 1 2 3 4 TOLL SAVER RINGER OFF 1 to 4 rings Saves you the charge for the call Does not ring Sett...

Page 143: ...eactivate reduction 92 reduction 86 reduction 72 reduction 84 30 Setting the silent fax recognition ring count SILENT FAX RING 82 NORMAL DARKER Normal contrast Darker contrast 39 Changing the display contrast LCD CONTRAST 130 ON CODE 9 OFF Activate Deactivate 41 Changing the fax activation code FAX ACTIVATION 83 ON OFF Activate Deactivate 44 Setting the memory reception alert RECEIVE ALERT 86 ON O...

Page 144: ...ransmission reception error occurs 129 54 Setting the recording time for the TAD FAX greeting message GREETING TIME 16s 60s 16 seconds long 60 seconds long 97 60 Setting the message transfer pager call MESSAGE TRANS MESSAGE PAGER OFF Transfers incoming messages Calls your pager Deactivate 107 61 Recording the message transfer greeting message TRNS GREETING CHECK RECORD ERASE Checks the greeting me...

Page 145: ...ensions H W D 154 mm 365 mm 355 mm Mass Weight Approx 5 4 kg Power Consumption Standby KX FP300 Approx 5 0 W KX FP320 KX FM330 Approx 6 0 W Transmission KX FP300 Approx 13 W KX FP320 KX FM330 Approx 14 W Reception Approx 37 W When receiving a 20 black document Copy Approx 48 W When copying a 20 black document Maximum Approx 160 W When copying a 100 black document Power Supply 220 240 V AC 50 Hz Me...

Page 146: ... messages 113 114 Document feeder cleaning 126 Document jam 122 Document size 58 143 E EASY DIAL Making a voice call 45 Repeating the recorded messages 99 Selecting characters 33 41 Sending faxes 56 Skipping the recorded messages 99 Storing 43 44 ECM communication 88 Enlarge Reduce copy 91 92 ERASE button 51 96 98 Error messages 112 114 Extension telephone 79 83 F Facsimile telephone number 34 Fax...

Page 147: ...roblem solving 115 118 Programmable features 137 142 Pulse 39 Q QUICK button 99 R RECALL button 38 Recall mode 131 Receiving Fax 9 70 Setting 66 69 Receiving reduction 84 RECORD button 95 100 Recording Greeting message 95 108 Memo message 100 Telephone conversation 100 Recording paper 5 28 29 143 Recording paper jam 120 121 Recording time alert 111 Recording time for TAD FAX greeting message 97 RE...

Page 148: ... 109 TEL mode 66 69 70 TEL FAX delayed ring count 82 TEL FAX mode 78 82 Telephone line cord 6 30 Telephone number list 128 Thermal head cleaning 127 Toll saver 109 TONE button 38 Transmission Broadcast 63 64 EASY DIAL 56 From memory 62 Manually 8 54 One Touch Dial 55 Transmittable document 58 143 V Voice call Answering 7 37 EASY DIAL 45 Making 7 36 One Touch Dial 42 Voice contact 53 Voice time day...

Page 149: ...147 ...

Page 150: ...73 23 EEC 89 336 EEC 92 31 EEC 93 68 EEC Kyushu Matsushita Electric Co Ltd 1 62 4 chome Minoshima Hakata ku Fukuoka 812 8531 Japan Printed in Malaysia PFQX1322YA WM0699AN1079 ...

Reviews: