


21
VQT2J46
Basi
c
ope
ra
ti
o
n
s
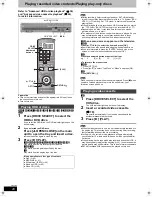
Recording television programmes
Refer to “Notes for recording” (
>
26) and “Advanced
recording” (
>
27) for detail information.
[HDD]
[RAM]
[-R]
[-RW‹V›]
[+R]
[+RW]
[VHS]
≥
From the start to the end of the recording is called one title.
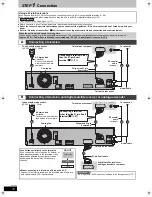
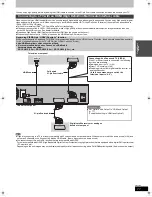
Preparation
≥
Turn on the television and select the appropriate AV input to suit
the connections to this unit.
≥
Turn on this unit.
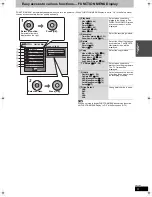
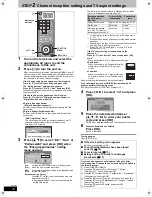
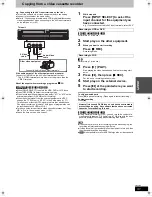
1
Press [DRIVE SELECT] to select the
HDD, DVD or VHS drive.
If you insert a DVD or VHS, the DVD or VHS indicator lights up
on the unit’s display.
2
If you selected the DVD drive
Press [
<
OPEN/CLOSE] on the main
unit to open the tray and insert a disc.
≥
Press the button again to close the tray.
If you selected the VHS drive
Insert a video cassette with an intact
accidental erasure prevention tab.
3
Press [
W X
CH] to select the channel.
Channels are displayed in the order of digital channels first,
and then followed by analogue channels.
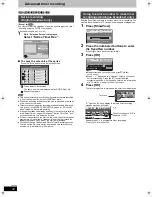
4
Press [REC MODE] to select the
recording mode.
≥
HDD and DVD recording modes and approximate recording
times (
>
27)
≥
VHS Recording Modes and Durations (
>
27)
e.g.,
5
Press [
¥
REC] to start recording.
≥
(Except for
[VHS]
)
Recording will take place on open space.
Data will not be overwritten.
≥
You cannot change the channel or recording mode during
recording.
≥
You can record while the unit is in standby for timer
recording. However, once the time for the timer recording to
begin is reached, any recording taking place will stop and
the timer recording will begin.
≥
[HDD]
[RAM]
(Analogue broadcast only) When “Rec for High
Speed Copy” is set to “Off” (
>
75), you can change the
audio being received by pressing [AUDIO] during recording.
(Does not affect the recording of audio.)
≥
[VHS]
– Even if the video cassette is labelled “S-VHS”, it is not
possible to record in the S-VHS system with this unit. This
unit records in the normal VHS system.
– When recording is paused for 5 minutes or more, the unit
returns to stop.
∫
To pause recording
Press [
;
].
Press again to restart recording.
You can also press [
¥
REC] to restart.
(Title is not split into separate titles.)
∫
To stop recording
Press [
∫
].
≥
[VHS]
It is not possible to record SECAM signal on a video cassette.
≥
[USB]
It is not possible to record on a USB memory.
≥
[SD]
It is not possible to record on a card.
≥
Video will not be recorded to DVD-R discs which include JPEG
images.
≥
[-R]
[-RW‹V›]
[+R]
[+RW]
It takes about 30 seconds for the unit to
complete recording management information after recording
finishes.
≥
[RAM]
[-RW‹V›]
[+R]
[+RW]
To use a new disc, formatting is necessary.
≥
When recording a digital radio broadcast or a digital broadcast that
is not being received correctly, the digital channel information
(
>
19) is also recorded and remains visible during playback.
In order to play DVD-R, DVD-RW (DVD-Video format) and +R
(recorded with this unit) on other DVD players, it is necessary
to finalise them (
>
72).
In order to play +RW on other players, we recommend you to
create a top menu (
>
72).
To select with the numbered
buttons:
e.g.,
5:
[0]
>
[0]
>
[5]
15: [0]
>
[1]
>
[5]
115: [1]
>
[1]
>
[5]
“D” means digital broadcasts.
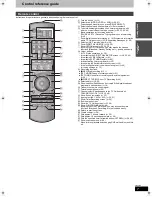
TIME SLIP
AUDIO
STTL DISPLAY
DIRECT TV REC
EXT LINK
REC MODE
REC
CHAPTER -10s
MANUAL SKIP
+60s
STOP
PAUSE
PLAY
INPUT
SELECT
0
9
8
7
6
5
4
3
2
1
CH
CH
TRACKING/V-LOCK/PAGE
ShowView
PROG/CHECK
SKIP/INDEX
REW
JET REW
FF
SLOW/SEARCH
PAUSE LIVE TV
RESET
VOL
AV
DRIVE
SELECT
TV
STATUS
EXIT
OPTION
RETURN
DELETE
OK
DIR
ECT
NA
VIG
ATO
R
FUN
CTIO
N M
ENU
GUIDE
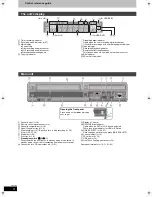
DRIVE
SELECT
PAUSE
STOP
REC MODE
0
9
8
7
6
5
4
3
2
1
REC
AUDIO
CH
CH
STTL
S VIDEO
IN 2
VIDEO
/MONO AUDIO R
L
S VIDEO VIDEO
/MONO AUDIO R
L
AV3 IN
DRIVE SELECT
REC
CH
CH
OPEN/CLOSE
EJECT
COPYING
COPYING
VHS
HDD
VHS
DVD
WX
CH
<
OPEN/CLOSE
REC
DRIVE SELECT
Numbered
buttons
XP
0:37
SP
1:15
LP
2:30
EP
5:00
Recording Mode
Rec Mode
Remain
SELECT
≥
(Except for
[VHS]
)
To record sound using
LPCM (XP mode only):
Set the “Audio Mode for XP
Recording” to “LPCM” in
the Setup menu (
>
76).
REC
Note
DMR-EX99VEG-VQT2J46_eng.book 21 ページ 2010年1月14日 木曜日 午前10時31分


