background image

 Change the order of destinations

1

Select [Change order] on the Change 
Route screen.

   The Reorder destinations screen is displayed.

2

Select the destination names in 
the order in which you want to pass 
through them, then select [OK].

   The names of the selected destinations are 

displayed in bold text, and numbered to indicate 
the order in which the route passes through 
them.

   To cancel the setting, select [Undo] or select the 

name of the destination to cancel.

   If there are no other operations for 3 seconds 

after the order of destinations is confi rmed, the 
order is automatically confi rmed and the Change 
Route screen is displayed.

3

Select [OK].

   The All route screen is displayed after the search 

is complete.

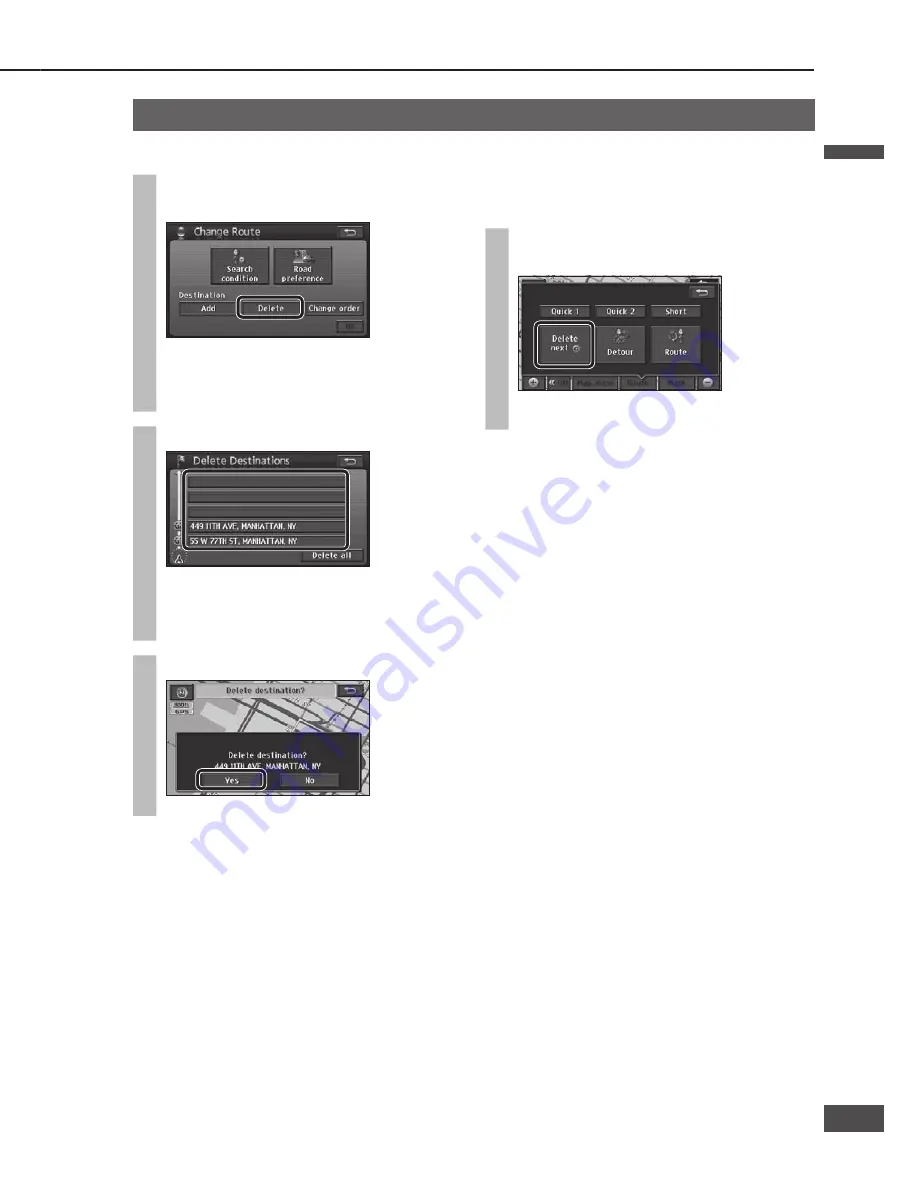
 Delete a destination

  Select a destination and delete it

1

Select [Delete] on the Change Route 
screen.

   The Delete Destinations screen is displayed.

   The Delete Destinations screen can also be 

displayed by selecting [Destination Delete] from 
the Destination menu.

2

Select the destination to delete.

   If only one destination has been set, the 

procedure moves to the next step without 
displaying the Delete Destinations screen.

   Select [Delete all] to delete all destinations.

3

Select [Yes].

   The destination is deleted.

  Delete the next destination that 

the route passes through with 
one touch

Select [Delete next 

] on the 

Re-route search screen.

   Searching starts and guidance of new route 

begins.

Note:

   This function can only be used when multiple 

destinations have been set.

Edit the route 

(continued)

4

Select [Start].

   Route guidance starts.

Note:

   This function can only be used when multiple 

destinations have been set.

English

English

54

55

55

54

Summary of Contents for CN-NVD905U - Strada - Navigation System

Page 1: ...ing Instructions Manuel d instructions Manual de Instrucciones Please read these instructions including Limited Warranty and Customer services directory carefully before using this product and keep this manual for future reference Prière de lire attentivement ces instructions y compris la Garantie limitée et le Répertoire des services à la clientèle avant d utiliser ce produit et conserver ce manu...

Page 2: ...ause a fire or an accident Protect the Deck Mechanism Do not insert any foreign objects into the slot of this unit Do not disassemble or modify the unit Do not disassemble modify the unit or attempt to repair the product yourself If the product needs to be repaired consult your dealer or an authorized Panasonic Servicenter Do not use the unit when it is out of order If the unit is out of order no ...

Page 3: ...ectrical installation and avoidance of potential harm to air bag anti theft and ABS braking or other systems necessary to install this product Any attempt to install this product in a motor vehicle by anyone other than a professional installer could cause damage to the electrical safety system and could result in serious personal injury or death If your car is equipped with air bag and or anti the...

Page 4: ...ions to properly install and wire the product could cause an accident or fire Take care not to damage the leads When wiring take care not to damage the leads Prevent them from getting caught in the vehicle chassis screws and moving parts such as seat rails Do not scratch pull bend or twist the leads Do not run them near heat sources or place heavy objects on them If leads must be run over sharp me...

Page 5: ...mounting area clean of dirt wax etc then fasten the camera securely in place Re affixing adhesive parts or use of general purpose double sided tape could cause weak bonding that would allow the equipment to drop off while the vehicle is in motion causing accident or injury Check the state of bonding or mounting loose screws etc occasionally Never assign the mp3 or wma file name extension to a file...

Page 6: ...result the panel may not work properly Do not use the unit while these symptoms are in evidence but leave the unit standing for about an hour and then resume or start use Notes on use Limitation of liability If malfunction or damage occurs due to fire earthquake third party action other accident error or intent by the customer misoperation or use under other improper conditions resulting repairs w...

Page 7: ... the subtitle settings may be changed If that happens reset to the previous settings manually Symbols used on jackets Examples of such symbols include Number of subtitle languages Number of audio tracks Number of angles The numbers indicate the number of languages tracks angles etc recorded on the disc Screen size H V aspect ratio 4 3 standard size Letterbox 16 9 wide size Playback in Letter box f...

Page 8: ...contact us via the web at http www panasonic com contactinfo You may also contact us directly at 1 800 211 PANA 7262 Monday Friday 9 am 9 pm Saturday Sunday 10 am 7 pm EST For hearing or speech impaired TTY users TTY 1 877 833 8855 Accessory Purchases Purchase Parts Accessories and Instruction Books online for all Panasonic Products by visiting our Web Site at http www pasc panasonic com or send y...

Page 9: ...other authorized service centers or damage that is attributable to acts of God THERE ARE NO EXPRESS WARRANTIES EXCEPT AS LISTED UNDER LIMITED WARRANTY COVERAGE THE WARRANTOR IS NOT LIABLE FOR INCIDENTAL OR CONSEQUENTIAL DAMAGES RESULTING FROM THE USE OF THIS PRODUCT OR ARISING OUT OF ANY BREACH OF THIS WARRANTY As examples this excludes damages for lost time cost of having someone remove or re ins...

Page 10: ... by mandatory laws Multi disc sets may only be transferred or sold as a complete set as provided by Panasonic and not as a subset thereof Restrictions Except where you have been specifically licensed to do so by Panasonic and without limiting the preceding paragraph you may not a use this Data with any products systems or applications installed or otherwise connected to or in communication with ve...

Page 11: ... between us with respect to such subject matter Governing Law The above terms and conditions shall be governed by the laws of the State of Illinois without giving effect to i its conflict of laws provisions or ii the United Nations Convention for Contracts for the International Sale of Goods which is explicitly excluded You agree to submit to the jurisdiction of the State of Illinois for any and a...

Page 12: ...e menu and start route guidance High performance Navigation Near the intersection Near the intersection Enlarged intersection map is displayed Enlarged intersection map is displayed Add a destination Add a destination After the destination has After the destination has been set it is still possible been set it is still possible to set other destinations to set other destinations up to 5 up to 5 De...

Page 13: ...in addition AV features DVD DVD CD CD MP3 MP3 WMA WMA FM FM AM AM Various AV sources Various AV sources RearView RearView Camera Camera Bluetooth Bluetooth iPod iPod TV TV TUNER TUNER SIRIUS SIRIUS XM XM Rear Rear Monitor Monitor Connectable Optional devices Connectable Optional devices iPod Direct cable for iPod CA DC300U option Optional XM Satellite Radio Tuner XMD1000 Optional Digital Adapter C...

Page 14: ...47 Map search 48 Coordinates search 48 Phone number search 49 Return Home 49 Display POI icons 50 Search for nearby POI icons 51 Edit the route 52 Add a destination 52 Change the order of destinations 54 Delete a destination 55 Search again for the route 56 The search looks for nearby detour routes 56 Set search conditions for each section of the route 57 Select the road to use 58 Check the route ...

Page 15: ... the top menu 79 Display the title menu 79 Top menu and title menu operations 80 CD operation screen 81 MP3 WMA operation screen 81 Select track file 81 Folder selection 81 Fast forward Fast reverse 81 Select a folder from the list 82 Select a file from the list 82 Scan play 82 Folder scan play 82 Random play 83 Folder random play 83 Repeat play 83 Folder repeat play 83 Display file information 83...

Page 16: ...rch methods shortcuts Any three desired search methods can be selected as shortcuts page 34 Current source Names of controls and functions To go back to the previous screen Touch in the top right of the screen Navigation menu Destination menu Audiovisual source operation screen 1 This is displayed when an XM Satellite Radio Tuner XMD1000 is connected 2 This is displayed when a SIRIUS Satellite Rad...

Page 17: ...dance Address page 40 POI Point Of Interest page 42 Nearest POI page 44 Emergency page 46 Address Book page 47 Previous page 47 Map page 48 Coordinates page 48 Phone No page 49 Home page 49 Change page 36 GPS Info page 23 Install Status page 22 Install Setting page 23 ID CODE Setting page 24 Language page 25 Rear View System Upgrade Guidebook This is displayed when a rear view camera is connected ...

Page 18: ...iovisual screen is displayed the display switches to current position screen If ACC is left on for a long period of time without running the engine it can run the battery down Do not start driving until the current position screen is displayed The system is preparing to boot up After moving this unit to a different vehicle or after changing the battery or disconnecting its cables the Input ID Code...

Page 19: ...screen 2 Touch the language to use Eng English Default Fr French Es Spanish The system restarts if the language is changed Note The language used for the touch keys explanatory text voice guidance and other content can be changed Place names and street names do not change The language can also be changed on the Information menu page 25 1 Check that the GPS mark is displayed It may take some time f...

Page 20: ...sual volume 1 Select Setup from the Navigation menu page 16 2 Select Guide Speaker 3 Select a setting 1 7 to adjust volume Select Off to cancel voice guidance To switch the volume automatically according to the speed When vehicle speed exceeds 50 miles 80 km per hour the guidance volume is automatically raised by one step Touch Adaptive volume control Touch it again to cancel Adaptive volume contr...

Page 21: ...rate the monitor Adjust the monitor angle TILT Screen off Select Screen Off from the Navigation menu page 16 The system operates as follows depending on the specific Screen Off settings page 86 On Screen display is switched off but sound remains on Off Both screen display and sound are switched off Illumination button illumination is not switched off Press or To display the screen Caution Take car...

Page 22: ...he reading changes to 0 when Pulse Reset is pressed If the system is functioning normally the number should be different after the vehicle has moved Accuracy Level The reading changes to 0 when Level Reset is pressed The number changes after the vehicle has moved Level 4 is the maximum Sensor Reset The reading changes to uncorrected when Sensor Reset is pressed Note In the following situations ple...

Page 23: ...s Speed Signal Set the speed signal detection level It should be set to Normal in normal circumstances Select Low Level if the voltage of the speed signal is low and the signal cannot be detected default Normal Rear View Camera Set whether or not to switch to the image from the rear view camera when the shift lever is in the reverse position System Upgrade Guidebook On Set this if a rear view came...

Page 24: ...his manual 343 342 ID code mem o Copy the memo below fill in the ID code and keep it in a secure locatio n Note de code d ide ntificatio n Copier la note ci dess ous remplir le code d ident ification et conser ver dans un endroit sûr Anotación del códig o de identificación Copie la anotac ión abajo rellene el código de identifi cación y guárde lo en un lugar seguro Model No CN NV D905U ID CODE To set...

Page 25: ...the memory clear function The inputted code is not displayed for your security Select the language to use on this system The language can also be changed at boot up page 19 default Eng 1 Select Language from the Information menu 2 Select the language to use from Eng Fr Es Eng English Fr French Es Spanish Restarts the system to change the language setting If you forget the ID code If you forget the...

Page 26: ...ly using a signal from GPS satellites The clock cannot be adjusted manually Note The clock can only display on the map screen It cannot be displayed on audiovisual screen and menu screen The time zone can be changed page 84 It does not change automatically default EST Eastern Standard Time It can be set to display not display page 84 Clock display Check map data English 26 26 ...

Page 27: ...nglish 27 Navigation Operations Map operations Create a route to the destination Search for a destination Edit the route Check the route During route guidance Register a location Contact Area to avoid 27 ...

Page 28: ...en display Two screen display Turn list Enlarged intersection map Highway transition zoom map Orientation mark page 32 Displays the orientation of the map Touch the icon to switch between North up and Heading up orientations North up North is at the top of the map Heading up The direction of motion is towards the top of the map Scale display The scale of the map is displayed Vehicle mark City map ...

Page 29: ...l time at the destination is displayed When in the Map mode screen the straight distance from the center of the map to the destination is displayed The display can be toggled to show remaining time page 39 Guidance route The route is displayed by a yellow line Remaining distance display The distance to the destination is displayed If multiple destinations have been set the distance to the next des...

Page 30: ...driving the distance to the junction the place the road heads to the name of the road to turn onto and the direction to turn are displayed The junction is displayed approximately 2 miles 2 km in advance Switch the map Map operations continued Two screen display The screen is split in two for map display A map such as the one on the right is displayed for junctions which are not in the database of ...

Page 31: ...on the left screen page 50 Zoom in Zoom out page 33 Zooms in or out the map scale Returns to left screen operation Operation of the left screen Operation of the right screen 1 Touch the right screen The right screen becomes the screen that can be operated 2 Operate the right screen The screen can be operated in the same way as a one screen display Note The map cannot be scrolled English 31 31 ...

Page 32: ... up North up Touch The display switches to Heading up Note The Map mode screen cannot be switched from North up to Heading up To switch from North up to Heading up To switch from Heading up to North up 1 Touch the screen The point touched becomes the center of the screen and the cursor is displayed Map mode screen 2 Touch and hold in the direction to scroll Scrolling continues while the screen is ...

Page 33: ...ity map is displayed The map is displayed at a scale which allows display of the entire route from the current position to the next destination Note This function can be used when setting a destination If the distance to the destination is so long that it cannot be displayed within a more detailed scale it is displayed at the 300 mile 500 km scale This operation is unavailable on city maps This is...

Page 34: ...e Destination menu 1 Touch Setup from the Navigation menu 2 Touch Custom Dest Menu 3 Touch three items to select them for inclusion in the Destination menu Always select three items Touch Default to select Address POI and Nearest POI 4 Touch OK The selected items are registered to the Destination menu They are arranged in order of selection from the left English 34 34 ...

Page 35: ...e setting page 84 Route trace Note When route trace is not displayed the route trace data is not recorded Touch Record on the Change map view screen Starts recording a route trace from the current position If No was selected in step 3 of the To clear route trace procedure the route trace that was displayed before it was cleared is displayed again To clear route trace To display route trace 1 Touch...

Page 36: ...y the Search Area screen Create a route to the destination 1 Search for the destination on the Navigation menu Use the search function to search for the destination Navigation menu Touch Destination Destination menu Touch Others Setting frequently used items on the Destination menu makes it easier to search for destinations page 34 Destination menu All The Destination setting screen a map of the a...

Page 37: ...e selection status for the route to use is displayed Example Use Do not use Highway Time restricted road Ferry Toll road Seasonally restricted road Car train Road preference The type of road to use can be changed page 58 If the destination has been set The following two touch keys will be displayed instead of Enter New The set destination is cancelled and a new destination is set Add to A new dest...

Page 38: ...ining time total route length toll road highway ferry and car train is displayed When a route is selected the All route screen is displayed for the selected route Note The routes displayed may be the same in some cases Maps cannot be scrolled on screens which display the 3 routes display screen If there are transit destinations page 52 3 routes will not be displayed 3 routes cannot be displayed on...

Page 39: ...time or remaining time for that destination Touch to return to the previous display Suspend route guidance If guidance for the set route is not required route guidance can be suspended This is a convenient function for driving on smaller roads or in well known areas 1 Select Setup from the Navigation menu during route guidance The Setup menu is displayed 2 Select Suspend guidance Suspends route di...

Page 40: ... search by street Enter the street name Go to step 3 To search by city Select City Go to step 3 How to enter text page 97 To search by street 3 ı Select List 3 ı Select the street from the list 3 ı Select the city from the list The address range list is displayed Go to step 4 Select Input name to refine your search by city Search for a destination English 40 40 ...

Page 41: ... to step 4 4 Select the address range from the list 5 Enter the house number and select OK The map is displayed If you select OK without entering the house number the map showing the vicinity of the street selected is displayed 6 Select Enter The All route screen is displayed after the search is complete 7 Select Start Route guidance starts Note If there is only one candidate for city address rang...

Page 42: ... your search by category Select Category Go to step 4 To refine your search by city Select City Go to step 4 If there is no refine search setting Select List Go to step 5 To search by category 4 ı Select a main category Select List all categories to display the sub categories within all main categories Select Cancel to cancel the set category 4 ı Select a sub category Go to step 3 Search for a des...

Page 43: ...here are multiple facilities of the same name in the same category such as branches of a supermarket chain the number of applicable facilities is displayed next to the icon When a POI with multiple instances is selected the branches are listed The list can be sorted Dist sort The list is sorted in order of proximity Name sort The list is sorted in alphabetical order 6 Select Enter The All route sc...

Page 44: ...egories can be selected To cancel a selected sub category select it again 6 Select Show list POIs within a radius of 20 miles 32 km of the search position the current position or the cursor position on the Map mode screen are searched for and listed in order of proximity to the current position Up to 200 matches can be made This is the range when km is set as the distance setting page 84 To re sel...

Page 45: ...he search are listed and the touch keys show the name the icon and the distance along the route from the current position Select Sort by to sort the list Distance The list is sorted in order of proximity Category The list is sorted by category Name The list is sorted in alphabetical order 2 Select a POI The map is displayed The POI name and the distance along the route from the current position ar...

Page 46: ... If the driver is also the operator of the navigation system he or she must stop the vehicle in a safe place before operating it 1 Select Emergency from the Destination menu All The Emergency selection screen is displayed 2 Select a category from the list The nearest POI to the current position is displayed 3 Select Enter The All route screen is displayed after the search is complete 4 Select Star...

Page 47: ...e than 20 routes the oldest are deleted sequentially Register necessary points as Contacts page 62 To clear previous points refer to page 86 Address Book search Search for a destination from among registered Contacts You must register locations to use this feature page 62 1 Select Address Book from the Destination menu All The Address Book search screen is displayed 2 Select the Contact from the l...

Page 48: ... for a destination 1 Select Coordinates from the Destination menu All The Coordinates search screen is displayed 2 Enter the coordinates and select OK When entering a latitude select N for north and S for south and select E for east and W for west when entering a longitude To correct the coordinates select to delete digits one at a time A map is displayed according to the coordinates input 3 Selec...

Page 49: ...er to pages 40 49 for the search method 3 Select Enter Home is registered Phone number search Use a telephone number to search for a destination 1 Select Phone No from the Destination menu All The Phone number search screen is displayed 2 Enter the telephone number and select OK The telephone number list is displayed To correct the number select to delete digits one at a time 3 Select the POI from...

Page 50: ...Select List all categories to display the sub categories within all main categories 5 Select POI icons displayed from the list and select OK Selected POI icons are displayed on the map Up to 5 icons can be selected To choose another category select More then repeat from step 4 To see information on POI icons 1 Put the cursor on POI icons which will cause the cursor to flash The POI name is display...

Page 51: ...he list Distance The list is sorted in order of proximity Category The list is sorted by category Name The list is sorted in alphabetical order Select On route during route guidance to search for POIs along the guidance route page 45 5 Select Enter 6 Select Enter The All route screen is displayed after the search is complete 7 Select Start Route guidance starts Note This function cannot be used if...

Page 52: ... destinations are marked by Add a destination After the destination has been set it is still possible to set other destinations up to 5 If 5 destinations have already been set delete one before adding another Add from the current position screen 1 Select Route on the current position screen The Re route search screen is displayed 2 Select Route The Change Route screen is displayed 3 Select Add 4 S...

Page 53: ...lect Start Route guidance starts Note The destination set by the one touch method is set as the first destination To change the order of destinations refer to Change the order of destinations on page 54 Add from the Destination menu 1 Search for the destination to add from the Destination menu All Refer to pages 40 49 for the search method 2 Select Add to Select New to delete all currently set des...

Page 54: ...rder in which the route passes through them To cancel the setting select Undo or select the name of the destination to cancel If there are no other operations for 3 seconds after the order of destinations is confirmed the order is automatically confirmed and the Change Route screen is displayed 3 Select OK The All route screen is displayed after the search is complete Edit the route continued 4 Se...

Page 55: ...to delete If only one destination has been set the procedure moves to the next step without displaying the Delete Destinations screen Select Delete all to delete all destinations 3 Select Yes The destination is deleted Delete the next destination that the route passes through with one touch Select Delete next on the Re route search screen Searching starts and guidance of new route begins Note This...

Page 56: ...test distance to the destination Note If multiple destinations have been set the search to the next destination is repeated Edit the route continued The search looks for nearby detour routes It can search for a route that detours around the route ahead of the vehicle 1 Select Route on the current position screen The Re route search screen is displayed 2 Select Detour The Detour screen is displayed...

Page 57: ...played 4 Select the search conditions for each section Select search conditions from Quick 1 Quick 2 Short If there are transit destinations only Quick and Short will be displayed for sections after the first transit destination Quick The search looks for a route with the shortest travel time Recommended route Short The search looks for a route with the shortest distance to the destination 5 Selec...

Page 58: ...types of road can be selected Operation indicators light for the selected items Allow highway Allow time restricted road Allow ferry Allow toll road Allow season restricted road Allow car train To cancel the item select it again 5 Select OK The All route screen is displayed after the search is complete 6 Select Start Route guidance starts Note Even if the roads to use have been set the search may ...

Page 59: ...ew on the map screen The Change map view screen is displayed 2 Select Route preview The map scrolls in the direction of the destination at low speed The map scrolls in the direction of the starting point at low speed The map scrolls in the direction of the destination at high speed The map scrolls in the direction of the starting point at high speed Jumps to the next destination Jumps to the start...

Page 60: ... The All route screen is displayed Select Start to start route guidance Select Route to display the Change Route screen page 38 The distance to the next destination is displayed together with estimated arrival time remaining time etc page 29 The estimated arrival time and remaining time can be switched page 39 If the vehicle is not on the route the direction and distance to the destination are dis...

Page 61: ... guidance near exits Request voice guidance Press during route guidance to display the name of the current position and provide voice guidance of the distance to the next intersection destination etc The name of the current position is displayed according to nearby place name POI name or street name etc Voice guidance on freeways Voice guidance on ordinary roads This is the distance when km is set...

Page 62: ...iled scale This is the scale when km is set as the distance setting page 84 Note The registered Contact is marked with a To register from the Navigation menu 1 Select Address Book from the Setup menu The Address Book screen is displayed 2 Select Register for Contacts 3 Search for the location to register Refer to pages 40 49 for the search method Home is not displayed 4 Select Enter Make the setti...

Page 63: ...play from the map screen 1 Move the cursor to the Contact The Contact name is displayed on the top of screen 2 Select Info The Contact information is displayed 3 Select Edit The Edit Contacts screen is displayed Select Enter to set it as the destination If a destination has already been set Add to or New is displayed Refer to page 37 for details Note Please be aware that in the unlikely event of p...

Page 64: ...ect Enter Direction guidance bell setting is complete Note Select No icon from Page 2 to avoid displaying an icon on the Contact Set a Contact for home Only one Contact can be set as home Select Set Home on the Edit Contacts screen A Contact is set for home When Del Home is selected the home setting is cancelled If another Contact has already been registered as home select Yes to cancel the old ho...

Page 65: ...e No on the Edit Contacts screen 2 Enter the phone number and select OK The entered number is set as the phone number Delete a Contact Once a Contact is deleted it cannot be restored Check thoroughly before deleting 1 Select Address Book from the Setup menu The Address Book screen is displayed 2 Select Delete for Contacts The Contact list is displayed 3 Select the Contact to delete The list can be...

Page 66: ...an Area to avoid 6 Select Enter If the destination is set route searching is performed The registered Area to avoid is displayed on the map screen as or range Note When or are used to switch the map scale the map switches but the size of the square frame indicating the area does not switch In the following situations a route search may produce a route passing through an Area to avoid If the vehicl...

Page 67: ...ect Yes If the destination is set route searching is performed Display the Edit area to avoid screen 1 Select Address Book from the Setup menu The Address Book screen is displayed 2 Select Edit for Area to avoid The list of areas to avoid is displayed 3 Select the Area to avoid to edit The Edit area to avoid screen is displayed Note Please be aware that in the unlikely event of product failure or ...

Page 68: ...e the position of the Area to avoid 1 Select Location on the Edit area to avoid screen 2 Move the cursor to the location to which you wish to move the Area to avoid and select Enter Move the Area to avoid to the center of the cursor Make the setting on a map of 0 5 mile 500 m or more detailed scale This is the scale when km is set as the distance setting page 84 Change the size of the Area to avoi...

Page 69: ...Guidebook for information on SIRIUS XM iPod and TV Video from the DVD Line in is not displayed while the vehicle is in motion Stop in a safe place and engage the parking brake before watching video Even while the vehicle is in motion video is output to the second monitor see System Upgrade Guidebook 69 ...

Page 70: ...t is not displayed on the screen Select to switch the screen Traffic The Traffic Channels of XM Satellite Radio and SIRIUS Satellite Radio can be memorized for easy access to traffic information System Upgrade Guidebook Refer to the System Upgrade Guidebook for information on the operation of accessories sold separately Refer to page 88 for operation of Sound Turn the audiovisual source off Select...

Page 71: ...eived While the button is held down stations will not be received even when they are detected Frequency Auto preset mode indicator Auto presetting Preset stations Tune by selecting a preset number List selection Frequency Auto presetting Specify the range for Auto presetting Each Perform Auto presetting for the displayed list bands 6 ch All Perform Auto presetting for the entire list from FM1 to 3...

Page 72: ...6 AM stations Touch and hold Auto P for at least 2 seconds Auto preset mode is engaged and the Auto preset mode indicator illuminates Stations are stored in order of reception quality The stored stations are overwritten and updated every time this operation is performed If no receivable stations are found tuning goes through the whole frequency range and returns to the original station Note Even i...

Page 73: ...D Hint screen is displayed when a DVD is inserted It presents a simple explanation of DVD operation Check the explanation then select OK The DVD Hint screen disappears Note Once OK is selected the DVD Hint screen will not be displayed again until the engine stops It appears again after the engine is restarted or the key is turned to ACC ON Disc eject CD DVD 1 Select Disc on the Open Tilt Eject scr...

Page 74: ... disc instructions manual for details Play a disc continued DVD operation screen When the source is switched to DVD the DVD operation screen is displayed automatically To display the DVD operation screen manually press while DVD is the source Read the section on Discs that can be played back carefully page 7 Switches the aspect ratio PLAY This screen can be operated while the vehicle is in motion ...

Page 75: ... the disc being played for how to operate page 79 HIDE BUTTONS Hides the touch keys Fast reverse page 77 Stop page 76 Pause page 76 Play page 76 Fast forward page 77 Short menu 3 This menu can be used for DVD playback related settings SETUP Displays the Setup menu page 94 SEARCH Inputs the title number to cue the title page 77 RETURN Moves to a predetermined position on the disc and starts playbac...

Page 76: ...here it stopped Pause Select from Short menu 1 Resume playback Select from Short menu 1 Playback resumes from where it stopped can also be selected to start playback Slow playback Touch and hold while playback is paused Slow playback continues for as long as it is touched Release to return to pause DVD English 76 76 ...

Page 77: ...from the next chapter Press to play the currently playing chapter from the beginning Press twice or more to play the preceding chapter Input the title number to cue the title 1 Select SEARCH from Short menu 3 2 Enter the title number and select Enter Playback starts from the input title number If there is no title on the DVD matching the input title number the currently playing title continues Sel...

Page 78: ...tle language If the disc contains multiple subtitle languages the subtitle language can be switched 1 Select SUB TITLES from Short menu 3 The subtitle numbers and languages are displayed 2 Select SUB TITLES The subtitle languages switch each time SUB TITLES is selected The subtitle displays toggle between show and hide each time Hide is selected The switch is displayed in bold faced type when the ...

Page 79: ...e power is turned on or the disc is changed the language set under DVD settings is prioritized as the audio and subtitle language The number of audio languages subtitle languages and angles varies between discs Refer to the disc instructions for details Display the top menu The top menu varies between discs Refer to the disc instructions for details Select TOP MENU from Short menu 1 The top menu i...

Page 80: ...reen mode is fixed to wide provided there is an item that can be selected for the DVD image Select Off to hide the touch keys Select On to display the touch keys When an item was selected but the unit did not recognize which item was selected the screen near the selected area is enlarged If this occurs select the item again Use the cursor keys to select The cursor keys can be used to select menu i...

Page 81: ...s and hold Fast forward or fast reverse continues while button is pressed Press and hold to fast forward Press and hold to fast reverse Release to return to normal playback Note For a CD or on the CD operation screen can also be selected to fast forward fast reverse Touch and hold the button to fast forward Touch and hold the button to fast reverse Release to return to normal playback Scan play Ra...

Page 82: ...e list Select to return to the MP3 WMA operation screen Scan play Select SCAN Scans all tracks Files in the folder currently being played are scanned Each track is played for approximately 10 seconds Select SCAN again to return to normal playback Scan will be automatically ended when it has run through all tracks all files in a folder Folder scan play Select FOLDER SCAN 10 seconds is played from t...

Page 83: ...played at random from among all files in all folders so the same file may be played any number of times Repeat play Select RPT The track file being played is played repeatedly Select RPT again to cancel the repetition Folder repeat play Select FOLDER RPT The file in the same folder as the file being played is played repeatedly Select FOLDER RPT again to cancel the repetition Display file informati...

Page 84: ... Select Change speed Keyboard layout Changes the key layout for text input default ABC Time zone Sets the Time zone and Daylight Saving Time to use default Time zone EST Daylight Saving Time Off Select Change Display POI icons Changes the POI icons displayed on the Display POI Icons screen page 50 Select Chg category 3D landmark Sets to display not display 3D landmarks page 28 default On Display c...

Page 85: ...untain Standard Time NST Newfoundland Standard Time AKST Alaska Standard Time Select OK Set Daylight Saving Time On Sets Daylight Saving Time Off Does not set Daylight Saving Time Select the POI icon to change Select Default to return settings to the defaults Select a main category Select List all categories to display all sub categories within the main categories Select a sub category as POI icon...

Page 86: ...nges the map display colors for night mode page 29 default 3 Menu picture Changes the icon for the Destination button on the Navigation menu The icon changes to represent morning midday evening and night depending on the time of day default 1 Format SD card Formats the SD memory card This function is for use with future versions of this software Select Format Basic navigation settings continued 1 ...

Page 87: ...dio when the screen is off 1 Route has easy to see colors when driving during the day and under brightly lit conditions 2 Icons have easy to see colors when driving during the day and under brightly lit conditions 3 Route has easy to see colors when driving at night and under low light conditions 4 Icons have easy to see colors when driving at night and under low light conditions Yes Formats the m...

Page 88: ...abled if a rear speaker 4 ch 4 1 ch is connected default Off Select On Surround effects 1 Select Sound on any Source operation screen Example AM 2 Select the item to set 3 Make settings right table Note SRS CS Auto will be turned off automatically if you change Balance Fader Speaker Setting Graphic Equalizer setting Change audio and video settings is a trademark of SRS Labs Inc CS Auto technology ...

Page 89: ...ich the dialog and music are played from the front channel and sound effects from the rear channel it may be difficult to hear the dialog from the rear seats Set Mix to Rear to combine output of front channel components such as dialog with the rear speaker output making dialog easier to hear from the rear seats while maintaining the realism of surround sound default 40 Adjustment range 0 40 100 Sp...

Page 90: ...egister the current adjustment values Load registered adjustment values Surround effects continued 1 Select Sound on any Source operation screen Example AM 2 Select the item to set 3 Make settings right table Note SRS CS Auto will be turned off automatically if you change Balance Fader Speaker Setting Graphic Equalizer setting Change audio and video settings continued Flat Flat Flat frequency resp...

Page 91: ...s is delayed to match the speaker furthest from the reference point Approximately 0 3 ms per 10 cm Set the listening position as the reference point Measure the distance horizontally Set the frequency Adjustment range 60 Hz 120 Hz 200 Hz Adjust the level for each frequency band Adjustment range 4 0 4 10 dB 0 dB 10 dB Touch and hold the setting to register from EQ1 to EQ5 for at least 2 seconds Not...

Page 92: ... performance risks infringing copyrights protected under copyright laws Extending a non wide screen 4 3 image to fill a wide screen hides part of the edge of the image or distorts the image View video in normal mode which respects the intentions of the producer default Wide Switch aspect setting 1 Select ASPECT when the DVD AV operation screen is displayed Example DVD 2 Make settings right table S...

Page 93: ...Select OK Adjust color saturation Adjustment range 1 6 11 default 6 Select OK When DAY MODE is selected during night mode display it switches to day mode Select it again to return to night mode Note The day mode switched to using DAY MODE is not the same brightness as normal day mode Select OK Settings Normal 4 3 w h screen Left and right sides are black Wide 16 9 w h screen English 93 93 ...

Page 94: ...et the software setting according to the symbol used on jacket page 7 DVD software mode is ignored if Pan Scan or Letterbox is already set in the software Screen aspect of the display unit is changed according to the aspect setting page 92 and DVD software s aspect Parental Control Level Restricts the DVD video that can be played default 8 DVD Setup menu 1 Select SETUP on Short menu 3 2 Select the...

Page 95: ...digit code number and select Enter Select to delete one character Note At the time of purchase no code number has been set The 4 digit number entered when making the initial settings becomes the code number If no code number has been entered the code number is displayed at the top as Once a code number is entered the code number will be required the next time the item is used and thereafter Do not...

Page 96: ...19 IceLandic 0920 Italian 0923 Hebrew 1001 Japanese 1009 Yiddish 1023 Javanese 1101 Georgian 1111 Kazakh 1112 Greenlandic 1113 Cambodian 1114 Kannada 1115 Korean 1119 Kashmiri 1121 Kurdish 1125 Kirghiz 1201 Latin 1214 Lingala 1215 Laotian 1220 Lithuanian 1222 Latvian 1307 Malagasy 1309 Maori 1311 Macedonian 1312 Malayalam 1314 Mongolian 1315 Moldavian 1318 Marathi 1319 Malay 1320 Maltese 1325 Burm...

Page 97: ...put varies between entry items Refer to the descriptions of each item The keyboard layout can be changed page 84 Enter alphabetic characters Select A Z Select to enter lower case characters Select to enter upper case characters When is selected is displayed Enter accented characters Select À Ý Select to enter lower case characters Select to enter upper case characters Enter numerals and symbols Se...

Page 98: ...ew one Consult your dealer The vehicle engine is not running Start the engine ACC ON is also usable Sound is not generated The wiring of speaker lines is not correct or a break or poor contact exists Check the wiring in accordance with the wiring diagram Installation Instructions Turn the volume up Noise There is an electromagnetic wave generator such as a cellular phone near the unit or its elect...

Page 99: ...ng against some obstruction or if a cable is trapped somewhere Sound does not come from one of the left right front rear speakers Check the volume balance of the Balance and Fader controls The sound quality is poor The sound skips If the sound is from DVD CD clean dust off the disc The mounting of the unit needs adjusting Adjust the angle to within 30 and mount it securely so that it does not vibr...

Page 100: ... off immediately after a Contact or area to avoid was registered or a setting was changed Register those again Power was turned off immediately after searching for a route Search for the route again The desired road is not included in the route A road away from the start location and destination was specified Add a destination close to the specified road There is no voice guidance The volume is se...

Page 101: ...ts when the engine starts Starting the engine may cause the vehicle radio antenna to extend and retract depending on the timing This is not a malfunction Car navigation Problem Possible cause Possible solution A route is created on roads other than the specified road A route is created if it is not possible to reach the destination without taking a road other than the one specified Depending on th...

Page 102: ...ase the unit is still out of order consult your dealer MP3 WMA No playback or disc ejected The disc has unplayable formatted data Refer to the description about MP3 WMA for playable sound data except CD DA i e music CD MP3 files must have the mp3 MP3 extension and WMA files must have the wma WMA extension The CD R RW that are playable on other devices are not playable on this unit The playability ...

Page 103: ...ing the disc or after switching to DVD the sound may break up for a short time while the format is recognized A DVD with dts audio content was played This system is not compatible with dts When playing always play non dts sound If dts sound is selected this system will output no audio On some discs audio automatically switches to dts when playback is stopped and resumed from the beginning of the d...

Page 104: ...to high temperature Not compatible with DTS Please select alternative mode A dts DVD was played This system is not compatible with dts If the DVD contains non dts sound switch to that No disc No disc is in the player Insert disc into the disc slot Incorrect region disc An attempt was made to play a disc with a region number other than 1 or ALL Check the disc Sound settings Problem Possible cause P...

Page 105: ...se to pressing the eject button restart the engine Cannot play this disc The inserted CD DVD cannot be read Refer to Discs that can be played back page 7 and use the right kind of disc Some mechanical or operation error has occurred If there is no response to pressing the eject button restart the engine Product servicing If the suggestions in the charts do not solve the problem we recommend that y...

Page 106: ...urface with a dry cloth Maintenance Pesticide Alcohol Thinner Benzine Wax The pickup lens Depending on the usage environment temperature humidity etc the pickup lens may become dirty in the course of long term use as dirt and fine dust on discs and in the air build up on the lens If there is a problem reading a disc check first for the dust on the disc If the disc is clean but the problem continue...

Page 107: ...use the discs to be jammed Do not leave discs in the following places Direct sunlight Near car heaters Dirty dusty and damp areas On seats or dashboards Disc cleaning Use a dry soft cloth to wipe from the center outward Do not attach any stickers or labels to your discs Do not write on the disc label in a heavy pen or ballpoint pen Printed side DVD Audio CD CD R CD RW How to hold the disc Do not t...

Page 108: ... TEXT Disc title Track title MP3 ID3 tag Album name Title name artist name MP3 WMA Folder name File name WMA WMA tag Album name Title name artist name Displayable characters Displayable length of file name folder name within 64 characters Unicoded file and folder names are reduced by half in the number of displayable characters Name files and folders in accordance with the standard of each file sy...

Page 109: ...ER appears when displaying the root folder name Recording MP3 WMA files on a CD media You are recommended to minimize the chances of making a disc that contains both CD DA files and MP3 WMA files If CD DA files are on the same disc as MP3 or WMA files the songs may not play in the intended order or some songs may not play at all When storing MP3 data and WMA data on the same disc use different fol...

Page 110: ...ecision The vehicle mark position may not be displayed correctly due to the driving environment and the GPS satellite status Continue driving without taking further action and the map matching function and GPS satellite data will be used to automatically correct the vehicle mark position When a highway and an ordinary road are close together When driving through a fork junction with a narrow angle...

Page 111: ...he destination Guidance may lead to an ordinary road under an elevated road The reverse can also happen A route may be displayed which makes a U turn Route guidance The following situations do not indicate a malfunction Guidance may not be displayed even though a turn is required at an intersection Guidance of the name of the intersection may not be provided Guidance for left or right turns may no...

Page 112: ...Shopping Book Store Grocery Store Pharmacy Shopping Center Main category Sub category Icons Automotive All Automotive Auto Club Auto Dealership Gas Station Open Parking Area Park Ride Parking Garage Vehicle Repair Facility Travel All Travel Airport Bus Station Commuter Rail Station Ferry Terminal Hotel or Motel Railway Station Rental Car Agency Rest Area Tourist Attraction Tourist Information Recr...

Page 113: ...DVD An interactive DVD is DVD software which includes multiple angles multiple plot endings etc Letterbox screen This refers to a screen on which the playback picture of wide screen DVD appears with black bands running along the top and bottom LPCM Linear PCM audio In this format the audio signal is converted to digital data and recorded in two channels without compression Because the capacity of ...

Page 114: ...lay 82 Frequency 71 G GPS 22 23 110 Graphic Equalizer 90 Guidance route 29 H H F Speaker 23 Highway transition zoom map 28 30 I ID CODE 18 24 Information menu 17 Installation confirmation 22 Installation setting 23 K Keyboard layout 84 L Language code list 96 Lighting Switch 22 List screen 36 M Map color Day 29 86 Map color Night 29 86 Map data 26 Map mode screen 29 Map operations 28 Heading up 32...

Page 115: ...ensitivity S N ratio 20 dB 26 dB µV Image rejection ratio 50 dB Monitor Liquid crystal panel 7 wide Screen dimensions W H D 156 82 176 mm 6 1 8 3 3 16 6 7 8 Number of pixels 336 960 pixels 234 vertical 480 horizontal 3 Valid pixel ratio Over 99 99 Display method Transparent color filter format Drive method TFT Thin Film Transistor active matrix format Light source Internal light Built in small flu...

Page 116: ...n Note de code d identification Copier la note ci dessous remplir le code d identification et conserver dans un endroit sûr Anotación del código de identificación Copie la anotación abajo rellene el código de identificación y guárdelo en un lugar seguro Model No CN NVD905U ID CODE 342 ...

Page 117: ...Memorandum 343 ...

Page 118: ...ria Km 9 5 San Gabriel Industrial Park Carolina Puerto Rico 00985 http www panasonic com Panasonic Canada Inc 5770 Ambler Drive Mississauga Ontario L4W 2T3 http www panasonic ca CN NVD905U Installation 2007 Matsushita Electric Industrial Co Ltd All Rights Reserved YEFM294342 F0107 1037 2007 Matsushita Electric Industrial Co Ltd Tous droits réservés Printed in Japan Imprimé au Japon Impreso en Japa...

Reviews: