background image

35 (E)

Menu Item Settings and Changes 

(in user mode)

K

Picture level adjustment [A. Iris Level: –50 to +50]

This is for adjusting the AGC/ELC convergence level.

L

Light-metering detection ratio adjustment [A. Iris PEAK/AVG: P50 to A50]

This  enables  the  ratio  of  the  average  level  (A)  to  peak  level  (P)  at  which  AGC/ELC  is
detected to be adjusted.  

M

Light metering method selection 
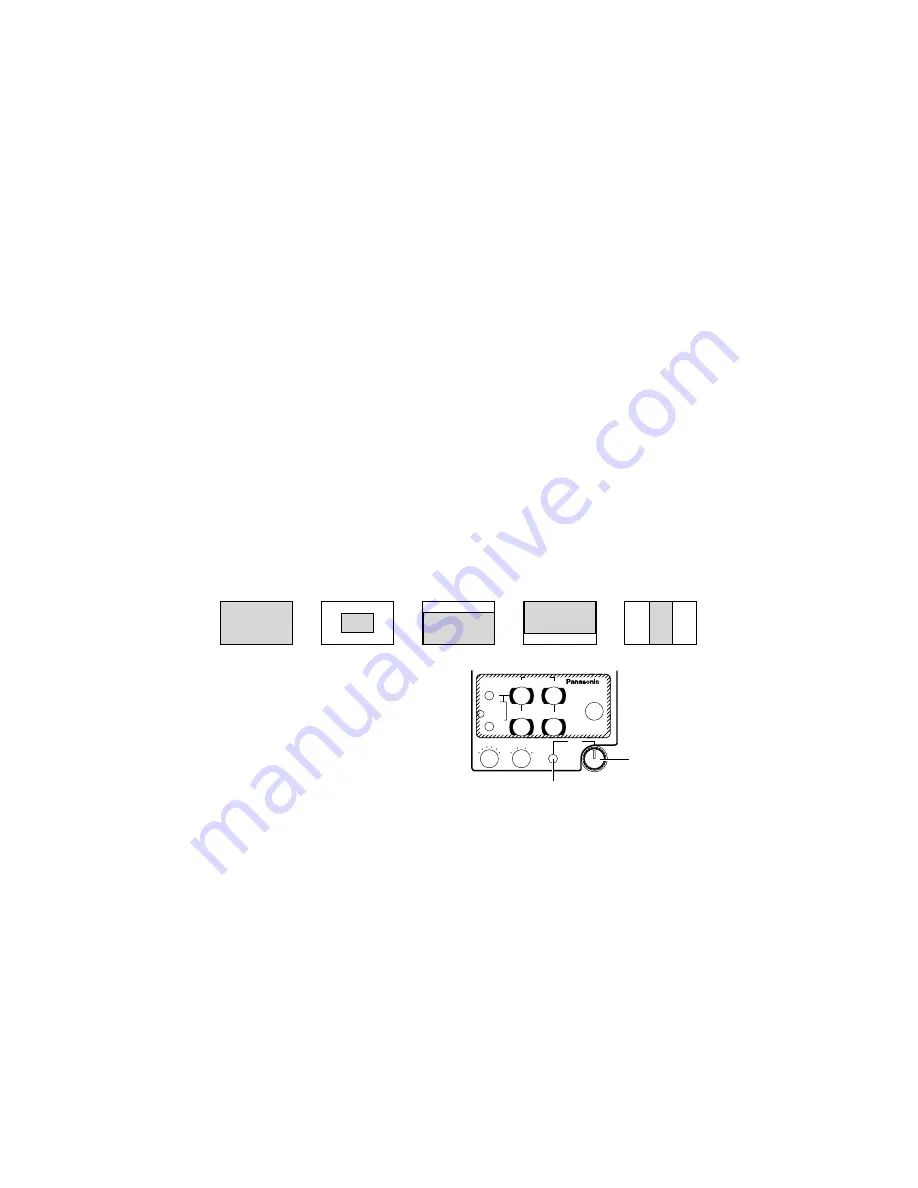
[A. Iris Area: All, centre, top cut, bottom cut, R/L cut]

This enables the AGC/ELC light-metering method to be selected.
All

: Light metering over the entire screen area; the light of the whole screen is

metered.

Centre

: Light  metering  with  priority  given  to  the  centre  of  the  screen;  about  one-

third of the screen at the top and bottom and one-third on the left and right
sides are cut off.

Top cut

: Light metering area with one-third at the top cut off; about one-third of the

screen at the top is cut off.

Bottom cut : Light metering area with one-third at the bottom cut off; about one-third of

the screen at the bottom is cut off.

R/L cut

: Light metering area with one-third on the left and right sides cut off; about

one-third of the screen on the left and right sides is cut off.

N

Auto  iris  fine  level  adjustment  [Auto
Iris Adjust: OFF or ON]

ON: When  the  iris  switch  on  the  RCU

(RCB)  is  at  AUTO,  the  AGC/ELC
convergence  level  can  be  finely
adjusted using the iris control.

OFF: The  iris  control  does  not  work

when  the  iris  switch  on  the  RCU
(RCB) is at AUTO.

O

Electronic shutter mode selection [Shutter Mode: Step, ELC or synchro scan]

Step : The  electronic  shutter  is  actuated  at  the  shutter  speed  selected  for  electronic

shutter step selection 

P

.

ELC : The light quantity is automatically adjusted by controlling the electronic shutter.
Synchro scan:

The electronic shutter is actuated at the shutter speed set by the synchro scan setting

Q

.

<Note>

When  “Frame1”  is  selected  as  the  CCD  readout  method  selection 

R

setting,  the

electronic shutter mode cannot be set.

All

Centre

Top cut

Bottom cut

R/L cut

R

B

R

B

PED

TOTAL

PED

A

B

ATW

AWC

AUTO

HOLD
ABC

IRIS

MAN

AUTO

1000

S/S

ELC

500

100

OFF

SHUTTER

SCENE

2

1

3

USER

SET

AUTO/ATW

PAINTING

GAIN

RCU (RCB)

Iris switch

Iris control

Summary of Contents for AWE300SP - COLOR CAMERA

Page 1: ...OPERATING INSTRUCTIONS ...

Page 2: ...Before attempting to connect operate or adjust this product please read these instructions completely 1 3 inch Camera With Separate Head Model AW P FOCUS LOCK ...

Page 3: ...IPMENT TO RAIN OR MOISTURE CAUTION TO REDUCE THE RISK OF FIRE OR SHOCK HAZARD AND ANNOYING INTERFERENCE USE THE RECOMMENDED ACCESSORIES ONLY FCC Note This device complies with Part 15 of the FCC Rules To assure continued compliance follow the attached installation instructions and do not make any unauthorized modifications This equipment has been tested and found to comply with the limits for a cl...

Page 4: ...ions for exercising control from a computer 15 Reference Model numbers of related equipment 16 Operating Mode Selection 17 How to select the operating mode 18 Operating Procedures 19 Adjustments 20 Flange back adjustment 20 White balance adjustment 21 Black balance adjustment 23 Black level total pedestal adjustment 24 Genlock adjustment 25 Menu Item Settings and Changes 27 Setting the menu items ...

Page 5: ...compact size OSetting of camera parameters using menu screens enabled OAuto functions such as ATW ELC and AGC incorporated OCCD readout field frame switching supported The vertical resolution can be improved by switching to the frame mode and this is useful for capturing still images and other kinds of image processing OSynchro scan function provided to reduce horizontal line noise when computer s...

Page 6: ...y studio cable RCB cable or other cable to any unit of equipment must be performed while power is off While the camera is in automatic mode OShooting of bright objects in ELC operation mode may result in a smeared picture unique to the CCD OThe ATW function under fluorescent illumination can adversely change the white balance ...

Page 7: ...t in use Do not unnecessarily turn the camera power on and off repeatedly Do not block the ventilation slots ORefer any servicing to qualified service personnel OHandle the camera with care OPlace the lens cap on the lens when the camera is not in use If the lens is not installed protect the surface of the prism by placing the body cap over the lens mount hole OUse a mild blower or lens cleaning t...

Page 8: ...displayed when the camera is in the shooting mode it serves as the automatic white balance control AWC switch 4YES ABC switch YES ABC When this switch is pressed while a menu is displayed the sub menu of a menu item appears on the screen When it is pressed while a sub menu is displayed the higher of the two settings shown is selected While a menu is not displayed it serves as the automatic black b...

Page 9: ...AW CA50T10 RCB cable is required to connect the WV CB700A 9Power LED This lights up red when DC power is supplied to the DC 12V input socket DC 12V input socket DC 12V IN The DC 12 V power supply 2 A or above is connected here using the AW CA4T1 DC power cable Cable clamp This clamps the AW CA4T1 DC power cable which has been connected to the DC 12V input socket to prevent the cable from becoming ...

Page 10: ...screw and adjust by turning the FOCUS screw Adjustment range 0 2 mm Upon completion of the adjustment re tighten the LOCK screw Cable connector This is used to connect the head unit to the main unit using a cable ACamera mounting adapter mounting screw holes M2 6a10 spring washers provided This is used to secure the head unit when it is to be installed on a wall or ceiling or a tripod is to be use...

Page 11: ...ay damage the camera unit OSome lenses need to be attached in a different way Therefore reference should also be made to the operating instructions that accompany the lens Installation on a camera stand tripod etc 1Mount the camera mounting adapter onto the top or bottom surface of the camera head unit 2Use the screw holes 1 4 20UNC in the camera mounting adapter to secure the camera stand tripod ...

Page 12: ... composite video input connector OConnect the output from the camera s video output connector to the video monitor VTR or other such unit which is provided with a composite video input connector OUse the AW PS505 AC adapter for the power supply Use the AW CA4T1 as the DC power cable VIDEO OUT AW CA4T1 DC power cable 75 Ω coaxial cable Composite video input connector VIDEO IN Video monitor AW PS505...

Page 13: ...rs The distance between the WV RC550 and the camera can be extended up to a maximum of 100 meters Use the WV CA26U15 15 meters WV CA26U30 30 meters and WV CA26U100 100 meters studio cables and the WV CA26T26 cable joint adapter for extension OThe power for the camera is supplied from the RCU 1Before proceeding to connect the RCU to the camera set the RCU s power switch to OFF 2If the WV RC700A is ...

Page 14: ...CB 3Once the AC adapter s power switch is set to ON and the RCB ON OFF switch is set to ON the camera can be controlled from the RCB 4Upon completion of shooting first set the RCB ON OFF switch to OFF and then set the AC adapter s power switch to OFF Notes OThe camera s setting will not be stored in the memory if the AC adapter s power switch is set to OFF before the RCB ON OFF switch is set to OF...

Page 15: ... system Genlock signal BB OUTPUT WJ 300C video divider System Configuration Connections Connecting multiple cameras achieving genlock OInput the sync signal BB to the genlock input connector ODo not turn off the power of the camera which is used to achieve genlock OThe genlock adjustment must be performed when genlock is to be achieved See page 25 ...

Page 16: ...nnections for exercising control from a computer The AW CA50T9 PC control cable and the dedicated software program are required for the camera to be controlled from the computer Ask your dealer for details VIDEO OUT AW CA4T1 DC power cable 75 Ω coaxial cable AW CA50T9 10 meters PC control cable RS 232C Composite video input connector VIDEO IN Video monitor Computer AW PS505 AC adapter ...

Page 17: ...e control box WV CB700A RCU rack mounting chassis WV Q70 Connecting cable WV CA9T5 D sub 9 pin BNC approx 5 meters Studio cable WV CA26U15 WV CA26U30 WV CA26U100 Cable joint adapter WV CA26T26 RCB cable AW CA50T10 RCU able AW CA50A26 PC control cable AW CA50T9 DC power cable AW CA4T1 RGB cable AW CA50T6 Studio card 1 with RGB YPrPb output AW PB301 Studio card 2 with no RGB YPrPb output AW PB305 RG...

Page 18: ...ode is suited to shooting indoors at wedding receptions parties seminars and other indoor events Its settings can be changed using a simple menu Fluorescent light mode This mode is suited to shooting indoors under fluorescent lighting Its settings can be changed using a simple menu Outdoor mode This mode is suited to shooting outdoors Its settings can be changed using a simple menu User mode This ...

Page 19: ...de changes Make the desired operating mode flash by pressing of these switches 3When the YES ABC switch is pressed the flashing item is set and the setting screen appears for about 5 seconds after which the shooting mode is restored After this the camera will operate the mode which has been set OOperations using the RCU or RCB The operating mode can be selected using the scene file switch on the R...

Page 20: ...conditions or brightness has changed O Once this adjustment has been performed it need not be repeated so long as the camera is to be used under the same conditions 6 Adjust the black balance O This adjustment must be performed when using the camera for the first time or when the camera has not been used for a prolonged period O It must be performed when the ambient temperature has changed signifi...

Page 21: ...subject to open the iris 2Reduce the distance between the camera and subject to less than 2 meters remove the cap over the camera s flange back adjust screw and loosen the LOCK screw 3Set the lens to the maximum telephoto position and bring the subject into focus using the focus ring 4Set the lens to the widest angle position and turn the FOCUS screw to bring the subject into focus 5Repeatedly adj...

Page 22: ...r AWC B for the white balance 2Shoot a white subject such as a white wall or white handkerchief to fill the screen The size of the white subject must be at least 10 of the screen and it must appear in the middle Keep shiny objects or very bright objects off the screen 3 The white balance can be set by pressing the ITEM AWC switch for at least 2 seconds in the shooting mode 4The white balance can b...

Page 23: ...erature remains unchanged However if the setting conditions change if the shooting location changes from outdoors to indoors or vice versa for example set the white balance again OIf the white balance is set when using the camera by itself the setting for the R red and B blue gain adjustment using Painting will return to 0 The Painting settings are valid only in the user mode Automatic color tempe...

Page 24: ...h is held down for two or more seconds After the black balance has been set the black balance can be finely adjusted by varying the R pedestal and B pedestal using Painting on the color set sub menu in the user mode The black balance is set when the auto set switch is set to ABC The AUTO LED flashes while the black balance is being set The AUTO LED goes off to indicate a successful completion of t...

Page 25: ... the lens 2Select the black level using the brightness setting on the sub menu or iris shutter gain settings in the user mode 3Adjust the black level to 5 IRE 0 035 V using the YES ABC switch or NO BAR switch When performing the adjustment using the camera Adjust the black level to 5 IRE 0 035 V using the total pedestal control When performing the adjustment using the RCU RCB Camera MENU ITEM AWC ...

Page 26: ...r so and set to color bar signals 2Select H phase as the genlock color bar setting on the sub menu 3Bring the horizontal phase into alignment using the YES ABC switch or NO BAR switch When performing the adjustment using the camera Use the horizontal phase control to perform the adjustment Note When adjusting the horizontal phase from the RCU RCB set the BAR CAM switch to BAR before performing the...

Page 27: ...coarse for the genlock color bar setting on the sub menu and use the YES ABC switch or NO BAR switch to perform the coarse adjustment 3Select SC fine and use the YES ABC switch or NO BAR switch to adjust finely so that the color phase is brought into alignment When performing the adjustment using the camera Use the subcarrier phase coarse adjustment switch and subcarrier phase fine adjustment cont...

Page 28: ...s on selecting the operation mode 2Each time the MENU switch ITEM AWC switch or NO BAR switch is pressed the flashing item changes 3When the YES ABC switch is pressed the sub menu screen for the flashing item appears 4Select the item to be set or changed using the menu screen or ITEM AWC switch 5Change the setting using the YES ABC switch or NO BAR switch 6Select Return using the MENU switch or IT...

Page 29: ... menu for user mode Main menus for halogen light mode fluorescent light mode and outdoor mode Menu Item Settings and Changes The mode selected is displayed here Displayed by flashing cursor To return to the shooting conditions displayed when the camera is used to perform the settings Notes OComposite signals are supplied to the video output whether the RCU RCB user set switch is at the ENC or VF p...

Page 30: ... Tone MID Return F G H I J Other Set Shutter Speed OFF Syncro Scan V Resolution Normal Baud Rate 9600bps Nega Posi Posi Return G L Color Bar Set H Phase 0 SC Coarse 1 SC Fine 0 Color Bar Set 7 5IRE Return Halogen light fluorescent light and outdoor mode sub menu screens Menu Item Settings and Changes in halogen light mode fluorescent light mode or outdoor mode Notes OWhen the RCU RCB is used items...

Page 31: ...m cut Light metering with one third at the bottom cut off about one third of the screen at the bottom is cut off R L cut Light metering with one third on the left and right sides cut off about one third of the screen on the left and right sides is cut off All Center Top cut Bottom cut R L cut 4Auto ND ELC selection Auto ND ELC OFF or ON ON The light quantity is automatically adjusted by controllin...

Page 32: ...ye night eye This item can be set only when OFF has been selected for the auto gain increase selection 5 setting 0 dB This setting is the one which is normally used 1 dB to 30 dB Use this setting when shooting in dark locations and an adequate video output cannot be obtained even if the lens iris is opened N Eye This increases the sensitivity by adding the digital gain increase to the 30 dB gain i...

Page 33: ...colors is increased to prevent whitening out in very bright conditions Horizontal phase adjustment H Phase 206 to 49 This enables the horizontal phase during genlock to be adjusted Color phase adjustment SC Coarse 1 2 3 or 4 This enables the color phase during genlock to be coarsely adjusted Color phase fine adjustment SC Fine 511 to 511 This enables the color phase during genlock to be finely adj...

Page 34: ...shutter synchro scan setting G Auto ND The light quantity is automatically adjusted by controlling the electronic shutter ELC Notes OThe speed cannot be set to 1 250 1 2000 1 4000 or 1 10000 by operating the RCU RCB OWhen the auto ND setting is selected under fluorescent lighting the flicker may increase OWhen ON is selected as the auto ND ELC selection 4 setting on the Brightness Set sub menu the...

Page 35: ...It is improved by frame storage and the electronic shutter with no accompanying increase in the residual image IPC control communication speed selection Baud Rate 1200 2400 4800 or 9600 bps This is for selecting the baud rate at which the camera is to be controlled from a computer JNegative positive selection Nega Posi Posi or Nega Posi Normal images Nega Images whose light and dark sections and c...

Page 36: ...djust OFF Shutter Mode Step Step OFF Syncro Scan Field Frame Field Gain 0dB Pedestal 0 Return d e f g Detail Set2 Chroma Detail 0 DTL Flesh Tone MID Corner Detail OFF Precision Detail OFF Return Color Matrix Set Matrix R G 0 Matrix R B 0 Matrix G R 0 Matrix G B 0 Matrix B R 0 Matrix B G 0 Return i j k m n o p Other Set Gamma 0 45 Knee Point 88 White Clip 110 Flare R 0 Flare G 0 Flare B 0 Black Str...

Page 37: ...n at the bottom is cut off R L cut Light metering area with one third on the left and right sides cut off about one third of the screen on the left and right sides is cut off NAuto iris fine level adjustment Auto Iris Adjust OFF or ON ON When the iris switch on the RCU RCB is at AUTO the AGC ELC convergence level can be finely adjusted using the iris control OFF The iris control does not work when...

Page 38: ...tronic shutter synchro scan setting Synchro Scan 60 34 Hz to 15 75 kHz This can be set only when Synchro scan has been selected as the electronic shutter mode selection O setting The horizontal bar noise can be reduced by adjusting the synchro scan frequency when shooting the screen of a work station etc Refer to the table below for the light quantity that should be set at different shutter speeds...

Page 39: ...UTO has been selected as the RCU RCB iris switch setting TBlack level adjustment Pedestal 30 to 30 This enables the black level pedestal level of the luminance Y signal to be set It is used to adjust the black level of two or more cameras UChroma level adjustment Chroma Level 3 to 3 This enables the chroma level to be set in 3 stages VWhite balance selection White Bal ATW AWC A AWC B P SET 3200K P...

Page 40: ...mera by itself the settings will return to 0 Y2 dimensional low pass filter selection 2D LPF OFF LOW or HIGH This is for setting the 2 dimensional low pass filter which reduces moire and cross color color blur ZHorizontal phase adjustment H Phase 206 to 49 This enables the horizontal phase during genlock to be adjusted Color phase adjustment SC Coarse 1 2 3 or 4 This enables the color phase during...

Page 41: ... is reduced bLevel dependent compensation level adjustment Level Dependent 0 to 25 This is for reducing the amount of screen noise caused by the detail in the dark areas of the subject However if the setting is too high the sharpness of hair etc may be lost cDark detail compensation level adjustment Dark Detail 0 to 5 This is for emphasizing the detail in the dark areas of the subject It can be se...

Page 42: ...lly adjusted to match the light quality kWhite clip level setting White Clip 95 to 110 The peak level of the white clipped video signals can be set lFlare compensation level adjustment Flare R G B 0 to 100 These enable the flare compensation level to be adjusted Note The flare compensation level is set prior to shipment mBlack stretch selection Black Stretch ON or OFF This makes it possible to set...

Page 43: ...alize Data sub menu screen shown on the right will now appear for about 10 seconds 2 Once the Initialize Data sub menu screen has appeared press the YES ABC switch within 10 about seconds to initialize the settings A message is then displayed on the screen such as the one shown in 2 and operation returns to the main menu 3 If after the Initialize Data sub menu screen has appeared the NO BAR switch...

Page 44: ...MID Outdoor mode 0 0 Top cut ON HIGH 10 MID Color Set Chroma Level Flesh Tone White Bal High light Chroma 0 0 AWC A OFF 1 0 AWC A OFF 2 0 ATW OFF G L Color Bar Set H Phase SC Coarse SC Fine Color Bar Set 0 1 0 7 5 IRE 0 1 0 7 5 IRE 0 1 0 7 5 IRE Sharpness DTL Set DTL Select Level Noise Suppress Clean DNR DTL Flesh Tone Sharpness HIGH OFF OFF MID Sharpness HIGH OFF OFF MID Sharpness HIGH OFF OFF MI...

Page 45: ...G L Color Bar Set H Phase SC Coarse SC Fine Color Bar Set 0 1 0 7 5 IRE Detail Set 1 Detail H Detail Level H V Detail Level H H Detail Level L V Detail Level L Detail Band Noise Suppress Level Dependent Dark Detail HIGH 11 12 7 6 2 3 0 0 Detail Set 2 Chroma Detail Flesh DTL Level Corner Detail Precision Detail 0 MID OFF OFF Item User mode Color Matrix Set Matrix R G Matrix R B Matrix G R Matrix G ...

Page 46: ...S ABC NO BAR OPTION CARD VIDEO OUT I F REMOTE G L IN IRIS DC12V IN 7 16 10 5 3 4 145 3 1 16 77 3 16 4 3 5 16 84 Outline Drawings Main unit Camera head unit 1 16 1 2 49 6 5 16 7 9 2 5 16 58 5 1 16 1 5 2 3 4 69 7 16 10 LOCK FOCUS Unit inch mm ...

Page 47: ... 60 fields 30 frames Scanning frequency 15 734 kHz horizontal 59 94 Hz vertical Synchronization system Internal sync gen lock Power requirements DC 12V Power consumption 0 8 A Gen lock input 1 0 V p p black burst signal BNC connector 50 pin D sub connector Video outputs NTSC composite 1 0 V p p 75 Ω BNC connector 50 pin D sub connector YC 1 0 V p p for Y 0 286 V p p for C 50 pin D sub connector St...

Page 48: ...P CUT BOTTOM CUT R L CUT CCD Read Out Mode FIELD FRAME 1 FRAME 2 Clean DNR Color Bar Setup Use Mode Nega Posi PC Control Access Speed Adjustment function Menu adjustment R B Gain R B Pedestal Black Level Video Level Detecting Ratio Genlock Horizontal Phase Color Phase Gamma Compensation Level Knee Compensation Level White Clip Level Horizontal Detail Level Vertical Detail Level Detail Band Level N...

Page 49: ...os Angeles CA 90068 323 436 3500 Government Marketing Department 52 West Gude Drive Rockville MD 20850 301 738 3840 Broadcast PARTS INFORMATION ORDERING 9 00 a m 5 00 p m EST 800 334 4881 24 Hr Fax 800 334 4880 Emergency after hour parts orders 800 334 4881 TECHNICAL SUPPORT Emergency 24 Hour Service 800 222 0741 Panasonic Canada Inc 5770 Ambler Drive Mississauga Ontario L4W 2T3 905 624 5010 Panas...

Page 50: ...Before attempting to connect operate or adjust this product please read these instructions completely 1 3 inch Camera With Separate Head Model AW E FOCUS LOCK ENGLISH DEUTSCH FRANÇAIS ITALIANO ...

Page 51: ...ied service personnel WARNING TO REDUCE THE RISK OF FIRE OR SHOCK HAZARD KEEP THIS EQUIPMENT AWAY FROM ALL LIQUIDS USE AND STORE ONLY IN LOCATIONS WHICH ARE NOT EXPOSED TO THE RISK OF DRIPPING OR SPLASHING LIQUIDS AND DO NOT PLACE ANY LIQUID CONTAINERS ON TOP OF THE EQUIPMENT CAUTION TO REDUCE THE RISK OF FIRE OR SHOCK HAZARD AND ANNOYING INTERFERENCE USE THE RECOMMENDED ACCESSORIES ONLY ...

Page 52: ...nections for exercising control from a computer 14 Reference Model numbers of related equipment 15 Operating Mode Selection 16 How to select the operating mode 17 Operating Procedures 18 Adjustments 19 Flange back adjustment 19 White balance adjustment 20 Black balance adjustment 22 Black level total pedestal adjustment 23 Genlock adjustment 24 Menu Item Settings and Changes 26 Setting the menu it...

Page 53: ...compact size OSetting of camera parameters using menu screens enabled OAuto functions such as ATW ELC and AGC incorporated OCCD readout field frame switching supported The vertical resolution can be improved by switching to the frame mode and this is useful for capturing still images and other kinds of image processing OSynchro scan function provided to reduce horizontal line noise when computer s...

Page 54: ...of any studio cable RCB cable or other cable to any unit of equipment must be performed while power is off While the camera is in automatic mode OShooting of bright objects in ELC operation mode may result in a smeared picture unique to the CCD OThe ATW function under fluorescent illumination can adversely change the white balance ...

Page 55: ... when not in use Do not unnecessarily turn the camera power on and off repeatedly Do not block the ventilation slots ORefer any servicing to qualified service personnel OHandle the camera with care OPlace the lens cap on the lens when the camera is not in use If the lens is not installed protect the surface of the prism by placing the body cap over the lens mount hole OUse a mild blower or lens cl...

Page 56: ...not displayed when the camera is in the shooting mode it serves as the automatic white balance control AWC switch 4YES ABC switch YES ABC When this switch is pressed while a menu is displayed the sub menu of a menu item appears on the screen When it is pressed while a sub menu is displayed the higher of the two settings shown is selected While a menu is not displayed it serves as the automatic bla...

Page 57: ...AW CA50T10 RCB cable is required to connect the WV CB700A 9Power LED This lights up red when DC power is supplied to the DC 12 V input socket DC 12V input socket DC 12V IN The DC 12 V power supply 2 A or above is connected here using the AW CA4T1 DC power cable Cable clamp This clamps the AW CA4T1 DC power cable which has been connected to the DC 12 V input socket to prevent the cable from becomin...

Page 58: ...LOCK screw and adjust by turning the FOCUS screw Adjustment range 0 2 mm Upon completion of the adjustment re tighten the LOCK screw Cable connector This is used to connect the head unit to the main unit using a cable ACamera mounting adapter mounting screw holes M2 6a10 spring washers provided This is used to secure the head unit when it is to be installed on a wall or ceiling or a tripod is to b...

Page 59: ...ay damage the camera unit OSome lenses need to be attached in a different way Therefore reference should also be made to the operating instructions that accompany the lens Installation on a camera stand tripod etc 1Mount the camera mounting adapter onto the top or bottom surface of the camera head unit 2Use the screw holes 1 4 20UNC in the camera mounting adapter to secure the camera stand tripod ...

Page 60: ...ith a composite video input connector OConnect the output from the camera s video output connector to the video monitor VTR or other such unit which is provided with a composite video input connector OUse the AW PS505 AC adapter for the power supply Use the AW CA4T1 as the DC power cable VIDEO OUT AW CA4T1 DC power cable 75 Ω coaxial cable Composite video input connector VIDEO IN Video monitor AW ...

Page 61: ...ers The distance between the WV RC550 and the camera can be extended up to a maximum of 100 meters Use the WV CA26U15 15 meters WV CA26U30 30 meters and WV CA26U100 100 meters studio cables and the WV CA26T26 cable joint adapter for extension OThe power for the camera is supplied from the RCU 1Before proceeding to connect the RCU to the camera set the RCU s power switch to OFF 2If the WV RC700A is...

Page 62: ...the RCB 3Once the AC adapter s power switch is set to ON and the RCB ON OFF switch is set to ON the camera can be controlled from the RCB 4Upon completion of shooting first set the RCB ON OFF switch to OFF and then set the AC adapter s power switch to OFF Notes OThe camera s setting will not be stored in the memory if the AC adapter s power switch is set to OFF before the RCB ON OFF switch is set ...

Page 63: ...g system Genlock signal BB OUTPUT WJ 300C video divider System Configuration Connections Connecting multiple cameras achieving genlock OInput the sync signal BB to the genlock input connector ODo not turn off the power of the camera which is used to achieve genlock OThe genlock adjustment must be performed when genlock is to be achieved See page 24 ...

Page 64: ...s Connections for exercising control from a computer The AW CA50T9 PC control cable and the dedicated software programme are required for the camera to be controlled from the computer Ask your dealer for details VIDEO OUT AW CA4T1 DC power cable 75 Ω coaxial cable AW CA50T9 10 meters PC control cable RS 232C Composite video input connector VIDEO IN Video monitor Computer AW PS505 AC adapter ...

Page 65: ...te control box WV CB700A RCU rack mounting chassis WV Q70 Connecting cable WV CA9T5 D sub 9 pin BNC approx 5 meters Studio cable WV CA26U15 WV CA26U30 WV CA26U100 Cable joint adapter WV CA26T26 RCB cable AW CA50T10 RCU able AW CA50A26 PC control cable AW CA50T9 DC power cable AW CA4T1 RGB cable AW CA50T6 Studio card 1 with RGB YPrPb output AW PB301 Studio card 2 with no RGB YPrPb output AW PB305 R...

Page 66: ...his mode is suited to shooting indoors at wedding receptions parties seminars and other indoor events Its settings can be changed using a simple menu Fluorescent light mode This mode is suited to shooting indoors under fluorescent lighting Its settings can be changed using a simple menu Outdoor mode This mode is suited to shooting outdoors Its settings can be changed using a simple menu User mode ...

Page 67: ...ode changes Make the desired operating mode flash by pressing of these switches 3When the YES ABC switch is pressed the flashing item is set and the setting screen appears for about 5 seconds after which the shooting mode is restored After this the camera will operate the mode which has been set OOperations using the RCU or RCB The operating mode can be selected using the scene file switch on the ...

Page 68: ...ting conditions or brightness has changed O Once this adjustment has been performed it need not be repeated so long as the camera is to be used under the same conditions 6 Adjust the black balance O This adjustment must be performed when using the camera for the first time or when the camera has not been used for a prolonged period O It must be performed when the ambient temperature has changed si...

Page 69: ... subject to open the iris 2Reduce the distance between the camera and subject to less than 2 meters remove the cap over the camera s flange back adjust screw and loosen the LOCK screw 3Set the lens to the maximum telephoto position and bring the subject into focus using the focus ring 4Set the lens to the widest angle position and turn the FOCUS screw to bring the subject into focus 5Repeatedly ad...

Page 70: ...r AWC B for the white balance 2Shoot a white subject such as a white wall or white handkerchief to fill the screen The size of the white subject must be at least 10 of the screen and it must appear in the middle Keep shiny objects or very bright objects off the screen 3 The white balance can be set by pressing the ITEM AWC switch for at least 2 seconds in the shooting mode 4The white balance can b...

Page 71: ...perature remains unchanged However if the setting conditions change if the shooting location changes from outdoors to indoors or vice versa for example set the white balance again OIf the white balance is set when using the camera by itself the setting for the R red and B blue gain adjustment using Painting will return to 0 The Painting settings are valid only in the user mode Automatic colour tem...

Page 72: ...witch is held down for two or more seconds After the black balance has been set the black balance can be finely adjusted by varying the R pedestal and B pedestal using Painting on the colour set sub menu in the user mode The black balance is set when the auto set switch is set to ABC The AUTO LED flashes while the black balance is being set The AUTO LED goes off to indicate a successful completion...

Page 73: ...itor 1Close the lens 2Select the black level using the brightness setting on the sub menu or iris shutter gain settings in the user mode 3Adjust the black level to 0 035 V using the YES ABC switch or NO BAR switch When performing the adjustment using the camera Adjust the black level to 0 035 V using the total pedestal control When performing the adjustment using the RCU RCB Camera MENU ITEM AWC Y...

Page 74: ...and set to colour bars 2Select H phase as the genlock colour bar setting on the sub menu 3Bring the horizontal phase into alignment using the YES ABC switch or NO BAR switch When performing the adjustment using the camera Use the horizontal phase control to perform the adjustment Note When adjusting the horizontal phase from the RCU RCB set the BAR CAM switch to BAR before performing the adjustmen...

Page 75: ...O BAR switch to perform the coarse adjustment 3Select SC fine and use the YES ABC switch or NO BAR switch to adjust finely so that the colour phase is brought into alignment When performing the adjustment using the camera Use the subcarrier phase coarse adjustment switch and subcarrier phase fine adjustment control to perform the adjustment Note When adjusting the colour phase from the RCU RCB set...

Page 76: ...etails on selecting the operation mode 2Each time the MENU switch ITEM AWC switch or NO BAR switch is pressed the flashing item changes 3When the YES ABC switch is pressed the sub menu screen for the flashing item appears 4Select the item to be set or changed using the menu screen or ITEM AWC switch 5Change the setting using the YES ABC switch or NO BAR switch 6Select Return using the MENU switch ...

Page 77: ...menu for user mode Main menus for halogen light mode fluorescent light mode and outdoor mode Menu Item Settings and Changes The mode selected is displayed here Displayed by flashing cursor To return to the shooting conditions displayed when the camera is used to perform the settings Notes OComposite signals are supplied to the video output whether the RCU RCB user set switch is at the ENC or VF po...

Page 78: ... DNR OFF DTL Flesh Tone MID Return F G H I J Other Set Shutter Speed OFF Syncro Scan V Resolution Normal Baud Rate 9600bps Nega Posi Posi Return G L Adjustment H Phase 0 SC Coarse 1 SC Fine 0 Return Halogen light fluorescent light and outdoor mode sub menu screens Menu Item Settings and Changes in halogen light mode fluorescent light mode or outdoor mode Notes OWhen the RCU RCB is used items whose...

Page 79: ...tom cut Light metering with one third at the bottom cut off about one third of the screen at the bottom is cut off R L cut Light metering with one third on the left and right sides cut off about one third of the screen on the left and right sides is cut off All Centre Top cut Bottom cut R L cut 4Auto ND ELC selection Auto ND ELC OFF or ON ON The light quantity is automatically adjusted by controll...

Page 80: ...r N Eye night eye This item can be set only when OFF has been selected for the auto gain increase selection 5 setting 0 dB This setting is the one which is normally used 1 dB to 30 dB Use this setting when shooting in dark locations and an adequate video output cannot be obtained even if the lens iris is opened N Eye This increases the sensitivity by adding the digital gain increase to the 30 dB g...

Page 81: ...GH When this is set to LOW or HIGH the dynamic range of the colours is increased to prevent whitening out in very bright conditions Horizontal phase adjustment H Phase 206 to 49 This enables the horizontal phase during genlock to be adjusted Colour phase adjustment SC Coarse 1 2 3 or 4 This enables the colour phase during genlock to be coarsely adjusted Colour phase fine adjustment SC Fine 511 to ...

Page 82: ...ity is automatically adjusted by controlling the electronic shutter ELC Notes OThe speed cannot be set to 1 250 1 2000 1 4000 or 1 10000 by operating the RCU RCB OWhen the auto ND setting is selected under fluorescent lighting the flicker may increase OWhen ON is selected as the auto ND ELC selection 4 setting on the Brightness Set sub menu the electronic shutter is automatically set to Auto ND Me...

Page 83: ...is improved by frame storage and the electronic shutter with no accompanying increase in the residual image IPC control communication speed selection Baud Rate 1200 2400 4800 or 9600 bps This is for selecting the baud rate at which the camera is to be controlled from a computer JNegative positive selection Nega Posi Posi or Nega Posi Normal images Nega Images whose light and dark sections and colo...

Page 84: ...p cut Auto Iris Adjust OFF Shutter Mode Step Step OFF Syncro Scan Field Frame Field Gain 0dB Pedestal 0 Return d e f g Detail Set2 Chroma Detail 0 DTL Flesh Tone MID Corner Detail OFF Precision Detail OFF Return Colour Matrix Set Matrix R G 0 Matrix R B 0 Matrix G R 0 Matrix G B 0 Matrix B R 0 Matrix B G 0 Return i j k m n o p Other Set Gamma 0 45 Knee Point 88 White Clip 110 Flare R 0 Flare G 0 F...

Page 85: ...een at the bottom is cut off R L cut Light metering area with one third on the left and right sides cut off about one third of the screen on the left and right sides is cut off NAuto iris fine level adjustment Auto Iris Adjust OFF or ON ON When the iris switch on the RCU RCB is at AUTO the AGC ELC convergence level can be finely adjusted using the iris control OFF The iris control does not work wh...

Page 86: ... to 15 75 kHz This can be set only when Synchro scan has been selected as the electronic shutter mode selection O setting The horizontal bar noise can be reduced by adjusting the synchro scan frequency when shooting the screen of a work station etc Refer to the table below for the light quantity that should be set at different shutter speeds and synchro scan frequencies RCCD readout method selecti...

Page 87: ...d Similarly it may not work when AUTO has been selected as the RCU RCB iris switch setting TBlack level adjustment Pedestal 30 to 30 This enables the black level pedestal level of the luminance Y signal to be set It is used to adjust the black level of two or more cameras UChroma level adjustment Chroma Level 3 to 3 This enables the chroma level to be set in 3 stages VWhite balance selection White...

Page 88: ...pedestal controls are used If ABC is executed when using the camera by itself the settings will return to 0 Y2 dimensional low pass filter selection 2D LPF OFF LOW or HIGH This is for setting the 2 dimensional low pass filter which reduces moire and cross colour colour blur ZHorizontal phase adjustment H Phase 206 to 49 This enables the horizontal phase during genlock to be adjusted Colour phase a...

Page 89: ...s is reduced bLevel dependent compensation level adjustment Level Dependent 0 to 25 This is for reducing the amount of screen noise caused by the detail in the dark areas of the subject However if the setting is too high the sharpness of hair etc may be lost cDark detail compensation level adjustment Dark Detail 0 to 5 This is for emphasizing the detail in the dark areas of the subject It can be s...

Page 90: ...tomatically adjusted to match the light quality kWhite clip level setting White Clip 95 to 110 The peak level of the white clipped video signals can be set lFlare compensation level adjustment Flare R G B 0 to 100 These enable the flare compensation level to be adjusted Note The flare compensation level is set prior to shipment mBlack stretch selection Black Stretch ON or OFF This makes it possibl...

Page 91: ...ialize Data sub menu screen shown on the right will now appear for about 10 seconds 2 Once the Initialize Data sub menu screen has appeared press the YES ABC switch within 10 about seconds to initialize the settings A message is then displayed on the screen such as the one shown in 2 and operation returns to the main menu 3 If after the Initialize Data sub menu screen has appeared the NO BAR switc...

Page 92: ...0 0 Top cut OFF OFF 0dB 0 MID Outdoor mode 0 0 Top cut ON HIGH 10 MID Colour Set Chroma Level Flesh Tone White Bal High light Chroma 0 0 AWC A OFF 1 0 AWC A OFF 2 0 ATW OFF G L Adjustment H Phase SC Coarse SC Fine 0 1 0 0 1 0 0 1 0 Sharpness DTL Set DTL Select Level Noise Suppress Clean DNR DTL Flesh Tone Sharpness HIGH OFF OFF MID Sharpness HIGH OFF OFF MID Sharpness HIGH OFF OFF MID Other Set Sh...

Page 93: ...F 0 0 0 0 OFF G L Adjustment H Phase SC Coarse SC Fine 0 1 0 Detail Set 1 Detail H Detail Level H V Detail Level H H Detail Level L V Detail Level L Detail Band Noise Suppress Level Dependent Dark Detail HIGH 11 12 7 6 2 3 0 0 Detail Set 2 Chroma Detail Flesh DTL Level Corner Detail Precision Detail 0 MID OFF OFF Item User mode Colour Matrix Set Matrix R G Matrix R B Matrix G R Matrix G B Matrix B...

Page 94: ...LISH Separate Camera AW MENU ITEM AWC YES ABC NO BAR OPTION CARD VIDEO OUT I F REMOTE G L IN IRIS DC12V IN 10 145 77 4 84 Outline Drawings Main unit Camera head unit 1 49 6 7 9 58 5 1 5 69 10 LOCK FOCUS Unit mm ...

Page 95: ... 625 kHz horizontal 50 Hz vertical Synchronization system Internal sync gen lock Power requirements DC 12V Power consumption 0 8 A Gen lock input 1 0 V p p black burst signal BNC connector 50 pin D sub connector Video outputs Composite 1 0 V p p 75 Ω BNC connector 50 pin D sub connector YC 1 0 V p p for Y 0 3V p p for C 50 pin D sub connector Standard illumination 2 000 lux 3 200K f 8 Minimum illu...

Page 96: ...TOP CUT BOTTOM CUT R L CUT CCD Read Out Mode FIELD FRAME 1 FRAME 2 Clean DNR Colour Bar Setup Use Mode Nega Posi PC Control Access Speed Adjustment function Menu adjustment R B Gain R B Pedestal Black Level Video Level Detecting Ratio Genlock Horizontal Phase Colour Phase Gamma Compensation Level Knee Compensation Level White Clip Level Horizontal Detail Level Vertical Detail Level Detail Band Lev...

Page 97: ...F0301W Printed in Japan VQT9258 E Matsushita Electric Industrial Co Ltd Central P O Box 288 Osaka 530 8691 Japan ...

Reviews: