- 243 -
∫
Indication
∫
Recording
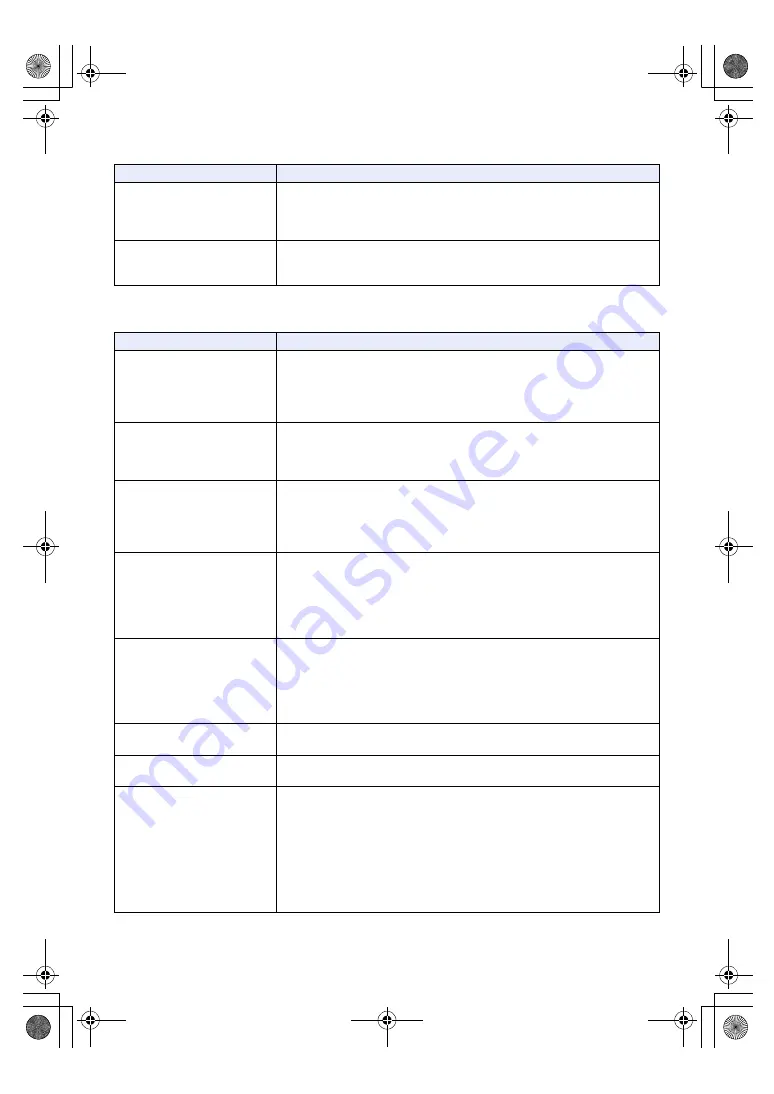
Problem
Check points
Function display (Remaining
Display, Counter Display,
etc.) is not displayed.
≥
[CARD & BATTERY] or [OTHER DISPLAY] of the [DISP SETUP] is [OFF].
(
)
≥
Switch the counter display by pressing the USER button assigned as
<COUNTER>. (
)
Nothing is displayed even
though the unit is turned on.
≥
Is the LCD monitor turned off?
Press the USER1 button while pressing and holding the SHIFT button to turn
on the LCD monitor. (
Problem
Check points
Recording does not start.
≥
Confirm if the Operation Mode is CAM Mode.
Connect the Camera Head Optional cable to this unit and the camera head
correctly while this unit is turned off, and then turn this unit on. (
This unit will not go into CAM Mode if you connect the cable while this unit is
turned on.
The unit arbitrarily stops
recording.
≥
Use an SD card that can be used for motion picture recording. (
)
≥
The recordable time may have shortened due to the deterioration of the data
writing speed or repeated recording and deletion. Using the unit, format the
SD card. (
)
Auto Focus function does
not work.
≥
If you are trying to record a scene which is hard to bring into focus in Auto
Focus Mode, use the Manual Focus Mode to adjust the focus. (
)
≥
(With the controller)
Press the [AUTO] button for focus control to switch to Manual Focus, and
adjust the focus manually.
Color or brightness of the
image changes, or you may
see horizontal bars in the
image.
The LCD monitor flickers
indoors.
≥
Color or brightness of the image may change, or you may see horizontal bars
in the image when the object is recorded under fluorescent light, mercury light
or sodium light, etc., but this is not a malfunction.
≥
Record images in Auto Shutter Mode or adjust the shutter speed to 1/50, 1/60
or 1/100.
≥
Adjust the Synchro Scan shutter speed. (
)
No pictures are displayed or
the pictures are disturbed
Image is not recorded.
≥
Confirm if the connected device is correctly connected.
When this unit is connected to the camera head, confirm if these devices are
connected with the Camera Head Optional cable.
≥
If the system is configured to switch the image when a camera to operate is
selected, confirm if correct camera is selected.
≥
Confirm if the image signal setup is correctly selected. (
The picture is flipped
vertically
≥
Check the settings of [
LCD REVERSE] and [SCAN REVERSE]. (
,
The Camera Text Menu is
displayed.
≥
(When performing the operations using the controller)
Press the [CAMERA OSD] button to exit the camera menu.
It is difficult to view the
Camera Text Menu screens
≥
Depending on the monitor you are using, you may experience one or more of
the symptoms described below, but these are not malfunctions.
j
The resolution of the characters in the menu displays changes as the
background image changes.
j
Depending on the edge enhancement setting established for the monitor,
white lines appear in front of the black shadows of the menus.
j
Depending on the edge enhancement setting established for the monitor,
the background colors may be superimposed onto the white parts of the
menus.
AG-UMR20PJ.EJ(DVQP1321ZA)_E.book 243 ページ 2017年5月22日 月曜日 午後2時11分


