


User’s Manual
48
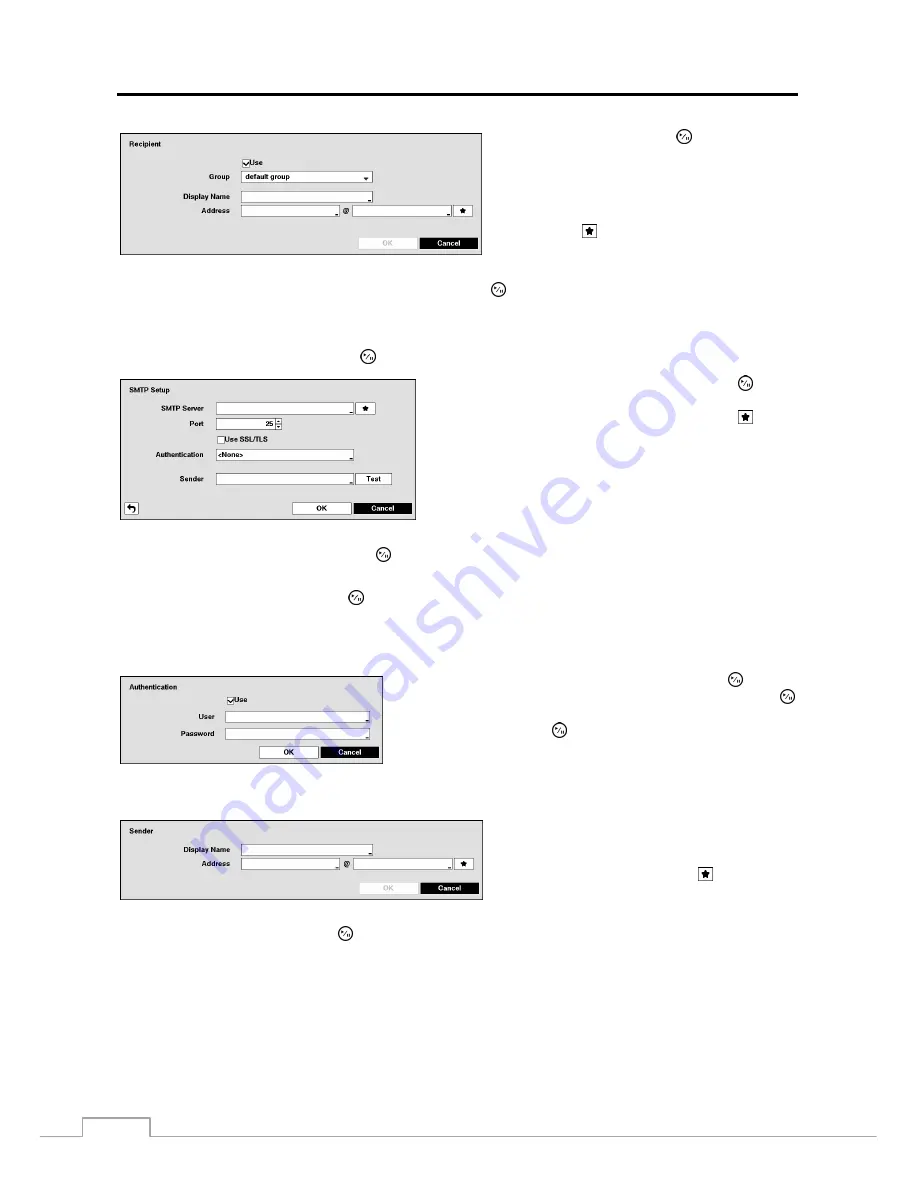
Highlight
Use
and press the button to toggle
between On and Off. Assign the Recipient to a
Group and enter the Recipient’s Display Name.
Highlight the box beside
Address
and enter the
recipient’s e-mail address and mail server provider.
Highlighting allows you to select the mail server
provider from a list of registered SMTP mail server
providers.
Highlight the box under the
Attach Type
heading and press the button to change the image file format attached to
an email.
NOTE: Attaching a image file to an email will not be available for the Text-In event.
Highlight
SMTP Setup…
and press the button. The SMTP Setup screen appears.
Highlight the box beside
SMTP Server
and press the button.
A virtual keyboard appears that you can use to enter the IP address
or domain name of the SMTP server. Highlighting allows
you to select your SMTP server from a list of registered SMTP
servers.
NOTE: You will need to get the IP Address or domain name
of the SMTP Server from your network administrator.
NOTE: You can use the domain name instead of IP address
if you already set up the DNS Server when setting up the LAN.
Highlight the box beside
Port
and press the button. Use the arrow buttons to enter the SMTP Server port number
obtained from your system administrator. The default port number is 25.
Highlight
Use SSL/TLS
and press the button to toggle between On and Off. When it is On, the DVR can send an
email via an SMTP server requiring SSL (Secure Sockets Layer) authentication.
NOTE: This product includes software developed by the OpenSSL Project for use in the OpenSSL Toolkit
(http://www.openssl.org/).
Highlight the box beside
Authentication
and press the button.
An Authentication screen appears. Highlight
Use
and press the
button to toggle between On and Off. Highlight the box beside
User
/
Password
and press the button. A virtual keyboard appears
allowing you to enter the user ID and password.
Highlight the box beside
Sender
and enter the sender’s e-mail address. Use the virtual keyboard to enter the e-mail
address.
Highlight the box beside
Display Name
and enter the
Sender’s Display Name. Highlight the box beside
Address
and enter the sender’s e-mail address and
mail server provider. Highlighting allows you to
select the mail server provider from a list of registered
mail server providers.
Highlight the
Test
box and press the button to test emailing with the current settings you made.


