


FOR ASSISTANCE CALL 1-800-275-6187
5.7
OPEN
CLOSE
STOP
GND
1-BTN
N-O
SAFETY
N-O
SAFETY
ODC
STB
ODC
STB
EXT
INTLK
EXT
INTLK
SENSING EDGE SWITCH
CONTROL SIGNAL TERMINAL STRIP
Figure 12
Figure 13
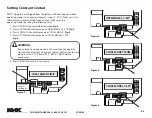
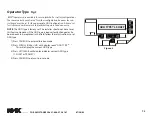
NOTE
: Do not connect a 2-wire monitored sensing edge switch to
these terminals.
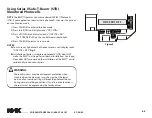
Figure 12
shows an example of a typical sensing edge installation. Left
hand side is shown but right hand is a mirror image of this.
1A) If wiring from sensing edge switch to operator is coiled cord
or 2 wire jacketed cord:
•
Install junction box 12" above the center of the door
opening on same side as sensing switch.
•
Secure one end of cord to junction box using a cable clamp.
1B) If connection is to be made through a take up reel cord:
•
Install on same side as sensing edge switch and above door
opening and slightly to the side.
•
Install junction box adjacent to take up reel and route the
stationary cord from the reel to the box and secure with a
cable clamp.
2)
Secure other end of cord (straight, coiled or reel) to sensing
edge switch enclosure using a cable clamp.
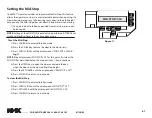
3)
Connect wires of cord to sensing edge switch using wire nuts
or other suitable wire connectors.
4)
Run a straight 2 wire cord from the junction box (Step 1) to
the operator electrical box.
•
Secure using cable clamp on each end.
5)
Join wires in cord from operator to wires in cord from switch
using wire nuts or other suitable wire connectors.
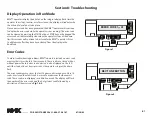
6)
Connect to terminal strip using N-O Safety inputs. See
Fig. 13
.
7)
Operate the door to make certain cord is free to travel and
does not become snared during door opening or closing.
•
Check sensing edge switch for proper operation.
Sensing Edge Switch Installation
WARNING:
Actuating the operator using constant contact on the
CLOSE button will override external reversing devices, including
sensing edges or reversing edges
07/30/09


