23
Caution: It is very important for the film to
travel correctly. Wrinkles in the film will cause
defects in printing.
5) Attach the end of the film to the top of the
take-up core on the Take-Up Spool. Affix with
a piece of adhesive tape.
6) Turn the empty take-up core clockwise to
remove any slack while checking that the film
advances smoothly without kinking or wrin-
kling.
7) Press the Reset button to return the Foil
Handling System to its Home Position and
put Foil Direct into its normal operation.
Note: There is a short video included in
the Folder “Instructional Vidoes” on the
User CD called - “Mode 1: Changing
Foil” - that shows this operation.
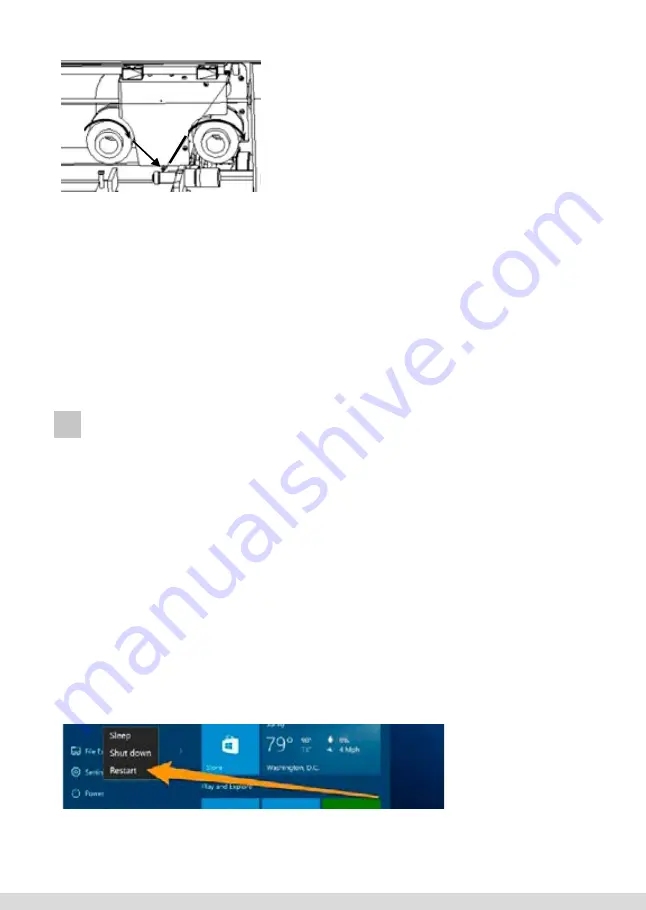
Figure 3-2.
Threading the foil
Loading Film
(continued)
4) Pull foil from Feed Spool down and under
the printhead, and then up and around the take-
up shool as shown in Figure 3-2.
Caution: It is very important for the film to travel
correctly. Wrinkles in the film will cause defects in
printing.
5. Attach the end of the film to the top of the take-
up core on the Take-Up Spool. Affix with a piece
of adhesive tape.
6. Turn the empty take-up core clockwise to remove any slack while checking that the film
advances smoothly without kinking or wrinkling.
7. Press the Reset button to return the Foil Handling System to its Home Position and put
Foil Xpress Direct into its normal operation.
Note: There is a short video included in the Folder “Instructional Vidoes” on the User CD
called - “Mode 1: Changing Foil” - that shows this operation.
4 INSTALLING PRINTER DRIVER
Foil Xpress Direct’ Printer Driver must be installed before operating the printer. The Printer
Driver is included in the User CD in the Foil Xpress Direct Driver Folder. The Printer Driver
works with Windows XP and Windows 7 operating systems. It also works with Windows 8,
8.1, and Windows 10, but only if the following instructions are followed.
Note: Do not try to install the Driver without first following instructions below that de-
tail how to Disable Driver Signature Verification on 64-Bit Windows 8, 8.1 or 10. If you
do not follow these instructions, you will not be able to install the driver.
To disable driver signature verification, you need to get into the Troubleshooting options
from the boot manager. The easiest way to bring up this screen is to select Restart from
the power options menu (on Windows 8 it is under Charms or on the login screen, and in
Windows 10 it is on the Start Menu.
Hold down the SHIFT key while you clickRestart.
[Wpisz tekst]
24
[Wpisz tekst]
Rozdział 4
Instalowanie sterownika
drukarki
Instalowanie
sterownika drukarki
Sterownik drukarki Foil Direct musi zostać
zainstalowany przed uruchomieniem drukarki.
Sterownik drukarki znajduje się na płycie
kompaktowej użytkownika w katalogu Foil Direct
Driver (Sterownik Foil Direct). Sterownik drukarki
jest zgodny z systemami operacyjnymi Windows XP
i Windows 7.
Działa on również w systemach
operacyjnych Windows 8, 8.1 i Windows 10,
jednak jedynie pod warunkiem postępowania
zgodnie z następującymi wskazówkami.
Uwaga: Nie należy próbować instalacji sterownika
przed uprzednim wykonaniem poniższych
instrukcji, które podają szczegóły dezaktywacji
weryfikacji sygnatury sterownika w 64-bitowym
Windows 8, 8.1 lub 10. Jeśli wskazówki te nie
zostaną wykonane, nie będzie można zainstalować
sterownika.
Aby wyłączyć weryfikację sygnatury sterownika,
należy do opcji Rozwiązywania Problemów
Menadżera Rozruchu (Boot Manager).
Najłatwiejszym sposobem otwarcia tego ekranu jest
wybór Restart z menu opcji uruchamiania (w
Windows 8 pod „Charms” lub na ekranie logowania,
a w Windows 10 w Start Menu.
Klikając Restart przytrzymać klawisz SHIFT.
Once your computer has rebooted, you will be able to choose the Troubleshoot Option.
55
Figure 3.2.
Threading the foil
Summary of Contents for Foil Xpress Direct
Page 41: ...41...


