


Operation
66
7.2
Ethernet Interface setup
A proper IP address must be set for the Compute Box and the robot/computer to be able to use the
Ethernet interface. There are three ways how it could be configured (using the DIP switch 3 and 4):
•
Auto mode
(factory default)
This is the easiest way of getting the IP addresses to be configured for both the Compute Box and
the robot/computer. It is recommended to start with this mode, so this is the factory default
setting.
•
Fixed IP mode
(192.168.1.1)
If the
Auto mode
does not work, use this mode to have a fixed IP for the Compute Box. This requires
a manual IP address configuration for the robot/computer. (This mode could also be used to reset
the IP address to a known value if the Compute Box become unreachable in
Advanced mode
.)
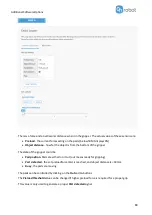
•
Advanced mode
(any static IP/subnet mask)
If the Fixed IP address (192.168.1.1) is already in use in your network or a different subnet needs to
be configured, in this mode the IP address and subnet mask can be changed to any value. This also
requires a manual IP address configuration for the robot/computer.
NOTE:
To change between modes, first change the DIP switches and then the
Compute Box power needs to be cycled for the changes to take effect.
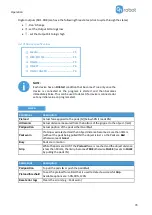
Auto mode
Use the factory default settings (DIP switch 3 and 4 in OFF position).
In this case, the Compute Box has both Dynamic Host Configuration Protocol (DHCP) client,
and DHCP server enabled.
DHCP Client enabled
means, Compute Box will automatically obtain ("get") IP address FROM the
connected robot/computer if that is capable of assigning ("give") IP to the Compute Box.
DHCP Server enabled
means, Compute Box will automatically assign ("give") IP address TO the connected
robot/computer if that was configured to obtain ("get") IP address automatically.
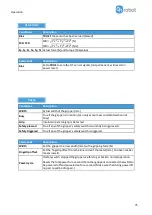
NOTE:
The assigned IP range is 192.168.1.100-105 (with subnet mask 255.255.255.0).
If the Compute Box is used in a company network where a DHCP server is
already in use, it is recommended to disable the DHCP server of the Compute
Box by setting DIP switch 4 to the ON position.
If no IP was assigned to the Compute Box within a minute, it will automatically
get a fallback IP address (192.168.1.1).
NOTE:
If the Compute Box was in
Advanced mode
, first reset the IP setting by
switching to
Fixed IP mode
and then switch back to
Auto mode
.
Summary of Contents for Gecko Gripper
Page 1: ...USER MANUAL FOR NACHI ROBOTS ORIGINAL INSTRUCTION EN v1 05...
Page 12: ...Operationmode s 12 Mode I OnRobot EtherNet IP...
Page 26: ...Installation 26...
Page 47: ...Operation 47...
Page 48: ...Operation 48 Mode II OnRobot WebLogic...
Page 64: ...Installation 64...
Page 115: ...Additional Software Options 115 O Tassemblyid 157 O Tdata size 64 bytes O Tparameters...
Page 123: ...Additional Software Options 123...
Page 139: ...Hardware Specification 139 RG2 GrippingSpeedGraph RG2 Work Range...
Page 142: ...Hardware Specification 142 RG6 GrippingSpeedGraph RG6 Work Range...
Page 162: ...Hardware Specification 162 9 2 Mechanical Drawings 9 2 1 Adapter plate s...
Page 163: ...Hardware Specification 163 Adapter I...
Page 164: ...Hardware Specification 164 Adapter J...
Page 170: ...Hardware Specification 170 Gecko All dimensionsare in mm and inches...
Page 171: ...Hardware Specification 171 RG2 FT All dimensionsare in mm and inches...
Page 172: ...Hardware Specification 172 RG2 All dimensionsare in mm and inches...
Page 173: ...Hardware Specification 173 RG6 All dimensionsare in mm and inches...
Page 174: ...Hardware Specification 174 VG10 All dimensionsare in mm and inches...
Page 175: ...Hardware Specification 175 All dimensionsare in mm and inches...
Page 176: ...Hardware Specification 176 VGC10 All dimensionsare in mm and inches...
Page 177: ...Hardware Specification 177 All dimensionsare in mm and inches...
Page 178: ...Hardware Specification 178 Quick Changer Tool side All dimensionsare in mm and inches...
Page 185: ...Certifications 185 12 Certifications...
Page 186: ...Certifications 186...
Page 187: ...Certifications 187...
Page 188: ...Certifications 188...
Page 189: ...Certifications 189...
Page 190: ...Certifications 190...