background image

35

2-1. Preparing for Measurement

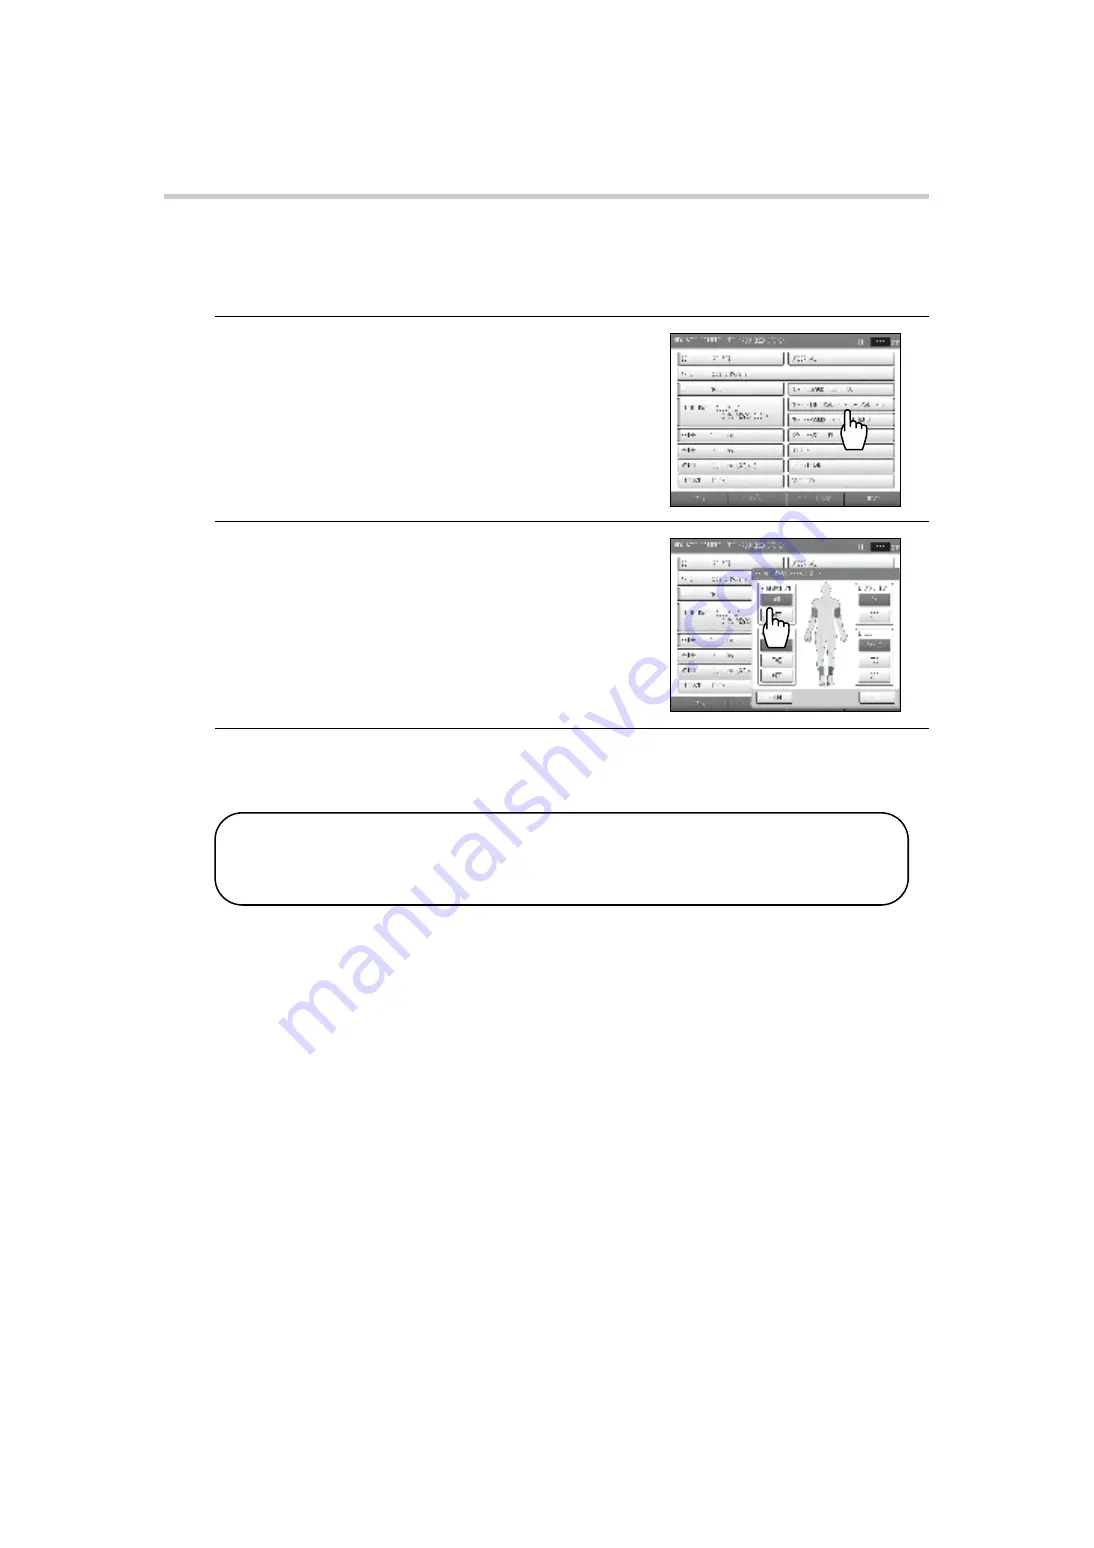
Setting the Measurement Sites

The cuffs are normally attached to both brachia and both ankles.
If a shunt is placed on an arm for hemodialysis, do not attach a cuff to or perform measurement on 
that arm.

1.

Press the [MEAS. SITE] button.

2.

Set the measurement sites.

• Specify settings for the right brachium and left 

brachium.
Cuff attached: [ON]
Cuff not attached: [OFF]

• Specify settings for the right ankle and left ankle.

Ankle cuff attached: [ANKLE]
Toe cuff attached: [TOE]
Cuff not used: [OFF]

• [TOE] only appears when the TBI package is installed.

3.

Press the [OK] button.

To cancel entry, press the [CANCEL] button.

Notes:

• When a TBI package is installed, read the accompanying manual.
• The right brachium and left brachium cannot both be set to "OFF".
• Measurement cannot be performed with both an ankle cuff and a toe cuff attached.

BP-203RPE3(A).fm  35 ページ  

9年

6日 土曜日 午後5時4

Summary of Contents for Colin BP-203RPE III

Page 1: ...03RPE3 unit Read all of the instructions in the manual before you operate the unit and keep the manual near the unit at all times for future reference Non invasive Vascular Screening Device BP 203RPE3 BP 203RPE3 A fm 1 ページ 9年 月 日 月曜日 午後 時5 分 ...

Page 2: ...BP 203RPE3 A fm 0 ページ 9年 月 6日 土曜日 午後5時4 分 ...

Page 3: ...nt History 40 Attaching the Cuff and Sensor 41 2 2 Basic Measurement 47 Viewing the Measurement Screen 47 Contents of the Measurement Screen 48 Starting and Ending Measurement 51 2 3 Measurement Results 53 Contents of the Measurement Results Screen 53 Measurement Results Reports 54 2 4 R R Interval Examination 65 Starting and Ending R R Interval Examination 65 R R Interval Examination Results 66 2...

Page 4: ...e for Printing Usage Frequency Facility Patient Reports 115 3 10 Data Export Import USB Flash Drive 116 Data Processing Items 116 Data Processing Procedure 117 3 11 Transferring Report Data PC 120 4 Options 4 1 Options 121 TBI package 121 HMC package 122 Bar Code Reader Set 123 5 Maintenance 5 1 Routine Maintenance 124 Maintenance Procedures 124 Supplies 125 5 2 Replacing Cuffs 126 Replacing an Ar...

Page 5: ...product usage conditions indicated in this manual including power installation and storage conditions 6 Failures damage or injuries due to modification or inappropriate repair of the product 7 Failures damage or injuries due to natural calamities such as fire earthquake flooding or lightning 1 The contents of this manual are subject to change without notice 2 Considerable care has been taken in th...

Page 6: ...medical facilities where the non invasive peripheral vascular test is conducted Durable Period 5 years provided that the appropriate maintenance has been done from production date Self certification through OMRON HEALTHCARE s own data Measurement Parameter Non invasive Blood Pressure Heart Rate Pulse Wave Heart Sound Calculating Parameter ABI Ankle Brachial Index Pulse Wave Velocity Augmentation I...

Page 7: ...mperature limitation Authorised representative in the European community Catalogue number Manufacturer Disposal instructions Date of manufacture Use by Do not reuse Batch code Defibrillation proof type BF applied part Fragile Handle with care Defibrillation proof type CF applied part Gruene Punkt Green point in German CE mark Serial number BP 203RPE3 A fm 5 ページ 9年 月 日 月曜日 午前 時 9分 ...

Page 8: ...ndling may cause human death or serious injury Caution Indicates a situation where incorrect handling may cause human injury or physical damage indicates mandatory an action that must be observed The actual action that is mandatory is indicated inside or next to The icon at left indicates disconnect the power plug indicates forbidden an action that must not be taken The actual action that is forbi...

Page 9: ...es when performing measurement This device is only to be used by qualified medical personnel or under the guidance of such personnel Otherwise incorrect diagnosis and treatment or device failure may result The results of measurement should only be interpreted by a doctor If you are concerned about a measurement result consult your doctor Otherwise incorrect diagnosis and treatment may result This ...

Page 10: ...While or after an electrosurgical knife or a device which generates noise being used near this device however make sure that it is properly functioning Otherwise incorrect diagnosis and treatment or device failure may result Do not use this device in the presence of a flammable gas such as a highly inflammable anesthetic or in a high pressure oxygen chamber or tent Fire and explosion may result Do...

Page 11: ...ot the cord Pulling on the cord may break wires and cause a short circuit resulting in fire or electric shock If a power failure occurs while using the device turn the power switch to the off position and disconnect the power plug Failure to do so may result in a product failure or other problem If the device becomes wet wipe it completely dry with a soft cloth before use Otherwise electric shock ...

Page 12: ... nerves When using the device in combination with another medical device read the manual of the other device well and understand all warnings and cautions Incorrect diagnosis and treatment may result Do not use the device in a location with loud noise Incorrect diagnosis and treatment may result Attach the PCG sensor correctly Incorrect diagnosis and treatment may result Take care that the PCG sen...

Page 13: ...of an arm cuff or an ankle cuff that is bent or collapsed Incorrect diagnosis and treatment may result Installation Do not install in a location where the temperature or humidity is outside the allowed range This may cause malfunctioning or device failure Do not use in a moving vehicle such as an ambulance Incorrect measurement may result Incorrect diagnosis and treatment or an accident may result...

Page 14: ... patient and do not touch the device When moving or using the device do not drop or subject the device to shock This may cause the electric components and precision mechanisms to fail After use Clean the device and accessories and arrange properly for storage Do not wash or moisten the cuff Do not use solvents such as thinner benzene or concentrated alcohol to clean the device Do not use an autocl...

Page 15: ...tative If any accessory is missing or damaged Main Unit Non invasive Vascular Screening Device BP 203RPE3 Standard Accessories BP 203RPE3 stand BP 203RPE3 stand cover BP 203RPE3 hook and loop fastener for the sensor box Power cord for main unit 0 8 m Power cord for printer 1 1 m BP 203RPE3 power tap USB cable for printer Items on this page will be assembled on delivery as follows BP 203RPE3 A fm 1...

Page 16: ... and right pair BP 203RPE3 ankle cuffs left and right pair Sensor box ECG clips Phonocardiogram sensor PCG sensor PCG weight Sensor gel packet consumable packet 5 sets PCG sensor pad 1 piece x 5 ECG clip electrodes 3 pieces x 5 Blood vessel model BP 203RPE3 touch pen BP 203RPE3 manual Quick manuals BP 203RPE3 A fm 14 ページ 9年 月 6日 土曜日 午後5時4 分 ...

Page 17: ... cuff left 9999501 1 HEM CR31 LEFT ECG clips 9999503 8 HFA RPE3 ECG PCG sensor 9999507 0 HFA RPE3 PCG PCG weight 9999506 2 HFA RPE3 W700 Sensor gel packet 20 sets 9967933 0 HBP FORM 101S Blood vessel model 9999510 0 HFA FORM ARTVS Touch pen 9996749 2 HBP PEN LAN cable for hub use 9997621 1 HFA RPE3 LANS LAN cable 9997622 0 HFA RPE3 LANX Toe standard disposable cuff 9957110 6 HBP DCUFF TBI31 Toe sm...

Page 18: ...SER Bar Code Reader Set 9996743 3 HBP RPE3 BAR TBI package manual 9512236 6 HFA RPE3 TBIME HMC package manual 9512235 8 HFA RPE3 HMCME Affix S N label BP 203RPE 3 Unit Serial Number Product Package Classification HMC Package OMRON HEALTHCARE CO LTD Non invasive Vascular Screening Device BP 203RPE 3 Product Package License Certificate This certificate is a registration certificate for the product p...

Page 19: ...f Power is off Green on Power is on normal mode Orange on Power is on sleep mode 4 START button Press to begin measurement 5 STOP button Press to interrupt and stop measurement On the screen with the BACK button the STOP button can be also used to return to the previous screen 6 Brightness button This enables the and brightness buttons This darkens the screen This makes the screen brighter 7 Power...

Page 20: ... right Insert the touch pen stand on the side that is empty Refer to 5 4 Changing the Arm Position page 129 7 Drawer Store printing paper and other supplies in the drawer 8 Cable hook Hang the sensor box cable on this hook 9 Tray Stores supplies on the tray 10 Laser printer holder 11 Cuff storage pocket Store arm and ankle cuffs 12 Handle Hold this when moving the main unit 13 Power on off switch ...

Page 21: ...rds not damaged Is power line not exposed Is the power cords not frayed Supplies Are ECG clip electrodes and PCG sensor pads ready Does the printer have enough toner and paper Is paper loaded in the printer After turning the power on Main Unit No smoke or abnormal smell No abnormal noises Check the date and time setting Are the date and time correct If not see page 93 to set the correct date and t...

Page 22: ...elow 1 Turn the power switch to the off position 2 Remove the power plug from the outlet and coil the cord Please do not pull the power cord 3 Store the sensors on the arm 4 Store the cuffs in the cuff storage pocket 5 Hang the sensor box cable on the cable hook BP 203RPE3 A fm 20 ページ 9年 月 6日 土曜日 午後5時4 分 ...

Page 23: ...g 6 Unlock the casters 7 Grasp the handle and move the device Do not push or pull any other parts rather than the handle 8 After moving the device lock the casters to secure the stand BP 203RPE3 A fm 21 ページ 9年 月 6日 土曜日 午後5時4 分 ...

Page 24: ...s to the patient Make sure that ECG OK and PCG OK appear on the display Press the START button Measurement starts To stop measurement press the STOP button Measurement ends Measurement results will be displayed and or measurement report will be printed Have the patient in a supine position on the bed and remain quite BP 203RPE3 A fm 22 ページ 9年 月 6日 土曜日 午後5時4 分 ...

Page 25: ...patient s information on the touch panel at the time of measurement B Enter the patient s information in advance from Advanced Registration of Patient Information This is convenient for group examinations Refer to 3 8 Advanced Registration of Patient Information page 105 Item name Input Page ID Required 26 Sex 29 Birth Date 30 Height 31 Name Optional 28 Weight 31 Waist 32 Disease 32 Order Number 3...

Page 26: ...ngs ID Input Type page 76 If you manage data by Order Number associated with the electronic chart you can change the initial screen from the ID entry screen to the order number entry screen To use order numbers patient information must be stored in advance Refer to 3 2 User Default Settings Search Key page 76 MAIN MENU button Touch this to change to the main menu screen The main menu screen is use...

Page 27: ...gnosis support The number of digits must be the same or the ID will treated as two separate IDs Example 300 and 0300 The above will be treated as two separate IDs The ID SEX BIRTH DATE and HEIGHT must be entered If not entered measurement cannot be performed Once ID number or order number is entered in the initial screen the ID or Order Number cannot be changed Take care to avoid mistakes when ent...

Page 28: ... patient Patient information not registered 1 Enter a new ID number 1 Enter the ID number 2 Press the SEARCH NEXT button 1 Enter the order number 2 Press the SEARCH NEXT button 2 Press the SEARCH NEXT button 3 Press the SEARCH NEXT button Patient for whom patient information is already registered Patient information already registered Patient for whom re measurement is necessary due to inadequate ...

Page 29: ... the patient s measurement history BACK button Return to the initial screen HMC DATA PROC button Can be used when the optional HMC Package is connected NEXT button Proceed to the measurement screen 1 Enter patient information 2 Press the NEXT button 2 Press the NEXT button 1 Check the patient information Enter any items that have not been entered as needed The measurement screen will appear Attach...

Page 30: ...n upper case entry is selected the lower button appears When lower case entry is selected the UPPER button appears Each time the button is pressed it changes between UPPER and lower To change a character press the or button to move the cursor to that character press the DELETE button and enter the new character To delete all characters that have been entered press the CLR ALL button 3 Press the OK...

Page 31: ...is must be entered If not entered measurement cannot be performed 1 Press the SEX button 2 Press the SEX button to select the sex The selection switches between Male and Female each time you press the SEX button BP 203RPE3 A fm 29 ページ 9年 月 6日 土曜日 午後5時4 分 ...

Page 32: ... one year prior to the day the information is being entered cannot be entered The device cannot be used for an infant less than one year old 1 Press the BIRTH DATE button 2 Enter the day month and year of birth Enter the date in the format yyyy mm dd 3 Press the OK button To cancel entry press the CANCEL button BP 203RPE3 A fm 30 ページ 9年 月 6日 土曜日 午後5時4 分 ...

Page 33: ...IGHT button 2 Enter the height and press the OK button The input range is 120 cm to 210 cm To cancel entry press the CANCEL button Entering the Weight The weight is required for calculation of the BMI Body Mass Index 1 Press the WEIGHT button 2 Enter the weight and press the OK button The input range is 25 0 kg to 300 0 kg To cancel entry press the CANCEL button BP 203RPE3 A fm 31 ページ 9年 月 6日 土曜日 ...

Page 34: ... cm To cancel entry press the CANCEL button Selecting the Disease 1 Press the DISEASE button 2 Select the disease and press the OK button Press the button of the applicable disease so that a checkmark appears Multiple items can be selected If none is applied select NO To cancel entry press the CANCEL button BP 203RPE3 A fm 32 ページ 9年 月 6日 土曜日 午後5時4 分 ...

Page 35: ... button 2 Enter the order number Up to 16 digits including hyphens can be entered 3 Press the OK button To cancel entry press the CANCEL button Note Once a patient information screen has been opened by entering the ID number or order number in the initial screen entering and changing is not possible BP 203RPE3 A fm 33 ページ 9年 月 6日 土曜日 午後5時4 分 ...

Page 36: ...nt sensors Specify settings for the ECG PCG Sensor attached ON Sensor not attached OFF 3 Press the OK button To cancel entry press the CANCEL button Note Even when ECG is OFF if the HR Synchronized tone setting is ON and the ECG clip is attached the beep sound will be heard BP 203RPE3 A fm 34 ページ 9年 月 6日 土曜日 午後5時4 分 ...

Page 37: ...left brachium Cuff attached ON Cuff not attached OFF Specify settings for the right ankle and left ankle Ankle cuff attached ANKLE Toe cuff attached TOE Cuff not used OFF TOE only appears when the TBI package is installed 3 Press the OK button To cancel entry press the CANCEL button Notes When a TBI package is installed read the accompanying manual The right brachium and left brachium cannot both ...

Page 38: ...s the patient s blood pressure automatically If the patient complains of discomfort due to cuff pressurizing change the setting to Manual and set an upper limit of pressurizing 1 Press the MAX PRESSURE button 2 Select Auto or Manual for the right leg If you selected Auto go to step 4 3 Set the upper limit of pressurizing The input range is 100 mmHg to 280 mmHg 4 Repeat steps 2 and 3 for the left l...

Page 39: ...maximum blood pressure 60 mmHg If the pressurizing upper limit setting is not suitable the measured values of the blood pressure may be low as shown below Set the pressurizing upper limit while checking measurement accuracy on a pulsation variation graph Good accuracy Poor accuracy when pressurizing is not sufficient BP 203RPE3 A fm 37 ページ 9年 月 6日 土曜日 午後5時4 分 ...

Page 40: ...d If the setting does not need to be changed go to the next item 2 Press the SYNC MEAS button to select ON or OFF The selection switches between ON and OFF each time you press the SYNC MEAS button Selecting the Doctor Select the doctor from the list The list must be stored in advance Refer to 3 4 Facility name Doctor Technician Category Settings page 86 1 Press the DOCTOR button 2 Select the docto...

Page 41: ...name is not necessary press UNSELECT To cancel entry press the CANCEL button Selecting the Category The medical department category of the patient can be entered Select from the list The list must be stored in advance Refer to 3 4 Facility name Doctor Technician Category Settings page 86 1 Press the CATEGORY button 2 Select the category and press the OK button If a category name is not necessary p...

Page 42: ...n the measurement history screen 3 Press the OK button You will return to the patient information screen The value shown in baPWV is the higher of the left and right values and the value shown in ABI is the lower of the left and right values Notes An ABI Ankle Brachial Index value marked by is a measured TBI Toe Brachial Index value The TBI package is required for TBI measurement If the TBI packag...

Page 43: ...cuff and or hose air is not let out from the cuff This may result in bad blood circulation in the arm causing peripheral functional disorder Choose the appropriate cuff to avoid any error caused by gap between cuff and arm in the measurements If the cuff used is too large the blood pressure measurement may be lower than the actual value If the cuff used is too small the blood pressure measurement ...

Page 44: ...g placed over thin clothing pull the clothing straight so that it does not bunch up at the artery If the cuff is wrapped around the arm with clothing bunched up the blood pressure will measure higher than the actual value 4 Position the arrows on the creases 5 Tighten the cuff so that two fingers can be just barely inserted under the cuff BP 203RPE3 A fm 42 ページ 9年 月 6日 土曜日 午後5時4 分 ...

Page 45: ...e bone 3 First wrap the ankle side 1 tightly 4 Then wrap the calf side 2 5 Tighten the cuff so that one finger can be just barely inserted under the cuff Notes If you are measuring on a single ankle make sure the cuff setting for the other ankle is OFF when you enter patient information Refer to page 35 Keep the foot with the cuff attached at the level of the heart The cuffs for the right and left...

Page 46: ...wise an infection may result Do not use a worn or expired ECG clip electrode Otherwise incorrect diagnosis and treatment may result ECG clip electrode have an expiry date After the expiry date the electrode becomes dry and incapable of accurate measurement Use only an electrode whose indicated expiry date has not passed Refer to page 12 for how to confirm the expiry date Notes There are different ...

Page 47: ...moved In case that they are used on moist injured or infected skin dispose them right away Otherwise an infection may result Take care that the PCG sensor does not fall on the patient This may cause injury Do not use a worn or expired PCG sensor pad Otherwise incorrect diagnosis and treatment may result PCG sensor pad have an expiry date After the expiry date the pad becomes dry and incapable of a...

Page 48: ...nds Excessive body hair does not allow the PCG sensor to fully contact the skin Due to contour the perceptive part of the sensor possibly does not contact appropriately with body surface Because a patient does not keep in a horizontal position the sensor may be declined which makes the perceptive part fail to adhere to body surface These problems can be resolved by using the PCG sensor weight 1 Pl...

Page 49: ...atient information review screen to proceed to the measurement screen Notes If ECG was set to OFF in the SELECT MEASUREMENT SENSOR settings when the patient s information was entered refer to page 34 ECG messages and the ECG wave will not appear If PCG was set to OFF in the SELECT MEASUREMENT SENSOR settings when the patient s information was entered refer to page 34 PCG messages the PCG level and...

Page 50: ... sensor weight refer to page 46 4 PACEMAKER button If the patient uses a pacemaker select ON The pacemaker setting reverts to OFF at the end of measurement Select ON each time you perform a measurement 5 Heart Rate Displays the patient s heart rate 6 ECG wave Displays the ECG wave The ECG display gain is normally set by auto gain However when the pacemaker setting is turned ON the gain is fixed at...

Page 51: ...rm If a cell phone or other device is in use nearby move it farther away Only a weak signal can be obtained from the wrist Try moving the ECG clip from the left wrist to the instep of the left foot secondary induction Check Electrodes An ECG electrode is not inserted in an ECG clip Make sure that three electrodes are properly inserted refer to page 44 The protective sheet is still affixed to the E...

Page 52: ...G sensor pad is dry or dirty Replace with a new PCG sensor pad refer to page 45 The wrong side of the PCG sensor is attached Attach the PCG sensor correctly refer to page 45 A position where the first three or more levels of the meter are lit is optimum Measurement can be performed if the meter is only lit to the second or first level but accuracy may be reduced Re Position The position of the sen...

Page 53: ...ond measurement is required the delay time count is displayed Measurement begins when the count ends Note In some cases one measurement is required and in some cases two measurements are required to complete measurement Two measurements are required in the following cases Synchro measurement setting is set to ON refer to page 38 Synchro measurement setting is set to OFF however blood pressure was ...

Page 54: ...Results Reports page 54 To print a measurement results report again press the PRINT REPORT button press a number of printed pages selection 1 and then press PRINT 2 To repeat a measurement press the REMEASUREMENT button and then select the repeat measurement condition 1 and prepare for measurement 4 To perform stress test go to page 67 without performing the next steps 5 Press the END button 6 Rem...

Page 55: ...ion 5 Heart Rate Displays the heart rate from the R R interval obtained from ECG 6 Heart Rate Pulse Rate Displays the heart rate from the R R interval obtained from ECG If ECG was set to OFF in the SELECT MEASUREMENT SENSOR settings when the patient s information was entered displays the pulse rate refer to page 34 7 baPWV This displays the PWV value calculated from the interval from the start of ...

Page 56: ...64 Notes Do not turn off the power while printing is in progress This may damage the internal memory You can also set reports not to print after measurement The initial setting is 1 sheet Refer to 3 3 Print Default Settings page 80 To print additional reports after measurement press the PRINT REPORT button in the measurement results screen You can also print a report without performing measurement...

Page 57: ...55 2 3 Measurement Results Standard Report go to next page BP 203RPE3 A fm 55 ページ 9年 月 6日 土曜日 午後5時4 分 ...

Page 58: ...for the right and left brachia is greater than 16 mmHg the maximum blood pressure of the brachium with the lower blood pressure is shaded 10 Measured value reliability If a measured value appears in parentheses the accuracy of that value was low for some reason and it is indicated only for reference 11 PWV baPWV The PWV value calculated from the interval from the start of the brachial pulse wave t...

Page 59: ...efault Settings the risk of cardiovascular disease occurring within the next 10 years is calculated based on age sex and baPWV and displayed refer to page 84 21 Comments Revising point for measurement This shows errors detected during measurement and points to be checked to prevent errors 22 Graph 2 The indices are shown on a graph Details are explained from page 58 23 Simple Evaluation of Heart F...

Page 60: ...ased on the SD line 3 Age baPWV SD Nomo This shows baPWV vs age on the horizontal axis Graph shading is based on the SD line Shows mean age SD line and mean line of applicable blood pressure group 4 Age baPWV Nomo1 This shows baPWV vs age on the horizontal axis Graph shading is based on baPWV Shows mean age SD line and mean line of applicable blood pressure group 5 Age baPWV Nomo This shows baPWV ...

Page 61: ...s shows baPWV vs minimum blood pressure value on the horizontal axis 9 baPWV Trend This shows baPWV vs date on the horizontal axis 10 ABI Trend This shows ABI vs date on the horizontal axis 11 Vascular Comment This shows comments on vascular sclerosis This is the same content as in the patient report refer to page 60 BP 203RPE3 A fm 59 ページ 9年 月 6日 土曜日 午後5時4 分 ...

Page 62: ...port layout can be selected for No 1 and No 2 The report type is set in advance in Report type in Print Default Settings page 81 and the layout is set in Patient Report Layout page 84 Patient Report No 1 The measured values graphs and images are arranged uniformly Select from two types of layouts based on the Risk of Pathogenesis selection page 84 BP 203RPE3 A fm 60 ページ 9年 月 6日 土曜日 午後5時4 分 ...

Page 63: ... of the right brachium If the right brachium was not measured due to constriction the blood pressure value of the left brachium is shown 6 Arterial stiffness baPWV This is evaluated based on an age standard The Compare with age layout or Vascular age layout can be selected in the Stiffness setting of Patient report layout Vascular age N is not supported refer to page 84 7 Arterial stenosis ABI The...

Page 64: ... layout or Vascular age N layout can be selected in the Stiffness setting of Patient report layout refer to page 84 2 Next check up This is printed when Next check up is set in Patient report layout refer to page 84 Notes The horizontal axis representing time on the artery flexibility trend graph is automatically set within a range of 1 to 5 years depending on the patient s past data The next sche...

Page 65: ...to understand 1 Arterial stiffness baPWV This is evaluated based on an age standard The Compare with age layout or Vascular age layout can be selected in the Stiffness setting of Patient report layout Vascular age N is not supported Refer to page 84 2 Standard weight This is shown if a weight was entered BP 203RPE3 A fm 63 ページ 9年 月 6日 土曜日 午後5時4 分 ...

Page 66: ...print regardless of whether or not there is a patient history Refer to Print Default Settings Trend Print Condition page 82 Chart when measurement is performed with the TBI package installed Note The horizontal axis representing time on the trend graph is automatically set within a range of one to five years based on the patient s past data Standard measurement BP 203RPE3 A fm 64 ページ 9年 月 6日 土曜日 午...

Page 67: ...Attach the ECG clips to the patient Refer to Attaching the ECG clips page 44 2 Make sure that ECG OK is displayed on the measurement screen It is not necessary to attach the PCG sensor 3 Press the R R INTERVALS TEST button Heartbeat acquisition begins When the effective heartbeats count reaches 100 measurement ends and an R R interval exam report is printed an R R interval exam report is printed R...

Page 68: ... the standard deviation of the R R interval 2 R R interval mean value This shows the mean value of the R R interval 3 HR mean value This shows the mean value of the heart rate 4 CVRR This shows the coefficient of variance of the R R interval 5 Histogram This shows the histogram of the R R interval 6 Trend chart This shows the trend graph of the R R interval BP 203RPE3 A fm 66 ページ 9年 月 6日 土曜日 午後5時4...

Page 69: ...isconnect the arm cuff from the cuff hose and leave the cuff on the patient 3 Press the STRESS MODE button 4 To change the measurement sites press the MODIFY button If you do not need to change the measurement sites go to step 6 Notes The amount of exercise that the patient performs must be determined in consultation with a doctor While the patient exercises always pay close attention to the patie...

Page 70: ...readmill speed INTERVALS 2 3 4 5 minutes Time until measurement begins after exercise 9 Start applying the exercise stress to the patient Apply the exercise stress to the patient based on the exercise stress conditions set in step 8 10 Attach cuffs and sensors to the patient Immediately after applying the exercise stress attach the ankle cuff ECG clips and PCG sensor Connect the arm cuff to the cu...

Page 71: ... device Measurement begins During measurement the waveform appears To view numerical values during measurement press the SWITCH VIEW button and select the desired screen from the three screen types Refer to Checking Numerical Values During Stress Test page 71 BP 203RPE3 A fm 69 ページ 9年 月 6日 土曜日 午後5時4 分 ...

Page 72: ...o the state before exercise stress end the stress test Press END STRESS TEST and then OK to end To cancel press the CANCEL button Measurement ends the stress test report will be printed 14 Press the END button 15 Remove the cuffs and sensors from the patient BP 203RPE3 A fm 70 ページ 9年 月 6日 土曜日 午後5時4 分 ...

Page 73: ...ed time or Waveform screen Changes in the numerical values being measured can be viewed in these screens Select an appropriate screen for the patient and the circumstances Previous measurement result screen Displays graphs of the most recently measured values and pulsatile variation 1 Interval Counts the standby time until the next measurement 2 END STRESS TEST button Press to stop stress test BP ...

Page 74: ... time This shows the trend of the ABI value over time 1 SYS Shows the maximum blood pressure value 2 ABI Shows the ABI value 3 RR This shows the recovery ratio which is the ratio of measured ABI to ABI at rest This approaches 1 as time elapses BP 203RPE3 A fm 72 ページ 9年 月 6日 土曜日 午後5時4 分 ...

Page 75: ...nd of the ABI value over time 3 List data Shows a list of the measurement results together with the elapsed time 4 R indicates a measurement taken in the rest state 5 P indicates a stress test 6 Parentheses indicate that the accuracy of the value was low for some reason and the value is indicated only for reference 7 Exercise Conditions Shows the exercise conditions BP 203RPE3 A fm 73 ページ 9年 月 6日 ...

Page 76: ...ettings related to measurement such as measurement sensors and measurement sites 76 PRINT DEFAULT SETTINGS You can configure print settings such as paper size copies and print layout 80 FACIL Dr TECHNICIAN CATEGORY Facility name doctor technician and category settings can be stored edited and deleted 86 DATE TIME SETTINGS Use this to set the date and time in the device 93 SYSTEM INFORMATION The de...

Page 77: ...ent information can be registered in advance edited and deleted 105 USAGE FREQ RPT FACIL PATIENT A usage frequency report and a facility patient report can be printed 113 DATA EXPORT IMPORT Measurement data can be exported to USB flash drive and imported from USB flash drive for registration 116 HMC DATA IMPORT REPORT PRINT The optional HMC package can be used to import data from a household measu...

Page 78: ... new patient information registration screen Default Age Set the default age that appears in the new patient information registration screen when the patient s age is entered Setting the average patient age as the default age makes it easier to enter a patient s age by jog dial This can be adjusted within the range of 0 to 100 The default setting is 60 Selections Description PATIENT ID Select this...

Page 79: ...odialysis do not attach an arm cuff to or perform measurement on that brachium Measurement cannot be performed with both ankle cuffs and toe cuffs attached Synchro Measurement Set the default setting for synchro measurement Selections Description ON Make a beep sound OFF Do not make a beep sound Selections Description ON Attached OFF Not attached Selections Description RIGHT BRACHIUM LEFT BRACHIUM...

Page 80: ...second measurement for synchro measurement and ABI remeasurement Select from the 10 sec to 120 sec buttons The default setting is 10 sec Selections Description OFF Do not judge whether or not to perform a second measurement using the base ABI value ON When the measured ABI is lower than the set value automatically perform a second measurement Set the base ABI value within the range of 0 30 to 1 40...

Page 81: ... Select or enter a setting A To select a setting from multiple selections repeatedly press the item button until the desired setting appears B If a value must be entered use the keyboard that appears To clear a mistake press the CLEAR button When the setting is completed press the OK button To cancel press the CANCEL button 4 Repeat steps 2 and 3 to configure other items 5 Press the SAVE AND RETUR...

Page 82: ...f paper that is loaded in the printer Selections Description STANDARD Select this to use the printer that accompanies the device SERVER COLOR Select this to use a color printer other than the printer that accompanies the device SERVER BLACK WHITE Select this to use a black white printer other than the printer that accompanies the device OFF Select this when a printer will not be used Selections De...

Page 83: ...C package is used For details see the manual for the HMC package Trend Reports Refer to Trend Report page 64 This is only enabled when the optional HMC package is used For details see the manual for the HMC package Selections Description NO 1 This type shows measured values graphs and images in a uniform arrangement NO 2 This type focuses on arterial stiffness and arterial stenosis in graph format...

Page 84: ...OFF Do not print 1 PAGE 10 PAGES The set number of copies is printed The default setting is 1 page Selections Description AFTER 2ND TIME Only print when there is a patient history ALWAYS Print regardless of whether or not there is a patient history Note If you will not be using a printer set all settings for the standard report patient report and trend chart to OFF BP 203RPE3 A fm 82 ページ 9年 月 6日 土...

Page 85: ...Graph shading is based on baPWV Shows mean age SD line and mean line of applicable blood pressure group 5 Age baPWV Nomo This shows baPWV vs age on the horizontal axis Shows mean line of each blood pressure group 6 ABI baPWV This shows baPWV vs ABI on the horizontal axis 7 SYS baPWV This shows baPWV vs maximum blood pressure value on the horizontal axis 8 DIA baPWV This shows baPWV vs minimum bloo...

Page 86: ...rall diagnosis Doctor field SHOW RESULT In the blood pressure value field of patient report No 1 print the Evaluation Overall diagnosis Doctor field and also print the evaluation result Print the evaluation result in the opinion field of the standard print out as well Selections Description COMPARE WITH AGE The result of baPWV measurement is compared with the mean value of a group of healthy peopl...

Page 87: ...you wish to configure 3 Select or enter a setting A To select a setting from multiple selections repeatedly press the item button until the desired setting appears B If a value must be entered use the keyboard that appears When the setting is completed press the OK button To cancel press the CANCEL button 4 Repeat steps 2 and 3 to configure other items 5 Press the SAVE AND RETURN button BP 203RPE3...

Page 88: ...an or category data is prepared in advance on a computer and the data is imported into the device Data that has been imported into and stored in the device can be individually edited or deleted at the touch panel Method B allows easy and immediate entry editing and deletion of data Note Use the scroll bar that appears on the right side of the screen when a doctor technician or other list appears a...

Page 89: ...can be entered Alphabetic characters Numeric characters Section name Enter the content of each list following FACILITY DOCTOR TECHNICIAN CATEGORY Facility name 40 characters maximum Doctor technician category 40 characters maximum 3 Save the created data to USB flash drive and connect it to the USB port on the device 4 Press the FACIL Dr TECHNICIAN CATEGORY button 5 Press the IMPORT FILE button FA...

Page 90: ...88 3 4 Facility name Doctor Technician Category Settings 6 Press the OK button To cancel the import press the CANCEL button BP 203RPE3 A fm 88 ページ 9年 月 6日 土曜日 午後5時4 分 ...

Page 91: ...PER button lower button When upper case entry is selected the lower button appears When lower case entry is selected the UPPER button appears Each time the button is pressed it changes between UPPER and lower To change a character press the or button to move the cursor to that character press the DELETE button and enter the new character To delete all characters that have been entered press the CL...

Page 92: ... To enter a space press the SPACE button To switch between upper case and lower case letters use the UPPER button lower button When upper case entry is selected the lower button appears When lower case entry is selected the UPPER button appears Each time the button is pressed it changes between UPPER and lower To change a character press the or button to move the cursor to that character press the...

Page 93: ...n is entered the names set in the pre selection settings will initially appear in Doctor Technician and Category on the screen 1 Press the FACIL Dr TECHNICIAN CATEGORY button 2 Select the item you wish to pre select 3 Select the name that will be pre selected 4 Press the SAVE AS button 5 Press the OK button To cancel press the CANCEL button BP 203RPE3 A fm 91 ページ 9年 月 6日 土曜日 午後5時4 分 ...

Page 94: ...tings 6 Repeat steps 2 to 5 to configure other items 7 Press the SAVE AND RETURN button Note If there is no need to print the Doctor Technician and Category on measurement result reports press the CLEAR button BP 203RPE3 A fm 92 ページ 9年 月 6日 土曜日 午後5時4 分 ...

Page 95: ...ial screen Configure Date Time Settings from the main menu screen 1 Press the DATE TIME SETTINGS button 2 Set the date and time Change the year month and time with the buttons button Change to the next higher value button Change to the next lower value Directly select the day on the calendar 3 Press the OK button To cancel press the CANCEL button BP 203RPE3 A fm 93 ページ 9年 月 6日 土曜日 午後5時4 分 ...

Page 96: ...dex data TBI can be measured when the TBI package is installed If the TBI package is installed read the accompanying manual The scroll bar that appears on the right side of the screen when the patient list appears is used as explained below Press to move back five pages Press to return to the previous page This shows the approximate position within the list Press to move to the next page Press to ...

Page 97: ...he main menu screen 1 Press the PRINT REPORT EDIT PATIENT INFO button 2 Select the first measurement data that you wish to reprint 3 Press the PRINT REPORT button 4 Check change the number of copies to be printed 1 Select the report for which you wish to change the number of copies If no change is needed go to step 5 2 Select the number of copies to be printed 3 Press the OK button To cancel press...

Page 98: ...asurement data that you wish to reprint 7 Press the OK button To cancel press the CANCEL button 8 Press the PRINT button 9 Press the OK button To cancel printing press the CANCEL button Note To cancel printing after it has begun press the CANCEL button or the STOP button on the device BP 203RPE3 A fm 96 ページ 9年 月 6日 土曜日 午後5時4 分 ...

Page 99: ... in the initial screen Edit patient information from Print report Edit Patient Info in the main menu screen 1 Press the PRINT REPORT EDIT PATIENT INFO button 2 Select the patient information that you wish to edit 3 Press the EDIT DELETE button 4 Press EDIT PATIENT INFO BP 203RPE3 A fm 97 ページ 9年 月 6日 土曜日 午後5時4 分 ...

Page 100: ...at you wish to edit and edit the item For details on each item and editing procedures see Entering and Editing Patient Information refer to page 25 6 Press the OK button To cancel editing press the CANCEL button 7 Press the BACK button BP 203RPE3 A fm 98 ページ 9年 月 6日 土曜日 午後5時4 分 ...

Page 101: ...ton in the initial screen Delete measurement data from Print report Edit Patient Info in the main menu screen 1 Press the PRINT REPORT EDIT PATIENT INFO button 2 Select the measurement data that you wish to delete 3 Press the EDIT DELETE button 4 Press DELETE DATA BP 203RPE3 A fm 99 ページ 9年 月 6日 土曜日 午後5時4 分 ...

Page 102: ...Reports and Editing Patient Information 5 Press the OK button To cancel the deletion press the CANCEL button 6 Press the BACK button Note Once deleted data cannot be recovered BP 203RPE3 A fm 100 ページ 9年 月 6日 土曜日 午後5時4 分 ...

Page 103: ...creen Perform Trend Report Printing from the main menu screen Searching by ID number 1 Press the TREND REPORT PRINTING button 2 Press the SEARCH BY ID button 3 Enter the ID number Note Data marked by at the right of the date and time of measurement is TBI Toe Brachial Index data TBI can be measured when the TBI package is installed If the TBI package is installed read the accompanying manual BP 20...

Page 104: ...e CANCEL button Press the PREVIOUS ID button to show the previous ID Press the NEXT ID to show the next ID Note You can search for an ID number by entering just the initial digits of the number it is not necessary to enter all digits If there are multiple matches for the entered number scroll through the IDs as follows BP 203RPE3 A fm 102 ページ 9年 月 6日 土曜日 午後5時4 分 ...

Page 105: ...Press the TREND REPORT PRINTING button 2 Press the SEARCH BY DATE button 3 Enter the measurement date Enter the date in the format yyyy mm dd 4 Press the OK button To cancel press the CANCEL button 5 Press the PRINT button BP 203RPE3 A fm 103 ページ 9年 月 6日 土曜日 午後5時4 分 ...

Page 106: ...he CANCEL button Press the PREVIOUS ID button to show the previous ID Press the NEXT ID to show the next ID Note When there are multiple sets of data with the same date scroll through the data as explained below to search for the patient BP 203RPE3 A fm 104 ページ 9年 月 6日 土曜日 午後5時4 分 ...

Page 107: ... been imported into and stored in the device can be individually edited or deleted at the touch panel Method B allows easy and immediate registration editing and deletion of data Notes When measurement is finished the pre registered patient information is removed from the pre registered patient list The scroll bar that appears on the right side of the screen when the pre registered patient list ap...

Page 108: ...cters 120 to 210 units cm Weight Numeric characters 25 0 to 300 0 units kg Waist Numeric characters 30 to 250 units cm Disease Code input 2 1 character Measurement site Code input 2 1 character Doctor Character type same as for Name Technician Character type same as for Name Category Character type same as for Name Order number Numeric characters hyphens maximum of 16 digits 1 An XML file can also...

Page 109: ...oth ankles 1 Hypertension 1 Right brachium right ankle 2 Hyperlipidemia 2 Right brachium left ankle 3 Diabetes 3 Right brachium 4 Hypertension diabetes 4 Both brachia both ankles 5 Hyperlipidemia diabetes 5 Both brachia right ankle 6 Hypertension Hyperlipidemia 6 Both brachia left ankle 7 Hypertension Hyperlipidemia diabetes 7 Both brachia cannot be specified 8 Left brachium both ankles 9 Left bra...

Page 110: ...ss the button for each item and enter the information For details on each item and editing procedures see Entering and Editing Patient Information page 25 It is not necessary to enter HEIGHT for Advanced Registration of Patient Information 5 Press the OK button To cancel the information entered press the CANCEL button 6 Press the BACK button BP 203RPE3 A fm 108 ページ 9年 月 6日 土曜日 午後5時4 分 ...

Page 111: ...he initial screen Patient information can be edited from Register Manage patient info in the main menu screen 1 Press the REGISTER MANAGE PATIENT INFO button 2 Select the patient information that you wish to edit 3 Press the EDIT DELETE Button 4 Press EDIT SELECTED DATA BP 203RPE3 A fm 109 ページ 9年 月 6日 土曜日 午後5時4 分 ...

Page 112: ...that you wish to edit and edit the item For details on each item and editing procedures see Entering and Editing Patient Information page 25 6 Press the OK button To cancel editing press the CANCEL button 7 Press the BACK button BP 203RPE3 A fm 110 ページ 9年 月 6日 土曜日 午後5時4 分 ...

Page 113: ... the initial screen Patient information can be deleted from Register Manage patient info in the main menu screen 1 Press the REGISTER MANAGE PATIENT INFO button 2 Select the patient information that you wish to delete 3 Press the EDIT DELETE button 4 Press DELETE DATA BP 203RPE3 A fm 111 ページ 9年 月 6日 土曜日 午後5時4 分 ...

Page 114: ...ration of Patient Information 5 Press the OK button To cancel the deletion press the CANCEL button 6 Press the BACK button Note Once deleted patient information cannot be recovered BP 203RPE3 A fm 112 ページ 9年 月 6日 土曜日 午後5時4 分 ...

Page 115: ...tal Measurements Total Patient Prints the total number of measurements and the total number of patient 2 Usage Frequency Graph per year This graphs the frequency of use by month over the past 12 months 3 Usage Frequency Graph per month This graphs the frequency of use by day over the last month 4 Use Frequency by each Category This shows usage by category refer to page 39 BP 203RPE3 A fm 113 ページ 9...

Page 116: ...I and baPWV can be extracted from the recorded measurement data and shown on a graph Data with high values are printed followed by data with low values Mean values of baPWV are calculated over 10 year intervals and shown as a mean value line BP 203RPE3 A fm 114 ページ 9年 月 6日 土曜日 午後5時4 分 ...

Page 117: ...n the initial screen Perform Usage frequency report facility patient from the main menu screen 1 Press the USAGE FREQ RPT FACIL PATIENT button 2 Select the report that you wish to print Multiple reports can be selected 3 Press the PRINT button 4 Press the OK button To cancel printing press the CANCEL button BP 203RPE3 A fm 115 ページ 9年 月 6日 土曜日 午後5時4 分 ...

Page 118: ... Processing Items Processing category Description DATA EXPORT Export measurement data to USB flash drive DATA IMPORT Import measurement data from USB flash drive DATA EXPORT FORMER UNIT Export measurement data in the BP 203RPE or BP 203RPE2 data format to USB flash drive DATA IMPORT FORMER UNIT Import BP 203RPE and BP 203RPE2 data This is only possible for Ver CX002 or later BP 203RPE3 A fm 116 ペー...

Page 119: ...RT IMPORT button 2 Set the processing category 1 Press the PROCESSING CATEGORY button 2 Select the desired processing category 3 Press the OK button To cancel press the CANCEL button Items Specified yes no Yes No ID Only data of specified IDs are processed All data are processed FROM Starting date Data from the specified date and later are processed All data are processed TO Ending date Data prior...

Page 120: ...CANCEL button 4 Specify the data range of measurements 1 Press the FROM button 2 Enter the starting date Enter the date in the format yyyy mm dd 3 Press the OK button To cancel press the CANCEL button 4 Press the TO button 5 Enter the ending date Enter the date in the format yyyy mm dd 6 Press the OK button To cancel press the CANCEL button BP 203RPE3 A fm 118 ページ 9年 月 6日 土曜日 午後5時4 分 ...

Page 121: ...he START PROCESSING button 6 Connect the USB flash drive to the USB port on the device 7 Press the OK button To cancel processing press the CANCEL button The displayed message varies depending on the processing BP 203RPE3 A fm 119 ページ 9年 月 6日 土曜日 午後5時4 分 ...

Page 122: ...t report data to a computer A technician will configure network settings to enable use of this function Please consult a dealer or an Omron Healthcare technical support representative Types of reports that can be exported to a computer Standard Reports Patient Reports Trend Reports BP 203RPE3 A fm 120 ページ 9年 月 6日 土曜日 午後5時4 分 ...

Page 123: ...osclerosis calcification or other reason because calcification tends not to extend to peripheral areas Measurable items Toe systolic blood pressure maximum blood pressure Measurement range 40 mmHg 260 mmHg However in the vicinity of 40 mmHg fluctuations of about 10 mmHg may occur due to pulse amplitude TBI Toe Brachial Index TBI Toe systolic pressure brachial systolic pressure higher of left and r...

Page 124: ...s of the device on a trend chart Importable Data For more information contact a dealer or an Omron Healthcare technical support representative Measuring instrument Data item Blood pressure monitor Maximum blood pressure value minimum blood pressure value date and time of measurement heart rate Pedometer Total steps in one day date and time of measurement Body composition monitor Weight date of mea...

Page 125: ...by bar code the bar code reader set makes it possible to use these as patient information Support must be verified in advance For more information consult a dealer or an Omron Healthcare technical support representative initial screen ID number entry BP 203RPE3 A fm 123 ページ 9年 月 6日 土曜日 午後5時4 分 ...

Page 126: ...ning the device dry it completely before turning on the power again Otherwise electric shock or current leakage may result Use only the specified supplies for the cord cuff and other parts Do not install other than specified options An accident may result Caution Before cleaning or maintaining the device disconnect the power plug Otherwise electric shock or injury may result The ECG clip electrode...

Page 127: ...g supplies please order by model number Refer to Accessories Sold Separately page 15 Note Keep ECG clip electrodes and PCG sensor pads out of direct sunlight and away from high temperatures and high humidity Store at room temperature 10 to 35 C If these become dry correct measurement will not be possible Note Dispose used ECG clip electrodes and PCG sensor pads as medical waste BP 203RPE3 A fm 125...

Page 128: ...nector clockwise until it clicks into place Replacing an Ankle Cuff 1 Squeeze the removal levers 1 on the sensor box and remove each cuff connector 2 The levers are small and slippery Squeeze the levers firmly 2 Insert each connector on the new cuff into the sensor box until it clicks into place Caution The sensor box removal lever uses a strong spring mechanism Hold the sensor box firmly and pres...

Page 129: ... blows there may be a problem in the device Contact a dealer or an Omron Healthcare technical support representative 8 AC plug connector Connector for the power cord 9 Sensor box hose joint Connector for the sensor box air hose 10 Left arm cuff hose joint Connector for the left arm cuff hose 11 Right arm cuff hose joint Connector for the right arm cuff hose 12 LAN cable connector A computer can be...

Page 130: ...uired in advance For more information consult a dealer or an Omron Healthcare technical support representative Arm cuffs PCG ECG clips Rear side of device Ankle cuffs toe cuffs option Printer The appearance of the device is subject to change without notice USB cable for HMC Package communication Option Sensor box Bar code reader Option BP 203RPE3 A fm 128 ページ 9年 月 6日 土曜日 午後5時4 分 ...

Page 131: ... examination environment 1 Turn the power off 2 Remove the cable cover 3 Unfasten the cables one for the ECG clips and the other for the PCG sensor from the fasteners behind the main unit 4 Disconnect the ECG clip and the PCG sensor connected on the back of the main unit 5 Remove the touch pen stand 6 Loosen the screw 1 and pull out the arm BP 203RPE3 A fm 129 ページ 9年 月 6日 土曜日 午後5時4 分 ...

Page 132: ...3 8 Loosen the screw 4 and slide the arm rail off 9 Remove the fastener 5 for the PCG sensor cable 10 Change the PCG sensor cable so that it faces out and move the PCG sensor pocket to the outer side 11 Attach the arm rail and PCG sensor cable fastener 5 and tighten screw 4 BP 203RPE3 A fm 130 ページ 9年 月 6日 土曜日 午後5時4 分 ...

Page 133: ...nd 13 Reconnect the ECG clip and the PCG sensor connectors on the back of the main unit 14 Secure the ECG clip and the PCG sensor cables with the holder slot and fasten the two cable fasteners 15 Attach the cable cover BP 203RPE3 A fm 131 ページ 9年 月 6日 土曜日 午後5時4 分 ...

Page 134: ...pport representative Types of Audible Alarms Audible alarm Error level Description Beep beep beep beep beep High The alarm sounds repeatedly A serious problem has occurred in the device or an abnormality has occurred to the patient Measurement cannot be performed in this state You must check the error Beep beep beep Medium The alarm sounds repeatedly A problem has occurred that makes measurement d...

Page 135: ...n menu screen When you call a dealer or an Omron Healthcare technical support representative you may be asked to provide this information 1 Press the SYSTEM INFORMATION button 2 Select the item that you wish to view To print the system information press the PRINT button at the bottom right of the screen The content that appears varies depending on the program version and the options that are insta...

Page 136: ...screen ID entry screen and select Maintenance menu from the main menu screen to perform testing Item Description AIR LEAKAGE TEST Perform this test to check for air leaks in the air system including the cuffs INFLATION DEFLATION TEST Use this to check the speed of inflation and deflation of the air system PRESSURE ACCURACY TEST Use this to test the accuracy of pressure detection BP 203RPE3 A fm 13...

Page 137: ...edical electrical equipment Part 1 General requirements for safety EN IEC60601 1 1 Medical electrical equipment Part 1 1 General requirements for safety Collateral standard Safety requirements for medical electrical systems Power supply Rating AC 220 240 V Frequency 50 60 Hz Power consumption 1200 VA max including printer Multiple Portable Socket outlets Type TDZ 4 Rated current and Voltage AC 250...

Page 138: ...2304 Medical device software software life cycle processes ISO14971 Medical devices Application of risk management to medical devices Environmental Conditions Power supply Rating AC 100 240 V Frequency 50 60 Hz Power consumption 150 VA Fuses Quantity 2 250 V T2AH Time lag High Breaking Capacity HBC Operational temperature and humidity Temperature range 10 40 C Humidity range 15 85 no condensation ...

Page 139: ...Numbers of cuff 4 Right and Left Brachials Right and Left Ankles Reference standards EN IEC60601 2 30 Medical electrical equipment Part 2 30 Particular requirements for safety including essential performance of automatic cycling non invasive blood pressure monitoring equipment EN1060 1 Non invasive sphygmomanometers Part 1 General requirements EN1060 3 Non invasive sphygmomanometers Part 3 Supplem...

Page 140: ... accuracy 1 or 1 beat HR response time 9 sec or less HR averaging 4 beats moving average at HR 120 8 beats moving average at 120 HR HR updating rate Every beats Pacemaker pulse rejection Amplitude 2 700 mV Pulse width 0 1 2 0 ms Reference standards EN IEC60601 2 27 Medical electrical equipment Part 2 Particular requirements for the safety of Electrocardiographic monitoring equipment PCG Measuremen...

Page 141: ...ir Floors should be wood concrete or ceramic tile If floors are covered with synthetic material the relative humidity should be at least 30 Electrical fast transient burst IEC 61000 4 4 2 kV for power supply lines 1 kV for input output lines 2 kV for power supply lines 1 kV for input output lines Mains power quality should be that of a typical commercial or hospital environment Surge IEC 61000 4 5...

Page 142: ...nce may occur in the vicinity of equipment marked with the following symbol NOTE 1 At 80 MHz and 800 MHz the higher frequency range applies NOTE 2 These guidelines may not apply in all situations Electromagnetic propagation is affected by absorption and reflection from structures objects and people a Field strengths from fixed transmitters such as base stations for radio cellular cordless telephon...

Page 143: ... the recommended separation distance d in meters m can be estimated using the equation applicable to the frequency of the transmitter where P is the maximum output power rating of the transmitter in watts W according to the transmitter manufacturer Note At 80MHz and 800MHz the separation distance for the higher frequency range applies Note These guidelines may not apply in all situations Electroma...

Page 144: ...r the medical device This may result in incorrect operation of the unit and create a potentially unsafe situation Recommendation is to keep a minimum distance of 7 m Verify correct operation of the device in case the distance is shorter Further documentation in accordance with IEC60601 1 2 is available at OMRON Healthcare at the address mentioned in this instruction manual Correct Disposal of This...

Page 145: ...ave height P1 of the presystolic component MAP Mean Arterial Pressure This value is one of the pulse waveform indices that are calculated from the blood pressure values It expresses as a percentage the mean value P2 of the area of the PVR waveform divided by the amplitude of the pulse P1 This value is calculated as follows Ankle systolic blood pressure Brachial systolic blood pressure higher of le...

Page 146: ...each In general the device uses the right brachial ankle PWV baPWV as the PWV Ascending aorta carotid artery hcPWV Ascending aorta right brachial hbPWV Ascending aorta femoral artery hfPWV Femoral artery ankle PWV faPWV Right brachial ankle baPWV Ascending aorta ankle PWV haPWV TBI Toe Brachial Index The TBI is calculated as follows This index is an evaluation of the severity of constriction and b...

Page 147: ...tion Time and PEP Pre Ejection Period Correlations with left ventricular end diastolic volume and pressure LVEDV LVEDP ejection efficiency EF stroke volume SV and cardiac muscle contraction speed VCF can also be indicated This index can be expressed in the form ET PEP or in the form PEP ET Q II Overall control period The time from the start of the Q wave to the closing of the aortic valve II sound...

Page 148: ...e stage of depressurization following pressurization of the cuff the oscillometric method determines the blood pressure value by checking the variation in cuff pressure pressure pulse wave due to vibration of the blood vessel wall synchronized with the heartbeat In general the cuff pressure when the pressure pulse wave suddenly grows large is the maximum blood pressure and the cuff pressure when t...

Page 149: ...al rules and regulations 2 This device includes a lithium battery Dispose in accordance with local rules and regulations Component Part Material Package Box Cardboard Packing material Cardboard Bag Polyethylene Main Unit Main unit ABS resin rubber Internal parts Common electronic components 1 rubber Chassis Iron aluminum Cuffs Cloth vinyl chloride PP resin Batteries on board Lithium manganese diox...

Page 150: ...148 Memo BP 203RPE3 A fm 148 ページ 9年 月 6日 土曜日 午後5時4 分 ...

Page 151: ...BP 203RPE3 A fm 149 ページ 9年 月 6日 土曜日 午後5時4 分 ...

Page 152: ...OPE B V Kruisweg 577 2132 NA Hoofddorp The Netherlands www omron healthcare com Manufacturer OMRON HEALTHCARE Co Ltd 24 Yamanouchi Yamanoshita cho Ukyo ku Kyoto 615 0084 Japan Production facility OMRON MATSUSAKA CO LTD 1855 370 Kubo cho Matsusaka city Mie prefecture 515 8503 Japan 5328937 6A 28 12 09 BP 203RPE3 A fm 150 ページ 9年 月 日 月曜日 午後4時 6分 ...

Reviews: