background image

Printer Settings 

2-16

ADVANCED OPERATION GUIDE

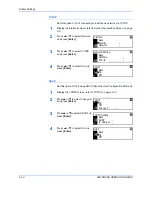
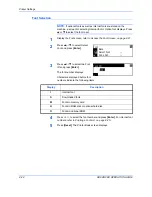
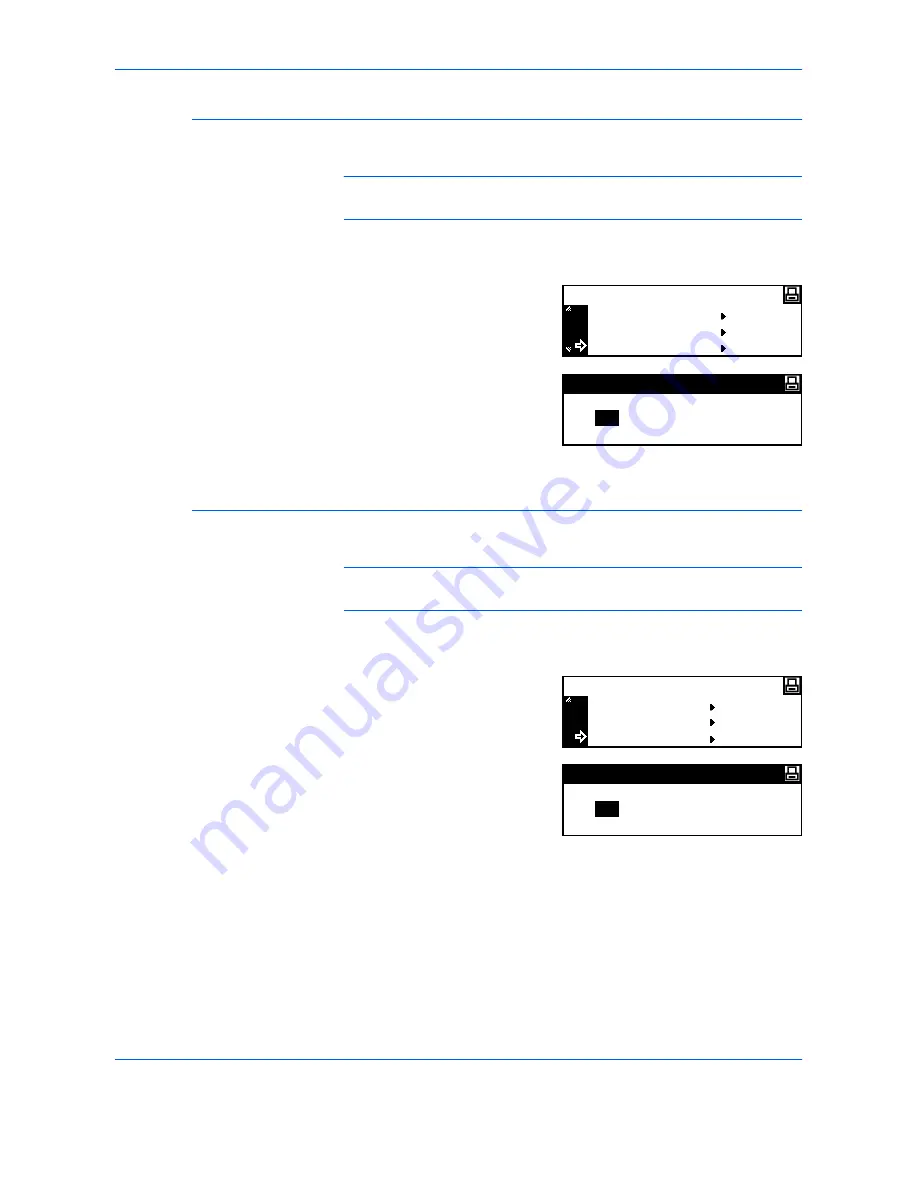
Subnet Mask Setting

Continue from the previous Step 6 to register the 

Subnet Mask

 address.

NOTE: 

If you are not sure of the appropriate 

Subnet Mask

 address, 

contact your Network Administrator.

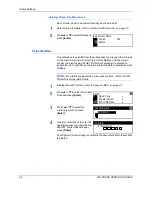
1

Display the 

TCP/IP Setting

 screen.

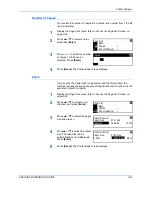
2

Press 

S

 or 

T

 to select 

Subnet 

Mask

 and press 

[Enter]

.

3

Enter the 

Subnet Mask

 address 

using the same procedure used 
for the 

IP Address

 in steps 8 - 9 of 

IP Address Setting

.

Press 

[Enter]

 when the entire address has been entered.

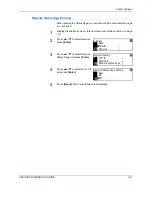
Default Gateway

Continue from the previous Step 3 to register the 

Default Gateway

.

NOTE: 

If you are not sure of the appropriate 

Default Gateway

 address, 

contact your Network Administrator.

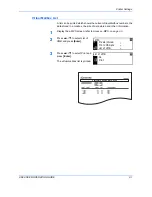
1

Access the 

TCP/IP Setting

 screen.

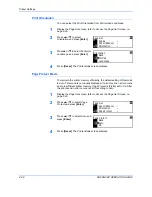
2

Press 

S

 or 

T

 to select 

Gateway


and press 

[Enter]

.

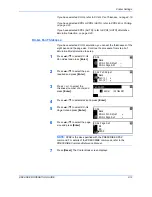
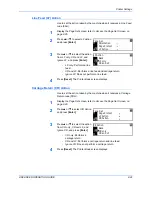
3

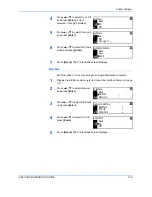
Enter the 

Gateway

 address using 

the same procedure used for the 

IP Address

 in steps 8 - 9 of 

IP 

Address Setting

.

Press 

[Enter]

 when the entire address has been entered.

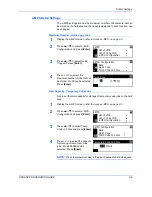
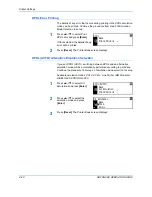
4

When you have entered all the network settings, press 

[Reset]

.

The 

Printer Basic

 screen displays.

DHCP

IP Address

TCP/IP Setting

Subnet Mask

Subnet Mask

0

0

.

.

0

0 .

IP Address

Subnet Mask

TCP/IP Setting

Gateway

Gateway

0

0

.

.

0

0 .

Summary of Contents for d-copia 200MF

Page 1: ...ADVANCED INFORMATION...

Page 2: ...utilization of more energy efficient office equipment ENERGY STAR is a U S registered mark Your attention is drawn to the following actions which could compromise the conformity attested to above as w...

Page 3: ...ghtable subject must contain the same copyright notice as the material from which the copying is done Regarding Trade names PRESCRIBE is a registered trademark of Kyocera Corporation KPDL and KIR Kyoc...

Page 4: ...ii ADVANCED OPERATION GUIDE...

Page 5: ...s Explains the copier functions available on the machine 2 Printer Settings Explains the settings available for the printer functions 3 System Settings Explains the general settings available on the m...

Page 6: ...is Advanced Operation Guide contains explanations on copier and printer functions as well as default settings adjusted on the machine KX Printer Driver Operation Guide Describes how to install and set...

Page 7: ...i Bypass Tray Bracket Bold Text Typeface Used to emphasise the selection of a feature mode or key Press Enter Notes Used to provide additional or useful information about a function or feature NOTE To...

Page 8: ...vi ADVANCED OPERATION GUIDE...

Page 9: ...ode 1 16 Auto Selection Mode 1 17 Program Function 1 18 2 Printer Settings Status Page 2 2 e MPS Function 2 3 Interface 2 11 Emulation 2 18 Font 2 21 Print Configuration 2 26 Print Quality 2 31 Memory...

Page 10: ...tents viii ADVANCED OPERATION GUIDE Job Accounting Mode 4 2 Managing Accounts 4 4 Default Settings 4 12 Using Job Accounting 4 15 Appendix Paper Appendix 2 Specifications Appendix 11 Glossary Appendix...

Page 11: ...use the copier functions of the machine Original Size 1 2 Original Placement 1 4 Offset Mode 1 5 Stapling 1 6 Combine Mode 1 7 Margin Mode 1 12 Border Erase Mode 1 13 Continuous Scan 1 14 Auto Rotati...

Page 12: ...ocedure to select a standard original size 1 Position the original and press Original Size 2 Press S or T to select the original size required and press Enter Select Auto to allow the machine to autom...

Page 13: ...select the vertical size required 2 to 11 5 8 in 1 8 increments 50 to 297 mm in 1 mm increments can be selected Press T to select the horizontal size 4 Press or to select the horizontal size 2 to 17 i...

Page 14: ...ng Optional When the originals are positioned on the Platen When the originals are loaded in the Document Processor NOTE To change the default setting for Original Orientation refer to Original Orient...

Page 15: ...can be used for Offset copying are A4 B5 and 11 8 1 2 NOTE Ensure the Auto Rotation feature is On refer to Auto Rotation on page 1 15 1 Position the original and press Offset 2 Press Sort 3 Enter the...

Page 16: ...own below 1 Position the original and press Staple 2 Press S or T to select the stapling position and press Enter 3 Press Start If using the optional Document Processor copying completes automatically...

Page 17: ...Paper Size must be regular sizes Original Copy 2 1 1 2 Mode Description 2 in 1 Copies two originals onto one sheet This mode can also be used in conjunction with Duplex Mode optional in order to copy...

Page 18: ...ng illustrations indicate how the orientation of the original will affect the resulting copies Using the Platen Using the Document Processor NOTE Ensure that the first page of the originals is scanned...

Page 19: ...The following illustrations indicate how the orientation of the original will affect the resulting copies Using the Platen Using the Document Processor NOTE Ensure that the first page of the originals...

Page 20: ...The following illustrations indicate how the orientation of the original will affect the resulting copies Using the Platen Using the Document Processor NOTE Ensure that the first page of the originals...

Page 21: ...riginal and press Combine 2 Press S or T to select the combine option required and press Enter 3 Press S or T to select the Border Line type and press Enter Borderline type Copy 2 in 1 4 in 1 horizont...

Page 22: ...blank space at the left or top side of the copy You can set the width of each margin to 1 8 to 3 4 in 1 8 increments 1 mm to 18 mm in 1 mm increments NOTE To set the default value for Margin Width ref...

Page 23: ...1 8 to 3 4 in 1 8 increments 1 mm to 18 mm in 1 mm increments can be selected Press Enter 4 Press Start Copying commences Mode Description Sheet Erase Use this mode to erase shadows which appear when...

Page 24: ...ies are then made 1 Position the first original s and press Function 2 Press S or T to select Continuous Scan and press Enter 3 Press S or T to select On and press Enter 4 Press S or T to select End a...

Page 25: ...default setting refer to Auto Rotation Copy on page 3 11 The paper sizes that can be used for Auto Rotation are A4 11 8 1 2 or smaller sizes NOTE A3 B4 Folio 11 17 Ledger or 8 1 2 14 Legal cannot be u...

Page 26: ...for draft copies NOTE The copy exposure will be a little lighter To set the EcoPrint mode as the default setting refer to EcoPrint Mode on page 3 4 1 Position the first original s and press Function 2...

Page 27: ...The maximum number of sheets that can be loaded in the Document Processor in this mode is 30 The following original sizes can be used in Auto Selection mode Inch Specification 11 8 1 2 and 11 17 Ledg...

Page 28: ...ress S or T to select the program number required 1 to 8 and press Enter The program is registered NOTE You can also select the program number using a numeric key Using a Program 1 Press Program 2 Pre...

Page 29: ...are required for the printer functions of the machine Status Page 2 2 e MPS Function 2 3 Interface 2 11 Emulation 2 18 Font 2 21 Print Configuration 2 26 Print Quality 2 31 Memory Card Operation 2 34...

Page 30: ...etails are printed on the Status Page 1 Press Printer 2 Press S or T to select MENU and press Enter 3 Press S or T to select Print Status Page and press Enter 4 Press S or T to select Print and press...

Page 31: ...rd Disk must be installed For details on e MPS refer to the KX Printer Driver Operation Guide NOTE If the RAM Disk Operation refer to page 2 41 is switched On the e MPS function can still be used for...

Page 32: ...ccess e MPS on page 2 3 2 Press S or T to select Quick Copy and press Enter 3 Press S or T to select the user name specified by the printer driver and press Enter 4 Press S or T to select the job name...

Page 33: ...ver options refer to the KX Printer Driver Operation Guide 1 Display the e MPS screen refer to Access e MPS on page 2 3 2 Press S or T to select Private Stored and press Enter 3 Press S or T to select...

Page 34: ...e the job to print When the job is printed the data is deleted from the mailbox NOTE For information about the printer driver options refer to the KX Printer Driver Operation Guide 1 Display the e MPS...

Page 35: ...ed in a mailbox the size of data stored and other information 1 Display the e MPS screen refer to Access e MPS on page 2 3 2 Press S or T to select List of VMB and press Enter 3 Press S or T to select...

Page 36: ...printed 1 Display the e MPS screen refer to Access e MPS on page 2 3 2 Press S or T to select List of code JOB and press Enter 3 Press S or T to select Print and press Enter The code job list is prin...

Page 37: ...ty Temporary Code Jobs Use to set the total capacity for storage of temporary code jobs on the hard disk 1 Display the e MPS screen refer to Access e MPS on page 2 3 2 Press S or T to select e MPS Con...

Page 38: ...tual Mailboxes Use to set the total capacity for storage of virtual mailboxes on the hard disk 1 Display the e MPS screen refer to Access e MPS on page 2 3 2 Press S or T to select e MPS Configuration...

Page 39: ...equired Parallel Interface The parallel interface supports bi directional high speed mode The transmission reception modes that can be set are shown below GO CANCEL Ready MENU Back Print Status Page M...

Page 40: ...This section describes the tasks required for using the network function NOTE Before setting the IP Address ask your Network Administrator to obtain the address and prepare it NetWare Set this option...

Page 41: ...s option to On if connecting to an Apple Macintosh computer 1 Display the Interface screen refer to Access the Interface Screen on page 2 11 2 Press S or T to select Network and press Enter 3 Press S...

Page 42: ...press Enter 4 Press S or T to select On and press Enter DHCP Set this option to On if using DHCP Dynamic Host Configuration Protocol 1 Display the TCP IP screen refer to TCP IP on page 2 14 2 Press S...

Page 43: ...n again 1 Display the TCP IP screen refer to TCP IP on page 2 14 2 Press S or T to select Change and press Enter 3 Press S or T to select IP Address and press Enter 4 Press S or T to select IP Address...

Page 44: ...ss has been entered Default Gateway Continue from the previous Step 3 to register the Default Gateway NOTE If you are not sure of the appropriate Default Gateway address contact your Network Administr...

Page 45: ...screen refer to Access the Interface Screen on page 2 11 2 Press S or T to select Network press Enter 3 Press S or T to select Network Status Page and press Enter 4 Press S or T to select On or Off an...

Page 46: ...set the thickness of the pen and page size If you set KPDL AUTO switching between KPDL and an alternative emulation mode will be automatically performed according to the print data If you set KPDL or...

Page 47: ...r T to select KC GL Pen Adjust and press Enter 2 Press S or T to select the pen required and press Enter 3 Press or to select the thickness number of dots and press Enter 4 Press S or T to select Back...

Page 48: ...PDL AUTO Alternative Emulation Selection If you set KPDL AUTO switching between KPDL and an alternative emulation mode will be automatically performed according to print data Continue the procedure fr...

Page 49: ...r Letter Gothic Font Character Pitch Courier Letter Gothic Thickness Code Set Printing a Font List NOTE You can set the font for each interface Access the Font Screen 1 Press Printer 2 Press S or T to...

Page 50: ...press Enter 3 Press S or T to select the Font ID and press Enter The font number displays Characters displayed before font numbers indicate the following items 4 Press or to select the font number an...

Page 51: ...an be selected Press Enter 5 Press Reset The Printer Basic screen displays Courier Letter Gothic Font Character Pitch You can set the character pitch for the Courier or Letter Gothic font 1 Display th...

Page 52: ...rier and press Enter 4 Press S or T to select Regular or Dark and press Enter 5 Press Reset The Printer Basic screen displays Code Set With the PCL6 emulation you can select a code set 1 Display the F...

Page 53: ...fonts are stored on the machine you can also select List of Option Fonts 3 Press S or T to select Print and press Enter The Font List is printed Select Font Font Code Set List of Inter Fonts No List o...

Page 54: ...n set the print configuration for each interface Access the Page Set Screen 1 Press Printer 2 Press S or T to select MENU and press Enter 3 Press S or T to select Page Set and press Enter 4 Press S or...

Page 55: ...e and the Output Size the machine reduces the image at a preset magnification ratio to print onto the specified Output Size paper 1 Display the Page Set screen refer to Access the Page Set Screen on p...

Page 56: ...iciently the default setting of this mode is Auto This menu is not usually displayed If a print overrun error occurs due to insufficient printer memory Page Protect is forcibly set to On After the pri...

Page 57: ...The Printer Basic screen displays Carriage Return CR Action Use to set the action taken by the machine when it receives a Carriage Return code 0DH 1 Display the Page Set screen refer to Access the Pa...

Page 58: ...larged 1 Display the Page Set screen refer to Access the Page Set Screen on page 2 26 2 Press S or T to select Wide A4 and press Enter 3 Press S or T to select On or Off and press Enter 4 Press Reset...

Page 59: ...e Print Quality screen displays Select the options required KIR Mode Smoothing changes the print quality to 2400 dpi equivalent 600 dpi 1 Display the Print Quality screen refer to Access the Print Qua...

Page 60: ...press Enter 4 Press Reset The Printer Basic screen displays Resolution With this machine three types of resolution are available 300 dpi 600 dpi and Fast 1200 Mode 1 Display the Print Quality screen r...

Page 61: ...dark 1 Display the Print Quality screen refer to Access the Print Quality Screen on page 2 31 2 Press S or T to select Print Density and press Enter 3 Press or to select the Print Density and press E...

Page 62: ...Data Reading Data Reading Program Writing Data Deleting Data Deleting Font Data Deleting Program Data Deleting Macro Data Deleting Language Data Formatting Memory Card Printing a Partition List Access...

Page 63: ...on page 2 34 2 Press S or T to select Read Macro and press Enter 3 Press S or T to select OK and press Enter Macros are read from the Memory Card 4 Press Reset The Printer Basic screen displays Readi...

Page 64: ...screen refer to Access the Memory Card Screen on page 2 34 2 Press S or T to select Write Data and press Enter 3 Press S or T to select OK and press Enter GO and CANCEL display NOTE If you select CAN...

Page 65: ...T to select Delete Font and press Enter 3 Press S or T to select the font to delete and press Enter The selected font is deleted from the Memory Card 4 Press Reset The Printer Basic screen displays D...

Page 66: ...ss S or T to select Delete the language and press Enter 3 Press S or T to select the language data to delete and press Enter The selected language data is deleted from the Memory Card 4 Press Reset Th...

Page 67: ...tion List 1 Display the Memory Card screen refer to Access the Memory Card Screen on page 2 34 2 Press S or T to select List of Partitions and press Enter 3 Press S or T to select Print and press Ente...

Page 68: ...data The Hard Disk can also be formatted and a Partition List printed Access Hard Disk 1 Press Printer 2 Press S or T to select MENU and press Enter 3 Press S or T to select HARD DISK and press Enter...

Page 69: ...et or the main power is switched off The RAM Disk area is assigned from the user available memory Consequently printing speed may be lower or insufficient memory occurs depending on the RAM Disk setti...

Page 70: ...to Memory Card Operation on page 2 34 RAM Disk Size 1 Press Printer 2 Press S or T to select MENU and press Enter 3 Press S or T to select RAM Disk Mode and press Enter 4 Press S or T to select Chang...

Page 71: ...ION GUIDE 2 43 6 Press or to select the RAM disk size 1 to 1024 Mbyte can be selected Press Enter 7 Press Reset 8 Press S or T to select Yes and press Enter The machine restarts RAM Disk size 28 Mbyte...

Page 72: ...er Handling screen displays Select the options required Multi Bypass Tray Mode If you select First any paper loaded in the Multi Bypass Tray will be fed 1 Display the Paper Handling screen refer to Ac...

Page 73: ...Press S or T to select the paper source and press Enter 4 Press Reset The Printer Basic screen displays Duplex Print Mode Use to set the binding position on finished prints for duplex printing NOTE T...

Page 74: ...ptional Finisher or Job Separator is installed 1 Display the Paper Handling screen refer to Access the Paper Handling Screen on page 2 44 2 Press S or T to select Stack Select and press Enter 3 Press...

Page 75: ...e 1 Display the Paper Handling screen refer to Access the Paper Handling Screen on page 2 44 2 Press S or T to select Override A4 LT and press Enter 3 Press S or T to select On or Off and press Enter...

Page 76: ...on Resetting Resource Protect Mode Auto Continue Duplex Error Detection Stapling Error Detection Printing a Service Status Page Access the Others Screen 1 Press Printer 2 Press S or T to select MENU a...

Page 77: ...or to set the time 0 to 495 seconds in 5 second increments can be selected Press Enter 4 Press Reset The Printer Basic screen displays Received Data Dump You can print data received as hexadecimal co...

Page 78: ...ts the resource data such as downloaded fonts and macros and memorizes the PCL resources even if the emulation mode is switched off If you select Permanent temporary resources are not protected If you...

Page 79: ...Continue is activated 1 Display the Others screen refer to Access the Others Screen on page 2 48 2 Press S or T to select Auto Continue and press Enter 3 Press S or T to select On or Off and press Ent...

Page 80: ...to Access the Others Screen on page 2 48 2 Press S or T to select Finishing Error and press Enter 3 Press S or T to select Proces Duplex print and press Enter 4 Press S or T to select On or Off and p...

Page 81: ...en on page 2 48 2 Press S or T to select Finishing Error and press Enter 3 Press S or T to select Staple Setting and press Enter 4 Press S or T to select On or Off and press Enter 5 Press Reset The Pr...

Page 82: ...re to print this page if required 1 Display the Others screen refer to Access the Others Screen on page 2 48 2 Press S or T to select Service and press Enter 3 Press S or T to select Print Status Page...

Page 83: ...Settings This chapter explains the system settings available on the machine Copy Default Settings 3 2 Machine Default Settings 3 14 Viewing and Printing the Total Counter 3 28 Report Output 3 30 Langu...

Page 84: ...ade is set to 1 and the Image Quality is set to Text Photo mode Use these instructions to customize the settings to meet your requirements The following settings are available Exposure Mode Original I...

Page 85: ...del 1600 20 ppm model 2000 and 25 ppm model 2500 The four digit management code can be changed For further information refer to Administrator Management Code Change on page 3 25 If the code is accepte...

Page 86: ...ss the Copy Default Screen on page 3 3 2 Press S or T to select Orig Quality and press Enter 3 Press S or T to select Text Photo Text or Photo as the default setting and press Enter 4 Press Reset The...

Page 87: ...right to darken the background color or left to lighten the background color Press Enter 4 Press Reset The Copier Basic screen returns Paper Selection Use to automatically select the cassette that co...

Page 88: ...type from the paper types that are currently set for the cassettes refer to Paper Type cassettes 1 to 4 on page 3 17 1 Display the Copy Default screen refer to Access the Copy Default Screen on page 3...

Page 89: ...or T to select Default Cassette and press Enter 3 Press S or T to select the priority cassette and press Enter 4 Press Reset The Copier Basic screen returns Default Magnification Select whether or no...

Page 90: ...returns Auto OCR Exposure Adjustment Adjusts the overall density of scanning for OCR when using the optional Scanner functions 1 Display the Copy Default screen refer to Access the Copy Default Screen...

Page 91: ...et The Copier Basic screen returns Exposure Adjustment for Text Originals Adjusts the density of the central value in Manual Exposure mode for Text originals 1 Display the Copy Default screen refer to...

Page 92: ...e Copier Basic screen returns Sort Copying If the optional Document Processor is installed select whether or not to set the Sort Copy mode as a default setting NOTE This item is displayed only if the...

Page 93: ...the Copy Default screen refer to Access the Copy Default Screen on page 3 3 2 Press S or T to select Auto Rotation and press Enter 3 Press S or T to select On or Off and press Enter 4 Press Reset The...

Page 94: ...ou can select from 1 8 to 3 4 in 1 8 increments 1 mm to 18 mm in 1 mm increments and press Enter 4 Press Reset The Copier Basic screen returns Number of Copies Limit Use to set the limit for the numbe...

Page 95: ...refore it is recommended to use the factory default setting To use the Black Streaking Reduction processing first select Weak If black streaking is not reduced select Strong 1 Display the Copy Default...

Page 96: ...quirements The following settings are available Auto Cassette Switching Paper Size cassettes 1 to 4 Paper Type cassettes 1 to 4 Multi Bypass Tray Confirmation Display Paper Weight for Paper Type Duple...

Page 97: ...model 1600 20 ppm model 2000 and 25 ppm model 2500 The four digit management code can be changed For further information refer to Administrator Management Code Change on page 3 25 If the code is accep...

Page 98: ...returns Paper Size cassettes 1 to 4 Use to set the paper sizes for cassettes 1 to 4 To detect the paper size automatically set to Auto Detection Metric or Auto Detection Inch NOTE For the 16 ppm model...

Page 99: ...option is available for each cassette Press S or T to select the Paper Type option required and press Enter 3 Press S or T to select the paper type and press Enter 4 Press Reset The Copier Basic scre...

Page 100: ...ve finished changing the settings press S or T to select End and press Enter 6 Press Reset The Copier Basic screen returns Duplex Print for Paper Type Use to set the use of custom paper 1 to 8 for dup...

Page 101: ...e sided printing and two sided printing Example Paper is set as shown in the illustration NOTE Setting of Match Print Direction will decrease the speed of one sided printing slightly When Match Print...

Page 102: ...elect Rear or Left top and press Enter 4 Press Reset The Copier Basic screen returns Auto Sleep Time Use to set the time that elapses before the Auto Sleep function is activated if the function has be...

Page 103: ...lt screen refer to Access the Machine Default Screen on page 3 15 2 Press S or T to select Low power time and press Enter 3 Press or to select the time required from 1 to 240 minutes or 1 to 120 minut...

Page 104: ...s displayed only if the optional Fax kit and Finisher or Job Separator are installed 1 Display the Machine default screen refer to Access the Machine Default Screen on page 3 15 2 Press S or T to sele...

Page 105: ...Fax mode and press Enter 4 Press Reset The Copier Basic screen returns Key Sound Use to enable a beep sound each time a key on the Operation Panel is pressed 1 Display the Machine default screen refer...

Page 106: ...ect DST Summer time Press or to set On or Off 6 Press S or T to select Year Press or to set the current year 7 Press S or T to select Month Press or to set the current month 8 Press S or T to select D...

Page 107: ...the machine administrator IMPORTANT If you change the Management Code ensure you note it down If you forget the code contact your Service Representative NOTE The factory default management code varie...

Page 108: ...press Enter 4 Press Reset The Copier Basic screen returns Auto Clear Using Auto Clear once a specified amount of time has passed after copying stops between 10 and 270 seconds the machine returns to t...

Page 109: ...ear Time and press Enter 3 Press or to select the time from 10 to 270 seconds and press Enter 4 Press Reset The Copier Basic screen returns Silent Mode This mode reduces the operating noise caused by...

Page 110: ...ng the counters press S or T to select End and press Enter 6 Press Reset The Copier Basic screen returns Printing the Counter Report NOTE Ensure that A4 11 8 1 2 paper is loaded in the cassette when p...

Page 111: ...SystemSettings ADVANCED OPERATION GUIDE 3 29 4 Press Reset The Copier Basic screen returns Example Counter report...

Page 112: ...System Settings 3 30 ADVANCED OPERATION GUIDE Report Output You can output the following reports from the Operation Panel Copy Status Report Machine Status Report...

Page 113: ...he following items are included Total Toner Coverage report Copy Toner Coverage report Printer Toner Coverage report Fax Toner Coverage report 1 Press System Menu Counter 2 Press S or T to select Prin...

Page 114: ...panish Espa ol and Japanese Metric Specification English German Deutsch French Fran ais Spanish Espa ol and Italian Italiano 1 Press System Menu Counter 2 Press S or T to select Language and press Ent...

Page 115: ...ypass Tray 1 Press System Menu Counter 2 Press S or T to select User Adjustment and press Enter 3 Press S or T to select Drum refresh and press Enter 4 Press S or T to select Yes and press Enter Drum...

Page 116: ...System Settings 3 34 ADVANCED OPERATION GUIDE...

Page 117: ...ANCED OPERATION GUIDE 4 1 4 Job Accounting This chapter explains the Job Accounting functions of the machine Job Accounting Mode 4 2 Managing Accounts 4 4 Default Settings 4 12 Using Job Accounting 4...

Page 118: ...Accounting concerning the printer functions refer to the KX Printer Driver Operation Guide NOTE In addition the Job Accounting mode that can be set from the computer is available For details refer to...

Page 119: ...agement code varies for each model 16 ppm model 1600 20 ppm model 2000 and 25 ppm model 2500 The four digit management code can be changed For further information refer to Administrator Management Cod...

Page 120: ...error occurs Enter another ID code and press Enter When the ID code is registered Please wait displays 4 Set the Limit in use for each function refer to Limit of Use on page 4 5 You can set the Limit...

Page 121: ...select Copy and press Enter 3 Press S or T to select Able to use or Unable to use and press the Enter key Able to use Permits copying Unable to use Prohibits copying The Limit in use screen displays...

Page 122: ...ering a New Account on page 4 4 2 Press S or T to select Output limit and press Enter 3 Press S or T to select No limit or Counter limit and press Enter No limit Does not set the limit of count Counte...

Page 123: ...ss Enter 3 Press S or T to select No limit Counter limit or Is not permitted and press Enter No limit Does not set the limit of count of scanner transmission Counter limit Set the limit of count of sc...

Page 124: ...nsmission 0 to 999 999 Is not permitted Prohibits use of fax transmission If Counter limit is selected the Counter limit Default Value screen displays Use the numeric keys to enter the counter limit u...

Page 125: ...Accounting to On refer to Default Settings on page 4 12 1 Display the Job Accounting screen refer to Access the Job Accounting Screen on page 4 3 2 Press S or T to select Edit Job Accounting and press...

Page 126: ...eport and press Enter Example Job Accounting report 4 To clear the counter press S or T to select Counter clear and press Enter A confirmation screen displays Press S or T to select Yes and press Ente...

Page 127: ...Job Accounting Use to switch the Job Accounting function On or Off 1 Display the Job Accounting screen refer to Access the Job Accounting Screen on page 4 3 2 Press S or T to select Job Accounting On...

Page 128: ...r Printer Job Accounting You can select whether or not to enable Job Accounting for the Printer functions 1 Display the Job Accounting screen refer to Access the Job Accounting Screen on page 4 3 2 Pr...

Page 129: ...4 Press S or T to select Off or On and press Enter 5 On completion press S or T to select End and press Enter Fax Job Accounting You can select whether or not to enable Job Accounting for the Fax fun...

Page 130: ...Def Set and press Enter 3 Press S or T to select Excess limit Set and press Enter 4 Press S or T to select Stop job immediately Stop after job done or Only warning and press Enter 5 On completion pres...

Page 131: ...NOTE If you enter an incorrect code press Stop Clear and enter the code again If the entered ID code does not match any registered ID code an error sound is emitted Enter the correct ID code and press...

Page 132: ...Job Accounting 4 16 ADVANCED OPERATION GUIDE...

Page 133: ...ADVANCED OPERATION GUIDE Appendix 1 Appendix The Appendix contains the following specifications Paper Appendix 2 Specifications Appendix 11 Glossary Appendix 17...

Page 134: ...hree general grades of paper economy standard and premium The most significant difference between grades is the ease with which they pass through the machine This is affected by the smoothness size an...

Page 135: ...ng can cause such paper to give off harmful fumes Bond paper should contain at least 80 pulp Not more than 20 of the total paper content should consist of cotton or other fibers Paper Sizes Cassettes...

Page 136: ...ti bypass tray Thickness The paper used with the machine should be neither extremely thick nor extremely thin If you are having problems with paper jams multiple feeds and faint printing the paper you...

Page 137: ...s cut into sheets with the grain running parallel to the length long grain or parallel to the width short grain Short grain paper can cause feeding problems in the machine All paper used in the machin...

Page 138: ...orm a test prior to purchasing large amounts Glazed paper Watermarked paper Paper with uneven surface Paper with perforations Special Paper The following types of special paper can be used Transparenc...

Page 139: ...from the Multi Bypass Tray The basic rule for printing on adhesive labels is that the adhesive must never come into contact with any part of the machine Adhesive paper sticking to the drum or rollers...

Page 140: ...postcards on a flat place and rub the edges with for example a ruler to smooth them Envelopes Feed envelopes from the Multi Bypass Tray Since the composition of an envelope is complex consistent print...

Page 141: ...s of paper have rough edges on the back those are created when the paper is cut In this case put the paper on a flat place and rub the edges once or twice with for example a ruler to smooth them Feedi...

Page 142: ...ct recycled paper that meets the same specifications as the white bond paper except for whiteness refer to Paper Specifications on page Appendix 2 NOTE Before purchasing recycled paper test a sample o...

Page 143: ...Paper on page Appendix 2 Paper Feed Source Capacity Cassette 300 sheets 80 g m 100 sheets 90 to 105 g m Multi Bypass Tray 50 sheets 80 g m 25 sheets for A3 B4 Folio 11 17 Ledger 8 1 2 14 Legal 8 1 2...

Page 144: ...ute A6R 10 sheets minute 20 ppm model A3 11 17 Ledger 10 sheets minute B4 8 1 2 14 Legal 11 sheets minute A4 11 8 1 2 20 sheets minute A4R 8 1 2 11 Letter 13 sheets minute B5 20 sheets minute B5R 13 s...

Page 145: ...ADVANCED OPERATION GUIDE Appendix 13 Resolution Scanning 600 600 dpi Printing 600 600 dpi Continuous Copying 1 to 999 sheets Copying Magnification Any ratio from 25 to 200 1 increments and fixed magni...

Page 146: ...nal Feed System Automatic Feeding Acceptable Originals Sheets of paper Original Sizes Max A3 11 17 Min A5R 5 1 2 8 1 2 Original Paper Weight One sided originals 45 g m to 160 g m Two sided originals 5...

Page 147: ...17 Ledger 8 1 2 14 Legal 11 8 1 2 8 1 2 11 Letter 8 1 2 13 Oficio II Acceptable Paper Weight 60 to 105 g m Types Standard Paper Recycled Paper Color Paper Thin Paper Thick Paper and Letterhead Dimens...

Page 148: ...fications are required Recovery time from Low Power mode 10 seconds Transition time to Low Power mode at time of purchase 15 minutes Transition time to Auto Sleep mode at time of purchase 30 minutes 1...

Page 149: ...ssign a separate IP address to each client including printers dpi dots per inch This indicates the number of dots printed per inch 25 4 mm as a unit for expressing resolution EcoPrint This is a printi...

Page 150: ...mode the machine consumes less power than in standby mode The default time period is 15 minutes The default setting can be changed Multi Bypass tray This tray is used instead of the cassette when prin...

Page 151: ...ol This is a protocol for the management of networks that use TCP IP Transmission Control Protocol Internet Protocol Status page This lists machine conditions such as the machine s memory the total nu...

Page 152: ...Appendix Appendix 20 ADVANCED OPERATION GUIDE...

Page 153: ...26 Auto sleep time 3 20 B Background color adjustment 3 5 Black streaking reduction processing 3 13 Book erase 1 13 Border erase mode 1 13 Book erase 1 13 Sheet erase 1 13 Border erase width default v...

Page 154: ...ion Duplex 2 52 Stapling 2 53 EtherTalk 2 13 Excess limit setting 4 14 Exposure adjustment for photo originals 3 10 Exposure adjustment for text photo originals 3 9 Exposure adjustment for text origin...

Page 155: ...lti bypass tray mode 2 44 N NetWare 2 12 Network setting 2 12 Default gateway 2 16 DHCP 2 14 EtherTalk 2 13 IP address 2 15 NetWare 2 12 Subnet mask 2 16 TCP IP 2 14 Network status page 2 17 Number of...

Page 156: ...te 3 7 Private print stored job 2 5 Delete 2 6 Program function 1 18 Registering a program 1 18 Using a program 1 18 Proof and hold 2 4 Proof and Hold 2 4 Q Quick copy 2 4 Quick copy jobs 2 9 R RAM di...

Page 157: ...time 3 24 T TCP IP 2 14 Temporary code jobs 2 9 Thick paper Appendix 9 Time Zone 3 24 Total capacity Permanent code jobs 2 10 Quick copy jobs 2 9 Temporary code jobs 2 9 Virtual mailboxes 2 10 Total...

Page 158: ...6 ADVANCED OPERATION GUIDE...

Page 159: ...MEMO...

Page 160: ...507150T ENG...

Reviews: