English
Troubleshooting
8-9
6
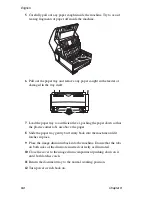
Carefully peel off the white plastic tape from the bottom of the
cartridge. With the ridged side facing up and the grey lever to the right,
insert the new cartridge into the image drum unit left side first.
7
Once the cartridge is in place, push the grey lever forward and down,
securing the cartridge and releasing the toner.
8
Using the cleaning wipe provided in the package with the new toner
cartridge, gently wipe the full length of the machine’s LED array.
9
Close the cover to the image drum compartment pushing down on it
until both latches catch.
10
Return the document tray to its working position.
11
Turn power switch back on.
Summary of Contents for OKIFAX 5700
Page 1: ...User s Guide OKIFAX 5700 5900 PLAIN PAPER FAX...
Page 10: ...English 1 2 Chapter 1...
Page 24: ...English 2 2 Chapter 2...
Page 28: ...English 2 6 Chapter 2...
Page 90: ...English 6 10 Chapter 6...
Page 92: ...English 7 2 Chapter 7...
Page 98: ...English 7 8 Chapter 7...
Page 100: ...English 8 2 Chapter 8...
Page 114: ...English 8 16 Chapter 8...
Page 132: ...English E 4 Appendix E...

