background image

51

3)

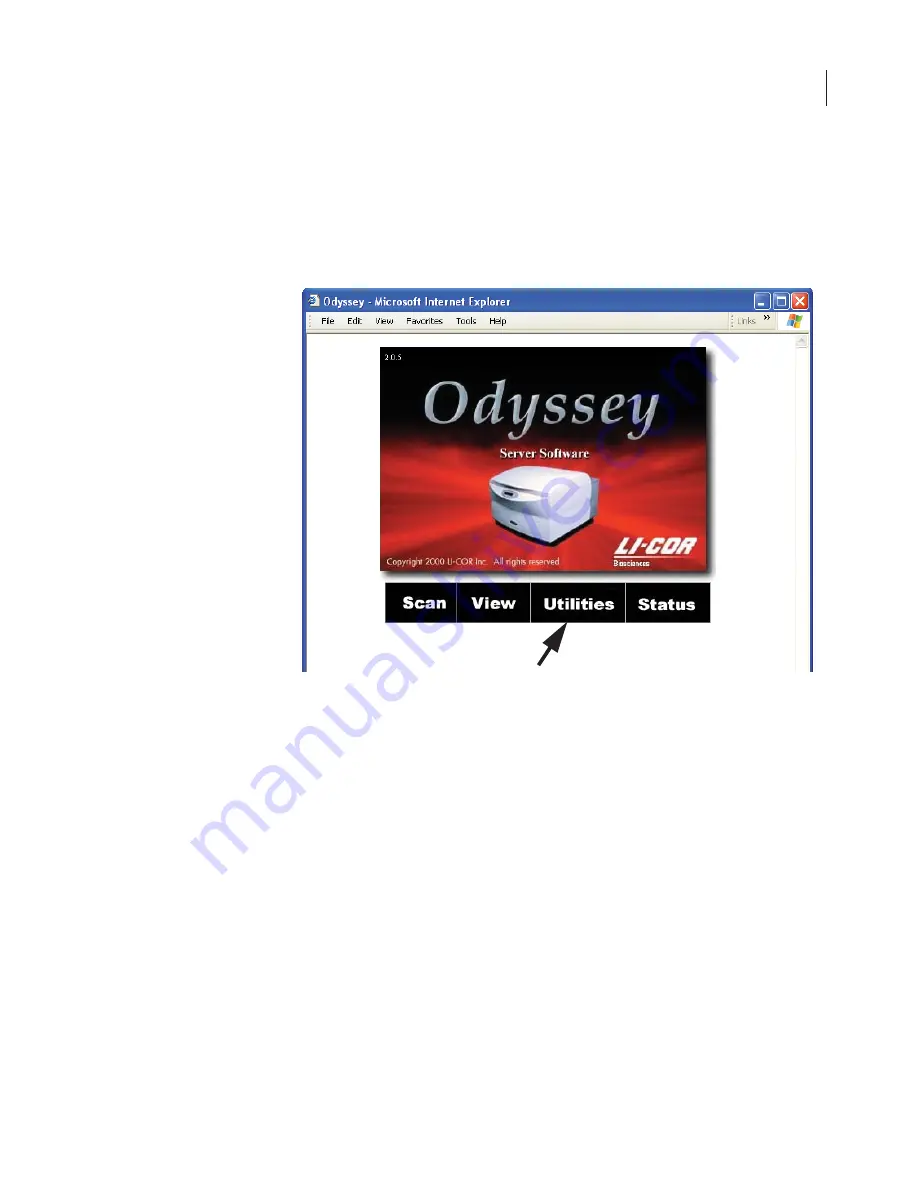
Start your Internet browser. In the URL field enter 

http://

 plus the 

IP address for the Odyssey

®

 instrument that you copied down in 

step 2.

4)

On the Odyssey “home” page, click 

Utilities

5)

When prompted for a user name and password, enter 

admin

 in 

both fields (or use some other administrator account, if you have 
already created one).

Summary of Contents for LI-COR

Page 1: ......

Page 2: ...E Marking This product model number 9120 is a CE marked product For conformity information contact LI COR Support at biosupport licor com Outside of the U S contact your local sales office or distribu...

Page 3: ...present The product is marked with this symbol for a Chassis Ground connection Equipment markings Manual markings Warnings must be followed carefully to avoid bodily injury WARNING CAUTION Cautions mu...

Page 4: ...photocopied reproduced or translated to another language without prior written consent of LI COR Inc Printing History Publication Number 984 11712 Printed March 2011 Revised April 2014 The Odyssey Sy...

Page 5: ...operated in a commercial environment Operation of this equipment in a residential area is likely to cause interference in which case the user at his own expense will be required to take whatever measu...

Page 6: ......

Page 7: ...nt 16 Chapter 3 Operation Before You Begin 17 Cleaning the Scanning Surface 17 Using Membranes 18 Using Gels 19 Using Microplates 20 Using the MousePOD Accessory 21 Positioning Membranes and Gels 22 P...

Page 8: ...an Group 75 Deleting Scan Groups 77 Viewing and Deleting Scans Within a Scan Group 78 Chapter 7 Starting Scans Using an Internet Browser Using the Scan Setup Window 81 Naming the Scan 82 Entering Scan...

Page 9: ...112 Browser Test 113 Technician Diagnostics 115 Chapter 10 Appendices Specifications 117 Error Messages 118 Scan Setup 118 Scan Console 119 Imaging 119 Software Upgrade Errors 119 Time Setup 120 Utili...

Page 10: ......

Page 11: ...red Imaging System Laser Safety The Center for Devices and Radiological Health CDRH was estab lished in October 1982 by the U S Food and Drug Administration FDA to protect the public health in the fie...

Page 12: ...st be attached to laser products marketed in the United States is Figure 1 1 and is located on the rear panel of the Odyssey System indicating compliance with CDRH regulations CAUTION Use of controls...

Page 13: ...ve to the glass scanning surface laser radiation could be focused at any position on this surface Safety interlocks below automatically turn the lasers off when the Odyssey lid is opened The label sho...

Page 14: ...the lid is opened and closed Chemical Safety LI COR Biosciences recommends that all biochemicals be handled carefully and that safe laboratory procedures be followed at all times Be aware of the hazar...

Page 15: ...osure and circuit boards are cooled with two internal fans There are no restrictions regarding placement of the instrument with respect to the fan cover the fan shrouds are not filtered and the cover...

Page 16: ...strument can be leveled after it is moved if necessary The instrument does not need to be level for proper operation it may be helpful however if the laboratory bench is not level to prevent moistened...

Page 17: ...water or chemical spills The Odyssey Imager draws approximately 3 amperes at 120V If an extension cord is used make sure the total of the ampere ratings on the instruments plugged into the extension...

Page 18: ...oltages there is a danger of fire or electrical shock if the equipment is not properly maintained LI COR Biosciences recommends that you routinely inspect the system and the scanning surface The follo...

Page 19: ...5 networking cabes are provided with the Odyssey Imager Do not use networking cables other than the ones provided The use of other networking cables may result in improper electrical performance Netw...

Page 20: ......

Page 21: ...nd or changed over the network finished scans are then downloaded from the Odyssey hard disk to local drives for storage and analysis Note Although the Odyssey Imager has an internal hard disk it shou...

Page 22: ...ntially sorts the fluorescent signals by transmitting the light above 810 nm and reflecting light below 750 nm Transmitted and reflected light travels two independent paths through optics designed to...

Page 23: ...aled from the instrument interior so no moisture can penetrate to the detection optics and electronics below Scans can be initiated in any of three ways 1 using the Odyssey Application Software 2 usin...

Page 24: ...the size of the area to be scanned are chosen Scanning starts at the lower left hand corner of the scanning surface when facing the front of the instrument and progresses first across the X axis and t...

Page 25: ...Imager uses approximately 0 5 amp of power about the same as a light bulb If the Odyssey Imager needs to be powered off when moving it for example see Powering Off The System below Width 25 Height Or...

Page 26: ...n function Note Do not attempt to turn off the instrument by unplugging the power cable or by pushing O on the rear power switch if applicable In the event that the front panel keypad is unresponsive...

Page 27: ...e glass The paint can be damaged by acetone 3 If the silicone mat is being used rinse it under warm water Gentle lab soap may be used but the soap must be completely rinsed away before use The silicon...

Page 28: ...h edged forceps Lift the membrane only by the corners Fingerprints even from a glove will show clearly when imaged Use the silicone mat included to cover the membrane s before scanning Use the 4 soft...

Page 29: ...When placing the gel on the scanning surface take care not to trap air bubbles underneath Cover the gel with plastic wrap to prevent drying if desired 3 Scan the gel in the 700 nm channel 4 Adjust th...

Page 30: ...and black walled plates can be used Consult protocols in the Application Protocols manual or on the LI COR website http biosupport licor com for specific recommendations Do not use plates with white...

Page 31: ...t signal to noise as the focus offset for experiments with the alternate plates The Intensity scan parameter for both 700 and 800 nm channels should be set to 5 for initial scanning If the image signa...

Page 32: ...ls are placed in a similar orientation Figure 3 2 Membranes and gels are placed with sample surface down with top of the membrane facing the front of the instrument Important Handle membranes only wit...

Page 33: ...oftware If the sample is placed too near either axis or if the scan boundary is too close to the membrane annotations in the Odyssey Application Software may be truncated in some views Figure 3 3 Leav...

Page 34: ...d slide it into place until it contacts both the front and left side of the alignment guide The first well in the first row A1 should be toward the back and left side of the alignment guide as shown b...

Page 35: ...roplates The first well in the first row A1 for each microplate should be in the upper left corner as you face the Odyssey instrument Consult the Odyssey User Guide for details on the Scan Multiple Pl...

Page 36: ...Keypad and display The front panel controls are as follows Power Powers the instrument On Off Also performs instrument reset if held down for 4 seconds Stop N Stops or pauses scanning or cancels opti...

Page 37: ...in the static IP address press Start Y to scroll through numbers 0 through 9 When the correct number is displayed press Next to move the cursor to the next number Continue to enter each of the number...

Page 38: ...the keypad using the first 7 characters of the chosen Preset file followed by the date and a sequential index number An example would be Membran 12 10_5 in which Membrane was the Preset name December...

Page 39: ...Available Scans list 5 Click OK to download the selected scan into the current project The file size for scans from the Odyssey Imager is dependent upon the resolution of the scan and the area of the...

Page 40: ...k 350k 1 4M 5 7M 22 6M 5 x 15 cm 132k 525k 2 1M 8 5M 34 0M 5 x 20 cm 176k 700k 2 8M 11 3M 45 3M 5 x 25 cm 220k 875k 3 5M 14 2M 56 7M 10 x 10 cm 176k 700k 2 8M 11 3M 45 3M 10 x 15 cm 264k 1 0M 4 1M 17...

Page 41: ...e those combinations that cannot be scanned with the Odyssey Application Software Anything that affects the computer s system resources may also influence the ability to start scans with the Applicati...

Page 42: ...Western Assays The In vivo Imaging Module has software to facilitate scanning mice using the Odyssey MousePOD accessory Browser Interface The Odyssey Imager has a built in internal server that provide...

Page 43: ...open standards based networking technology that automatically connects electronic devices on the same network Rendezvous technology allows Odyssey Application Software running on a computer to commun...

Page 44: ...IT department for help in selection and configuration if your organization does not already provide you with firewall protection Legitimate safe remote access can still be achieved when the Odyssey s...

Page 45: ...nstallation if you accept the terms of the license 8 Choose whether to make the Odyssey application available to all users of the computer or just the current user and click Next this refers to user a...

Page 46: ...sly had a user account and password on the Odyssey Imager it will still be there If you do not have a user account you will need to create one before you can use the Odyssey Imager Chapter 12 in the O...

Page 47: ...g scans The Odyssey software uses settings files to record user preferences and to set the default behavior of certain aspects of the Odyssey software When settings are saved they are written to a spe...

Page 48: ...tion The instructions are written for the Windows XP operating system and the Windows Vista or Windows 7 operating systems Windows XP Instructions Follow the instructions below to configure the Window...

Page 49: ...w 7 Use Windows Explorer to find the Licor folder at the following path C Documents and Settings All Users Application Data 8 Right click the Licor folder and select Properties from the menu 9 Select...

Page 50: ...r Users list 11 If there are any account names or groups not shown in the list that need to use the Odyssey software click Add 12 Enter the names of user accounts or groups and click Check Names The u...

Page 51: ...s 7 operating system to allow access to the Odyssey settings folder to all users 1 Open the system Control Panel 2 Select Appearance and Personalization Folder Options 3 Select the View tab in the Fol...

Page 52: ...r to find the Licor folder at the following path C ProgramData 8 Right click the Licor folder and select Properties from the menu 9 Select the Security tab in the Licor Properties window 10 Select any...

Page 53: ...hown in the list that need to use the Odyssey software click Add 13 Enter the names of user accounts or groups and click Check Names After the user names are verified click OK to close the window 14 I...

Page 54: ...5 RJ 45 cables included to connect the Odyssey network port and the NIC 2 on the computer 3 Turn on the computer and the Odyssey Imager and wait for their start up procedures to complete 4 Set up the...

Page 55: ...og in using the default admin admin account you are successfully connected and will be able to create new user control accounts For best security change the password for the admin account and keep a r...

Page 56: ...ly from any computer on the same network The default configurations of the computer and the Odyssey Imager are for automatic addressing making it easy to connect to a network with a DHCP server 1 Star...

Page 57: ...it for addresses to be assigned before starting the Odyssey software 5 The computer and or the Odysssey Imager can also be set up with a static IP address see Setting a Static or Automatic DHCP IP Add...

Page 58: ...ection between the two networks in which case you will not be able to connect with the Odyssey Imager At some interval the addresses assigned by a DHCP server expire and new addresses are assigned If...

Page 59: ...r in this chapter 1 Start by turning off both the Odyssey Imager and the computer 2 Make sure none of the Cat 5 RJ 45 network cables are plugged into port 5 on the network switch Move them to ports 1...

Page 60: ...c address changes can cause occasional loss of communication with the Odyssey Imager One way to avoid this problem is to enter a static IP address in the Odyssey Imager Some networks also do not use D...

Page 61: ...us the IP address for the Odyssey instrument that you copied down in step 2 4 On the Odyssey home page click Utilities 5 When prompted for a user name and password enter admin in both fields or use so...

Page 62: ...ck the Networking Setup link on the Utilities Page 7 For automatic addressing select Use DHCP For static addressing select Static IP for the type of IP address 8 If using static addressing enter the I...

Page 63: ...the changes to the Odyssey Imager and then close your Internet browser software 13 Close the internet browser Updating the Scanner Settings 14 Start the Odyssey Application software and click OK to u...

Page 64: ...or automatic DHCP IP address Consult with your network administrator for specifics on configuring a computer for your network 1 On the Windows Start menu select Control Panel 2 Double click on View ne...

Page 65: ...the Local Area Connection Status window click Properties on the General tab 6 Scroll through the list of connection items on the Networking tab select Internet Protocol Version 4 TCP IPv4 and click Pr...

Page 66: ...ork offices etc can be used to download and analyze scans start scans create templates etc If you have the Odyssey Imager set for static IP configuration all you need to do is install the Odyssey soft...

Page 67: ...is somewhat different than if you are using a static IP address It is possible that you may not have to do anything but install the Odyssey software If you are on the same network as the Odyssey Image...

Page 68: ......

Page 69: ...rform functions that require Administrator access rights Functions that have restricted access are noted where appro priate throughout the remainder of this manual Note Browser based access to images...

Page 70: ...s supplied by your System Administrator not the one shown in the graphic Note The current IP address of the Odyssey Imager can also be displayed on the Odyssey front panel as described in Chapter 3 Th...

Page 71: ...he scanner while others are retrieving and analyzing scans stored on the Odyssey Imager s internal hard disk Using the Status link on the Odyssey Imager s home page a browser on an office computer can...

Page 72: ...ey User Name and Password assigned to you The Status page is a typical Odyssey page The navigation bar at the top of the page indicates that the Status page is in the Utilities section The left side p...

Page 73: ...atus is typically Idle Paused or Scanning The status could also be some error state When the Odyssey Imager is in operation as shown above the user is listed as well as the remaining scan time Because...

Page 74: ......

Page 75: ...h the browser interface as described in this chapter Adding user accounts requires Administrator access rights 1 Log in to the Odyssey server by entering http plus the IP address of the Odyssey Imager...

Page 76: ...Name and Password of a current account with Administrator rights User Name and Password are case sensitive 4 Click the Manage User Accounts link on the Utilities page The left side of the Utilities pa...

Page 77: ...ng to the following definitions None When account rights are set to None the user account becomes inactive and the user cannot access data or start scans The Manage User Accounts page displays a list...

Page 78: ...ic functions Technician rights are not needed for any user operation or maintenance functions Improper use of technician functions can render the Odyssey Imager inoperable 7 Enter the new user name ca...

Page 79: ...ccount rights can be upgraded or downgraded by clicking the Change Account Rights link on the Manage User Accounts page 2 Use the Account Rights drop down list next to the User Name to select new acco...

Page 80: ...ion in Chapter 4 for logging in to the Odyssey Imager using an Internet browser 2 Click Utilities on the home page to open the Utilities page 3 In the password window enter your User Name and Password...

Page 81: ...ount and Group Utilities section 5 Enter your current password in the Old Password field 6 Enter the new password in the New Password field and confirm it by typing it again in the New Password Confir...

Page 82: ...e User Name to change that user s password 2 Enter the new password in the New Password field and confirm that it is correct by typing it again in the New Password Confirm field 3 Click Change Passwor...

Page 83: ...link next to the user name to be remove 2 Click Remove User Account to confirm removal of the user account or Cancel to leave the account unchanged Note The last Administrator account cannot be delet...

Page 84: ...an be created for special purposes For example if several people are all doing scans for a particular research project it might be useful to keep all of the scans for a project in one scan group Impor...

Page 85: ...her groups The user who created the group is automatically given permission to access the new group The next section shows how to give others access to the group Changing Access Permission of a Scan G...

Page 86: ...es no access Users with permission level of None will not see the indicated group when selecting a group for new scans or while opening scans Access permission level allows users to open completed sca...

Page 87: ...on the Utilities page Users with Administrator rights can delete any scan group Important Deleting a scan group deletes all scans within the group Once a group is deleted it is not possible to retrie...

Page 88: ...e Utilities page to display a list of scans in a group and delete any of the listed scans Users with Administrator rights can delete scans in any scan group Important Deleted scans cannot be restored...

Page 89: ...next to the scan group containing the scans you want to view or delete 3 All scans in the selected group are listed To delete a scan click the Remove Scan link next to the scan name and confirm that t...

Page 90: ......

Page 91: ...Internet browser method of starting scans is discussed in this chapter 1 Open the Odyssey home page by entering the IP address or host name of the Odyssey Imager as described in Chapter 4 2 On the hom...

Page 92: ...for the scan in the Name field 2 Select a scan group from the Available Groups drop down list Initially the scan groups listed may include only your own group and the public scan group Chapter 5 desc...

Page 93: ...g Preset parameters skip to Step 4 The Odyssey software initially has three sets of Preset parameters one for membranes and two for gels The default Presets generally produce good results but you will...

Page 94: ...e are five settings Choosing Highest quality will reduce noise in the image data but significantly increase scanning time due to the slower scanning speed Similarly choosing Lowest will decrease scann...

Page 95: ...age file Scan Area is used to specify the portion of the 25 x 25 cm scan surface that will be scanned For the Origin enter the X and Y offset of the left front corner of the area to be scanned Only in...

Page 96: ...andard microplates The maximum allowable focus offset is 4 mm i e 8 mm gels Comments Comments can be used to identify the scan In the Odyssey software comments can be included in reports Starting a Sc...

Page 97: ...oplate on the scan surface as described in Chapter 3 and click Start in the Scan Console to begin the scan When the scan is started the scan information page in the View section is displayed To see th...

Page 98: ...matic completion click Pause in the Scan Console To complete a scan before the entire area has been scanned click Stop To abandon a scan completely click Cancel The difference between Stop and Cancel...

Page 99: ...lick the maximize button on the browser window Images are often large and it is best not to resize the browser window while viewing an image 3 On the home page click the View link to open the Image Vi...

Page 100: ...les stored on the Odyssey Imager The image files can then be saved to a local storage drive using the Save button Other functions on the View page are used to edit the image while it is open Follow th...

Page 101: ...p drop down list shows all scan groups that are available to the user who is logged in 2 Use the Scan drop down list to select one of the scans in the designated scan group 3 Click Open to open the im...

Page 102: ...window Images may be displayed at 1 2 1 4 or even smaller To enlarge an image click the Zoom button and then click the image When the Zoom Factor reaches 1 1 actual size clicking the image will no lo...

Page 103: ...the toolbar Next define a rectangular crop area by clicking the mouse at the upper left and lower right corners of the area to be cropped as shown below cross hair marks are show for illustration only...

Page 104: ...how the wide range of data values in the image are mapped to the comparatively small number of color or grayscale values on the display The sensitivity on each channel can be adjusted independently b...

Page 105: ...see Showing and Hiding Image Channels below the grayscale image map can be inverted by clicking Invert in the toolbar and then clicking the Black White button Clicking Black White toggles between a wh...

Page 106: ...down or in some other orientation the image can be rotated in 90 degree increments by clicking Rotate in the toolbar and then clicking 90 CW or 90 CCW The 90 CW and 90 CCW buttons rotate the image 90...

Page 107: ...y When a scan is opened the images are initially displayed in color with both image channels overlaid The 700 channel image is red and the 800 channel image is green At pixel locations where fluores c...

Page 108: ...ed Images To view only one of the two images click Layer in the toolbar Next uncheck the image 700 channel or 800 channel that you don t want to see and click the View button The image that remained c...

Page 109: ...nsole button and Progress bar are used during scans The More Information button shows complete information about a completed scan or a scan still in progress All scan parameters are displayed includin...

Page 110: ...anned Images After images are open they can be saved to a local storage drive by clicking Save in theView toolbar and clicking the save buttons for the images To save the log file for the scan click S...

Page 111: ...splayed in a new window that does not contain the buttons related to the Odyssey Imager operation The image can then be printed by choosing File Print The image s are printed exactly as shown If image...

Page 112: ......

Page 113: ...t discussion describes how to use the Status page to determine whether the instrument is in operation who the user is and how much time remains in the current scan The Status page can also be accessed...

Page 114: ...Power key on the keypad but the Odyssey Imager can also be shut down using the ShutdownThe Instrument link on the Utilities page Check the instrument status to make sure it is idle before shutting dow...

Page 115: ...h your network administrator on how to fill out the Network Setup page A brief description of how the Odyssey Imager uses each field is given below Note For stand alone non network configurations the...

Page 116: ...o it If your network has a domain name server a host name may be a convenient alternative to using an IP address to log onto the Odyssey Imager A host name is generally a common name that is easy to r...

Page 117: ...to set the clock in the Odyssey Imager A backup battery maintains the clock when power is discon nected so it is generally only necessary to set the clock when the Odyssey Imager is first installed Im...

Page 118: ...al hard disk If the hard disk is full the oldest scans will be deleted to make room for the update so make sure all scans are downloaded before proceeding In many cases the OdysseyApplication Software...

Page 119: ...is not in operation 3 Return to the home page and click Utilities to open the Utilities page 4 If necessary enter the User Name and Password of a current account with Administrator rights in the passw...

Page 120: ...stics 5 Click the Update Scanner Software link on the Utilities page Starting the Update 6 If you have an update CD insert the CD into the drive If you downloaded the update file make sure the file is...

Page 121: ...reen check mark next to it If there was a problem during the update a red X will be placed next to the update component that failed and a failure message will be displayed Contact LI COR Technical Sup...

Page 122: ...al Support staff may ask you to perform the User Diagnostic function If you suspect a problem with the instrument the User Diagnostic can also be used to verify a problem before contacting technical s...

Page 123: ...iences via mail or as an e mail attachment If you have a gateway address and DNS server address specified on the Network Setup page you can also e mail the file directly using the Transfer Options are...

Page 124: ...Utilities and Diagnostics To run the browser diagnostic open the Utilities page and click the Browser Test link If the test fails download a current copy of the Internet Explorer browser www microsof...

Page 125: ...uble shooting and factory calibration Do not use these functions unless directed to do so by LI COR or LI COR authorized Distributors Similarly you should not need to use the ScanTest Pattern link unl...

Page 126: ......

Page 127: ...ting temperature 15 35 C and dew point not greater than 19 C non condensing altitude not to exceed 2000m Environmental Conditions Pollution Degree 1 Fuse Ratings Fuses are non user replaceable A 5A fa...

Page 128: ...he group the scan belongs to Description The group field is blank Error Message The focus values must be between 0 0 and 4 0 Description The user entered a number out of the valid range or a number th...

Page 129: ...pen page you must select a scan name Software Upgrade Errors Error Message Signatures on files do not match Description The file transferred is not a LI COR update Error Message Could not find install...

Page 130: ...utes must be between 0 and 59 No fractions accepted Error Message All entries must be numerical values Description Illegal non numeric characters were entered Utilities Change Password Error Message T...

Page 131: ...way Description The instrument has not been configured to allow e mail of log or diagnostic information directly from the instrument Error Message The Domain Name Server is not defined Please proceed...

Page 132: ......

Reviews: