background image

North&Wing&S,LSA&Maintenance&Manual&

Model:&Sport&X2&582&


Issue 3.2 

Printed: July 16 2017 

Page 65 


4.3.8

&

Repair/Replace Front Fork Assembly 


Skill Level:

  LSR-M,  A&P 


Tools:


Hex wrenches 


Materials:


Replacement parts 


Task Description: 

 
If the fork assembly is bent or twisted as may occur on a very hard landing, the fork arms or 
top or bottom plates will have to be replaced as described below.  Other parts connected to the 
fork assembly can be replaced directly without having to remove the entire fork assembly. 
 

1.

!

Remove front wheel as described in Section 4.3.7 above. 

2.

!

Disconnect throttle cable and pull free of throttle pedal. 

3.

!

Unbolt brake master cylinder at both ends and tie back from fork assembly.  You will 
have to route the brake line away from the fork assembly.  DO NOT disconnect brake 
hydraulic line. 

4.

!

Remove nut from fork pivot bolt. 

5.

!

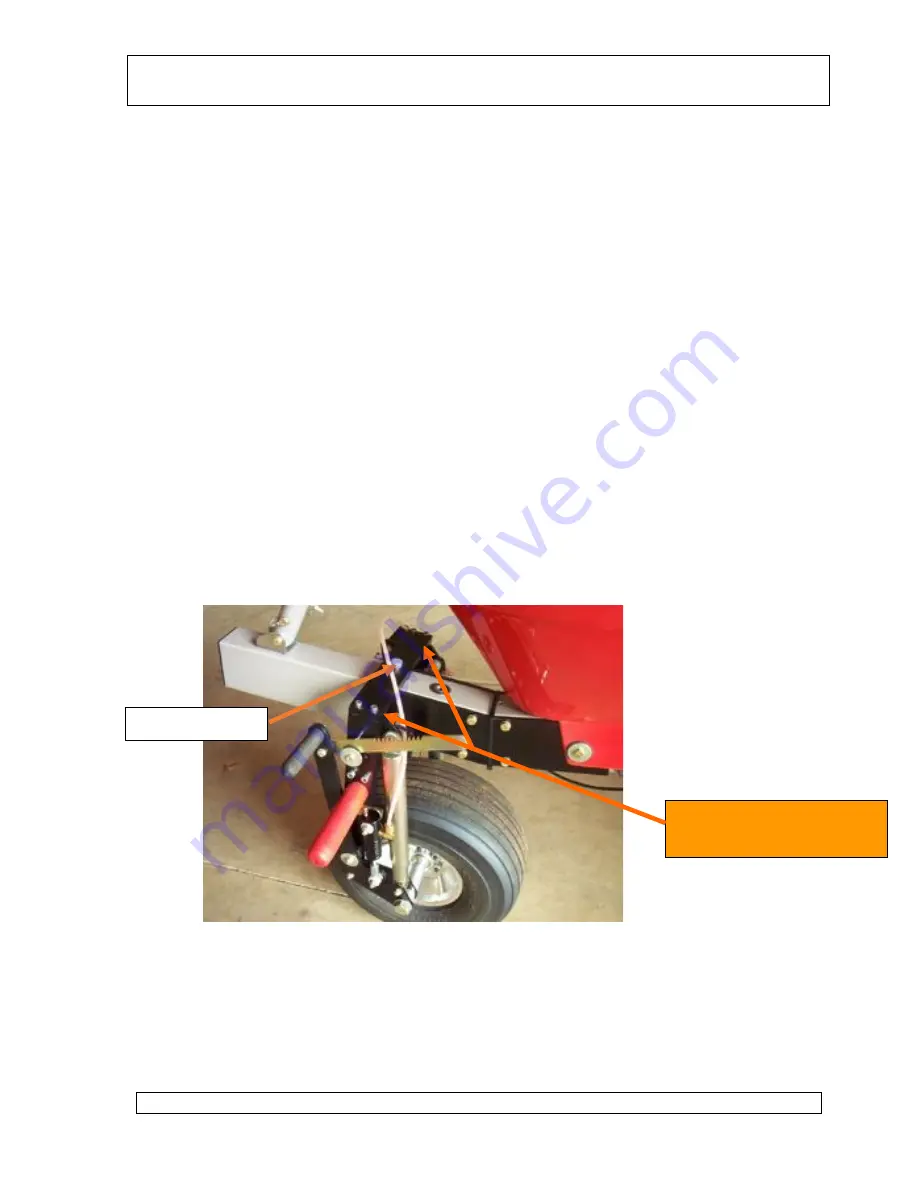
Using 5/32” hex wrench, remove four hex head machine screws from top plate of fork 
assembly.  Support the fork assembly before removing the last screw as it will fall out 
when all 4 screws are removed. 


6.

!

Remove the pivot bolt from the root tube along with the top plate. 

7.

!

Inspect all pieces to assure all damaged parts will be replaced.   

8.

!

Re-assemble with new parts. 


Hex bolts on top plate (4) 

(5/32” Hex wrench) 

Pivot Bolt 

Summary of Contents for Sport X2 582

Page 1: ...LSA Maintenance Manual Model Sport X2 582 Issue 3 2 Printed July 16 2017 Page 1 Manufacturer North Wing UUM Inc 103 Gala Ave Chelan Wa 98816 USA Phone 509 682 4359 Fax 509 682 0758 Website www ultrikes northwing com ...

Page 2: ...ache 582 S LSA This document is the North Wing S LSA Sport X2 582 Maintenance Manual for Types Navajo and Apache It describes the maintenance requirements and procedures for the wing carriage engine and propeller Pilot s Operating Handbook Rotax Owners Manual Rotax Maintenance Compact Disk Radio Manual If Installed BRS Parachute Manual If Installed Manuals for all installed instrumentation ...

Page 3: ...ed Section 4 4 6 Fuel gage calibration Feb 2 2009 Kamron Blevins July 10 2009 Corrected Torque values for Warp propeller Page 17 July 13 2009 Kamron Blevins June 2015 Maintenance task added all June 2015 Kamron Blevins Table 1 Amendment Record Sheet NOTE North Wing s manuals will be revised as necessary Registered North Wing S LSA owners will be notified of any changes and directed to the North Wi...

Page 4: ...2 Printed July 16 2017 Page 4 http www northwing com for the applicable pages The amended pages should be printed and the prior page replaced in the folder as soon as possible The amendment table should at that time be updated with the appropriate details and date ...

Page 5: ...ns and Securing 15 2 2 Weight and Loading 18 2 3 Ground Handling 19 2 3 1 Moving 19 2 3 2 Parking and Tie Down 20 2 3 3 Lifting 20 2 4 Lubrication 20 2 5 Replacement Parts 20 3 0 Inspections 22 3 1 Inspection Procedure 22 3 2 Inspection Checklists 24 4 0 Maintenance and Repairs 30 4 1 Maintenance Tasks 30 4 2 Wing Maintenance M Pulse 15 Meter Wing 33 4 2 1 Wing Cleaning 33 4 2 2 Wing Tuning 33 4 2...

Page 6: ... defined 4 4 2 Replace Fuel Filter Error Bookmark not defined 4 4 3 Replace Fuel Pump Error Bookmark not defined 4 4 4 Replace Fuel Tank Error Bookmark not defined 4 4 5 Replace Fuel Tank Drain Valve Error Bookmark not defined 4 4 6 Calibrate Fuel Gage Error Bookmark not defined 4 5 Electrical System Error Bookmark not defined 4 5 1 Replacing Battery Error Bookmark not defined 4 5 2 Checking and R...

Page 7: ... with an inspection rating or equivalent Abbreviation LR I LSA Repairman Maintenance Items that can be expected to be completed on a S LSA by a responsible individual who holds a FAA repairman certificate light sport aircraft with a maintenance rating or equivalent from an FAA approved 104 hour course on Weight Shift Control Abbreviation LR M A P Items that can be expected to be completed by a res...

Page 8: ...manual addresses only Line maintenance functions and tasks that can reasonably be performed by a responsible and skilled as described above It does not address any Heavy maintenance tasks such as the removal of the engine cylinder heads gear box or electrical end of the engine block For all required maintenance on the Rotax 582 refer to the Rotax engine manual provided with your North Wing S LSA t...

Page 9: ...However since the Rotax engine is built in Austria a set of metric open end box sockets and hex wrenches may be needed The only tools that might be considered somewhat special or unusual needed for the maintenance described in this manual are the following Low range torque wrench capable of up to 230 inch pounds of torque with both metric and English size sockets High range torque wrench capable o...

Page 10: ...al is based on the data that was available at the time of its publication The latest amendments to this manual will be issued on the North Wing website in PDF format This should be printed out and added to the manual Therefore it is important that operators keep a regular check on the website for any amendments that have been made If any errors or omissions are found in this manual please advise t...

Page 11: ...6 Aluminum o Nose 2 1 8 o Apex 2 Distance from leading edge bolts to 1 Crosstube hinge pin plates 44 500 2 must be resting on keel 2 Trike Hang Point 54 to 56 5 Ribs 7075 T6 Aluminum 14 Nose Plates 1 8 Stainless steel Struts Extruded 6061 T6 Aluminum Strut attachment brackets Machined 6061 T6 Aluminum Down tubes 6061 T6 Aluminum Base tube 11 8 x 0 058 4130 steel tubing Sail chord length 1 3 from r...

Page 12: ...Length from fairing nose to propeller 112 inches Length from carriage root tube to propeller 108 inches Width side to side outside of tires 73 inches Width side to side outside of wheel pants 75 inches Total height with wing level 108 inches Wheel base rear axle to front axle o in short setting 66 5 inches o in long setting 69 0 inches Optional Equipment Body fairing Apache Fiberglass resin gel co...

Page 13: ...ith associated carburetor jetting Ceramic powder coated exhaust system RK400 drive clutch and C box instead of E box must use ignition end starter for electric start Clutch not available for E box configuration GPL ignition end starter for use with clutch 2 1 4 Fuel System Standard Configuration 16 gallon translucent polymer fuel tank Electric fuel gauge with panel display Engine driven pneumatic ...

Page 14: ...ary lighting terminals 170Watts AC 6000rpm Voltage regulator Key West on 582 Ducati on 912 12 volt 18 amp hour battery Fusing integral to Hot Box Strobe light mounted at rear below BRS mount Electronic Instrument System Optional Equipment Navigation position lights red green for after sunset flight mounted on wing tips 2 1 8 Electronic Instrumentation System EIS Standard Configuration EIS console ...

Page 15: ...tions are referred to as Snug connections in this manual The limiting factor in the tightening of most Nylock applications on tubing is to avoid distorting the tubing circular shape For those applications where significant torque should be used a recommended torque is specified in the table below Castle nut fasteners are used for applications where the bolt is exposed only to shear stresses and do...

Page 16: ...ock Snug Nose tube upper bolt nut 1 4 Castle pin Secured Nose tube lower bolt nut 1 4 Castle pin Secured Engine Engine mount nuts 10mm Lock washer Loctite 242 335 Head bolts 8mm Loctite 242 60 Thermostat housing bolts 6mm Loctite 222 25 Exhaust manifold bolts 8mm Lock washer 195 Exhaust ball joint bolts 3 16 Nylock Snug Exhaust muffler Lord mount nuts 5 16 Lock washer Snug Carburetor boot hose cla...

Page 17: ...s 1 4 Nylock Snug Control frame apex bolt Front rear wire tang attachment to downtube 1 4 Nylock Snug Pivot block assemble top bolt 3 8 Castle Secured Pivot block assemble middle two bolts 3 8 Nylock Snug Pivot block assemble bottom bolt 3 8 Nylock Snug Nose plate to leading edge bolts Nylock Snug Crossbar plate to crossbar bolts Nylock Snug Nose wire catch assemble to keel tube Nylock Snug Crossb...

Page 18: ...aining collar to the front tip of the keel tube not nose bracket See the sketch below In its forward most position the front collar is up against the control frame apex This is a distance of 50 from the keel tube tip The pivot block assembly may be moved rearward a maximum of 2 resulting in a measurement from the keel tube tip to the front collar of 52 The hang point is changed by loosening the sp...

Page 19: ...e taken in maneuvering the trike on the ground for maintenance for several reasons 1 Avoid overstressing the pivot block assembly that connects the trike to the wing 2 Avoid causing the trike to flip onto the propeller by lifting the nose too high 3 Avoid wear of the base tube due to rubbing against the nose tube 4 Avoid wing tip damage by scraping the ground or hitting objects 2 3 1 Moving To saf...

Page 20: ... be lifted using the hand hold underneath the nose of the wind fairing BE CAREFUL not to lift the nose too quickly or too high Any trike will easily go beyond the balance point and can flip over onto the propeller causing substantial damage to the trike wing and engine 2 4 Lubrication The points requiring lubrication and the recommended lubricant is given in the following table Most bearings on No...

Page 21: ... Without silencer With silencer Clean or replace based on inspections K N RC 2820 or Rotax 825 723 K N CM 0300 North Wing or Any K N filter dealer Fuel filter Replace after the first 30 hours Thereafter replace every 100 hours or sooner if required by inspection North Wing or aircraft parts dealer Carburetor sockets 2 Based on inspections Look for deep cracks Rotax part no 867 696 Rotax parts cent...

Page 22: ...roperly there is no need for additional more in depth inspections at longer intervals All degradation mechanisms are covered in the standard annual 100hour inspections 3 1 Inspection Procedure The following steps must be followed prior to performing the actual inspection to achieve an effective inspection 1 Walk around aircraft and note any visible damage or problems such as leaks and skin and sai...

Page 23: ...down engine and re examine engine and other moving parts for new leaks that have become visible as a result of the short engine run These areas will require more detailed inspection 12 Allow all heated components to cool enough to touch 13 Wash aircraft engine wing and outer surface according to instructions provided in subsequent maintenance sections of this manual so that other non obvious probl...

Page 24: ...anufacturers safety directives bulletins and letters 3 Clean aircraft 4 Prepare discrepancy list by walking around aircraft looking for leaks and physical surface damage 5 Clear discrepancy list 6 Perform inspection 1 Magneto check at approx 3500 rpm Pre Inspection RPM drop 1 ___________ RPM drop 2 ___________ Differential______________ 2 Brake check at 4500 rpm for holding capability and pedal tr...

Page 25: ... Annual testing with a Bettsometer is recommended for wings exposed to UV on a frequent basis or typically long exposure periods Use a 1 2 mm diameter needle Check tensioned sail for 1360 grams pulling upward 6 Remove all ribs and check for damage and symmetry against the template provided by North Wing 7 Rib tensioning cords for wear and proper tension 8 Wing strut attachment bolts tightened to s...

Page 26: ...attachment 10 Lord engine mounts are not cracked or broken 11 Fuel tank is secure and no sign of cracks or leaks 12 Fuel tank sump drain works properly and no water in tank 13 Fuel tank vent is not blocked 14 Fuel tank cap fits secure 15 Fuel lines are flexible and are not leaking 16 Fuel filter is not contaminated cracked or obscured 17 All fuel lines are secured from rubbing against other parts ...

Page 27: ... with the aircraft 3 Check rubber engine mounts for damage cracks and security 4 Carburetor boots for cracks 5 Throttle oil injection and choke cables are properly routed and not kinked 6 Oil injection control arm adjusted properly 7 Throttle and choke cable boots at carburetor are not cracked or missing 8 Air intake silencer boots for cracks 9 Oil lines and reservoir for rotary valve lubrication ...

Page 28: ...y North Wing Annual and 100 hour Inspection Check List continued Propeller Warp 3 Blade Pass Fail Perform the following checks on the propeller 1 Mounting bolts for proper torque 2 Inspect for nicks cracks and abrasion 3 Check for tracking in full circle 4 Leading edge tape if used for tears or missing pieces replace if any North Wing Annual and 100 hour Inspection Check List continued Electrical ...

Page 29: ...r output 4 Electronic equipment 5 Parking brake 6 Oil pressure and temperature 7 Propeller smoothness 8 Mag drop 1 2 9 Mag switch operation 10 Idle RPM 11 Static RPM note EGT and CHT in limits 12 Throttle operation 13 Engine instruments operational and within limit North Wing Annual and 100 hour Inspection Check List continued General Pass Fail Check the following 1 Aircraft conforms to operating ...

Page 30: ...an removal of nonstructural items 5 Making simple fabric repair not requiring stitching 6 Replenishing brake fluid 7 Refinishing decorative coatings when disassembly is not required 8 Repairing upholstery when disassembly is not required 9 Making small repairs to fairings not changing the contour of the fairing 10 Replacing safety belts 11 Replacing seat parts where disassembly isn t required 12 R...

Page 31: ... 7 Repair or replace front tire Owner LSR M A P 8 Reposition front fork assembly LSR M A P 9 Repair replace front fork assembly LSR M A P 10 Replace Seat frame LSR M A P 11 Replace main dual mast LSR M A P 12 Replace seat belts Owner LSR M A P 13 Replace mast lift cylinder Owner LSR M A P 14 Replace engine mount tubes LSR M A P 15 Repair radiator leak in radiator and or hoses LSR M A P 16 Remove a...

Page 32: ...tarter solenoid Out or Inside hot box LSR M A P 8 Connecting 12 Volt Power to Auxiliary Equipment LSR M A P Engine Section 4 6 1 Changing Spark Plugs Owner LSR M A P 2 Changing Gearbox oil Owner LSR M A P 3 Remove and Replace prop Per prop Mfg instruction Owner LSR M A P 4 Change Prop Pitch Owner LSR M A P ...

Page 33: ...les can be cleaned with WD40 or household cleaner if necessary Wing struts are anodized and can be cleaned with a soft damp cloth or with a mild detergent If placards such as the EXPERIMENTAL placard is attached to the strut be careful not to scrub the strut to avoid removing or damaging the placards Other exposed aluminum tubes keel tube cross bars down tubes base tube leading edges and ribs can ...

Page 34: ...ned by test flying 2 Never change more than one adjustment at a time without testing the result of that adjustment 3 Upon completion of making any adjustments test fly the trike about a foot off the ground for the length of the runway at least three times before climbing to altitude to assure no adverse characteristics have been introduced 4 Record all changes in your wing maintenance log There ar...

Page 35: ... right with hands off straight and level flight Q F L D Wing pulls to the left with hands off straight and level flight R E K C Yaw unstable roll response lag G I Roll is unstable difficult to keep from rolling M O J Roll too stable heavy force required to enter into roll G P I Wing Breaks to left in a stall E K Wing breaks to the right in a stall F L Trailing edge flutter N J Table 4 2 1 Wing Tun...

Page 36: ...ly starting at the tips K Tighten rib tension on the left side ribs 1 4 L Tighten rib tension on the right side ribs 1 4 M Loosen tension on ribs 2 4 on both sides to remove excess reflex from these ribs N Tighten rib tension in the locality of each problem area O Tighten the rigging tension of the cross bar restraining cable using the adjustable tangs on the rear shackle P Loosen the rigging tens...

Page 37: ...be crossed and then re attached This will essentially make the loop distance shorter and put more tension on that rib If more tension is required the knot in the leech line must be untied and re tied at a short loop length Crossbar Rigging Tension Adjustments O and P Rigging tension is adjusted using the pull back cable adjustment shackle as shown in the picture below Wing must be removed from the...

Page 38: ...strap out of the groove in the trim tip This may require removing the sail screw at the nose going into the leading edge so the sail can slide back to allow slack in the yellow strap Step 4 Slide the trip tip out of the end of the leading edge Step 5 Slip shim over the trip tip and reinsert trim tip into leading edge Shims range from to Step 6 Realign screws with marks on leading edge as it was wh...

Page 39: ... to a new position The operation of the wing trim tip is described below It is also helpful to review the description of Inserting Shims above since it shows how to release the trip tip so it can be turned Figure 4 2 1 Wing Trim Tip End Cap Adjustment Figure 4 2 2 Wing Trim Tip Securing Mechanism Line up marks Shim Sight screws to line up with marks Split trim tip pushes out against leading edge a...

Page 40: ...acetone to clean the area 2 Cut the patch material to the required size Since this task is only approved for tears up to 1 long the maximum patch size should be 2 wide by 3 long Rounding the corners of the patch will reduce the tendency of the patch to peel off or snag on something 3 Remove the backing from the patch and apply patch to torn area 4 Using a smooth hard material as a backer board und...

Page 41: ...ns If it is not possible to avoid the wind face the nose of the wing into the wind 1 Remove the wing from the trike using the procedure described in the Owner s Manual 2 Remove wing struts and ribs following the procedure shown in the Owner s manual as if you were going to put wing in bag for transporting 3 Disconnect the nose wires from the swan hook and lay the wing flat on the ground with top o...

Page 42: ...ng a box wrench or socket on the nut inside the crossbar end and a screw driver inserted in the strut attachment hole to keep the eye bolt from turning Note There is no need to remove the sprog or the sprog to leading edge attachment bracket 9 Un velcro the sail to keel tube restraint webbing 10 Slide sail toward rear slightly on both sides and open velcro straps that are holding yellow sail strap...

Page 43: ...traight and slowly and carefully pull the mylar out If any resistance is encountered stop and pull the leading edge of the sail flat and straight again Having a second person slightly fluff the wing at the tip end as you pull the mylar out will help Note the orientation of the mylar as it is removed so you will re install it the same way 15 Fold the sail first in half along the center line keel tu...

Page 44: ...nose and oriented with the control frame up Using a small cord or velcro strap to hold the tubes together on each side is helpful The control frame and crossbars must be kept separate from the leading edges The sprogs should be tied back so they are pointing toward the tips of the frame not the nose 4 With help from a second person carefully slide the tips of the leading edges into their respectiv...

Page 45: ... sequence of washers and saddle 7 Unzip the mid point sprog long sprog inspection zippers and fold the sprog back toward the wing tip to remove the tension from its support cable Remove the front and rear LE attachment bolts rear one attaches the sprog cable to the leading edge This will require sliding a 7 16 open end wrench under the protective mylar wrapped around the leading edge to hold the h...

Page 46: ...in its hole in the LE Remove the tip cover from the sprog and feed the long bungee cord through the sprog While pulling the bungee with significant tension through the sprog tie a knot in the bungee at a point that holds the sprog against its socket when in place If it is certain that this is the only section that is damaged the new rear section leading edge can be installed and the leading edge r...

Page 47: ... hole in the LE It is helpful to have a second person assist with this 4 2 7 Keel Tube Replacement Skill Level LSR M or A P Tools Required Two 7 16 box or open end wrenches Hex wrench Allen wrench Materials Replacement keel tube AN4 Nylock nuts Task Description The keel tube can be removed and replaced without removing the sail or any other elements of the wing frame following the sequence outline...

Page 48: ...washers out easily Note sequence of collars and washers for reassembly 10 Slide keel tube out of the nose plates toward the rear of the wing then slide it out of the keel pocket forward 4 2 8 Crossbar Replacement Skill Level LSR M or A P Tools Required Two 7 16 box or open end wrenches Materials Replacement crossbar 2 Thin AN4 Nylock nuts 1 Thin AN5 Nylock nut Task Description The crossbar can be ...

Page 49: ...ausing significant damage 5 Roll the wing onto its back so the bottom of the wing is facing up Spread the wing tips out until the wing is about one quarter open 6 Unbolt the damaged crossbar from the leading edge attachment by removing the castle nut on the inside of the tapered end of the crossbar using a 9 16 wrench with a screw driver to hold the eye bolt Lift the crossbar off the bolt Do not r...

Page 50: ...ear pitch cables and mounting tangs come as two separate cable assemblies Although they can be replaced separately if damaged it is recommended both assemblies be replaced at the same time These cables should be replaced every 400 hours of flight time or if any one of them becomes kinked or shows any sign of wear or abrasion 1 Perform Steps 1 5 in Section 4 2 2 Sail Removal 2 With the wing lying o...

Page 51: ...ace bolt and nut if any signs of wear on the bolt 4 Replace the rear cable tang on the new nut and re assemble at the keel tube and down tube attachment points Tighten bolts to SNUG per torqueing discussion 4 2 10 Replacing Wing Fittings and Hardware Skill Level LSR M or A P Tools Required Two 7 16 box or open end wrenches Materials Replacement Fittings and Hardware Pitch cable attachment to downt...

Page 52: ...particular care to note the sequence of washers saddles and nut positions 5 Replace the worn or damaged part checking the holes in the tubing at the same time for wear or fatigue cracks 6 Replace the bolts and nylock nuts with new ones if there is any sign of wear or the nylock has been used more than 3 times 7 Tighten the bolts to SNUG making sure the tubing is not distorted excessively which wou...

Page 53: ...polish and soft rag Do not use rubbing compound 4 3 2 Remove Rear Wheel Pants Skill Level Owner and higher Tools 3 8 wrenches or sockets Materials None Task Description Prior to any other maintenance tasks on the rear wheels the wheel pants must be removed They have three mounting bolts two on the inside and one on the outer side of the wheel pant 1 Remove the two bolts on the inside or backside o...

Page 54: ... 7 16 wrenches 3 8 Hex wrench socket Materials Replacement tire inner O rings Task Description If the tire is being replaced due to wear it is recommended the O rings seals inside the rim be replaced at the same time to avoid additional downtime in the near future 1 Remove wheel pants as described above in Section 4 3 2 2 Raise both axles off ground with wood blocks as shown below Long wheel pant ...

Page 55: ...f axle Wheel may have a tight fitting on the brake disc pins and need to be bumped off with a rubber mallet or block of wood A three pin adapter is attached to the back side of the wheel as shown below These three stopping pins engage the brake disc which passes through the brake caliper when turning When the brake pedal is depressed the caliper stops the brake disc which through these pins stops ...

Page 56: ...the brake stopping pins in position on the inboard rim half and put bolts in holes through both the plate and the inboard half of rim 8 Mount new tire on inboard rim 9 Put seal disk with O rings onto inboard rim 10 Align inboard half rim bolt holes with outboard rim and re assemble rim Torque rim bolts to specified values in torque table 11 Re inflate tire to 15 psi and check for leaks using soapy...

Page 57: ... them hard when they are not aligned with the seat 6 Remount wheel and wheel pants 4 3 5 Replace Rear Brake Pads Calipers and Disc and Bleed Brakes Skill Level LSR M A P Tools 1 1 8 Socket Hex Allen key 1 8 ignition box wrench clean pump type oil can or syringe for brake fluid injection Materials Replacement brake pads ATF fluid 12 x 1 8 rubber or neoprene tubing Task Description 1 Remove wheel as...

Page 58: ...laced or serviced slide it just past the key so the bolts on the back side can be removed in subsequent steps 4 At this point the disc can be removed and replaced if necessary and the brake pads can be removed and replaced Replacing Brake Pads 5 Using a 5 32 hex wrench remove the 3 button head screws on the outboard side of caliper and remove outboard pads NOTE Do not remove the 4 smaller screws o...

Page 59: ...ir Air in the lines will result in a very soft brake pedal and excessive pedal movement If sufficient air is in the system there will be no braking action at all Bleeding the brakes is best done with two people For best results it is necessary to have the bleeder valve on the rear calipers at the lowest point This is because the brake fluid will be forced from the brake caliper back to the master ...

Page 60: ...he bleeder valve is at the bottom or at the lowest point 8 Slide a 12 piece of 1 8 flexible clear plastic tubing over the outlet of the bleeder valve on the master cylinder Put the other end of the tubing in a glass container on the ground If the tubing is not a tight fit it will try to slide off if particularly when you open the bleeder valve Using a 1 4 wrench open the bleeder valves normal righ...

Page 61: ...tire can be replaced without any disassembly of any other elements of the carriage following the procedure below 1 Chock rear wheels on both front and rear sides of both wheels Raise the front wheel about 12 off the ground This is best done by setting a saw horse on each side of the trike and laying a 2x4 or larger beam between them so that the 2x4 crosses the root tube just in front of the front ...

Page 62: ...or re installation 3 Lower the tire and wheel assembly out from under the carriage fairing and front suspension system 4 With wheel removed from axle remove the six 1 2 nuts holding the split rim together The bolt requires a 3 16 hex wrench 5 Using a smooth flat bar pry the rim halves off the tire Note there is an inner circular disk with 2 O rings sandwiched between the rim halves These O rings s...

Page 63: ...t pin against the back side of the outer race of the bearing Gently tap around the circumference of the bearing until the bearing is driven out of its seat 11 Align new bearings in their seats and gently tap them in with a rubber or wooden mallet or block of wood Be careful not to drive them hard when they are not aligned with the seat 12 Remount wheel DO NOT over tighten wheel nut Bring nut snug ...

Page 64: ...e pod can be rocked rearward slightly to allow the bolt to be removed or inserted For the Sport model there is just enough room to remove the bolt from the rear position without removing the fairing but the instrumentation wiring must be temporarily repositioned to get the bolt out 4 Slide the fork assembly to the desired position and re insert the pivot bolt and nut Be careful not to catch or kin...

Page 65: ... described in Section 4 3 7 above 2 Disconnect throttle cable and pull free of throttle pedal 3 Unbolt brake master cylinder at both ends and tie back from fork assembly You will have to route the brake line away from the fork assembly DO NOT disconnect brake hydraulic line 4 Remove nut from fork pivot bolt 5 Using 5 32 hex wrench remove four hex head machine screws from top plate of fork assembly...

Page 66: ...P Tools Two 7 16 wrenches Philips head screw driver Materials Replacement parts Task Description The seat frame is a structural member when the wing is in place Therefore the wing must be removed before the seat frame can be removed 1 Remove wing from trike 2 Tie main mast in upright position using a soft piece of rope tied from the mast to the gear case 3 With mast in upright position unclip and ...

Page 67: ... electronics box to the metal plate and lower the box clear of the seat frame straps 8 The rear metal seat plate along with the front seat backrest can now be lifted out from the seat frame as a unit and set aside 9 Remove screw in front seat plate holding plate to support tube Remove front seat plate and set aside 10 If a fairing is installed remove the top screws securing the fairing to the meta...

Page 68: ...position with wood block or other soft material 12 Remove two bolts from top back of seat frame where it is attached to the backframe 13 Remove two bolts from lower front of seat frame where it is attached to the root tube mounting plate Fairing attachment screws 2 each side Top rear attachment to backframe Support straps for rear seat metal plates with adjustment buckle ...

Page 69: ... cross bar of the frame is removed it must be re installed at the correct length Note that this strap is used to support the seat metal plate from resting directly on the fuel tank The front seat straps are not adjustable but the rear ones are Consequently the strap must be adjusted to the correct length at the upper end to avoid sitting directly on the fuel tank Lower front attachment bolts to ro...

Page 70: ...Slide strap off the bottom of the mast Position it on the new mast and re rivet 6 Install new mast and re assemble 4 3 11 Replace Seat Belts Skill Level Owner LSR M A P Tools Two 7 16 wrenches Materials Replacement parts Task Description The front seat belts are attached to the root tube under the rear seat The rear seat belts are attached to the top of the backframe The front seat shoulder harnes...

Page 71: ... are fastened to the lower portion of the backframe 7 The rear seat shoulder harness 1 is fastened to the main mast 4 3 12 Replace Mast Lift Cylinder Skill Level Owner LSR M A P Tools 7 16 wrench Materials Replacement parts Task Description If the mast lift cylinder fails to hold mast upright with wing attached the pneumatic cylinders should be replaced as follows Front seat belt attachment point ...

Page 72: ...t all electrical wires and label where they connect 3 Disconnect throttle and choke cables at the carburetor 4 Disconnect two fuel lines from fuel pump to carburetor Be sure fuel line it tied up high to avoid siphoning gas from the fuel tank 5 Drain coolant from cooling system and disconnect coolant hoses at water pump and radiator reservoir tank 6 Disconnect exhaust manifold from muffler at the f...

Page 73: ...d If they cannot be removed by twisting by hand slide a small screw driver under the hose in several points around the fitting Then try twisting hose again to break it loose from the fitting 3 Unbolt radiator at top and bottom attachment points and remove 4 Have radiator repaired at reputable repair shop and re install in reverse sequence 4 3 15 Install option Remove and Repair Apache Sport Fairin...

Page 74: ... Remove two screws attaching lower panel to root tube Lift panel from trike 7 Remove belly pan by removing 4 bolts attaching belly pan to brackets Installation is the reverse order 4 3 16 Remove and Replace rear Fiber glass rod axles Skill Level Owner LSR M A P Tools 7 16 and 3 8 wenches Wheel nut socket Materials Fiberglass axle rod Task Description 1 Do one side at a time Jack up trike underneat...

Page 75: ...nstall drag struts and side landing gear Gas Spring strut Section 4 3 6 Tighten all 8 nuts to snug 9 Install rear wheels See section 4 3 3 Use zip ties to secure the brake lines along the back of axles as shown in above picture Mounting bolts 4 on each side Drag Strut Landing Gear 4 bolts each side ...

Page 76: ...move the tire and breaks Make sure you set the break to the side carefully so you don t pull the break line out of the fitting 3 Remove the upper 4 3 8 mounting bolts Replace gear 4 Put the two outer bolts into position first Put the leaf spring legs into position and put the two washers and nuts on hand tight 5 Now install the inside bolts washers and nuts On the right side gear you will need to ...

Page 77: ...7 6 Install rear wheel spindles into the spindle bracket Install the bolt and nut to secure the spindle in place See section 4 3 3 Use zip ties to secure the brake lines along the back of axles as shown in above picture Mounting bolts 4 on each side Landing Gear spindle Fuel pump on rear holes ...

Page 78: ...ot Tube with 6 bolts AN4 27A Use AN960 416L Thin Washers on both sides and secure with MS21083N4 Thin Nylock Nuts 2 Insert Root Tube Bearings into top holes Use a rubber mallet to gently pound bearings into holes Note how the picture shows a socket placed over bearings to aid the compression of bearing into hole as you pound it in There are two holes with bearings so you can choose which hole to u...

Page 79: ...t Tube between center supports on Back Frame 2 Insert Delrin spacer into rear of Main Root Tube 3 Align bolt holes in Root Tube to holes in Main Root Tube Insert both AN5 36A bolts through holes using a AN970 5 washer at head of bolt and two AN960 516 washers at bottom of bolt and secure with a AN365 524A Nylock Nut By using 2 washers at bottom of each bolt you can ensure that when you tighten the...

Page 80: ...lve failures in the industry North Wing uses a bulb by pass to assure fuel flow passage to the engine when it is running even if the check valve does fail closed This by pass will allow some fuel to drain back to the tank when the engine is shut down Therefore the bulb should be pumped until firm by pinching off the by pass line and squeezing the bulb several times until firm before each engine st...

Page 81: ...e fuel line on the fitting to break the bond between the line and the fitting Do not hold the line with pliers to break this bond It may damage the fitting itself which would require replacing the part connected to the line Work the fuel line off in a twisting and pulling motion and catch any fuel that may drain from the line or the filter itself If the line is not easily removed by pulling with a...

Page 82: ... be replaced Cut them off with wire dikes and a knife and replace them with new fuel line per Section 4 4 1 above 4 When installing the new filter be sure the fuel flow will be in the correct direction as indicated on the filter body 5 Use new clamps or safety wire on both ends of the filter Do not tighten safety wire excessively as it can cut through the fuel line 4 4 3 Replace Fuel Pump Skill Le...

Page 83: ...e fuel vapors and it may still need to be removed If so it is recommended that the tank be replaced rather than welded 1 Drain all fuel from the tank through the drain valve at the bottom of the tank 2 Remove the seats and backrest 3 Remove the backrest mounting tube 4 For the Apache model with fairing remove the four screws on the aft panels so that the top of the panels can be pulled apart a few...

Page 84: ...threads with a high quality plumbers sealant certified for use with gasoline and oil 4 Start screwing the new valve into the bottom of the tank by hand first to assure the threads are aligned 5 Tighten the drain valve with the 5 8 wrench but with very light torque BE CAREFUL to void stripping the threads out of the valve opening 4 4 6 Calibrate Fuel Gage Skill Level Owner LSR M A P Tools Small fla...

Page 85: ... a thin wire or string through one of the empty screw holes all the way through the gage gasket and retaining ring Loosen the remaining 2 screws to allow some gap between the gage head and the tank body Then slip a screw driver under the gage to hold the gap between the gage head and the tank body This will provide enough clearance to hook the string on the inside of the tank using a stiff wire wi...

Page 86: ...make sure the needle starts moving upscale immediately then turn CCW until the needle just stops moving downward again This is the EMPTY reference mark Repeat this step until you are sure the EMPTY reference is obtained Setting The Full Point Put the probe into your tank Turn the FULL screw CCW until the needle indicates the liquid level in your tank For best results the probe should be fully imme...

Page 87: ...ine to replace the coil assembly The lighting coils cannot be individually replaced Instead the entire set of lighting and ignition coils must be replaced as a single unit Operation at the full 170 watts for short periods of time is acceptable and should not damage the coils For miscellaneous accessories a power socket is provided on the instrument panel that will accommodate up to approximately a...

Page 88: ...North Wing S LSA Maintenance Manual Model Sport X2 582 Issue 3 2 Printed July 16 2017 Page 88 ...

Page 89: ...ne Ground Battery Blk 16 GA to Hot Box Case Red 6 AWG Mag 1 Mag 2 Nav Lights Strobe Lights Blk 16 GA EIS Power Red 16 GA Red 22 GA Yel 14 AWG Yel Blk 14 AWG From Water Temp sender Master Switch off Hot Box Leads to Engine 5 Mag 1 5 Mag 2 5 Tach 5 Ground Wht 22 GA Fuel Tank EGT CHT pre5wired cable See EIS cable diagram North Wing 582 S5LSA Wiring Schematic Mag 1 Mag 2 Power Socket Optional Instruct...

Page 90: ...Issue 3 2 Printed July 16 2017 Page 90 EIS EGT and CHT Probe Connections to Pre Wired Cable ...

Page 91: ...or two later Fly the aircraft for a couple hours on one day will bring the battery up to a level that will sustain enough power to start the engine a week or so later If the battery does not accept or hold a charge as described above it will not hold a direct charge either and it needs to be replaced following the procedure below 1 Disconnect two black ground wires from negative terminal of batter...

Page 92: ...hat will allow you to measure the voltage while the engine is running 2 Secure aircraft so it will not move when engine is running slightly above idle 3 Start engine warm up until it will idle smoothly at around 2000 rpm 4 Using a volt meter measure the DC voltage between the red lead you just removed from the Hot Box and ground which can be the case of the Hot Box If 12 14 VDC is present regulato...

Page 93: ...f mag switches 2 switches or two sets four switches The second set is optional and would only be used when the aircraft is intended to be used for instruction This gives the instructor the ability to easily shut down the engine if it becomes necessary The primary set is mounted on the front control panel as shown below and the second set is mounted on the upper right corner of the seat frame as sh...

Page 94: ... of someone forgetting to open it but still having enough fuel in the carburetor to get off the ground With Instructor Switches Installed Pilot Switches Instructor Switches Results Ign A Ign B Ign A Ign B On On On On Engine runs on both ignition systems On Off Off Off Engine will not run Off Off On On Engine will not run On Off On Off Engine runs on ignition system A only Fails Open Off On On Engi...

Page 95: ... replaced using the following procedure 1 Disconnect the negative terminal of the battery and secure it away from the battery 2 For the Navajo model remove the six screws holding the control panel in the instrument housing and rotate the panel forward to expose the back side of the Master switch For the Apache model with the full fairing it may be possible to reach around the instrument panel side...

Page 96: ...ce the gear ring or drive gear 4 If the amp meter indicates near zero then it is necessary to determine if the problem is in the current supply circuit or in the starter This is easily done by measuring the voltage applied to the starter terminal when the Master switch is turned to the start position 5 Repeat Step 2 above only this time measuring voltage at the starter terminal If the voltage is n...

Page 97: ... Tools Electric drill 3 16 drill bit Philips screwdriver 5 16 box wrench Parts Replacement Hot Box Task Description With the exception of physical damage from impact or corrosion there is little that can fail in the Hot Box that would require the entire box to be replaced If replacement becomes necessary follow the procedure below 1 Disconnect the both the negative side and the positive side of th...

Page 98: ...d under Replacing the Hot Box 4 5 8 Connecting 12 Volt Power to Auxiliary Equipment Skill level LSR M A P Tools Crimping tool for electrical connectors Parts Crimp on Electrical connectors 12V accessory plug Task Description Electrical accessories can be added to the aircraft provided they do not exceed the continuous load output of the lighting coil internal to the Rotax 582 engine Note the descr...

Page 99: ...use will blow out possibly causing failure of other components on the same circuit Anyone wiring accessories to the Hot Box must have a good understanding of electrical power calculations and wiring techniques Faulty wiring can cause an in flight fire or direct component failure 4 6 Engine 4 6 1 Changing spark plugs Skill level Owner LSR M A P Tools Spark plug socket ratchet handle and extension c...

Page 100: ...cket fuel For the same reason a ballistic parachute is shipped in two separate shipments or packages One shipment contains the parachute and all related mounting equipment and a second shipment contains the rocket propellant They may arrive on different days The installer is referred to the BRS manual for installation maintenance and repairs However the parachute canister itself must be mounted to...

Page 101: ...holes on the trike mounting plate and install a bolt in each holes See BRS bracket below 2 With these two bolts in place and using a felt tip pen reach underneath the mounting plate and mark the location of the other two mounting plate holes on the BRS bracket 3 Remove the BRS mounting bracket and drill a hole where marked for the mounting plate 4 Replace the BRS bracket on the mounting plate and ...

Reviews: